仮想プライベートネットワーク(VPN)を使用すると、信頼できないネットワークを、まるでプライベートネットワーク上にいるかのようにトラバースできます。ホテルやコーヒーショップのWiFiなど、信頼できないネットワークに接続している場合は、スマートフォンやラップトップからインターネットに安全かつ確実にアクセスできます。
HTTPS接続と組み合わせると、この設定により、ワイヤレスログインとトランザクションを保護できます。地理的な制限や検閲を回避し、場所と暗号化されていないHTTPトラフィックを信頼できないネットワークから保護することができます。
OpenVPNは、幅広い構成に対応するフル機能のオープンソースのトランスポート層セキュリティ(TLS)VPNソリューションです。このチュートリアルでは、Ubuntu 22.04サーバーでOpenVPNをセットアップし、クライアントマシンからアクセスできるように構成します。
注: DigitalOcean DropletにOpenVPNサーバーをセットアップする場合は、多くのホスティングプロバイダーと同様に、帯域幅の超過に対して課金されることに注意してください。このため、サーバーが処理しているトラフィックの量に注意してください。
詳細については、このページを参照してください。
このチュートリアルに従うには、次のものが必要です。
- sudo非rootユーザーとファイアウォールが有効になっている1台のUbuntu22.04サーバー。これを設定するには、Ubuntu22.04を使用したサーバーの初期設定のチュートリアルに従います。これをOpenVPNサーバーと呼びます このガイド全体。
- プライベート認証局(CA)としてセットアップされた別個のUbuntu 22.04サーバー。これを、CAサーバーと呼びます。 このガイド全体。このサーバーでサーバーの初期設定ガイドの手順を実行した後、Ubuntu 22.04で認証局(CA)を設定および構成する方法に関するガイドの手順1〜3に従って、それを実行できます。
注: OpenVPNサーバーまたはローカルマシンをCAとして使用することは技術的には可能ですが、VPNがセキュリティの脆弱性にさらされる可能性があるため、これはお勧めしません。 OpenVPNの公式ドキュメントによると、証明書リクエストのインポートと署名専用のスタンドアロンマシンにCAを配置する必要があります。このため、このガイドでは、CAが別のUbuntu 22.04サーバー上にあり、sudo権限と基本ファイアウォールが有効になっている非rootユーザーもいることを前提としています。
それに加えて、OpenVPNサーバーへの接続に使用するクライアントマシンが必要になります。このガイドでは、これをOpenVPNクライアントと呼びます。 。このチュートリアルでは、ローカルマシンをOpenVPNクライアントとして使用することをお勧めします。
これらの前提条件が整ったら、Ubuntu22.04でOpenVPNサーバーのセットアップと構成を開始する準備が整います。
注: これらのサーバーの構成中にパスワード認証を無効にすると、このガイドの後半でサーバー間でファイルを転送するときに問題が発生する可能性があることに注意してください。この問題を解決するには、各サーバーでパスワード認証を再度有効にすることができます。または、サーバーごとにSSHキーペアを生成してから、OpenVPNサーバーの公開SSHキーをCAマシンのauthorized_keysに追加することもできます。 ファイルおよびその逆。これらのソリューションのいずれかを実行する方法については、Ubuntu22.04でSSHキーを設定する方法を参照してください。
このチュートリアルの最初のステップは、OpenVPNとEasy-RSAをインストールすることです。 Easy-RSAは公開鍵インフラストラクチャ(PKI)管理ツールであり、OpenVPNサーバーで証明書要求を生成し、それを確認してCAサーバーにサインオンします。
まず、OpenVPNサーバーのパッケージインデックスを更新し、OpenVPNとEasy-RSAをインストールします。どちらのパッケージもUbuntuのデフォルトのリポジトリで利用できるため、aptを使用できます。 インストールの場合:
- sudo apt update
- sudo apt install openvpn easy-rsa
次に、OpenVPNサーバー上に~/easy-rsaという非rootユーザーとして新しいディレクトリを作成する必要があります。 :
- mkdir ~/easy-rsa
次に、easyrsaからシンボリックリンクを作成する必要があります パッケージが~/easy-rsaにインストールしたスクリプト 作成したディレクトリ:
- ln -s /usr/share/easy-rsa/* ~/easy-rsa/
注: 他のガイドがeasy-rsaをコピーするように指示する場合があります ファイルをPKIディレクトリにパッケージ化する場合、このチュートリアルではシンボリックリンクアプローチを採用しています。その結果、easy-rsaの更新はすべて パッケージはPKIのスクリプトに自動的に反映されます。
最後に、ディレクトリの所有者がroot以外のsudoユーザーであることを確認し、chmodを使用してそのユーザーへのアクセスを制限します。 :
- sudo chown sammy ~/easy-rsa
- chmod 700 ~/easy-rsa
これらのプログラムがインストールされ、システムの適切な場所に移動されたら、次のステップは、OpenVPNサーバー上に公開鍵インフラストラクチャ(PKI)を作成して、クライアントやその他のサーバーのTLS証明書を要求および管理できるようにすることです。 VPNに接続します。
OpenVPNサーバーの秘密鍵と証明書を作成する前に、OpenVPNサーバー上にローカルの公開鍵インフラストラクチャディレクトリを作成する必要があります。 CAサーバー上で直接作成するのではなく、このディレクトリを使用してサーバーとクライアントの証明書要求を管理します。
OpenVPNサーバー上にPKIディレクトリを構築するには、varsというファイルにデータを入力する必要があります いくつかのデフォルト値があります。まず、cd easy-rsaに ディレクトリ、次にvarsを作成および編集します nanoまたはお好みのテキストエディタを使用してファイルします。
- cd ~/easy-rsa
- nano vars
ファイルを開いたら、次の2行を貼り付けます。
〜/ easy-rsa / varsset_var EASYRSA_ALGO "ec"
set_var EASYRSA_DIGEST "sha512"
このvarsで必要なのはこれらの2行だけです 認証局として使用されないため、OpenVPNサーバー上のファイル。これにより、秘密鍵と証明書要求が、最新の楕円曲線暗号(ECC)を使用して、クライアントとOpenVPNサーバーの鍵と安全な署名を生成するように構成されていることが保証されます。
OpenVPNおよびCAサーバーをECCを使用するように構成すると、クライアントとサーバーが共有対称鍵を確立しようとしたときに、楕円曲線アルゴリズムを使用して交換を行うことができます。鍵交換にECCを使用すると、従来のRSAアルゴリズムでプレーンなDiffie-Hellmanを使用するよりも大幅に高速になります。これは、数値がはるかに小さく、計算が高速であるためです。
背景: クライアントがOpenVPNに接続するとき、クライアントは非対称暗号化(公開鍵/秘密鍵とも呼ばれます)を使用してTLSハンドシェイクを実行します。ただし、暗号化されたVPNトラフィックを送信する場合、サーバーとクライアントは対称暗号化を使用します。これは共有キー暗号化とも呼ばれます。
非対称暗号化と比較して、対称暗号化の計算オーバーヘッドははるかに少なくなります。使用される数ははるかに少なく、最新のCPUは命令を統合して、最適化された対称暗号化操作を実行します。非対称暗号化から対称暗号化に切り替えるために、OpenVPNサーバーとクライアントはElliptic Curve Diffie-Hellman(ECDH)アルゴリズムを使用して、共有秘密鍵について可能な限り迅速に合意します。
varsにデータを入力したら PKIディレクトリの作成に進むことができるファイル。これを行うには、easyrsaを実行します init-pkiを使用したスクリプト オプション。前提条件の一部としてこのコマンドをCAサーバーですでに実行していますが、OpenVPNサーバーとCAサーバーには別々のPKIディレクトリがあるため、ここで実行する必要があります。
- ./easyrsa init-pki
OpenVPNサーバーでは、認証局を作成する必要がないことに注意してください。 CAサーバーは、証明書の検証と署名に単独で責任を負います。 VPNサーバー上のPKIは、証明書要求と公開証明書を保存するための便利で一元化された場所としてのみ使用されます。
OpenVPNサーバーでPKIを初期化したら、次のステップであるOpenVPNサーバー証明書リクエストと秘密鍵の作成に進む準備ができています。
OpenVPNサーバーにすべての前提条件がインストールされたので、次のステップは、OpenVPNサーバーで秘密鍵と証明書署名要求(CSR)を生成することです。その後、リクエストをCAに転送して署名し、必要な証明書を作成します。署名された証明書を取得したら、それをOpenVPNサーバーに転送し直して、サーバーが使用できるようにインストールします。
開始するには、~/easy-rsaに移動します root以外のユーザーとしてのOpenVPNサーバー上のディレクトリ:
- cd ~/easy-rsa
次に、easyrsaと呼びます。 gen-reqを使用 オプションの後にマシンの共通名(CN)が続きます。 CNは好きなものにすることができますが、わかりやすいものにするのに役立ちます。このチュートリアル全体を通して、OpenVPNサーバーのCNはserverになります 。必ずnopassを含めてください オプションも。そうしないと、リクエストファイルがパスワードで保護され、後で権限の問題が発生する可能性があります。
注: server以外の名前を選択した場合 ここでは、以下の手順のいくつかを調整する必要があります。たとえば、生成されたファイルを/etc/openvpnにコピーする場合 ディレクトリでは、正しい名前に置き換える必要があります。 /etc/openvpn/server.confも変更する必要があります 後でファイルして、正しい.crtを指すようにします および.key ファイル。
- ./easyrsa gen-req server nopass
OutputCommon Name (eg: your user, host, or server name) [server]:

Keypair and certificate request completed. Your files are:
req: /home/sammy/easy-rsa/pki/reqs/server.req
key: /home/sammy/easy-rsa/pki/private/server.key
これにより、サーバーの秘密鍵とserver.reqという証明書要求ファイルが作成されます。 。サーバーキーを/etc/openvpn/serverにコピーします ディレクトリ:
- sudo cp /home/sammy/easy-rsa/pki/private/server.key /etc/openvpn/server/
これらの手順を完了すると、OpenVPNサーバーの秘密鍵が正常に作成されました。 OpenVPNサーバーの証明書署名要求も生成しました。これで、CSRはCAによる署名の準備が整いました。このチュートリアルの次のセクションでは、CAサーバーの秘密鍵を使用してCSRに署名する方法を学習します。
前の手順で、OpenVPNサーバーの証明書署名要求(CSR)と秘密鍵を作成しました。ここで、CAサーバーはserverについて知る必要があります。 証明書を作成して検証します。 CAが証明書を検証してOpenVPNサーバーに中継すると、CAを信頼するクライアントはOpenVPNサーバーも信頼できるようになります。
OpenVPNサーバーで、root以外のユーザーとして、SCPまたは別の転送方法を使用してserver.reqをコピーします 署名のためのCAサーバーへの証明書要求:
- scp /home/sammy/easy-rsa/pki/reqs/server.req sammy@your_ca_server_ip:/tmp
Ubuntu 22.04チュートリアルで認証局(CA)をセットアップおよび構成する方法の前提条件に従った場合、次のステップはCAサーバーにログインすることです。 CAを管理するために作成した非rootユーザーとして。 cd ~/easy-rsaへ PKを作成し、easyrsaを使用して証明書リクエストをインポートしたディレクトリ スクリプト:
- cd ~/easy-rsa
- ./easyrsa import-req /tmp/server.req server
Output. . .
The request has been successfully imported with a short name of: server
You may now use this name to perform signing operations on this request.
次に、easyrsaを実行してリクエストに署名します sign-reqを使用したスクリプト オプションの後に、リクエストタイプと共通名が続きます。リクエストタイプはclientのいずれかです。 またはserver 。 OpenVPNサーバーの証明書リクエストを処理しているため、必ずserverを使用してください リクエストタイプ:
- ./easyrsa sign-req server server
出力では、リクエストが信頼できるソースからのものであることを確認するように求められます。 yesと入力します 次に、ENTERを押します 確認する:
OutputYou are about to sign the following certificate.
Please check over the details shown below for accuracy. Note that this request
has not been cryptographically verified. Please be sure it came from a trusted
source or that you have verified the request checksum with the sender.

Request subject, to be signed as a server certificate for 3650 days:

subject=
commonName = server


Type the word 'yes' to continue, or any other input to abort.
Confirm request details: yes
. . .
Certificate created at: /home/sammy/easy-rsa/pki/issued/server.crt
CA秘密鍵を暗号化した場合は、この時点でパスワードの入力を求められることに注意してください。
これらの手順が完了すると、CAサーバーの秘密鍵を使用してOpenVPNサーバーの証明書要求に署名したことになります。結果のserver.crt ファイルには、OpenVPNサーバーの公開暗号化キーとCAサーバーからの署名が含まれています。署名のポイントは、CAサーバーを信頼するすべての人に、OpenVPNサーバーに接続するときにも信頼できることを伝えることです。
証明書の構成を完了するには、server.crtをコピーします およびca.crt CAサーバーからOpenVPNサーバーへのファイル:
- scp pki/issued/server.crt sammy@your_vpn_server_ip:/tmp
- scp pki/ca.crt sammy@your_vpn_server_ip:/tmp
ここでOpenVPNサーバーに戻り、/tmpからファイルをコピーします /etc/openvpn/serverへ :
- sudo cp /tmp/{server.crt,ca.crt} /etc/openvpn/server
これで、OpenVPNサーバーは接続を受け入れる準備がほぼ整いました。次のステップでは、サーバーのセキュリティを強化するためにいくつかの追加のステップを実行します。
セキュリティをさらに強化するために、サーバーとすべてのクライアントがOpenVPNのtls-cryptで使用する共有秘密鍵を追加します。 指令。このオプションは、サーバーとクライアントが最初に相互に接続するときに使用されるTLS証明書を難読化するために使用されます。また、OpenVPNサーバーは、着信パケットのクイックチェックを実行するために使用します。パケットが事前共有キーを使用して署名されている場合、サーバーはそれを処理します。署名されていない場合、サーバーはそれが信頼できないソースからのものであることを認識し、追加の復号化作業を実行することなく破棄できます。
このオプションは、OpenVPNサーバーが認証されていないトラフィック、ポートスキャン、およびサーバーリソースを占有する可能性のあるサービス拒否攻撃に確実に対処できるようにするのに役立ちます。また、OpenVPNネットワークトラフィックの識別が難しくなります。
tls-cryptを生成するには 事前共有キー。OpenVPNサーバーの~/easy-rsaで次のコマンドを実行します ディレクトリ:
- cd ~/easy-rsa
- openvpn --genkey secret ta.key
結果はta.keyというファイルになります 。 /etc/openvpn/server/にコピーします ディレクトリ:
- sudo cp ta.key /etc/openvpn/server
これらのファイルをOpenVPNサーバーに配置すると、VPNへの接続に使用するユーザーのクライアント証明書とキーファイルを作成する準備が整います。
クライアントマシンで秘密鍵と証明書の要求を生成し、それをCAに送信して署名することもできますが、このガイドでは、OpenVPNサーバーで証明書の要求を生成するプロセスの概要を説明します。このアプローチの利点は、必要なすべてのキーと証明書を含むクライアント構成ファイルを自動的に生成するスクリプトを作成できることです。これにより、キー、証明書、および構成ファイルをクライアントに転送する必要がなくなり、VPNに参加するプロセスが合理化されます。
このガイドでは、単一のクライアントキーと証明書のペアを生成します。複数のクライアントがある場合は、クライアントごとにこのプロセスを繰り返すことができます。ただし、すべてのクライアントのスクリプトに一意の名前の値を渡す必要があることに注意してください。このチュートリアル全体を通して、最初の証明書/キーのペアはclient1と呼ばれます。 。
まず、ホームディレクトリ内にディレクトリ構造を作成して、クライアント証明書とキーファイルを保存します。
- mkdir -p ~/client-configs/keys
クライアントの証明書/キーのペアと構成ファイルをこのディレクトリに保存するため、セキュリティ対策として、今すぐアクセス許可をロックダウンする必要があります。
- chmod -R 700 ~/client-configs
次に、EasyRSAディレクトリに戻り、easyrsaを実行します。 gen-reqを使用したスクリプト およびnopass オプション、およびクライアントの一般名:
- cd ~/easy-rsa
- ./easyrsa gen-req client1 nopass
ENTERを押します 一般名を確認します。次に、client1.keyをコピーします ~/client-configs/keys/へのファイル 以前に作成したディレクトリ:
- cp pki/private/client1.key ~/client-configs/keys/
次に、client1.reqを転送します 安全な方法を使用してCAサーバーにファイルします:
- scp pki/reqs/client1.req sammy@your_ca_server_ip:/tmp
次に、CAServerにログインします。次に、EasyRSAディレクトリに移動し、証明書要求をインポートします。
- cd ~/easy-rsa
- ./easyrsa import-req /tmp/client1.req client1
次に、前の手順でサーバーに対して行ったのと同じ方法でリクエストに署名します。ただし、今回は必ずclientを指定してください。 リクエストタイプ:
- ./easyrsa sign-req client client1
プロンプトが表示されたら、yesと入力します 証明書要求に署名するつもりであり、それが信頼できるソースからのものであることを確認するには:
OutputType the word 'yes' to continue, or any other input to abort.
Confirm request details: yes
ここでも、CAキーを暗号化した場合は、ここでパスワードの入力を求められます。
これにより、client1.crtという名前のクライアント証明書ファイルが作成されます 。このファイルをサーバーに転送し直します:
- scp pki/issued/client1.crt sammy@your_server_ip:/tmp
OpenVPNサーバーに戻り、クライアント証明書を~/client-configs/keys/にコピーします ディレクトリ:
- cp /tmp/client1.crt ~/client-configs/keys/
次に、ca.crtをコピーします およびta.key ~/client-configs/keys/へのファイル ディレクトリも作成し、sudoユーザーに適切な権限を設定します:
- cp ~/easy-rsa/ta.key ~/client-configs/keys/
- sudo cp /etc/openvpn/server/ca.crt ~/client-configs/keys/
- sudo chown sammy.sammy ~/client-configs/keys/*
これで、サーバーとクライアントの証明書とキーがすべて生成され、OpenVPNサーバーの適切なディレクトリに保存されます。これらのファイルで実行する必要のあるアクションはまだいくつかありますが、それらは後のステップで実行されます。今のところ、OpenVPNの構成に進むことができます。
他の多くの広く使用されているオープンソースツールと同様に、OpenVPNには、特定のニーズに合わせてサーバーをカスタマイズするために利用できる多数の構成オプションがあります。このセクションでは、このソフトウェアのドキュメントに含まれているサンプル構成ファイルの1つに基づいてOpenVPNサーバー構成をセットアップする方法について説明します。
まず、サンプルのserver.confをコピーします 独自の構成ファイルの開始点としてのファイル:
- sudo cp /usr/share/doc/openvpn/examples/sample-config-files/server.conf /etc/openvpn/server/
nanoで編集するために新しいファイルを開きます または選択したテキストエディタ:
- sudo nano /etc/openvpn/server/server.conf
このファイルの数行を変更する必要があります。まず、HMACを見つけます tls-authを検索して構成のセクション 指令。この行はデフォルトで有効になります。 ;を追加してコメントアウトします 行頭まで。次に、値tls-crypt ta.keyを含む新しい行を追加します。 のみ:
;tls-auth ta.key 0 # This file is secret
tls-crypt ta.key
次に、cipherを探して、暗号化暗号に関するセクションを見つけます。 行。デフォルト値はAES-256-CBCに設定されています ただし、AES-256-GCM 暗号は、より優れたレベルの暗号化とパフォーマンスを提供し、最新のOpenVPNクライアントで十分にサポートされています。 ;を追加して、デフォルト値をコメントアウトします この行の先頭に署名し、AES-256-GCMの更新された値を含む行の後に別の行を追加します :
;cipher AES-256-CBC
cipher AES-256-GCM
この行の直後に、authを追加します HMACメッセージダイジェストアルゴリズムを選択するためのディレクティブ。このために、SHA256 良い選択です:
auth SHA256
次に、dhを含む行を見つけます Diffie-Hellmanパラメーターを定義するディレクティブ。楕円曲線暗号を使用するようにすべての証明書を構成したので、Diffie-Hellmanシードファイルは必要ありません。 dh dh2048.pemのような既存の行をコメントアウトします またはdh dh.pem 。 Diffie-Hellmanキーのファイル名は、サーバー構成ファイルの例にリストされているものとは異なる場合があります。次に、その後ろにdh noneの内容の行を追加します :
;dh dh2048.pem
dh none
次に、OpenVPNは、開始後に特権なしで実行する必要があるため、誰もいないユーザーで実行するように指示する必要があります。 およびグループnogroup 。これを有効にするには、user nobodyを見つけてコメントを外します およびgroup nogroup ;を削除して行 各行の先頭から署名します:
user nobody
group nogroup
(オプション)DNSの変更をプッシュしてVPN経由ですべてのトラフィックをリダイレクトする
上記の設定により、クライアントとサーバー間にVPN接続が作成されますが、接続でトンネルを使用するように強制されることはありません。 VPNを使用してすべてのクライアントトラフィックをVPN経由でルーティングする場合は、追加の設定をクライアントコンピューターにプッシュすることをお勧めします。
開始するには、push "redirect-gateway def1 bypass-dhcp"を含む行を見つけてコメントを外します 。これを行うと、OpenVPNサーバーを介してすべてのトラフィックをリダイレクトするようにクライアントに指示されます。この機能を有効にすると、SSHなどの他のネットワークサービスとの接続の問題が発生する可能性があることに注意してください。
push "redirect-gateway def1 bypass-dhcp"
この行のすぐ下で、dhcp-optionを見つけます セクション。繰り返しますが、;を削除します 両方の行の先頭からコメントを外す:
push "dhcp-option DNS 208.67.222.222"
push "dhcp-option DNS 208.67.220.220"
これらの行は、リストされたIPアドレスで無料のOpenDNSリゾルバーを使用するようにクライアントに指示します。他のDNSリゾルバーが必要な場合は、強調表示されたIPの代わりにそれらを置き換えることができます。
これは、クライアントがDNS設定を再構成して、VPNトンネルをデフォルトゲートウェイとして使用するのに役立ちます。
(オプション)ポートとプロトコルを調整します
デフォルトでは、OpenVPNサーバーはポート1194を使用します クライアント接続を受け入れるUDPプロトコル。クライアントが存在する可能性のあるネットワーク環境が制限されているために別のポートを使用する必要がある場合は、portを変更できます。 オプション。 OpenVPNサーバーでWebコンテンツをホストしていない場合は、ポート443 通常はファイアウォールルールで許可されているため、これは一般的な選択肢です。
ポート443でリッスンするようにOpenVPNを変更するには、server.confを開きます ファイルを作成し、次のような行を見つけます:
port 1194
ポートが443になるように編集します:
/etc/openvpn/server/server.conf# Optional!
port 443
多くの場合、プロトコルはそのポートにも制限されています。もしそうなら、protoを見つけてください portの下の行 行を作成し、プロトコルをudpから変更します tcpへ :
# Optional!
proto tcp
する場合 プロトコルをTCPに切り替えるには、explicit-exit-notifyを変更する必要があります 1からのディレクティブの値 0へ 、このディレクティブはUDPでのみ使用されるため。 TCPの使用中にこれを行わないと、OpenVPNサービスの開始時にエラーが発生します。
explicit-exit-notifyを見つけます ファイルの最後に行を追加し、値を0に変更します :
# Optional!
explicit-exit-notify 0
別のポートとプロトコルを使用する必要がない場合は、これらの設定を変更しないでおくことをお勧めします。
(オプション)デフォルト以外のクレデンシャルを指す
./easyrsa gen-req serverで別の名前を選択した場合 以前のコマンドで、certを変更します およびkey server.confの行 適切な.crtを指すように構成ファイル および.key ファイル。デフォルト名を使用した場合は、server 、これはすでに正しく設定されています:
cert server.crt
key server.key
終了したら、ファイルを保存して閉じます。
これで、OpenVPNの一般設定の構成が完了しました。次のステップでは、サーバーのネットワークオプションをカスタマイズします。
OpenVPNがVPNを介してトラフィックを正しくルーティングできるように、サーバーのネットワーク構成を微調整する必要があるいくつかの側面があります。これらの最初のものはIP転送です 、IPトラフィックをルーティングする場所を決定する方法。これは、サーバーが提供するVPN機能に不可欠です。
OpenVPNサーバーのデフォルトのIP転送設定を調整するには、/etc/sysctl.confを開きます nanoを使用したファイル またはお好みのエディター:
- sudo nano /etc/sysctl.conf
次に、ファイルの最後に次の行を追加します。
/etc/sysctl.confnet.ipv4.ip_forward = 1
終了したら、ファイルを保存して閉じます。
ファイルを読み取り、現在のセッションの新しい値をロードするには、次のように入力します。
- sudo sysctl -p
Outputnet.ipv4.ip_forward = 1
これで、OpenVPNサーバーは着信トラフィックをあるイーサネットデバイスから別のイーサネットデバイスに転送できるようになります。この設定により、サーバーは、仮想VPNインターフェイスに接続するクライアントからのトラフィックを他の物理イーサネットデバイス経由で転送できるようになります。この構成では、クライアントからのすべてのWebトラフィックがサーバーのIPアドレスを介してルーティングされ、クライアントのパブリックIPアドレスは事実上非表示になります。
次のステップでは、OpenVPNサーバーとの間のトラフィックが適切に流れるようにファイアウォールルールを構成する必要があります。
これまで、サーバーにOpenVPNをインストールして構成し、クライアントがVPNにアクセスするために必要なキーと証明書を生成しました。ただし、クライアントからの着信Webトラフィックの送信先に関する指示はOpenVPNにまだ提供されていません。ファイアウォールルールとルーティング構成を確立することで、サーバーがクライアントトラフィックを処理する方法を指定できます。
このチュートリアルの開始時に前提条件に従っていると仮定すると、すでにufwが必要です。 サーバーにインストールして実行します。 OpenVPNがファイアウォールを通過できるようにするには、マスカレードを有効にする必要があります。これは、クライアント接続を正しくルーティングするためのオンザフライの動的ネットワークアドレス変換(NAT)を提供するiptablesの概念です。
ファイアウォール構成ファイルを開いてマスカレードルールを追加する前に、まずマシンのパブリックネットワークインターフェイスを見つける必要があります。これを行うには、次のように入力します:
- ip route list default
パブリックインターフェイスは、このコマンドの出力内にある「dev」という単語に続く文字列です。たとえば、この結果はeth0という名前のインターフェースを示しています 、以下で強調表示されています:
Outputdefault via 159.65.160.1 dev eth0 proto static
デフォルトルートに関連付けられたインターフェースがある場合は、/etc/ufw/before.rulesを開きます。 関連する構成を追加するファイル:
- sudo nano /etc/ufw/before.rules
UFWルールは通常、ufwを使用して追加されます 指図。 before.rulesにリストされているルール ただし、ファイルは、従来のUFWルールがロードされる前に読み取られ、配置されます。 Towards the top of the file, add the highlighted lines below. This will set the default policy for the POSTROUTING chain in the nat table and masquerade any traffic coming from the VPN. Remember to replace eth0 in the -A POSTROUTING line below with the interface you found in the above command:
#
# rules.before
#
# Rules that should be run before the ufw command line added rules. Custom
# rules should be added to one of these chains:
#   ufw-before-input
#   ufw-before-output
#   ufw-before-forward
#

# START OPENVPN RULES
# NAT table rules
*nat
:POSTROUTING ACCEPT [0:0]
# Allow traffic from OpenVPN client to eth0 (change to the interface you discovered!)
-A POSTROUTING -s 10.8.0.0/8 -o eth0 -j MASQUERADE
COMMIT
# END OPENVPN RULES

# Don't delete these required lines, otherwise there will be errors
*filter
. . .
終了したら、ファイルを保存して閉じます。
Next, you need to tell UFW to allow forwarded packets by default as well. To do this, open the /etc/default/ufw ファイル:
- sudo nano /etc/default/ufw
Inside, find the DEFAULT_FORWARD_POLICY directive and change the value from DROP to ACCEPT :
DEFAULT_FORWARD_POLICY="ACCEPT"
終了したら、ファイルを保存して閉じます。
Next, adjust the firewall itself to allow traffic to OpenVPN. If you did not change the port and protocol in the /etc/openvpn/server.conf file, you will need to open up UDP traffic to port 1194 。 If you modified the port and/or protocol, substitute the values you selected here.
In case you forgot to add the SSH port when following the prerequisite tutorial, add it here as well:
- sudo ufw allow 1194/udp
- sudo ufw allow OpenSSH
注 :If you are using a different firewall or have customized your UFW configuration, you may need to add additional firewall rules. For example, if you decide to tunnel all of your network traffic over the VPN connection, you will need to ensure that port 53 traffic is allowed for DNS requests, and ports like 80 and 443 for HTTP and HTTPS traffic respectively. If there are other protocols that you are using over the VPN then you will need to add rules for them as well.
After adding those rules, disable and re-enable UFW to restart it and load the changes from all of the files you’ve modified:
- sudo ufw disable
- sudo ufw enable
Your server is now configured to correctly handle OpenVPN traffic. With the firewall rules in place, you can start the OpenVPN service on the server.
Step 10 — Starting OpenVPN
OpenVPN runs as a systemd service, so you can use systemctl to manage it. You will configure OpenVPN to start up at boot so you can connect to your VPN at any time as long as your server is running. To do this, enable the OpenVPN service by adding it to systemctl :
- sudo systemctl -f enable openvpn-server@server.service
Then start the OpenVPN service:
- sudo systemctl start openvpn-server@server.service
Double check that the OpenVPN service is active with the following command. You should see active (running) in the output:
- sudo systemctl status openvpn-server@server.service
Output● openvpn-server@server.service - OpenVPN service for server
     Loaded: loaded (/lib/systemd/system/openvpn-server@.service; enabled; vendor preset: enabled)
     Active: active (running) since Thu 2022-04-21 17:58:24 UTC; 6s ago
       Docs: man:openvpn(8)
             https://community.openvpn.net/openvpn/wiki/Openvpn24ManPage
             https://community.openvpn.net/openvpn/wiki/HOWTO
   Main PID: 144351 (openvpn)
     Status: "Initialization Sequence Completed"
      Tasks: 1 (limit: 4665)
     Memory: 1.8M
        CPU: 27ms
     CGroup: /system.slice/system-openvpn\x2dserver.slice/openvpn-server@server.service
             └─144351 /usr/sbin/openvpn --status /run/openvpn-server/status-server.log --status-version 2 --suppress-timestamps --config server.conf

. . .
You have now completed the server-side configuration for OpenVPN. Next, you will configure your client machine and connect to the OpenVPN Server.
Step 11 — Creating the Client Configuration Infrastructure
Creating configuration files for OpenVPN clients can be somewhat involved, as every client must have its own config and each must align with the settings outlined in the server’s configuration file. Rather than writing a single configuration file that can only be used on one client, this step outlines a process for building a client configuration infrastructure which you can use to generate config files on-the-fly. You will first create a “base” configuration file then build a script which will allow you to generate unique client config files, certificates, and keys as needed.
Get started by creating a new directory where you will store client configuration files within the client-configs directory you created earlier:
- mkdir -p ~/client-configs/files
Next, copy an example client configuration file into the client-configs directory to use as your base configuration:
- cp /usr/share/doc/openvpn/examples/sample-config-files/client.conf ~/client-configs/base.conf
Open this new file using nano or your preferred text editor:
- nano ~/client-configs/base.conf
Inside, locate the remote 指令。 This points the client to your OpenVPN server address — the public IP address of your OpenVPN server. If you decided to change the port that the OpenVPN server is listening on, you will also need to change 1194 to the port you selected:
. . .
# The hostname/IP and port of the server.
# You can have multiple remote entries
# to load balance between the servers.
remote your_server_ip 1194
. . .
Be sure that the protocol matches the value you are using in the server configuration:
~/client-configs/base.confproto udp
Next, uncomment the user およびgroup directives by removing the ; sign at the beginning of each line:
# Downgrade privileges after initialization (non-Windows only)
user nobody
group nogroup
Find the directives that set the ca , cert , and key 。 Comment out these directives since you will add the certs and keys within the file itself shortly:
# SSL/TLS parms.
# See the server config file for more
# description. It's best to use
# a separate .crt/.key file pair
# for each client. A single ca
# file can be used for all clients.
;ca ca.crt
;cert client.crt
;key client.key
Similarly, comment out the tls-auth directive, as you will add ta.key directly into the client configuration file (and the server is set up to use tls-crypt ):
# If a tls-auth key is used on the server
# then every client must also have the key.
;tls-auth ta.key 1
Mirror the cipher and auth settings that you set in the /etc/openvpn/server/server.conf ファイル:
cipher AES-256-GCM
auth SHA256
Next, add the key-direction directive somewhere in the file. You must set this to “1” for the VPN to function correctly on the client machine:
key-direction 1
Finally, add a few commented out lines to handle various methods that Linux based VPN clients will use for DNS resolution. You’ll add two similar, but separate sets of commented out lines. The first set is for clients that do not use systemd-resolved to manage DNS. These clients rely on the resolvconf utility to update DNS information for Linux clients.
; script-security 2
; up /etc/openvpn/update-resolv-conf
; down /etc/openvpn/update-resolv-conf
Now add another set of lines for clients that use systemd-resolved for DNS resolution:
; script-security 2
; up /etc/openvpn/update-systemd-resolved
; down /etc/openvpn/update-systemd-resolved
; down-pre
; dhcp-option DOMAIN-ROUTE .
終了したら、ファイルを保存して閉じます。
Later in Step 13 - Installing the Client Configuration step of this tutorial you will learn how to determine how DNS resolution works on Linux clients and which section to uncomment.
Next, you’ll create a script that will compile your base configuration with the relevant certificate, key, and encryption files and then place the generated configuration in the ~/client-configs/files ディレクトリ。 Open a new file called make_config.sh within the ~/client-configs ディレクトリ:
- nano ~/client-configs/make_config.sh
Inside, add the following content:
~/client-configs/make_config.sh#!/bin/bash
# First argument: Client identifier
KEY_DIR=~/client-configs/keys
OUTPUT_DIR=~/client-configs/files
BASE_CONFIG=~/client-configs/base.conf
cat ${BASE_CONFIG} \
<(echo -e '<ca>') \
${KEY_DIR}/ca.crt \
<(echo -e '</ca>\n<cert>') \
${KEY_DIR}/${1}.crt \
<(echo -e '</cert>\n<key>') \
${KEY_DIR}/${1}.key \
<(echo -e '</key>\n<tls-crypt>') \
${KEY_DIR}/ta.key \
<(echo -e '</tls-crypt>') \
> ${OUTPUT_DIR}/${1}.ovpn
終了したら、ファイルを保存して閉じます。
Before moving on, be sure to mark this file as executable by typing:
- chmod 700 ~/client-configs/make_config.sh
This script will make a copy of the base.conf file you made, collect all the certificate and key files you’ve created for your client, extract their contents, append them to the copy of the base configuration file, and export all of this content into a new client configuration file. This means that, rather than having to manage the client’s configuration, certificate, and key files separately, all the required information is stored in one place. The benefit of using this method is that if you ever need to add a client in the future, you can run this script to quickly create a new config file and ensure that all the important information is stored in a single, easy-to-access location.
Please note that any time you add a new client, you will need to generate new keys and certificates for it before you can run this script and generate its configuration file. You will get some practice using this script in the next step.
Step 12 — Generating Client Configurations
If you followed along with the guide, you created a client certificate and key named client1.crt and client1.key , respectively, in Step 6. You can generate a config file for these credentials by moving into your ~/client-configs directory and running the script you made at the end of the previous step:
- cd ~/client-configs
- ./make_config.sh client1
This will create a file named client1.ovpn in your ~/client-configs/files ディレクトリ:
- ls ~/client-configs/files
Outputclient1.ovpn
You need to transfer this file to the device you plan to use as the client. For instance, this could be your local computer or a mobile device.
While the exact applications used to accomplish this transfer will depend on your device’s operating system and your personal preferences, a dependable and secure method is to use SFTP (SSH file transfer protocol) or SCP (Secure Copy) on the backend. This will transport your client’s VPN authentication files over an encrypted connection.
Here is an example SFTP command which you can run from your local computer (macOS or Linux). This will copy the client1.ovpn file you created in the last step to your home directory:
- sftp sammy@openvpn_server_ip:client-configs/files/client1.ovpn ~/
Here are several tools and tutorials for securely transferring files from the OpenVPN server to a local computer:
- WinSCP
- How To Use SFTP to Securely Transfer Files with a Remote Server
- How To Use Filezilla to Transfer and Manage Files Securely on your VPS
Step 13 — Installing the Client Configuration
This section covers how to install a client VPN profile on Windows, macOS, Linux, iOS, and Android. None of these client instructions are dependent on one another, so feel free to skip to whichever is applicable to your device.
The OpenVPN connection will have the same name as whatever you called the .ovpn ファイル。 In regards to this tutorial, this means that the connection is named client1.ovpn , aligning with the first client file you generated.
Windows
Installing
Download the OpenVPN client application for Windows from OpenVPN’s Downloads page. Choose the appropriate installer version for your version of Windows.
注 :OpenVPN needs administrative privileges to install.
After installing OpenVPN, copy the .ovpn file to:
C:\Program Files\OpenVPN\config
When you launch OpenVPN, it will automatically locate the profile and make it available.
You must run OpenVPN as an administrator each time it’s used, even by administrative accounts. To do this without having to right-click and select Run as administrator every time you use the VPN, you must preset this from an administrative account. This also means that standard users will need to enter the administrator’s password to use OpenVPN. On the other hand, standard users can’t properly connect to the server unless the OpenVPN application on the client has admin rights, so the elevated privileges are necessary.
To set the OpenVPN application to always run as an administrator, right-click on its shortcut icon and go to Properties 。 At the bottom of the Compatibility tab, click the button to Change settings for all users 。 In the new window, check Run this program as an administrator 。
Connecting
Each time you launch the OpenVPN GUI, Windows will ask if you want to allow the program to make changes to your computer. Click Yes 。 Launching the OpenVPN client application only puts the applet in the system tray so that you can connect and disconnect the VPN as needed; it does not actually make the VPN connection.
Once OpenVPN is started, initiate a connection by going into the system tray applet and right-clicking on the OpenVPN applet icon. This opens the context menu. Select client1 at the top of the menu (that’s your client1.ovpn profile) and choose Connect 。
A status window will open showing the log output while the connection is established, and a message will show once the client is connected.
Disconnect from the VPN the same way:Go into the system tray applet, right-click the OpenVPN applet icon, select the client profile and click Disconnect 。
macOS
Installing
Tunnelblick is a free, open source OpenVPN client for macOS. You can download the latest disk image from the Tunnelblick Downloads page. Double-click the downloaded .dmg file and follow the prompts to install.
Towards the end of the installation process, Tunnelblick will ask if you have any configuration files. Answer I have configuration files and let Tunnelblick finish. Open a Finder window and double-click client1.ovpn 。 Tunnelblick will install the client profile. Administrative privileges are required.
Connecting
Launch Tunnelblick by double-clicking the Tunnelblick icon in the Applications フォルダ。 Once Tunnelblick has been launched, there will be a Tunnelblick icon in the menu bar at the top right of the screen for controlling connections. Click on the icon, and then the Connect client1 menu item to initiate the VPN connection. If you are using custom DNS settings with Tunnelblick, you may need check “Allow changes to manually-set network settings” in the advanced configuration dialog.
Linux
Installing
If you are using Linux, there are a variety of tools that you can use depending on your distribution. Your desktop environment or window manager might also include connection utilities.
The most universal way of connecting, however, is to just use the OpenVPN software.
On Ubuntu or Debian, you can install it just as you did on the server by typing:
- sudo apt update
- sudo apt install openvpn
On CentOS you can enable the EPEL repositories and then install it by typing:
- sudo dnf install epel-release
- sudo dnf install openvpn
Configuring Clients that use systemd-resolved
First determine if your system is using systemd-resolved to handle DNS resolution by checking the /etc/resolv.conf ファイル:
- cat /etc/resolv.conf
Output# This file is managed by man:systemd-resolved(8). Do not edit.
. . .

nameserver 127.0.0.53
options edns0
If your system is configured to use systemd-resolved for DNS resolution, the IP address after the nameserver option will be 127.0.0.53 。 There should also be comments in the file like the output that is shown that explain how systemd-resolved is managing the file. If you have a different IP address than 127.0.0.53 then chances are your system is not using systemd-resolved and you can go to the next section on configuring Linux clients that have an update-resolv-conf script instead.
To support these clients, first install the openvpn-systemd-resolved パッケージ。 It provides scripts that will force systemd-resolved to use the VPN server for DNS resolution.
- sudo apt install openvpn-systemd-resolved
One that package is installed, configure the client to use it, and to send all DNS queries over the VPN interface. Open the client’s VPN file:
- nano client1.ovpn
Now uncomment the following lines that you added earlier:
client1.ovpnscript-security 2
up /etc/openvpn/update-systemd-resolved
down /etc/openvpn/update-systemd-resolved
down-pre
dhcp-option DOMAIN-ROUTE .
Configuring Clients that use update-resolv-conf
If your system is not using systemd-resolved to manage DNS, check to see if your distribution includes an /etc/openvpn/update-resolv-conf script instead:
- ls /etc/openvpn
Outputupdate-resolv-conf
If your client includes the update-resolv-conf file, then edit the OpenVPN client configuration file that you transferred earlier:
- nano client1.ovpn
Uncomment the three lines you added to adjust the DNS settings:
client1.ovpnscript-security 2
up /etc/openvpn/update-resolv-conf
down /etc/openvpn/update-resolv-conf
If you are using CentOS, change the group directive from nogroup to nobody to match the distribution’s available groups:
group nobody
Save and close the file.
Connecting
Now, you can connect to the VPN by just pointing the openvpn command to the client configuration file:
- sudo openvpn --config client1.ovpn
This should connect you to your VPN.
注: If your client uses systemd-resolved to manage DNS, check the settings are applied correctly by running the systemd-resolve --status command like this:
- systemd-resolve --status tun0
You should see output like the following:
OutputLink 22 (tun0)
. . .
         DNS Servers: 208.67.222.222
                      208.67.220.220
          DNS Domain: ~.
If you see the IP addresses of the DNS servers that you configured on the OpenVPN server, along with the ~. setting for DNS Domain in the output, then you have correctly configured your client to use the VPN server’s DNS resolver. You can also check that you are sending DNS queries over the VPN by using a site like DNS leak test.com.
iOS
Installing
From the iTunes App Store, search for and install OpenVPN Connect, the official iOS OpenVPN client application. To transfer your iOS client configuration onto the device, connect it directly to a computer.
The process of completing the transfer with iTunes is outlined here. Open iTunes on the computer and click on iPhone> apps 。 Scroll down to the bottom to the File Sharing section and click the OpenVPN app. The blank window to the right, OpenVPN Documents , is for sharing files. Drag the .ovpn file to the OpenVPN Documents window. 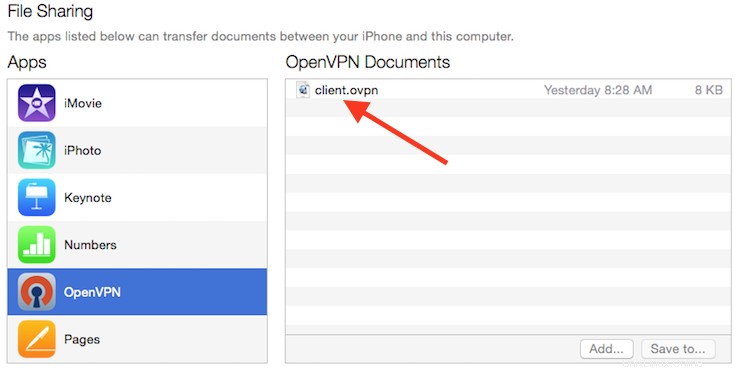
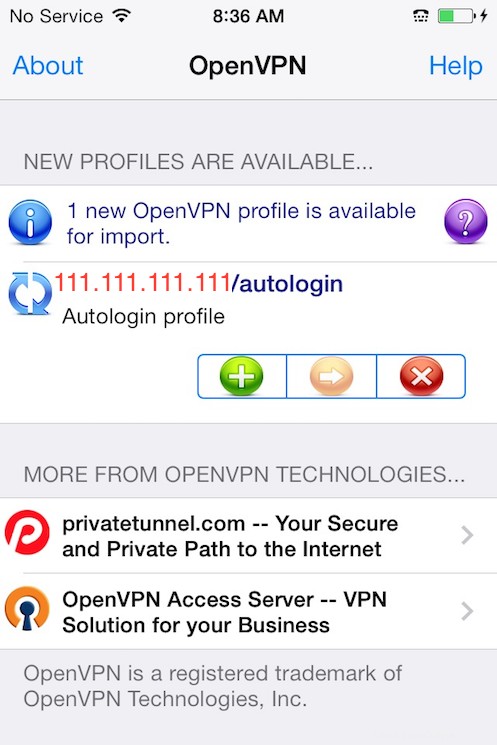
Now launch the OpenVPN app on the iPhone. You will receive a notification that a new profile is ready to import. Tap the green plus sign to import it.
 Connecting
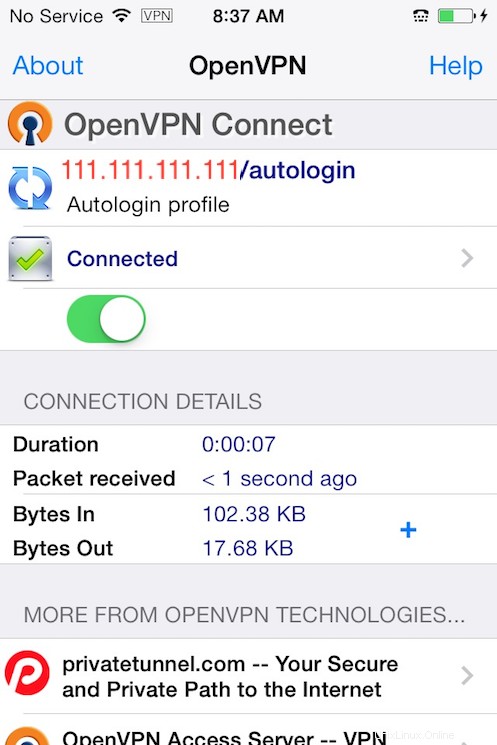
OpenVPN is now ready to use with the new profile. Start the connection by sliding the Connect button to the On position. Disconnect by sliding the same button to Off 。
注 :The VPN switch under Settings cannot be used to connect to the VPN. If you try, you will receive a notice to only connect using the OpenVPN app.
Android
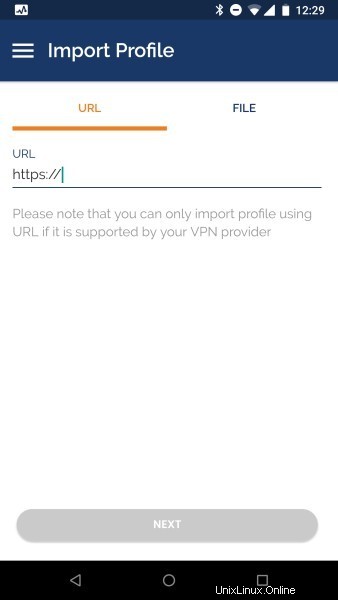
Installing
Open the Google Play Store. Search for and install Android OpenVPN Connect, the official Android OpenVPN client application.
You can transfer the .ovpn profile by connecting the Android device to your computer by USB and copying the file over. Alternatively, if you have an SD card reader, you can remove the device’s SD card, copy the profile onto it and then insert the card back into the Android device.
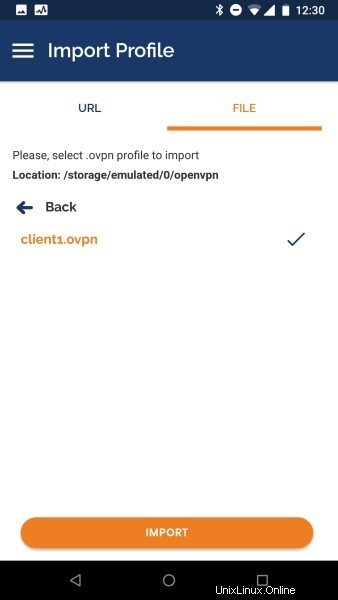
Start the OpenVPN app and tap the FILE menu to import the profile.
Then navigate to the location of the saved profile (the screenshot uses /storage/emulated/0/openvpn ) and select your .ovpn ファイル。 Tap the IMPORT button to finish importing this profile.
Connecting Once the profile is added, you will see a screen like this:
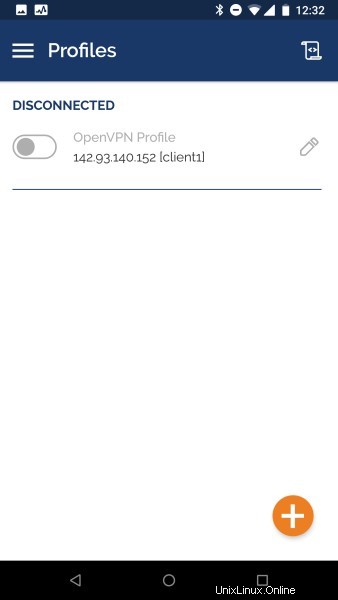
To connect, tap the toggle button close to the profile you want to use. You’ll see real time stats of your connection and traffic being routed through your OpenVPN server: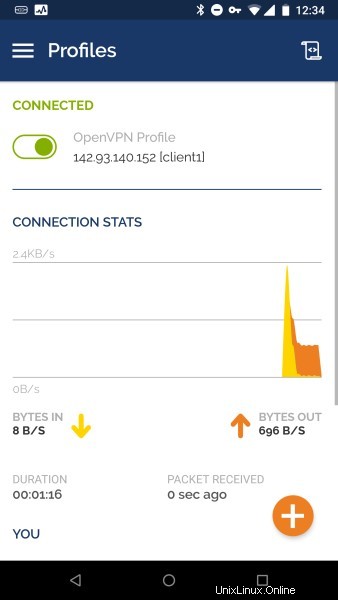
To disconnect, just tap the toggle button on the top left once again. You will be prompted to confirm that you want to disconnect from your VPN.
Step 14 — Testing Your VPN Connection (Optional)
注: This method for testing your VPN connection will only work if you opted to route all your traffic through the VPN in Step 7 when you edited the server.conf file for OpenVPN.
Once everything is installed, a simple check confirms everything is working properly. Without having a VPN connection enabled, open a browser and go to DNSLeakTest.
The site will return the IP address assigned by your internet service provider and as you appear to the rest of the world. To check your DNS settings through the same website, click on Extended Test and it will tell you which DNS servers you are using.
Now connect the OpenVPN client to your Droplet’s VPN and refresh the browser. A completely different IP address (that of your VPN server) should now appear, and this is how you appear to the world. Again, DNSLeakTest’s Extended Test will check your DNS settings and confirm you are now using the DNS resolvers pushed by your VPN.
Step 15 — Revoking Client Certificates
Occasionally, you may need to revoke a client certificate to prevent further access to the OpenVPN server.
To do so, follow the example in the prerequisite tutorial on How to Set Up and Configure a Certificate Authority on Ubuntu 22.04 under the Revoking a Certificate セクション。
Once you have revoked a certificate for a client using those instructions, you’ll need to copy the generated crl.pem file to your OpenVPN server in the /etc/openvpn/server ディレクトリ:
- sudo cp /tmp/crl.pem /etc/openvpn/server/
Next, open the OpenVPN server configuration file:
- sudo nano /etc/openvpn/server/server.conf
At the bottom of the file, add the crl-verify option, which will instruct the OpenVPN server to check the certificate revocation list that you created each time a connection attempt is made:
crl-verify crl.pem
Save and close the file.
Finally, restart OpenVPN to implement the certificate revocation:
- sudo systemctl restart openvpn-server@server.service
The client should no longer be able to successfully connect to the server using the old credential.
To revoke additional clients, follow this process:
- Revoke the certificate with the
./easyrsa revoke client_nameコマンド - Generate a new CRL
- Transfer the new
crl.pemfile to your OpenVPN server and copy it to the/etc/openvpn/server/directory to overwrite the old list. - Restart the OpenVPN service.
You can use this process to revoke any certificates that you’ve previously issued for your server.
You should now have a fully operational virtual private network running on your OpenVPN Server. You can browse the web and download content without worrying about malicious actors tracking your activity.
There are several steps you could take to customize your OpenVPN installation even further, such as configuring your client to connect to the VPN automatically or configuring client-specific rules and access policies. For these and other OpenVPN customizations, you should consult the official OpenVPN documentation.
To configure more clients, you only need to follow steps 6 and 11-13 for each additional device. To revoke access to clients, follow step 15 。