仮想プライベートネットワーク(VPN)を使用すると、コーヒーショップ、会議、空港などの信頼できないネットワークを通過するトラフィックを安全に暗号化できます。
Internet Key Exchange v2(IKEv2)は、サーバーとクライアント間の直接IPSecトンネリングを可能にするプロトコルです。 IKEv2 VPNの実装では、IPSecはネットワークトラフィックの暗号化を提供します。 IKEv2は、一部のプラットフォーム(OS X 10.11以降、iOS 9.1以降、およびWindows 10)でネイティブにサポートされており、追加のアプリケーションは必要ありません。また、クライアントの一時的な中断を非常にスムーズに処理します。
このチュートリアルでは、Ubuntu22.04サーバーでStrongSwanを使用してIKEv2VPNサーバーをセットアップします。次に、Windows、macOS、Ubuntu、iOS、およびAndroidクライアントを使用して接続する方法を学習します。
このチュートリアルを完了するには、次のものが必要です。
-
sudoを含むUbuntu22.04初期サーバーセットアップガイドに従って構成された1つのUbuntu22.04サーバー 非rootユーザーとファイアウォール。
まず、VPNサーバーとして構成するオープンソースのIPSecデーモンであるStrongSwanをインストールします。また、公開鍵インフラストラクチャ(PKI)コンポーネントをインストールして、認証局(CA)を作成し、インフラストラクチャの資格情報を提供できるようにします。
ローカルパッケージキャッシュを更新することから始めます:
- sudo apt update
次に、次のように入力してソフトウェアをインストールします。
- sudo apt install strongswan strongswan-pki libcharon-extra-plugins libcharon-extauth-plugins libstrongswan-extra-plugins
追加のlibcharon-extauth-plugins パッケージは、さまざまなクライアントが共有ユーザー名とパスフレーズを使用してサーバーに対して認証できるようにするために使用されます。 libstrongswan-extra-plugins StrongswanがCurve25519を使用する楕円曲線暗号スイートをサポートするようにパッケージが含まれています 暗号化スイート。
すべてがインストールされたので、証明書の作成に進みます。
IKEv2サーバーには、クライアントに対して自身を識別するための証明書が必要です。必要な証明書の作成を支援するために、 strongswan-pki パッケージには、 pkiというユーティリティが付属しています 認証局とサーバー証明書を生成します。
まず、作業するすべてのアセットを格納するためのディレクトリをいくつか作成します。ディレクトリ構造は、 /etc/ipsec.d内のいくつかのディレクトリと一致します 、最終的に作成するすべてのアイテムを移動します:
- mkdir -p ~/pki/{cacerts,certs,private}
次に、権限をロックして、プライベートファイルが他のユーザーに表示されないようにします。
- chmod 700 ~/pki
すべてを格納するディレクトリ構造ができたので、ルートキーを生成できます。これは、ルート認証局の証明書に署名するために使用される4096ビットのRSAキーになります。
次のコマンドを実行して、キーを生成します。
- pki --gen --type rsa --size 4096 --outform pem > ~/pki/private/ca-key.pem
その後、ルート証明書に署名するために生成したキーを使用して、ルート認証局の作成に進むことができます。
- pki --self --ca --lifetime 3650 --in ~/pki/private/ca-key.pem \
- --type rsa --dn "CN=VPN root CA" --outform pem > ~/pki/cacerts/ca-cert.pem
-lifetime 3650 フラグは、認証局のルート証明書が10年間有効であることを確認するために使用されます。機関のルート証明書は、それを依存するすべてのサーバーとクライアントに再配布する必要があるため、通常は変更されません。したがって、10年が安全なデフォルトの有効期限値です。
識別名を変更できます (DN)必要に応じて、他の何かに値を付けます。ここでの一般名(CNフィールド)は単なる指標であるため、インフラストラクチャ内の何かと一致する必要はありません。
ルート認証局が稼働しているので、VPNサーバーが使用する証明書を作成できます。
次に、VPNサーバーの証明書とキーを作成します。この証明書により、クライアントは、生成したCA証明書を使用してサーバーの信頼性を検証できます。
まず、次のコマンドを使用してVPNサーバーの秘密鍵を作成します。
- pki --gen --type rsa --size 4096 --outform pem > ~/pki/private/server-key.pem
次に、前の手順で作成した認証局のキーを使用してVPNサーバー証明書を作成して署名します。次のコマンドを実行しますが、[Common Name(CN)]フィールドと[Subject Alternative Name(SAN)]フィールドをVPNサーバーのDNS名またはIPアドレスに変更します。
- pki --pub --in ~/pki/private/server-key.pem --type rsa \
- | pki --issue --lifetime 1825 \
- --cacert ~/pki/cacerts/ca-cert.pem \
- --cakey ~/pki/private/ca-key.pem \
- --dn "CN=server_domain_or_IP" --san server_domain_or_IP \
- --flag serverAuth --flag ikeIntermediate --outform pem \
- > ~/pki/certs/server-cert.pem
注 :DNS名の代わりにIPアドレスを使用している場合は、複数の-sanを指定する必要があります エントリ。識別名(-dn ... )を指定する前のコマンドブロックの行 )次の抜粋行のような追加のエントリで変更する必要があります:
--dn "CN=IP address" --san @IP_address --san IP_address \
この余分な--san@ IP_addressの理由 エントリは、一部のクライアントがサーバーのIDを確認するときに、TLS証明書にサーバーのDNSエントリとIPアドレスエントリの両方があるかどうかを確認することです。
-flag serverAuth オプションは、暗号化されたトンネルが確立される前に、証明書がサーバー認証に明示的に使用されることを示すために使用されます。 -flag ikeIntermediate オプションは、古いmacOSクライアントをサポートするために使用されます。
StrongSwanが必要とするすべてのTLS/SSLファイルを生成したので、ファイルを /etc/ipsec.dの所定の場所に移動できます。 次のように入力してディレクトリ:
- sudo cp -r ~/pki/* /etc/ipsec.d/
この手順では、クライアントとサーバー間の通信を保護するために使用される証明書ペアを作成しました。また、CAキーを使用して証明書に署名したため、クライアントはCA証明書を使用してVPNサーバーの信頼性を検証できます。これらの証明書がすべて準備できたら、SrongSwanの構成に進む準備ができています。
StrongSwanには、いくつかの例を含むデフォルトの構成ファイルがありますが、ほとんどの構成は自分で行う必要があります。最初から始める前に、参照用にファイルをバックアップしましょう:
- sudo mv /etc/ipsec.conf{,.original}
お好みのテキストエディタを使用して、新しい空の構成ファイルを作成して開きます。ここでは、 nanoを使用します :
- sudo nano /etc/ipsec.conf
注 :このセクションを実行してVPNのサーバー部分を構成すると、左を参照する設定が表示されます。 および正しい 接続の側面。 IPSec VPNを使用する場合、左 慣例により、構成しているローカルシステム(この場合はサーバー)を指します。これらの設定の右側のディレクティブは、電話や他のコンピューターなどのリモートクライアントを参照します。
このチュートリアルの後半でクライアントの構成に進むと、クライアント構成ファイルはさまざまな左を使用して自分自身を参照します。 ディレクティブ、およびサーバーは rightを使用して参照されます サイド用語。
まず、StrongSwanに、デバッグのためにデーモンのステータスをログに記録し、重複接続を許可するように指示します。次の行をファイルに追加します:
/etc/ipsec.confconfig setup
charondebug="ike 1, knl 1, cfg 0"
uniqueids=no
次に、VPNの構成セクションを作成します。また、StrongSwanにIKEv2 VPNトンネルを作成し、起動時にこの構成セクションを自動的にロードするように指示します。次の行をファイルに追加します。
/etc/ipsec.conf. . .
conn ikev2-vpn
auto=add
compress=no
type=tunnel
keyexchange=ikev2
fragmentation=yes
forceencaps=yes
また、クライアントが予期せず切断した場合に「ぶら下がっている」接続をクリアするようにデッドピア検出を構成します。次の行を追加します:
/etc/ipsec.conf. . .
conn ikev2-vpn
. . .
dpdaction=clear
dpddelay=300s
rekey=no
次に、サーバーの「左側」のIPSecパラメーターを構成します。次の各パラメーターは、サーバーがクライアントからの接続を受け入れ、サーバー自体を正しく識別するように構成されていることを確認します。これらの各設定を/etc/ipsec.confに追加します それらが何であるか、そしてそれらが使用される理由を理解したら、ファイルしてください:
-
left =%any%anyvalueは、サーバーがネットワークインターフェイスを使用して、クライアントとの後続の通信のために着信接続を受信することを保証します。たとえば、プライベートネットワークを介してクライアントを接続している場合、サーバーは残りの接続でトラフィックを受信するプライベートIPアドレスを使用します。 -
leftid = @server_domain_or_IPこのオプションは、サーバーがクライアントに提示する名前を制御します。次のオプションleftcertと組み合わせると 、leftidオプションを使用すると、サーバーの構成済みの名前と、公開証明書に含まれている識別名(DN)が一致するようになります。 -
leftcert =server-cert.pemこのオプションは、手順3で構成したサーバーの公開証明書へのパスです。このオプションがないと、サーバーはクライアントで自身を認証したり、IKEv2セットアップのネゴシエーションを終了したりできません。 -
leftsendcert =always常に valueは、サーバーに接続するすべてのクライアントが、初期接続設定の一部としてサーバーの公開証明書のコピーを常に受信することを保証します。 -
leftsubnet =0.0.0.0 / 0追加する最後の「左側」オプションは、サーバーの背後で到達可能なサブネットについてクライアントに通知します。この場合、0.0.0.0/0IPv4アドレスのセット全体を表すために使用されます。つまり、サーバーはクライアントに、デフォルトですべてのトラフィックをVPN経由で送信するように指示します。
関連する「左側」の各オプションについて理解したので、次のようにすべてをファイルに追加します。
/etc/ipsec.conf. . .
conn ikev2-vpn
. . .
left=%any
leftid=@server_domain_or_IP
leftcert=server-cert.pem
leftsendcert=always
leftsubnet=0.0.0.0/0
注 :サーバーIDを構成する場合( leftid )、 @のみを含めます VPNサーバーがドメイン名で識別される場合の文字:
    . . .    leftid=@vpn.example.com
    . . .
サーバーがIPアドレスで識別される場合は、IPアドレスを次のように入力します。
/etc/ipsec.conf . . .
leftid=your_server_ip
. . .
次に、クライアントの「右側」のIPSecパラメータを設定できます。次の各パラメータは、クライアントからの接続を受け入れる方法、クライアントがサーバーに対して認証する方法、およびクライアントが使用するプライベートIPアドレス範囲とDNSサーバーをサーバーに指示します。これらの各設定を/etc/ipsec.confに追加します それらが何であるか、そしてそれらが使用される理由を理解したら、ファイルしてください:
-
right =%any%anyrightのオプション 接続の側は、リモートクライアントからの着信接続を受け入れるようにサーバーに指示します。 -
rightid =%anyこのオプションにより、暗号化されたトンネルが確立される前に、サーバーがIDを提供するクライアントからの接続を拒否しないようになります。 -
rightauth =eap-mschapv2このオプションは、クライアントがサーバーへの認証に使用する認証方法を構成します。eap-mschapv2ここでは、Windows、macOS、Androidデバイスなどのクライアントをサポートするための幅広い互換性のために使用されます。 -
rightsourceip =10.10.10.0 / 24このオプションは、指定された10.10.10.0 / 24からクライアントにプライベートIPアドレスを割り当てるようにサーバーに指示します。 IPのプール。 -
rightdns =8.8.8.8,8.8.4.4これらのIPアドレスは、GoogleのパブリックDNSリゾルバーです。これらは、他のパブリックリゾルバー、VPNサーバーのリゾルバー、またはクライアントが到達できる他のリゾルバーを使用するように変更できます。 -
rightsendcert =neverこのオプションは、クライアントが自身を認証するために証明書を送信する必要がないことをサーバーに指示します。
VPNに必要な「右側」のオプションについて理解したので、次の行を /etc/ipsec.confに追加します。 :
. . .
conn ikev2-vpn
    . . .
    right=%any
    rightid=%any
    rightauth=eap-mschapv2
    rightsourceip=10.10.10.0/24
    rightdns=8.8.8.8,8.8.4.4
    rightsendcert=never
次に、StrongSwanに、クライアントが接続するときにユーザーの資格情報を要求するように指示します。
/etc/ipsec.conf. . .
conn ikev2-vpn
. . .
eap_identity=%identity
最後に、Linux、Windows、macOS、iOS、およびAndroidクライアントをサポートするために次の行を追加します。これらの行は、さまざまなキー交換、ハッシュ、認証、および暗号化アルゴリズム(一般に暗号スイートと呼ばれます)を指定します。 )StrongSwanはさまざまなクライアントが使用できるようにします:
/etc/ipsec.conf. . .
conn ikev2-vpn
. . .
ike=chacha20poly1305-sha512-curve25519-prfsha512,aes256gcm16-sha384-prfsha384-ecp384,aes256-sha1-modp1024,aes128-sha1-modp1024,3des-sha1-modp1024!
esp=chacha20poly1305-sha512,aes256gcm16-ecp384,aes256-sha256,aes256-sha1,3des-sha1!
サポートされている各暗号スイートは、他の暗号スイートとはコンマで区切られています。例: chacha20poly1305-sha512-curve25519-prfsha512 は1つのスイートであり、 aes256gcm16-sha384-prfsha384-ecp384 別です。ここにリストされている暗号スイートは、Windows、macOS、iOS、Android、およびLinuxクライアント間で最も幅広い互換性を確保するために選択されています。
完全な構成ファイルは次のようになります。
/etc/ipsec.confconfig setup
charondebug="ike 1, knl 1, cfg 0"
uniqueids=no
conn ikev2-vpn
auto=add
compress=no
type=tunnel
keyexchange=ikev2
fragmentation=yes
forceencaps=yes
dpdaction=clear
dpddelay=300s
rekey=no
left=%any
leftid=@server_domain_or_IP
leftcert=server-cert.pem
leftsendcert=always
leftsubnet=0.0.0.0/0
right=%any
rightid=%any
rightauth=eap-mschapv2
rightsourceip=10.10.10.0/24
rightdns=8.8.8.8,8.8.4.4
rightsendcert=never
eap_identity=%identity
ike=chacha20poly1305-sha512-curve25519-prfsha512,aes256gcm16-sha384-prfsha384-ecp384,aes256-sha1-modp1024,aes128-sha1-modp1024,3des-sha1-modp1024!
esp=chacha20poly1305-sha512,aes256gcm16-ecp384,aes256-sha256,aes256-sha1,3des-sha1!
各行が正しく追加されたことを確認したら、ファイルを保存して閉じます。 nanoを使用した場合 、 CTRL + Xを押してこれを行います 、 Y 、次に ENTER 。
VPNパラメータを設定したので、ユーザーがサーバーに接続できるようにアカウントの作成に進むことができます。
これで、VPNサーバーはクライアント接続を受け入れるように構成されましたが、資格情報はまだ構成されていません。 ipsec.secretsと呼ばれる特別な構成ファイルでいくつかのことを構成する必要があります :
- サーバーがクライアントに対して認証できるように、サーバー証明書の秘密鍵の場所をStrongSwanに指示する必要があります。
- VPNへの接続を許可するユーザーのリストも設定する必要があります。
シークレットファイルを開いて編集しましょう:
- sudo nano /etc/ipsec.secrets
まず、StrongSwanに秘密鍵の場所と解析方法を伝えます。
/etc/ipsec.secrets: RSA "server-key.pem"
行が:で始まることを確認してください 文字であり、その後にスペースがあり、行全体が:RSA "server-key.pem"と表示されるようにします。 。
次に、ユーザーの資格情報を定義します。好きなユーザー名またはパスワードの組み合わせを作成できます:
/etc/ipsec.secretsyour_username : EAP "your_password"
ファイルを保存して閉じます。 VPNパラメータの操作が終了したので、VPNサービスを再起動して、構成を適用します。
- sudo systemctl restart strongswan-starter
VPNサーバーがサーバーオプションとユーザー資格情報の両方で完全に構成されたので、次に最も重要な部分であるファイアウォールの構成に移ります。
StrongSwanの構成が完了したら、VPNトラフィックが通過して転送できるようにファイアウォールを構成する必要があります。
前提条件の初期サーバーセットアップチュートリアルに従った場合は、UFWファイアウォールを有効にする必要があります。 UFWをまだ構成していない場合は、ファイアウォールを介したSSH接続を許可するルールを追加することから始めて、UFWを有効にしたときに現在のセッションが閉じないようにする必要があります。
- sudo ufw allow OpenSSH
次に、次のように入力してファイアウォールを有効にします。
- sudo ufw enable
次に、標準のIPSecポート 500へのUDPトラフィックを許可するルールを追加します。 および4500 :
- sudo ufw allow 500,4500/udp
次に、UFWの構成ファイルの1つを開いて、IPSecパケットをルーティングおよび転送するためのいくつかの低レベルポリシーを追加します。ただし、これを行う前に、サーバー上のどのネットワークインターフェイスがインターネットアクセスに使用されているかを確認する必要があります。デフォルトルートに関連付けられているデバイスを照会して、このインターフェースを見つけます。
- ip route show default
パブリックインターフェイスは「dev」という単語の後に続く必要があります。たとえば、この結果は eth0という名前のインターフェースを示しています 、これは次の例で強調表示されています:
Outputdefault via your_server_ip dev eth0 proto static
パブリックネットワークインターフェイスを使用したら、 /etc/ufw/before.rulesを開きます テキストエディタでファイルします。このファイルのルールは、残りの通常の入力および出力ルールの前にファイアウォールに追加されます。これらは、サーバーがクライアントとインターネットとの間で接続を正しくルーティングできるように、ネットワークアドレス変換(NAT)を構成するために使用されます。
- sudo nano /etc/ufw/before.rules
ファイルの先頭近く( * filter の前) 行)、次の構成ブロックを追加します。 eth0の各インスタンスを変更します 上記の構成で、 ip routeで見つけたインターフェース名と一致させます 。 * nat 回線は、ファイアウォールがVPNクライアントとインターネット間のトラフィックを正しくルーティングおよび操作できるようにルールを作成します。 * mangle lineは、特定のVPNクライアントで発生する可能性のある問題を防ぐために、最大パケットセグメントサイズを調整します。
*nat
-A POSTROUTING -s 10.10.10.0/24 -o eth0 -m policy --pol ipsec --dir out -j ACCEPT
-A POSTROUTING -s 10.10.10.0/24 -o eth0 -j MASQUERADE
COMMIT

*mangle
-A FORWARD --match policy --pol ipsec --dir in -s 10.10.10.0/24 -o eth0 -p tcp -m tcp --tcp-flags SYN,RST SYN -m tcpmss --mss 1361:1536 -j TCPMSS --set-mss 1360
COMMIT

*filter
:ufw-before-input - [0:0]
:ufw-before-output - [0:0]
:ufw-before-forward - [0:0]
:ufw-not-local - [0:0]
. . .
次に、 * filterの後 定義行をチェーンし、構成のブロックをもう1つ追加します:
. . .
*filter
:ufw-before-input - [0:0]
:ufw-before-output - [0:0]
:ufw-before-forward - [0:0]
:ufw-not-local - [0:0]

-A ufw-before-forward --match policy --pol ipsec --dir in --proto esp -s 10.10.10.0/24 -j ACCEPT
-A ufw-before-forward --match policy --pol ipsec --dir out --proto esp -d 10.10.10.0/24 -j ACCEPT
これらの行は、VPNクライアントが接続できるようにESP(Encapsulating Security Payload)トラフィックを転送するようにファイアウォールに指示します。 ESPは、VPNパケットが信頼できないネットワークを通過するときに、VPNパケットに追加のセキュリティを提供します。
終了したら、各行が正しく追加されたことを確認したら、ファイルを保存して閉じます。 nanoを使用した場合 、 CTRL + Xを押してこれを行います 、 Y 、次に ENTER 。
ファイアウォールを再起動する前に、あるインターフェイスから別のインターフェイスへのルーティングを可能にするために、いくつかのネットワークカーネルパラメータも変更する必要があります。これらの設定を制御するファイルは、 /etc/ufw/sysctl.confと呼ばれます。 。ファイルにいくつかの設定を行う必要があります。
最初にIPv4パケット転送をオンにして、トラフィックがVPNとサーバー上の公開されているネットワークインターフェイスの間を移動できるようにする必要があります。次に、パスMTUディスカバリーを無効にして、パケットの断片化の問題を防ぎます。最後に、中間者攻撃を防ぐために、ICMPリダイレクトを受け入れたりICMPリダイレクトを送信したりすることはありません。
nanoを使用してUFWのカーネルパラメータ設定ファイルを開きます またはお好みのテキストエディタ:
- sudo nano /etc/ufw/sysctl.conf
次に、次の net / ipv4 / ip_forward =1を追加します。 インターフェイス間でパケットを転送できるようにするためのファイルの最後の設定:
. . .
net/ipv4/ip_forward=1
次のブロックは、ファイルの最後に次の行を追加して、ICMPリダイレクトパケットの送受信をブロックします。
/etc/ufw/sysctl.conf. . .
net/ipv4/conf/all/accept_redirects=0
net/ipv4/conf/all/send_redirects=0
最後に、ファイルの最後に次の行を追加して、パスMTU探索をオフにします。
/etc/ufw/sysctl.conf. . .
net/ipv4/ip_no_pmtu_disc=1
終了したらファイルを保存します。 UFWは再起動するたびにこれらの設定を適用するため、ファイアウォールを無効にしてから再度有効にすることで、すべての変更を有効にできます。
- sudo ufw disable
- sudo ufw enable
プロセスを確認するように求められます。 Yと入力します 新しい設定でUFWを再度有効にします。
すべての設定が完了したので、試してみましょう。まず、作成したCA証明書をコピーして、VPNに接続するクライアントデバイスにインストールする必要があります。これを行う最も簡単な方法は、サーバーにログインして証明書ファイルの内容を出力することです。
- cat /etc/ipsec.d/cacerts/ca-cert.pem
次のような出力が表示されます:
Output-----BEGIN CERTIFICATE-----
MIIFNDCCAxygAwIBAgIIHCsidG5mXzgwDQYJKoZIhvcNAQEMBQAwODELMAkGA1UE

. . .

H2YUdz8XNHrJHvMQKWFpi0rlEcMs+MSXPFWE3Q7UbaZJ/h8wpSldSUbQRUlphExJ
dJ4PX+MUJO/vjG1/ie6Kh25xbBAc3qNq8siiJZDwrg6vjEK7eiZ1rA==
-----END CERTIFICATE-----
----- BEGIN CERTIFICATE -----を含むこの出力をコンピューターにコピーします および-----END CERTIFICATE ----- 行を入力し、 ca-cert.pemなどの認識可能な名前のファイルに保存します。 。作成するファイルに.pemが含まれていることを確認してください 拡張機能。
または、SFTPを使用してファイルをコンピューターに転送します。
ca-cert.pemを入手したら コンピュータにファイルをダウンロードしたら、VPNへの接続を設定できます。
ルート証明書をインポートし、VPNに接続するようにWindowsを構成する方法は複数あります。最初の方法では、ステップごとにグラフィカルツールを使用します。 2番目の方法では、PowerShellコマンドを使用します。このコマンドは、VPN構成に合わせてスクリプト化および変更できます。
注: これらの手順は、バージョン1903および1909を実行しているWindows10インストールでテストされています。
まず、次の手順に従ってルート証明書をインポートします。
-
WINDOWS + Rを押します 実行を表示するには ダイアログをクリックし、mmc.exeと入力します Windows管理コンソールを起動します。 -
ファイルから メニューで、スナップインの追加または削除に移動します 、証明書を選択します 利用可能なスナップインのリストから、[追加]をクリックします 。
-
VPNをすべてのユーザーと連携させたいので、コンピューターアカウントを選択します 次へをクリックします 。
-
ローカルコンピューターで構成しているので、ローカルコンピューターを選択します 、[完了]をクリックします 。
-
コンソールルートの下 ノードで、証明書(ローカルコンピューター)を展開します エントリ、信頼されたルート証明機関を展開します 、次に証明書を選択します エントリ:
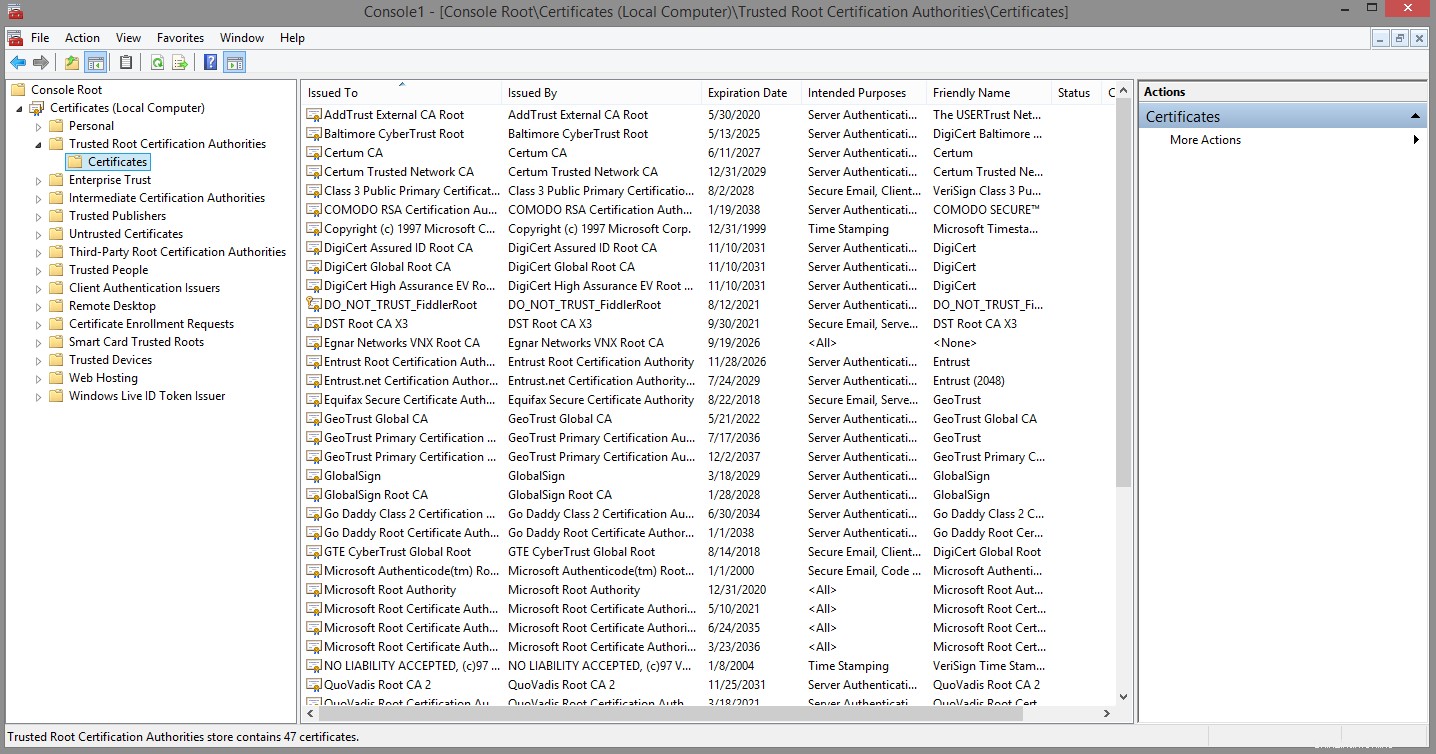
-
アクションから メニューで、すべてのタスクを選択します インポートをクリックします 証明書のインポートウィザードを表示します。 次へをクリックします イントロダクションを通過します。
-
インポートするファイル 画面で、参照を押します ボタンをクリックし、ファイルタイプを「X.509証明書( .cer; 」から変更してください。 .crt)」から「すべてのファイル(。 )」をクリックし、
ca-cert.pemを選択します 保存したファイル。次に、[次へ]をクリックします 。 -
証明書ストアを確認してください 信頼されたルート証明機関に設定されている 、[次へ]をクリックします 。
-
完了をクリックします 証明書をインポートします。
次に、次の手順でVPNを構成します。
- コントロールパネルを起動します 、次にネットワークと共有センターに移動します 。
- 新しい接続またはネットワークのセットアップをクリックします 、次に職場に接続を選択します 。
- [インターネット接続(VPN)を使用する]を選択します 。
- VPNサーバーの詳細を入力します。 インターネットアドレスにサーバーのドメイン名またはIPアドレスを入力します フィールドに入力し、宛先名に入力します VPN接続を説明するものを使用します。次に、[完了]をクリックします 。
PowerShellを使用してルートCA証明書をインポートするには、最初に管理者権限でPowerShellプロンプトを開きます。これを行うには、[スタート]メニューアイコンを右クリックして、[ Windows PowerShell(管理者)]を選択します。 。管理者としてコマンドプロンプトを開き、 powershellと入力することもできます。 。
次に、 Import-Certificateを使用して証明書をインポートします PowerShellコマンドレット。次のコマンドでは、最初の -CertStoreLocation 引数を指定すると、証明書がコンピュータの信頼されたルート証明機関に確実にインポートされます。 すべてのプログラムとユーザーがVPNサーバーの証明書を確認できるように保存します。 -FilePath 引数は、証明書をコピーした場所を指している必要があります。次の例では、パスは C:\ Users \ sammy \ Documents \ ca-cert.pemです。 。使用した場所に一致するようにコマンドを編集してください。
- Import-Certificate `
- -CertStoreLocation cert:\LocalMachine\Root\ `
- -FilePath C:\users\sammy\Documents\ca-cert.pem
コマンドは次のようなものを出力します:
Output   PSParentPath: Microsoft.PowerShell.Security\Certificate::LocalMachine\Root

Thumbprint                                Subject
----------                                -------
DB00813B4087E9367861E8463A60CEA0ADC5F002  CN=VPN root CA
ここで、PowerShellを使用してVPNを構成するには、次のコマンドを実行します。 -ServerAddressでサーバーのDNS名またはIPアドレスを置き換えます ライン。さまざまなフラグにより、 /etc/ipsec.confで設定したオプションと一致する適切なセキュリティパラメータを使用してWindowsが正しく構成されていることが保証されます。 。
- Add-VpnConnection -Name "VPN Connection" `
- -ServerAddress "server_domain_or_IP" `
- -TunnelType "IKEv2" `
- -AuthenticationMethod "EAP" `
- -EncryptionLevel "Maximum" `
- -RememberCredential `
コマンドが成功した場合、出力はありません。 VPNが正しく構成されていることを確認するには、 Get-VPNConnectionを使用します コマンドレット:
- Get-VpnConnection -Name "VPN Connection"
次のような出力が表示されます:
OutputName                  : VPN Connection
ServerAddress         : your_server_ip
AllUserConnection     : False
Guid                  : {B055A1AB-175C-4028-B4A8-D34309A2B20E}
TunnelType            : Ikev2
AuthenticationMethod  : {Eap}
EncryptionLevel       : Maximum
L2tpIPsecAuth         :
UseWinlogonCredential : False
EapConfigXmlStream    : #document
ConnectionStatus      : Disconnected
RememberCredential    : True
SplitTunneling        : False
DnsSuffix             :
IdleDisconnectSeconds : 0
デフォルトでは、Windowsは古くて遅いアルゴリズムを選択します。 Set-VpnConnectionIPsecConfigurationを実行します cmdlet to upgrade the encryption parameters that Windows will use for the IKEv2 key exchange, and to encrypt packets:
- Set-VpnConnectionIPsecConfiguration -Name "VPN Connection" `
- -AuthenticationTransformConstants GCMAES256 `
- -CipherTransformConstants GCMAES256 `
- -DHGroup ECP384 `
- -IntegrityCheckMethod SHA384 `
- -PfsGroup ECP384 `
- -EncryptionMethod GCMAES256
注 :If you would like to delete the VPN connection and reconfigure it with different options, you can run the Remove-VpnConnection cmdlet.
- Remove-VpnConnection -Name "VPN Connection" -Force
The -Force flag will skip prompting you to confirm the removal. You must be disconnected from the VPN if you attempt to remove it using this command.
Connecting to the VPN
Once you have the certificate imported and the VPN configured using either method, your new VPN connection will be visible under the list of networks. Select the VPN and click Connect 。 You’ll be prompted for your username and password. Type them in, click OK , and you’ll be connected.
Connecting from macOS
Follow these steps to import the certificate:
- Double-click the certificate file. Keychain Access will pop up with a dialog that says “Keychain Access is trying to modify the system keychain. Enter your password to allow this.”
- Enter your password, then click on Modify Keychain
- Double-click the newly imported VPN certificate. This brings up a small properties window where you can specify the trust levels. Set IP Security (IPSec) to Always Trust and you’ll be prompted for your password again. This setting saves automatically after entering the password.
Now that the certificate is imported and trusted, configure the VPN connection with these steps:
- Go to System Preferences and choose Network 。
- Click on the small “plus” button on the lower-left of the list of networks.
- In the popup that appears, set Interface to VPN , set the VPN Type to IKEv2 , and give the connection a name.
- In the Server and Remote ID field, enter the server’s domain name or IP address. Leave the Local ID blank.
- Click on Authentication Settings , select Username , and enter your username and password you configured for your VPN user.次に、[ OK]をクリックします 。
Finally, click on Connect to connect to the VPN. You should now be connected to the VPN.
Connecting from Ubuntu
To connect from an Ubuntu machine, you can set up and manage StrongSwan as a service or use a one-off command every time you wish to connect. Instructions are provided for both.
Managing StrongSwan as a Service
To manage StrongSwan as a service, you will need to perform the following configuration steps.
First, update your local package cache using apt
- sudo apt update
Next, install StrongSwan and the required plugins for authentication:
- sudo apt install strongswan libcharon-extra-plugins
Now you’ll need a copy of the CA certificate in the /etc/ipsec.d/cacerts directory so that your client can verify the server’s identity. Run the following command to copy the ca-cert.pem file into place:
- sudo cp /tmp/ca-cert.pem /etc/ipsec.d/cacerts
To ensure the VPN only runs on demand, use systemctl to disable StrongSwan from running automatically:
- sudo systemctl disable --now strongswan-starter
Next configure the username and password that you will use to authenticate to the VPN server. Edit /etc/ipsec.secrets using nano or your preferred editor:
- sudo nano /etc/ipsec.secrets
Add the following line, editing the highlighted username and password values to match the ones that you configured on the server:
/etc/ipsec.secretsyour_username : EAP "your_password"
Finally, edit the /etc/ipsec.conf file to configure your client to match the server’s configuration:
config setup

conn ikev2-rw
    right=server_domain_or_IP
    # This should match the `leftid` value on your server's configuration
    rightid=server_domain_or_IP
    rightsubnet=0.0.0.0/0
    rightauth=pubkey
    leftsourceip=%config
    leftid=username
    leftauth=eap-mschapv2
    eap_identity=%identity
    auto=start
To connect to the VPN, type:
- sudo systemctl start strongswan-starter
To disconnect again, type:
- sudo systemctl stop strongswan-starter
Using the charon-cmd Client for One-Off Connections
To manage StrongSwan as a service, you will need to perform the following configuration steps.
First, update your local package cache using apt
- sudo apt update
Next, install StrongSwan and the required plugins for authentication:
- sudo apt install strongswan libcharon-extra-plugins
Now you’ll need a copy of the CA certificate in the /etc/ipsec.d/cacerts directory so that your client can verify the server’s identity. Run the following command to copy the ca-cert.pem file into place:
- sudo cp /tmp/ca-cert.pem /etc/ipsec.d/cacerts
At this point you can connect to the VPN server with charon-cmd using the server’s CA certificate, the VPN server’s IP address, and the username you configured.
Run the following command whenever you want to connect to the VPN:
- sudo charon-cmd --cert ca-cert.pem --host vpn_domain_or_IP --identity your_username
When prompted, provide the VPN user’s password and you will be connected to the VPN. To disconnect, press CTRL+C in the terminal and wait for the connection to close.
Connecting from iOS
To configure the VPN connection on an iOS device, follow these steps:
- Send yourself an email with the root certificate attached.
- Open the email on your iOS device and tap on the attached certificate file, then tap Install and enter your passcode. Once it installs, tap Done 。
- Go to Settings , General , VPN and tap Add VPN Configuration 。 This will bring up the VPN connection configuration screen.
- Tap on Type and select IKEv2 。
- In the Description field, enter a short name for the VPN connection. This could be anything you like.
- In the Server and Remote ID field, enter the server’s domain name or IP address. The Local ID field can be left blank.
- Enter your username and password in the Authentication section, then tap Done 。
- Select the VPN connection that you just created, tap the switch on the top of the page, and you’ll be connected.
Connecting from Android
Follow these steps to import the certificate:
- Send yourself an email with the CA certificate attached. Save the CA certificate to your downloads folder.
- Download the StrongSwan VPN client from the Play Store.
- Open the app. Tap the “more” icon (. . . ) in the upper-right corner and select CA certificates 。
- Tap the “more” icon (. . . ) in the upper-right corner again. Select Import certificate 。
- Browse to the CA certificate file in your downloads folder and select it to import it into the app.
Now that the certificate is imported into the StrongSwan app, you can configure the VPN connection with these steps:
- In the app, tap ADD VPN PROFILE at the top.
- Fill out the Server with your VPN server’s domain name or public IP address.
- Make sure IKEv2 EAP (Username/Password) is selected as the VPN Type.
- Fill out the Username and Password with the credentials you defined on the server.
- Deselect Select automatically in the CA certificate section and click Select CA certificate 。
- Tap the IMPORTED tab at the top of the screen and choose the CA you imported (it will be named “VPN root CA” if you didn’t change the “DN” earlier).
- If you’d like, fill out Profile name (optional) with a more descriptive name.
When you wish to connect to the VPN, click on the profile you just created in the StrongSwan application.
Troubleshooting Connections
If you are unable to import the certificate, ensure the file has the .pem extension, and not .pem.txt 。
If you’re unable to connect to the VPN, check the server name or IP address you used. The server’s domain name or IP address must match what you’ve configured as the common name (CN) while creating the certificate. If they don’t match, the VPN connection won’t work. For example, if you set up a certificate with the CN of vpn.example.com , you must use vpn.example.com when you enter the VPN server details. Double-check the command you used to generate the certificate, and the values you used when creating your VPN connection.
Finally, double-check the VPN configuration to ensure the leftid value is configured with the @ symbol if you’re using a domain name:
leftid=@vpn.example.com
If you’re using an IP address, ensure that the @ symbol is omitted. Also make sure that when you generated the server-cert.pem file that you included both --san @IP_address and --san IP_address フラグ。
In this tutorial, you’ve built a VPN server that uses the IKEv2 protocol. You learned about the directives that control the left and right sides of a connection on both server and clients. You also configured a Windows, macOS, iOS, Android, or Linux client to connect to the VPN.
To add or remove users, skip to Step 5 again. Each line in /etc/ipsec.secrets is for one user, so adding or removing users, or changing passwords just requires editing the file.
Now you can be assured that your online activities will remain secure wherever you go and with any device that you use to access the internet.