パーフェクトサーバー-CentOS6.3x86_64(Apache2、Dovecot、ISPConfig 3)
このチュートリアルでは、ISPConfig3のインストール用にCentOS6.3 x86_64サーバーを準備する方法と、ISPConfig3をインストールする方法を示します。ISPConfig3は、Webブラウザーを介して次のサービスを構成できるWebホスティングコントロールパネルです。ApacheWebサーバー、Postfixメールサーバー、MySQL、BINDネームサーバー、PureFTPd、SpamAssassin、ClamAV、Mailman、その他多数。バージョン3.0.4以降、ISPConfigには、Apacheに加えてnginxWebサーバーの完全なサポートが付属しています。このチュートリアルでは、nginxではなくApacheを使用するサーバーのセットアップについて説明します。
この設定はISPConfig2では機能しないことに注意してください ! ISPConfig3でのみ有効です。
これがあなたのために働くという保証はありません!
ISPConfig3マニュアル
ISPConfig 3の使用方法を学ぶために、ISPConfig3マニュアルをダウンロードすることを強くお勧めします。
300ページ以上で、ISPConfig(管理者、再販業者、クライアント)の背後にある概念をカバーし、ISPConfig 3をインストールおよび更新する方法を説明し、有効な入力の例とともにISPConfigのすべてのフォームとフォームフィールドのリファレンスを含み、チュートリアルを提供しますISPConfig 3の最も一般的なタスクについても説明します。また、サーバーをより安全にする方法を示し、最後にトラブルシューティングのセクションがあります。
Android用ISPConfigモニターアプリ
ISPConfig Monitor Appを使用すると、サーバーのステータスを確認し、すべてのサービスが期待どおりに実行されているかどうかを確認できます。 TCPおよびUDPポートを確認し、サーバーにpingを実行できます。さらに、このアプリを使用して、ISPConfigがインストールされているサーバーに詳細を要求できます(ISPConfigモニターアプリをサポートするインストール済みのISPConfig3の最小バージョンは3.0.3.3です! );これらの詳細には、ISPConfigコントロールパネルのモニターモジュールから知っているすべてのもの(サービス、メールとシステムのログ、メールキュー、CPUとメモリの情報、ディスク使用量、クォータ、OSの詳細、RKHunterログなど)が含まれます。 、ISPConfigはマルチサーバー対応であるため、ISPConfigマスターサーバーから制御されているすべてのサーバーを確認できます。
ダウンロードと使用方法については、http://www.ispconfig.org/ispconfig-3/ispconfig-monitor-app-for-android/にアクセスしてください。
1要件
このようなシステムをインストールするには、次のものが必要です。
- 隣のミラーから2枚のCentOS6.3DVDをダウンロードします(ミラーのリストはここにあります:http://isoredirect.centos.org/centos/6/isos/x86_64/)。
- 高速インターネット接続。
2予備メモ
このチュートリアルでは、ホスト名server1.example.comとIPアドレス192.168.0.100およびゲートウェイ192.168.0.1を使用します。これらの設定はユーザーによって異なる場合があるため、必要に応じて置き換える必要があります。
3ベースシステムのインストール
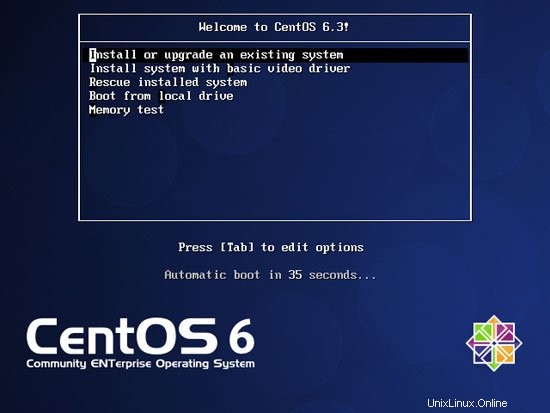
最初のCentOS6.3DVD(DVD 1)から起動します。 [既存のシステムのインストールまたはアップグレード]を選択します:
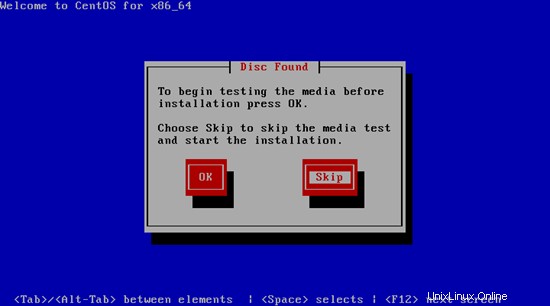
インストールメディアのテストには長い時間がかかる可能性があるため、ここではこのテストをスキップします:
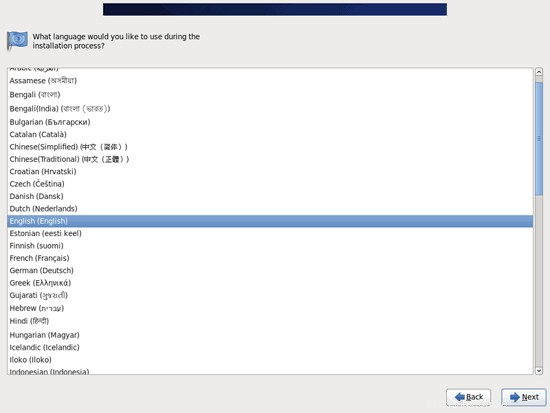
CentOSインストーラーのウェルカム画面が表示されます。 [次へ]をクリックします:

次に言語を選択してください:
キーボードレイアウトを選択します:

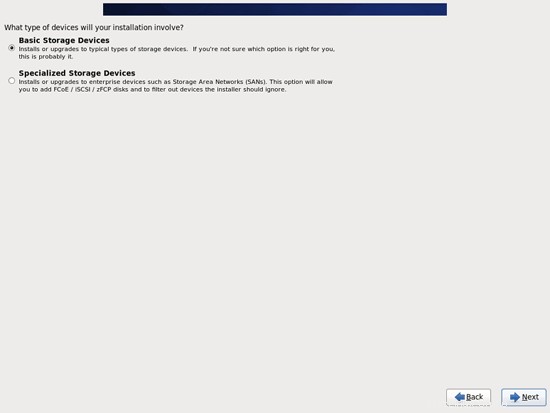
ローカルに接続されたハードドライブを使用していると想定しているため、ここで基本ストレージデバイスを選択する必要があります:
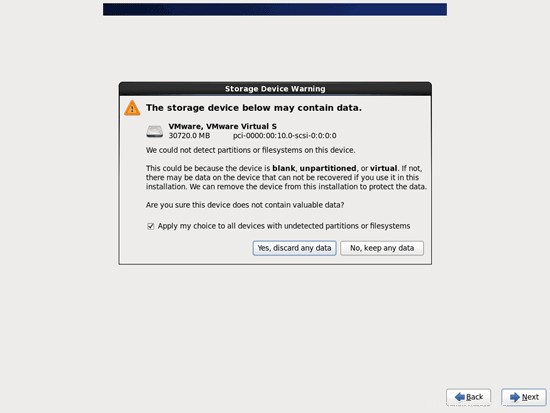
次の警告が表示される場合があります-ドライブの処理中にエラーが発生しました。これが表示された場合は、[すべて再初期化]ボタンをクリックして続行します。
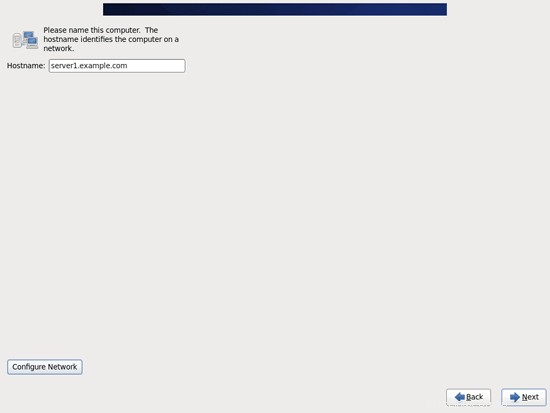
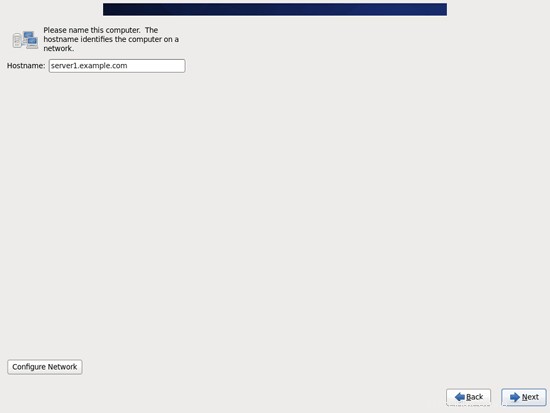
サーバーのホスト名(例:server1.example.com)を入力し、[ネットワークの構成]ボタンをクリックします。
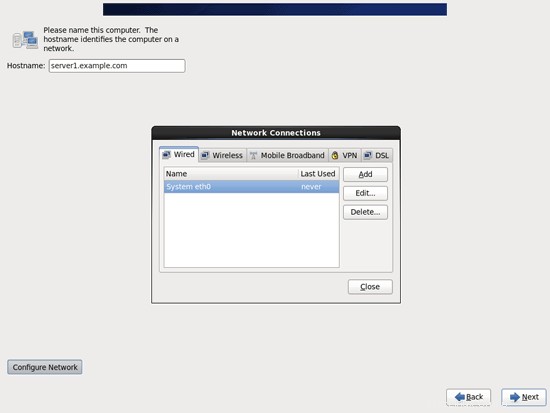
[有線]タブに移動し、ネットワークインターフェイス(おそらくeth0)を選択して、[編集...]をクリックします。:
[自動的に接続する]チェックボックスをオンにして、[IPv4設定]タブに移動し、[方法]ドロップダウンメニューで[手動]を選択します。 [DNSサーバー]フィールド(例:8.8.8.8、8.8.4.4)に1つ、2つ、または3つのネームサーバー(コンマで区切って)を入力し、[アドレス]領域の横にある[追加]ボタンをクリックします。
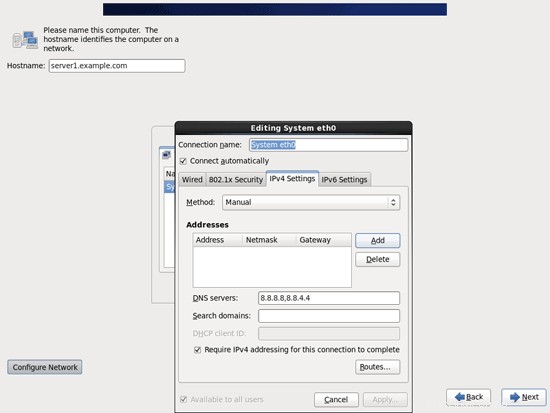
次に、ネットワークカードに静的IPアドレスとネットマスクを指定します(このチュートリアルでは、デモンストレーションの目的でIPアドレス192.168.0.100とネットマスク255.255.255.0を使用しています。正しい値がわからない場合は、http://www。サブネットマスク.infoが役立つ場合があります)。また、ゲートウェイ(192.168.0.1など)に入力して、[適用...]ボタンをクリックします:
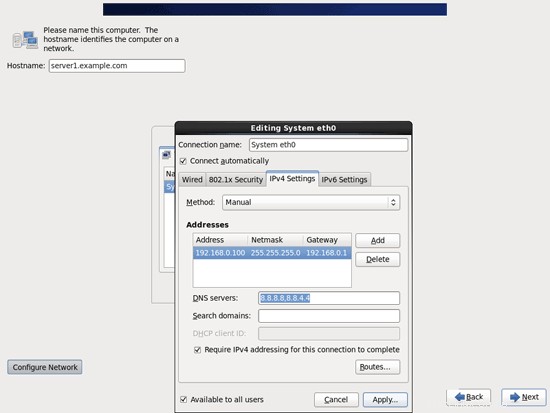
これでネットワーク構成は完了です。 [次へ]ボタンをクリックします:
完璧なサーバー-CentOS6.3x86_64(Apache2、Dovecot、ISPConfig 3)-ページ2
4 / etc/hostsを調整します
次に、/ etc/hostsを編集します。次のようにします:
vi /etc/hosts
127.0.0.1 localhost localhost.localdomain localhost4 localhost4.localdomain4 192.168.0.100 server1.example.com server1 ::1 localhost localhost.localdomain localhost6 localhost6.localdomain6 |
5ファイアウォールの構成
(基本的なシステムインストールの最後にファイアウォールをすでに無効にしている場合は、この章をスキップできます。)
このチュートリアルの最後に、独自のファイアウォールが付属しているISPConfigをインストールしたいと思います。そのため、今はデフォルトのCentOSファイアウォールを無効にしています。もちろん、そのままにして、必要に応じて構成することもできます(ただし、CentOSファイアウォールに干渉する可能性が高いため、後で他のファイアウォールを使用しないでください)。
実行
system-config-firewall
ファイアウォールを無効にします。
ファイアウォールが実際に無効になっていることを確認するには、
を実行できます。iptables -L
その後。出力は次のようになります。
[example@unixlinux.online〜]#iptables -L
Chain INPUT(policy ACCEPT)
target prot opt source destination
Chain FORWARD(policy ACCEPT)
target prot opt source destination
Chain OUTPUT(policy ACCEPT)
target prot opt source destination
[example@unixlinux.online〜]#
6SELinuxを無効にする
SELinuxはCentOSのセキュリティ拡張であり、拡張セキュリティを提供する必要があります。私の意見では、安全なシステムを構成するためにそれを必要とせず、通常、利点よりも多くの問題を引き起こします(一部のサービスが期待どおりに機能しなかったため、1週間のトラブルシューティングを行った後、それを考えてください。すべてが問題ないことを確認してください。SELinuxのみが問題を引き起こしていました)。したがって、無効にします(後でISPConfigをインストールする場合は必須です)。
/ etc / selinux / configを編集し、SELINUX =disableを設定します:
vi /etc/selinux/config
# This file controls the state of SELinux on the system. # SELINUX= can take one of these three values: # enforcing - SELinux security policy is enforced. # permissive - SELinux prints warnings instead of enforcing. # disabled - No SELinux policy is loaded. SELINUX=disabled # SELINUXTYPE= can take one of these two values: # targeted - Targeted processes are protected, # mls - Multi Level Security protection. SELINUXTYPE=targeted |
その後、システムを再起動する必要があります:
reboot
7追加のリポジトリを有効にして、いくつかのソフトウェアをインストールする
まず、ソフトウェアパッケージのGPGキーをインポートします:
rpm --import /etc/pki/rpm-gpg/RPM-GPG-KEY*
次に、CentOSシステムでRPMforgeおよびEPELリポジトリを有効にします。これは、このチュートリアルの過程でインストールするパッケージの多くが、公式のCentOS6.3リポジトリでは利用できないためです。
rpm --import http://dag.wieers.com/rpm/packages/RPM-GPG-KEY.dag.txt
cd / tmp
wget http://pkgs.repoforge.org/rpmforge-release/rpmforge-release-0.5.2-2.el6.rf.x86_64.rpm
rpm -ivh rpmforge-release- 0.5.2-2.el6.rf.x86_64.rpm
(上記のリンクが機能しなくなった場合は、rpmforge-releaseの現在のバージョンをここで見つけることができます:http://packages.sw.be/rpmforge-release/)
rpm --import https://fedoraproject.org/static/0608B895.txt
wgethttp://dl.fedoraproject.org/pub/epel/6/x86_64/epel-release-6-7.noarch。 rpm
rpm -ivh epel-release-6-7.noarch.rpm
yum install yum-priorities
/etc/yum.repos.d/epel.repoを編集します...
vi /etc/yum.repos.d/epel.repo
...そして[epel]セクションにpriority=10という行を追加します:
[epel] name=Extra Packages for Enterprise Linux 6 - $basearch #baseurl=http://download.fedoraproject.org/pub/epel/6/$basearch mirrorlist=https://mirrors.fedoraproject.org/metalink?repo=epel-6&arch=$basearch failovermethod=priority enabled=1 priority=10 gpgcheck=1 gpgkey=file:///etc/pki/rpm-gpg/RPM-GPG-KEY-EPEL-6 [...] |
次に、システム上の既存のパッケージを更新します。
yum update
次に、後で必要になるいくつかのソフトウェアパッケージをインストールします。
yum groupinstall 'Development Tools'
8クォータ
(私が行ったのとは異なるパーティションスキームを選択した場合は、この章を調整して、必要なパーティションにクォータが適用されるようにする必要があります。)
クォータをインストールするには、次のコマンドを実行します:
yum install quota
/ etc / fstabを編集し、、usrjquota =aquota.user、grpjquota =aquota.group、jqfmt =vfsv0を/パーティション(/ dev / mapper / vg_server1-lv_root)に追加します。
vi /etc/fstab
# # /etc/fstab # Created by anaconda on Wed Jul 11 17:52:57 2012 # # Accessible filesystems, by reference, are maintained under '/dev/disk' # See man pages fstab(5), findfs(8), mount(8) and/or blkid(8) for more info # /dev/mapper/vg_server1-lv_root / ext4 defaults,usrjquota=aquota.user,grpjquota=aquota.group,jqfmt=vfsv0 1 1 UUID=806910a1-dbdf-4746-bd94-cbe73ce81493 /boot ext4 defaults 1 2 /dev/mapper/vg_server1-lv_swap swap swap defaults 0 0 tmpfs /dev/shm tmpfs defaults 0 0 devpts /dev/pts devpts gid=5,mode=620 0 0 sysfs /sys sysfs defaults 0 0 proc /proc proc defaults 0 0 |
次に実行します
mount -o remount /
quotacheck -avugm
quote-avug
クォータを有効にします。
9 Apache、MySQL、phpMyAdminをインストールします
1つのコマンドで必要なパッケージをインストールできます:
yum install ntp httpd mod_ssl mysql-server php php-mysql php-mbstring phpmyadmin
10Dovecotをインストールする
Dovecotは次のようにインストールできます:
yum install dovecot dovecot-mysql
次に、システムの起動リンクを作成し、Dovecotを起動します。
chkconfig --levels 235 dovecot on
/etc/init.d/dovecot start
11Postfixをインストール
Postfixは次のようにインストールできます:
yum install postfix
次に、Sendmailをオフにして、PostfixとMySQLを起動します。
chkconfig --levels 235 mysqld on
/etc/init.d/mysqld start
chkconfig --levels 235 sendmail off
chkconfig --levels 235 postfix on
/etc/init.d/sendmail stop
/etc/init.d/postfix restart
12Getmailをインストール
Getmailは次のようにインストールできます:
yum install getmail
完璧なサーバー-CentOS6.3x86_64(Apache2、Dovecot、ISPConfig 3)-4ページ
13MySQLパスワードの設定とphpMyAdminの構成
MySQLルートアカウントのパスワードを設定します:
mysql_secure_installation
[example@unixlinux.online tmp]#mysql_secure_installation
注:このスクリプトのすべての部分を実行することは、本番環境のすべてのMySQLに推奨されます
使用する!各ステップを注意深くお読みください。
MySQLにログインしてセキュリティで保護するには、rootユーザーの現在の
パスワードが必要です。 MySQLをインストールしたばかりで、
rootパスワードをまだ設定していない場合、パスワードは空白になります。
ここで、Enterキーを押すだけです。
Enter rootの現在のパスワード(noneの場合は入力):
OK、正常に使用されたパスワード、次に進みます...
rootパスワードを設定すると、誰もMySQLにログインできないようになります
root適切な権限のないユーザー。
rootパスワードを設定しますか? [Y / n] <-ENTER
新しいパスワード:<-yourrootsqlpassword
新しいパスワードを再入力:<-yourrootsqlpassword
パスワードが正常に更新されました!
特権テーブルを再読み込みしています。 。
...成功!
デフォルトでは、MySQLのインストールには匿名のユーザーが含まれているため、ユーザーアカウントを持たなくても誰でもMySQLにログインできます。
それらのために作成されました。これは、テストのみを目的としており、インストールを
少しスムーズにすることを目的としています。
本番環境に移動する前に、それらを削除する必要があります。
匿名ユーザーを削除しますか? [Y / n] <-ENTER
...成功!
通常、rootは「localhost」からの接続のみを許可する必要があります。これにより、
誰かが、ネットワークからのルートパスワードを推測できないようになります。
ルートログインをリモートで禁止しますか? [Y / n] <-ENTER
...成功!
デフォルトでは、MySQLには「test」という名前のデータベースが付属しており、誰でもアクセスできます。
これもテストのみを目的としており、
本番環境に移動する前に削除する必要があります。
テストデータベースを削除して、データベースにアクセスしますか? [Y / n] <-ENTER
-テストデータベースを削除しています...
...成功しました!
-テストデータベースの特権を削除しています...
...成功しました!
特権テーブルを再読み込みすると、これまでに行われたすべての変更が
すぐに有効になります。
特権テーブルを今すぐ再読み込みしますか? [Y / n] <-ENTER
...成功!
クリーンアップ...
すべて完了しました!上記のすべての手順を完了した場合、MySQLのインストールは安全になっているはずです。
MySQLをご利用いただきありがとうございます。
[example @ unixlinux.online tmp]#
次に、phpMyAdminを設定します。 phpMyAdminがローカルホストからだけでなく接続を許可するようにApache構成を変更します(
vi /etc/httpd/conf.d/phpmyadmin.conf
# # Web application to manage MySQL # #<Directory "/usr/share/phpmyadmin"> # Order Deny,Allow # Deny from all # Allow from 127.0.0.1 #</Directory> Alias /phpmyadmin /usr/share/phpmyadmin Alias /phpMyAdmin /usr/share/phpmyadmin Alias /mysqladmin /usr/share/phpmyadmin |
次に、phpMyAdminの認証をcookieからhttp:
に変更します。vi /usr/share/phpmyadmin/config.inc.php
[...] /* Authentication type */ $cfg['Servers'][$i]['auth_type'] = 'http'; [...] |
次に、Apacheのシステム起動リンクを作成して起動します:
chkconfig --levels 235 httpd on
/etc/init.d/httpd start
これで、ブラウザをhttp://server1.example.com/phpmyadmin/またはhttp://192.168.0.100/phpmyadmin/に誘導し、ユーザー名rootと新しいrootMySQLパスワードでログインできます。
14 Amavisd-new、SpamAssassin、ClamAVをインストール
amavisd-new、spamassassin、およびclamavをインストールするには、次のコマンドを実行します。
yum install amavisd-new spamassassin clamav clamd unzip bzip2 unrar perl-DBD-mysql
次に、freshclam、amavisd、およびclamd.amavisdを開始します:
sa-update
chkconfig --levels 235 amavisd on
chkconfig --del clamd
chkconfig --levels 235 clamd.amavisd on
/ usr / bin / freshclam
/etc/init.d/amavisd start
/etc/init.d/clamd.amavisd start
15 mod_php、mod_fcgi / PHP5、およびsuPHPを使用したApache2のインストール
ISPConfig 3を使用すると、Webサイトごとにmod_php、mod_fcgi / PHP5、cgi / PHP5、およびsuPHPを使用できます。
次のように、mod_php5、mod_fcgid、およびPHP5を使用してApache2をインストールできます。
yum install php php-devel php-gd php-imap php-ldap php-mysql php-odbc php-pear php-xml php-xmlrpc php-pecl-apc php-mbstring php-mcrypt php-mssql php-snmp php-soap php-tidy curl curl-devel perl-libwww-perl ImageMagick libxml2 libxml2-devel mod_fcgid php-cli httpd-devel
次に、/ etc/php.iniを開きます...
vi /etc/php.ini
...エラーレポートを変更して(通知が表示されなくなるように)、cgi.fix_pathinfo =1のコメントを解除します:
[...] ;error_reporting = E_ALL & ~E_DEPRECATED error_reporting = E_ALL & ~E_NOTICE [...] ; cgi.fix_pathinfo provides *real* PATH_INFO/PATH_TRANSLATED support for CGI. PHP's ; previous behaviour was to set PATH_TRANSLATED to SCRIPT_FILENAME, and to not grok ; what PATH_INFO is. For more information on PATH_INFO, see the cgi specs. Setting ; this to 1 will cause PHP CGI to fix its paths to conform to the spec. A setting ; of zero causes PHP to behave as before. Default is 1. You should fix your scripts ; to use SCRIPT_FILENAME rather than PATH_TRANSLATED. ; http://www.php.net/manual/en/ini.core.php#ini.cgi.fix-pathinfo cgi.fix_pathinfo=1 [...] |
次に、suPHPをインストールします(リポジトリにはmod_suphpパッケージがありますが、残念ながらISPConfigと互換性がないため、自分でsuPHPをビルドする必要があります):
cd / tmp
wget http://suphp.org/download/suphp-0.7.1.tar.gz
tar xvfz suphp-0.7.1.tar.gz
cd suphp-0.7 .1 /
./configure --prefix =/ usr --sysconfdir =/ etc --with-apr =/ usr / bin / apr-1-config --with-apxs =/ usr / sbin / apxs --with-apache-user =apache --with-setid-mode =owner --with-php =/ usr / bin / php-cgi --with-logfile =/ var / log / httpd / suphp_log --enable- SUPHP_USE_USERGROUP =yes
make
make install
次に、suPHPモジュールをApache構成に追加します...
vi /etc/httpd/conf.d/suphp.conf
LoadModule suphp_module modules/mod_suphp.so |
...そして次のようにファイル/etc/suphp.confを作成します:
vi /etc/suphp.conf
[global]
;Path to logfile
logfile=/var/log/httpd/suphp.log
;Loglevel
loglevel=info
;User Apache is running as
webserver_user=apache
;Path all scripts have to be in
docroot=/
;Path to chroot() to before executing script
;chroot=/mychroot
; Security options
allow_file_group_writeable=true
allow_file_others_writeable=false
allow_directory_group_writeable=true
allow_directory_others_writeable=false
;Check wheter script is within DOCUMENT_ROOT
check_vhost_docroot=true
;Send minor error messages to browser
errors_to_browser=false
;PATH environment variable
env_path=/bin:/usr/bin
;Umask to set, specify in octal notation
umask=0077
; Minimum UID
min_uid=100
; Minimum GID
min_gid=100

[handlers]
;Handler for php-scripts
x-httpd-suphp="php:/usr/bin/php-cgi"
;Handler for CGI-scripts
x-suphp-cgi="execute:!self"
> |
最後にApacheを再起動します:
/etc/init.d/httpd restart
15.1 Ruby
バージョン3.0.3以降、ISPConfig3にはRubyのサポートが組み込まれています。 ISPConfigは、CGI / FastCGIを使用する代わりに、サーバーのApacheで使用可能なmod_rubyに依存しています。
CentOS 6.3の場合、使用可能なmod_rubyパッケージがないため、自分でコンパイルする必要があります。まず、いくつかの前提条件をインストールします:
yum install httpd-devel ruby ruby-devel
次に、mod_rubyを次のようにダウンロードしてインストールします。
cd / tmp
wget http://modruby.net/archive/mod_ruby-1.3.0.tar.gz
tar zxvf mod_ruby-1.3.0.tar.gz
cd mod_ruby-1.3 .0 /
./configure.rb --with-apr-includes =/ usr / include / apr-1
make
make install
最後に、mod_rubyモジュールをApache構成に追加する必要があるため、ファイル/etc/httpd/conf.d/ruby.conf ...
を作成します。vi /etc/httpd/conf.d/ruby.conf
LoadModule ruby_module modules/mod_ruby.so RubyAddPath /1.8 |
...そしてApacheを再起動します:
/etc/init.d/httpd restart
(RubyAddPath /1.8ディレクティブを省略すると、Rubyファイルを呼び出すときにApacheのエラーログに次のようなエラーが表示されます。
[2011年5月26日木曜日02:05:05][エラー]mod_ruby:ruby:0:in `require':ロードするファイルがありません--apache / ruby-run(LoadError)
[2011年5月26日木曜日02: 2011年5月5日][エラー]mod_ruby:apache /ruby-runを要求できませんでした
[2011年5月26日木曜日02:05:05][エラー]mod_ruby:ルビーのエラー
)
15.2 Python
mod_pythonをインストールするには、単に実行します...
yum install mod_python
...その後Apacheを再起動します:
/etc/init.d/httpd restart
15.3 WebDAV
WebDAVはすでに有効になっているはずですが、これを確認するには、/ etc / httpd / conf / httpd.confを開き、次の3つのモジュールがアクティブになっていることを確認してください。
vi /etc/httpd/conf/httpd.conf
[...] LoadModule auth_digest_module modules/mod_auth_digest.so [...] LoadModule dav_module modules/mod_dav.so [...] LoadModule dav_fs_module modules/mod_dav_fs.so [...] |
/etc/httpd/conf/httpd.confを変更する必要がある場合は、後でApacheを再起動することを忘れないでください:
/etc/init.d/httpd restart
16PureFTPdをインストールします
PureFTPdは、次のコマンドでインストールできます。
yum install pure-ftpd
次に、システム起動リンクを作成し、PureFTPdを起動します。
chkconfig --levels 235 pure-ftpd on
/etc/init.d/pure-ftpd start
次に、FTPおよびTLSセッションを許可するようにPureFTPdを構成します。 FTPは、すべてのパスワードとすべてのデータがクリアテキストで転送されるため、非常に安全でないプロトコルです。 TLSを使用することで、通信全体を暗号化できるため、FTPの安全性が大幅に向上します。
TLSにはOpenSSLが必要です。 OpenSSLをインストールするには、次のコマンドを実行するだけです。
yum install openssl
/etc/pure-ftpd/pure-ftpd.confを開きます...
vi /etc/pure-ftpd/pure-ftpd.conf
FTPおよびTLSセッションを許可する場合は、TLSを1に設定します。
[...] # This option can accept three values : # 0 : disable SSL/TLS encryption layer (default). # 1 : accept both traditional and encrypted sessions. # 2 : refuse connections that don't use SSL/TLS security mechanisms, # including anonymous sessions. # Do _not_ uncomment this blindly. Be sure that : # 1) Your server has been compiled with SSL/TLS support (--with-tls), # 2) A valid certificate is in place, # 3) Only compatible clients will log in. TLS 1 [...] |
TLSを使用するには、SSL証明書を作成する必要があります。 / etc / ssl / private /に作成するので、最初にそのディレクトリを作成します:
mkdir -p /etc/ssl/private/
その後、次のようにSSL証明書を生成できます。
openssl req -x509 -nodes -days 7300 -newkey rsa:2048 -keyout /etc/ssl/private/pure-ftpd.pem -out /etc/ssl/private/pure-ftpd.pem
国名(2文字のコード)[XX]:<-国名を入力します(例:「DE」)。
州名または州名(フルネーム)[]:<-州名または州名を入力します。
地域名(例:都市)[デフォルトの都市]:<-都市を入力します。
組織名(例:会社)[デフォルトの会社株式会社]:<-組織名を入力します(例: 、会社名)。
組織単位名(例:セクション)[]:<-組織単位名(例:「IT部門」)を入力します。
一般名(例:名前またはサーバーのホスト名)[]:<-システムの完全修飾ドメイン名を入力します(例: "server1.example.com")。
メールアドレス[]:<-メールアドレスを入力します。
SSL証明書のアクセス許可を変更します:
chmod 600 /etc/ssl/private/pure-ftpd.pem
最後にPureFTPdを再起動します:
/etc/init.d/pure-ftpd restart
それでおしまい。これで、FTPクライアントを使用して接続を試みることができます。ただし、TLSを使用するようにFTPクライアントを構成する必要があります。
完璧なサーバー-CentOS6.3x86_64(Apache2、Dovecot、ISPConfig 3)-5ページ
17BINDのインストール
BINDは次のようにインストールできます:
yum install bind bind-utils
次に/etc/ sysconfig / named ...
を開きますvi /etc/sysconfig/named
...そして、ROOTDIR =/ var / named / chroot行がコメントアウトされていることを確認してください:
# BIND named process options # ~~~~~~~~~~~~~~~~~~~~~~~~~~ # Currently, you can use the following options: # # ROOTDIR="/var/named/chroot" -- will run named in a chroot environment. # you must set up the chroot environment # (install the bind-chroot package) before # doing this. # NOTE: # Those directories are automatically mounted to chroot if they are # empty in the ROOTDIR directory. It will simplify maintenance of your # chroot environment. # - /var/named # - /etc/pki/dnssec-keys # - /etc/named # - /usr/lib64/bind or /usr/lib/bind (architecture dependent) # # Those files are mounted as well if target file doesn't exist in # chroot. # - /etc/named.conf # - /etc/rndc.conf # - /etc/rndc.key # - /etc/named.rfc1912.zones # - /etc/named.dnssec.keys # - /etc/named.iscdlv.key # # Don't forget to add "$AddUnixListenSocket /var/named/chroot/dev/log" # line to your /etc/rsyslog.conf file. Otherwise your logging becomes # broken when rsyslogd daemon is restarted (due update, for example). # # OPTIONS="whatever" -- These additional options will be passed to named # at startup. Don't add -t here, use ROOTDIR instead. # # KEYTAB_FILE="/dir/file" -- Specify named service keytab file (for GSS-TSIG) # # DISABLE_ZONE_CHECKING -- By default, initscript calls named-checkzone # utility for every zone to ensure all zones are # valid before named starts. If you set this option # to 'yes' then initscript doesn't perform those # checks. |
既存の/etc/named.confファイルのバックアップを作成し、次のように新しいファイルを作成します。
cp /etc/named.conf /etc/named.conf_bak
cat / dev / null> /etc/named.conf
vi /etc/named.conf
//
// named.conf
//
// Provided by Red Hat bind package to configure the ISC BIND named(8) DNS
// server as a caching only nameserver (as a localhost DNS resolver only).
//
// See /usr/share/doc/bind*/sample/ for example named configuration files.
//
options {
        listen-on port 53 { any; };
        listen-on-v6 port 53 { any; };
        directory       "/var/named";
        dump-file       "/var/named/data/cache_dump.db";
        statistics-file "/var/named/data/named_stats.txt";
        memstatistics-file "/var/named/data/named_mem_stats.txt";
        allow-query     { any; };
        recursion no;
        allow-recursion { none; };
};
logging {
        channel default_debug {
                file "data/named.run";
                severity dynamic;
        };
};
zone "." IN {
        type hint;
        file "named.ca";
};
include "/etc/named.conf.local"; |
/etc/named.confの最後に含まれるファイル/etc/named.conf.localを作成します(ISPConfigでDNSゾーンを作成すると、後でISPConfigによって/etc/named.conf.localにデータが入力されます):
touch /etc/named.conf.local
次に、スタートアップリンクを作成し、BINDを開始します:
chkconfig --levels 235 named on
/etc/init.d/named start
18WebalizerとAWStatsをインストールする
WebalizerとAWStatsは次のようにインストールできます:
yum install webalizer awstats perl-DateTime-Format-HTTP perl-DateTime-Format-Builder
19Jailkitをインストールする
Jailkitは、SSHユーザーをchrootする場合にのみ必要です。次のようにインストールできます(重要:JailkitはISPConfigの前にインストールする必要があります-後でインストールすることはできません!):
cd / tmp
wget http://olivier.sessink.nl/jailkit/jailkit-2.15.tar.gz
tar xvfz jailkit-2.15.tar.gz
cd jailkit-2.15
./configure
make
make install
cd ..
rm -rf jailkit-2.15 *
20fail2banをインストール
これはオプションですが、ISPConfigモニターがログを表示しようとするため、推奨されます:
yum install fail2ban
ログファイル/var/log/fail2ban.logにログを記録するようにfail2banを設定する必要があります。これは、ISPConfigMonitorモジュールによって監視されるログファイルであるためです。 /etc/fail2ban/fail2ban.confを開きます...
vi /etc/fail2ban/fail2ban.conf
...そしてlogtarget=SYSLOG行をコメントアウトし、logtarget =/var/log/fail2ban.log:
を追加します。 [...] # Option: logtarget # Notes.: Set the log target. This could be a file, SYSLOG, STDERR or STDOUT. # Only one log target can be specified. # Values: STDOUT STDERR SYSLOG file Default: /var/log/fail2ban.log # #logtarget = SYSLOG logtarget = /var/log/fail2ban.log [...] |
次に、fail2banのシステム起動リンクを作成して開始します。
chkconfig --levels 235 fail2ban on
/etc/init.d/fail2ban start
21rkhunterをインストールする
rkhunterは次のようにインストールできます:
yum install rkhunter
22Mailmanのインストール
バージョン3.0.4以降、ISPConfigではMailmanメーリングリストを管理(作成/変更/削除)することもできます。この機能を利用する場合は、次のようにMailmanをインストールします。
yum install mailman
Mailmanを開始する前に、mailmanという最初のメーリングリストを作成する必要があります。
/usr/lib/mailman/bin/newlist mailman
[example@unixlinux.online tmp]#/ usr / lib / mailman / bin / newlist mailman
リストを実行している人のメールアドレスを入力します:<-admin email address、e.g. example@unixlinux.online
最初のメールマンパスワード:<-メールマンリストの管理者パスワード
メールリストの作成を完了するには、/ etc / aliases(または
同等の)ファイルを編集する必要があります次の行を追加し、場合によっては
`newaliases'プログラムを実行します。
## mailman mailing list
mailman:" | / usr / lib / mailman / mail / mailman post mailman"
mailman-admin: "|/usr/lib/mailman/mail/mailman admin mailman"
mailman-bounces: "|/usr/lib/mailman/mail/mailman bounces mailman"
mailman-confirm: "|/usr/lib/mailman/mail/mailman confirm mailman"
mailman-join: "|/usr/lib/mailman/mail/mailman join mailman"
mailman -leave: "|/usr/lib/mailman/mail/mailman leave mailman"
mailman-owner: "|/usr/lib/mailman/mail/mailman owner mailman"
mailman-request: " |/usr/lib/mailman/mail/mailman request mailman"
mailman-subscribe: "|/usr/lib/mailman/mail/mailman subscribe mailman"
mailma n-unsubscribe: "|/usr/lib/mailman/mail/mailman unsubscribe mailman"
Hit enter to notify mailman owner... <-- ENTER
[example@unixlinux.online tmp]#
Open /etc/aliases afterwards...
vi /etc/aliases
... and add the following lines:
[...] mailman: "|/usr/lib/mailman/mail/mailman post mailman" mailman-admin: "|/usr/lib/mailman/mail/mailman admin mailman" mailman-bounces: "|/usr/lib/mailman/mail/mailman bounces mailman" mailman-confirm: "|/usr/lib/mailman/mail/mailman confirm mailman" mailman-join: "|/usr/lib/mailman/mail/mailman join mailman" mailman-leave: "|/usr/lib/mailman/mail/mailman leave mailman" mailman-owner: "|/usr/lib/mailman/mail/mailman owner mailman" mailman-request: "|/usr/lib/mailman/mail/mailman request mailman" mailman-subscribe: "|/usr/lib/mailman/mail/mailman subscribe mailman" mailman-unsubscribe: "|/usr/lib/mailman/mail/mailman unsubscribe mailman" |
実行
newaliases
afterwards and restart Postfix:
/etc/init.d/postfix restart
Now open the Mailman Apache configuration file /etc/httpd/conf.d/mailman.conf...
vi /etc/httpd/conf.d/mailman.conf
... and add the line ScriptAlias /cgi-bin/mailman/ /usr/lib/mailman/cgi-bin/. Comment out Alias /pipermail/ /var/lib/mailman/archives/public/ and add the line Alias /pipermail /var/lib/mailman/archives/public/:
#
#  httpd configuration settings for use with mailman.
#
ScriptAlias /mailman/ /usr/lib/mailman/cgi-bin/
ScriptAlias /cgi-bin/mailman/ /usr/lib/mailman/cgi-bin/
<Directory /usr/lib/mailman/cgi-bin/>
    AllowOverride None
    Options ExecCGI
    Order allow,deny
    Allow from all
</Directory>

#Alias /pipermail/ /var/lib/mailman/archives/public/
Alias /pipermail /var/lib/mailman/archives/public/
<Directory /var/lib/mailman/archives/public>
    Options Indexes MultiViews FollowSymLinks
    AllowOverride None
    Order allow,deny
    Allow from all
    AddDefaultCharset Off
</Directory>
# Uncomment the following line, to redirect queries to /mailman to the
# listinfo page (recommended).
# RedirectMatch ^/mailman[/]*$ /mailman/listinfo |
Restart Apache:
/etc/init.d/httpd restart
Create the system startup links for Mailman and start it:
chkconfig --levels 235 mailman on
/etc/init.d/mailman start
After you have installed ISPConfig 3, you can access Mailman as follows:
You can use the alias /cgi-bin/mailman for all Apache vhosts (please note that suExec and CGI must be disabled for all vhosts from which you want to access Mailman!), which means you can access the Mailman admin interface for a list at http://
Under http://
The Perfect Server - CentOS 6.3 x86_64 (Apache2, Dovecot, ISPConfig 3) - Page 6
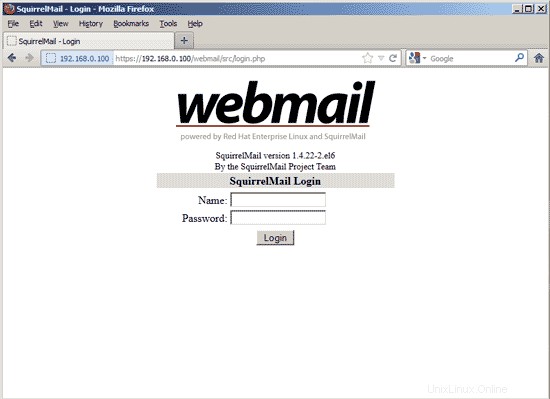
23 Install SquirrelMail
To install the SquirrelMail webmail client, run...
yum install squirrelmail
... and restart Apache:
/etc/init.d/httpd restart
Then configure SquirrelMail:
/usr/share/squirrelmail/config/conf.pl
We must tell SquirrelMail that we are using Dovecot:
SquirrelMail Configuration : Read: config.php (1.4.0)
---------------------------------------------------------
Main Menu --
1. Organization Preferences
2. Server Settings
3. Folder Defaults
4. General Options
5. Themes
6. Address Books
7. Message of the Day (MOTD)
8. Plugins
9. Database
10. Languages
D. Set pre-defined settings for specific IMAP servers
C Turn color off
S Save data
Q Quit
Command >> <-- D
SquirrelMail Configuration : Read: config.php
---------------------------------------------------------
While we have been building SquirrelMail, we have discovered some
preferences that work better with some servers that don't work so
well with others. If you select your IMAP server, this option will
set some pre-defined settings for that server.
Please note that you will still need to go through and make sure
everything is correct. This does not change everything. There are
only a few settings that this will change.
Please select your IMAP server:
bincimap = Binc IMAP server
courier = Courier IMAP server
cyrus = Cyrus IMAP server
dovecot = Dovecot Secure IMAP server
exchange = Microsoft Exchange IMAP server
hmailserver = hMailServer
macosx = Mac OS X Mailserver
mercury32 = Mercury/32
uw = University of Washington's IMAP server
gmail = IMAP access to Google mail (Gmail) accounts
quit = Do not change anything
Command >> <-- dovecot
SquirrelMail Configuration : Read: config.php
---------------------------------------------------------
While we have been building SquirrelMail, we have discovered some
preferences that work better with some servers that don't work so
well with others. If you select your IMAP server, this option will
set some pre-defined settings for that server.
Please note that you will still need to go through and make sure
everything is correct. This does not change everything. There are
only a few settings that this will change.
Please select your IMAP server:
bincimap = Binc IMAP server
courier = Courier IMAP server
cyrus = Cyrus IMAP server
dovecot = Dovecot Secure IMAP server
exchange = Microsoft Exchange IMAP server
hmailserver = hMailServer
macosx = Mac OS X Mailserver
mercury32 = Mercury/32
uw = University of Washington's IMAP server
gmail = IMAP access to Google mail (Gmail) accounts
quit = Do not change anything
Command >> courier
imap_server_type = courier
default_folder_prefix = INBOX.
trash_folder = Trash
sent_folder = Sent
draft_folder = Drafts
show_prefix_option = false
default_sub_of_inbox = false
show_contain_subfolders_option = false
optional_delimiter = .
delete_folder = true
Press enter to continue... <-- press ENTER
SquirrelMail Configuration : Read: config.php (1.4.0)
---------------------------------------------------------
Main Menu --
1. Organization Preferences
2. Server Settings
3. Folder Defaults
4. General Options
5. Themes
6. Address Books
7. Message of the Day (MOTD)
8. Plugins
9. Database
10. Languages
D. Set pre-defined settings for specific IMAP servers
C Turn color off
S Save data
Q Quit
Command >> <--S
SquirrelMail Configuration : Read: config.php (1.4.0)
---------------------------------------------------------
Main Menu --
1. Organization Preferences
2. Server Settings
3. Folder Defaults
4. General Options
5. Themes
6. Address Books
7. Message of the Day (MOTD)
8. Plugins
9. Database
10. Languages
D. Set pre-defined settings for specific IMAP servers
C Turn color off
S Save data
Q Quit
Command >> <--Q
One last thing we need to do is modify the file /etc/squirrelmail/config_local.php and comment out the $default_folder_prefix variable - if you don't do this, you will see the following error message in SquirrelMail after you've logged in:Query:CREATE "Sent" Reason Given:Invalid mailbox name.
vi /etc/squirrelmail/config_local.php
<?php /** * Local config overrides. * * You can override the config.php settings here. * Don't do it unless you know what you're doing. * Use standard PHP syntax, see config.php for examples. * * @copyright © 2002-2006 The SquirrelMail Project Team * @license http://opensource.org/licenses/gpl-license.php GNU Public License * @version $Id: config_local.php,v 1.2 2006/07/11 03:33:47 wtogami Exp $ * @package squirrelmail * @subpackage config */ //$default_folder_prefix = ''; ?> |
Now you can type in http://server1.example.com/webmail or http://192.168.0.100/webmail in your browser to access SquirrelMail.
24 Install ISPConfig 3
Download the current ISPConfig 3 version and install it. The ISPConfig installer will configure all services like Postfix, Dovecot, etc. for you. A manual setup as required for ISPConfig 2 is not necessary anymore.
You now also have the possibility to let the installer create an SSL vhost for the ISPConfig control panel, so that ISPConfig can be accessed using https:// instead of http://. To achieve this, just press ENTER when you see this question:Do you want a secure (SSL) connection to the ISPConfig web interface (y,n) [y]:.
To install ISPConfig 3 from the latest released version, do this:
cd /tmp
wget http://www.ispconfig.org/downloads/ISPConfig-3-stable.tar.gz
tar xfz ISPConfig-3-stable.tar.gz
cd ispconfig3_install/install/
The next step is to run
php -q install.php
This will start the ISPConfig 3 installer:
[example@unixlinux.online install]# php -q install.php
--------------------------------------------------------------------------------
_____ ___________ _____ __ _ ____
|_ _/ ___| ___ \ / __ \ / _(_) /__ \
| | \ `--.| |_/ / | / \/ ___ _ __ | |_ _ __ _ _/ /
| | `--. \ __/ | | / _ \| '_ \| _| |/ _` | |_ |
_| |_/\__/ / | | \__/\ (_) | | | | | | | (_| | ___\ \
\___/\____/\_| \____/\___/|_| |_|_| |_|\__, | \____/
__/ |
|___/
--------------------------------------------------------------------------------
>> Initial configuration
Operating System: Redhat or compatible, unknown version.
Following will be a few questions for primary configuration so be careful.
Default values are in [brackets] and can be accepted with
Tap in "quit" (without the quotes) to stop the installer.
Select language (en,de) [en]: <-- ENTER
Installation mode (standard,expert) [standard]: <-- ENTER
Full qualified hostname (FQDN) of the server, eg server1.domain.tld [server1.example.com]: <-- ENTER
MySQL server hostname [localhost]: <-- ENTER
MySQL root username [root]: <-- ENTER
MySQL root password []: <- - yourrootsqlpassword
MySQL database to create [dbispconfig]: <-- ENTER
MySQL charset [utf8]: <-- ENTER
Generating a 2048 bit RSA private key
..........................................................+++
................................+++
writing new private key to 'smtpd.key'
-----
You are about to be asked to enter information that will be incorporated
into your certificate request.
What you are about to enter is what is called a Distinguished Name or a DN.
There are quite a few fields but you can leave some blank
For some fields there will be a default value,
If you enter '.', the field will be left blank.
-----
Country Name (2 letter code) [XX]: <-- ENTER
State or Province Name (full name) []: <-- ENTER
Locality Name (eg, city) [Default City]: <-- ENTER
Organization Name (eg, company) [Default Company Ltd]: <-- ENTER
Organizational Unit Name (eg, section) []: <-- ENTER
Common Name (eg, your name or your server's hostname) []: <-- ENTER
Email Address []: <-- ENTER
Configuring Jailkit
Configuring Dovecot
Configuring Spamassassin
Configuring Amavisd
Configuring Getmail
Configuring Pureftpd
Configuring BIND
Configuring Apache
Configuring Vlogger
Configuring Apps vhost
Configuring Bastille Firewall
Configuring Fail2ban
Installing ISPConfig
ISPConfig Port [8080]: <-- ENTER
Do you want a secure (SSL) connection to the ISPConfig web interface (y,n) [y]: <-- ENTER
Generating RSA private key, 4096 bit long modulus
.....................++
.......++
e is 65537 (0x10001)
You are about to be asked to enter information that will be incorporated
into your certificate request.
What you are about to enter is what is called a Distinguished Name or a DN.
There are quite a few fields but you can leave some blank
For some fields the re will be a default value,
If you enter '.', the field will be left blank.
-----
Country Name (2 letter code) [XX]: <-- ENTER
State or Province Name (full name) []: <-- ENTER
Locality Name (eg, city) [Default City]: <-- ENTER
Organization Name (eg, company) [Default Company Ltd]: <-- ENTER
Organizational Unit Name (eg, section) []: <-- ENTER
Common Name (eg, your name or your server's hostname) []: <-- ENTER
Email Address []: <-- ENTER
Please enter the following 'extra' attributes
to be sent with your certificate request
A challenge password []: <-- ENTER
An optional company name []: <-- ENTER
writing RSA key
Configuring DBServer
Installing ISPConfig crontab
no crontab for root
no crontab for getmail
Restarting services ...
Stopping mysqld: [ OK ]
Starting mysqld: [ OK ]
Shutting down postfix: [ OK ]
Starting postfix: [ OK ]
Stopping saslauthd: [FAILED]
Starting saslauthd: [ OK ]
Waiting for the process [1424] to terminate
Shutting down amavisd: Daemon [1424] terminated by SIGTERM
[ OK ]
amavisd stopped
Starting amavisd: [ OK ]
Stopping clamd.amavisd: [ OK ]
Starting clamd.amavisd: [ OK ]
Stopping Dovecot Imap: [ OK ]
Starting Dovecot Imap: [ OK ]
Stopping httpd: [ OK ]
[Thu Jul 12 19:02:33 2012] [warn] NameVirtualHost *:80 has no VirtualH osts
Starting httpd: [ OK ]
Stopping pure-ftpd: [ OK ]
Starting pure-ftpd: [ OK ]
Installation completed.
[example@unixlinux.online install]#
To fix the Mailman errors you might get during the ISPConfig installation, open /usr/lib/mailman/Mailman/mm_cfg.py...
vi /usr/lib/mailman/Mailman/mm_cfg.py
... and set DEFAULT_SERVER_LANGUAGE ='en':
[...] #------------------------------------------------------------- # The default language for this server. DEFAULT_SERVER_LANGUAGE = 'en' [...] |
Restart Mailman:
/etc/init.d/mailman restart
Finally we need to tell Dovecot to use the dovecot.conf file generated by ISPConfig - /etc/dovecot.conf - and not the default /etc/dovecot/dovecot.conf:
cd /etc/dovecot
mv dovecot.conf dovecot.conf_orig
ln -s ../dovecot.conf dovecot.conf
/etc/init.d/dovecot restart
Afterwards you can access ISPConfig 3 under http(s)://server1.example.com:8080/ or http(s)://192.168.0.100:8080/ (http or https depends on what you chose during installation). Log in with the username admin and the password admin (you should change the default password after your first login):

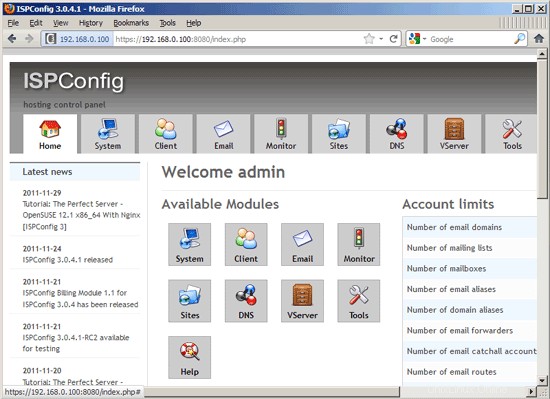
The system is now ready to be used.
24.1 ISPConfig 3 Manual
In order to learn how to use ISPConfig 3, I strongly recommend to download the ISPConfig 3 Manual.
On more than 300 pages, it covers the concept behind ISPConfig (admin, resellers, clients), explains how to install and update ISPConfig 3, includes a reference for all forms and form fields in ISPConfig together with examples of valid inputs, and provides tutorials for the most common tasks in ISPConfig 3. It also lines out how to make your server more secure and comes with a troubleshooting section at the end.
24.2 ISPConfig Monitor App For Android
With the ISPConfig Monitor App, you can check your server status and find out if all services are running as expected. You can check TCP and UDP ports and ping your servers. In addition to that you can use this app to request details from servers that have ISPConfig installed (please note that the minimum installed ISPConfig 3 version with support for the ISPConfig Monitor App is 3.0.3.3! ); these details include everything you know from the Monitor module in the ISPConfig Control Panel (e.g. services, mail and system logs, mail queue, CPU and memory info, disk usage, quota, OS details, RKHunter log, etc.), and of course, as ISPConfig is multiserver-capable, you can check all servers that are controlled from your ISPConfig master server.
For download and usage instructions, please visit http://www.ispconfig.org/ispconfig-3/ispconfig-monitor-app-for-android/.
25 Links
- CentOS:http://www.centos.org/
- ISPConfig:http://www.ispconfig.org/