この記事では、muninを使用して複数のシステムを監視する方法について説明します。 muninは、多くの構成を行わなくても、サーバーのほぼすべての側面(負荷平均、メモリ使用率、CPU使用率、MySQLスループット、eth0トラフィックなど)に関する気の利いた小さなグラフィックを生成します。監視対象のすべてのシステム(muninサーバー自体を含む)にmuninクライアントをインストールします。その後、muninクライアントはmuninサーバーに報告します。
このチュートリアルはDebianEtch向けに書かれていますが、設定はほとんど変更を加えずに他のディストリビューションにも適用されるはずです。
まず、このようなシステムを構築する方法はこれだけではありません。この目標を達成する方法はたくさんありますが、これが私のやり方です。これがあなたのために働くという保証はありません!
1予備メモ
muninサーバーのホスト名はserver1.example.com(IPアドレス:192.168.0.100)であり、ドキュメントルート/var/www/www.example.com/webを含むWebサイトwww.example.comがあります。 。
ここでは、1つのmuninクライアントserver2.example.com(IPアドレス:192.168.0.101)を使用しています。もちろん、クライアントシステムはいくつでも追加できます。
2サーバーにmuninをインストールして構成する
muninサーバー(server1.example.com):
muninクライアントとサーバーをDebianEtchにインストールするには、次のようにします。
apt-get install munin munin-node
次に、munin構成ファイル/etc/munin/munin.confを編集する必要があります。 muninがその出力をディレクトリ/var/www/www.example.com/web/monitoringに配置するようにしたいので、htmldirの値を変更し、localhostの代わりにserver1.example.comという名前を使用するようにします。 HTML出力のlocaldomainであるため、localhost.localdomainをserver1.example.comに置き換えます。この構成では、muninサーバーはそれ自体を監視できます。コメントがない場合、変更されたファイルは次のようになります。
vi /etc/munin/munin.conf
dbdir   /var/lib/munin
htmldir /var/www/www.example.com/web/monitoring
logdir  /var/log/munin
rundir  /var/run/munin

tmpldir /etc/munin/templates

[server1.example.com]
    address 127.0.0.1
    use_node_name yes
|
次に、ディレクトリ/var/www/www.example.com/web/monitoringを作成し、その所有権をユーザーとグループmuninに変更します。そうしないと、muninはその出力をそのディレクトリに配置できません。次に、muninを再起動します:
mkdir -p /var/www/www.example.com/web/monitoring
chown munin:munin /var/www/www.example.com/web/monitoring
/etc/init.d/munin-node restart
muninが最初の出力を生成できるように数分待ってから、ブラウザでhttp://www.example.com/monitoring/にアクセスすると、最初の統計が表示されます。数日後、これは次のようになります。
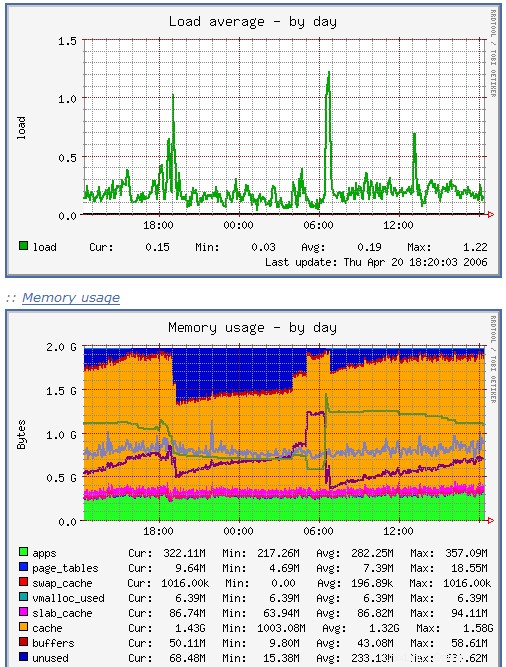
(これは、muninが生成する多くのグラフィックのほんの一部です...)
3 muninサーバー上のmunin出力ディレクトリをパスワードで保護する(オプション)
muninサーバー(server1.example.com):
サーバーに関する小さな統計情報をすべての人に表示させたい場合を除いて、ディレクトリ/var/www/www.example.com/web/monitoringをパスワードで保護することをお勧めします。
これを行うには、/ var / www / www.example.com / web/monitoringに.htaccessファイルを作成します。
vi /var/www/www.example.com/web/monitoring/.htaccess
AuthType Basic AuthName "Members Only" AuthUserFile /var/www/www.example.com/.htpasswd <limit GET PUT POST> require valid-user </limit> |
次に、パスワードファイル/var/www/www.example.com/.htpasswdを作成する必要があります。ユーザー名adminでログインしたいので、これを行います:
htpasswd -c /var/www/www.example.com/.htpasswd admin
管理者のパスワードを入力すれば完了です!
4クライアントにmuninをインストールして構成する
muninクライアント(server2.example.com):
クライアントシステムでは、munin-nodeと呼ばれるmuninクライアントパッケージをインストールするだけで済みます:
apt-get install munin-node
次に、IPアドレス192.168.0.100のmuninサーバーserver1.example.comがクライアントから詳細を取得するために接続できることをmuninクライアントに通知する必要があります。これを行うには、/ etc / munin / munin-node.confを開き、その下部にallow ^ 192 \ .168 \ .0 \.100$という行を追加します。その後、ファイルは次のようになります。
vi /etc/munin/munin-node.conf
# # Example config-file for munin-node # log_level 4 log_file /var/log/munin/munin-node.log port 4949 pid_file /var/run/munin/munin-node.pid background 1 setseid 1 # Which port to bind to; host * user root group root setsid yes # Regexps for files to ignore ignore_file ~$ ignore_file \.bak$ ignore_file %$ ignore_file \.dpkg-(tmp|new|old|dist)$ ignore_file \.rpm(save|new)$ # Set this if the client doesn't report the correct hostname when # telnetting to localhost, port 4949 # #host_name localhost.localdomain # A list of addresses that are allowed to connect. This must be a # regular expression, due to brain damage in Net::Server, which # doesn't understand CIDR-style network notation. You may repeat # the allow line as many times as you'd like allow ^127\.0\.0\.1$ allow ^192\.168\.0\.100$ |
最後に、muninクライアントを再起動します:
/etc/init.d/munin-node restart
5muninサーバー構成を更新する
muninサーバー(server1.example.com):
次に、監視する別のシステムがあることをmuninサーバーに通知する必要があります(IPアドレス192.168.0.101のserver2.example.com)。これを行うには、/ etc / munin / munin.confを開き、server2.example.comのスタンザを追加して、ファイルが次のようになるようにします。
vi /etc/munin/munin.conf
dbdir   /var/lib/munin
htmldir /var/www/www.example.com/web/monitoring
logdir  /var/log/munin
rundir  /var/run/munin

tmpldir /etc/munin/templates

[server1.example.com]
    address 127.0.0.1
    use_node_name yes

[server2.example.com]
    address 192.168.0.101
    use_node_name yes
|
次に、muninを再起動します:
/etc/init.d/munin-node restart
数分後、muninページ(http://www.example.com/monitoring/)にserver2.example.comへのリンクが表示されます。
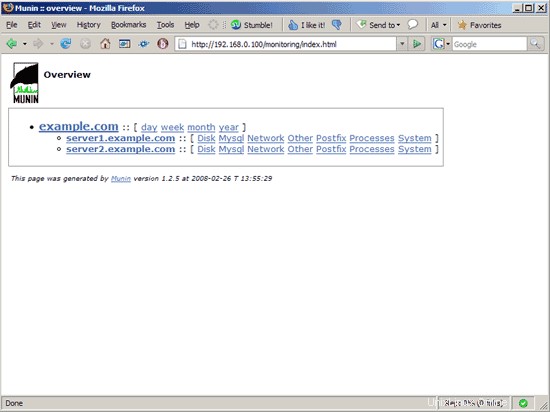
そのリンクをクリックすると、server2.example.comのグラフが表示されます。
6つのリンク
- munin:http://munin-monitoring.org/