このチュートリアルでは、MuninとMonitを使用してUbuntu14.04サーバーを監視する方法を説明します。 Muninはサーバーのほぼすべての側面について優れたグラフを生成しますが、MonitはApache、MySQL、Postfixなどのサービスの可用性をチェックし、サービスが期待どおりに動作していないことを検出した場合は再起動などの適切なアクションを実行します。 2つの組み合わせにより、完全な監視が可能になります。現在または今後の問題を認識できるグラフィックと、監視対象サービスの可用性を保証するウォッチドッグです。このチュートリアルには、MuninとMonitをISPConfigに統合することに関する2つの(オプションの)章が含まれています。
1予備メモ
システムのホスト名はserver1.example.comであり、ドキュメントルート/var/www/www.example.com/webを含むWebサイトwww.example.comがあります。
次の手順は、rootユーザーとして実行する必要があります。サーバーでrootユーザーになるには、次のコマンドを実行します。
sudo su
Muninのインストールを開始する前に、システムが最新であることを確認して、次のコマンドを実行します。
apt-get update
apt-get upgrade
Muninページを表示するためにApacheが使用され、Muninグラフのズーム機能にはapachefcgidモジュールが必要です。 aptを使用してapacheとlibapache2-mod-fcgidモジュールをインストールします。
apt-get install apache2 libcgi-fast-perl libapache2-mod-fcgid
apacheでfcgidモジュールを有効にします。
a2enmod fcgid
2Muninのインストールと構成
Ubuntu 14.04にMuninをインストールするには、以下のコマンドを実行します。
apt-get install munin munin-node munin-plugins-extra
サーバーがMySQLまたはMariaDBを実行している場合は、MySQLを監視するためにいくつかの追加のMuninプラグインを有効にします。
cd /etc/munin/plugins
ln -s /usr/share/munin/plugins/mysql_ mysql_
ln -s /usr/share/munin/plugins/mysql_bytes mysql_bytes
ln -s /usr/share/munin/plugins/mysql_queries mysql_queries
ln -s /usr/share/munin/plugins/mysql_slowqueries mysql_slowqueries
ln -s /usr/share/munin/plugins/mysql_threads mysql_threads
次に、Munin構成ファイル/etc/munin/munin.confを編集する必要があります。 dbdir、htmldir、logdir、rundir、およびtmpldir行のコメントを解除します(デフォルト値で問題ありません)。 MuninがHTML出力でlocalhost.localdomainの代わりにserver1.example.comという名前を使用するようにしたいので、単純なホストツリーセクションでlocalhost.localdomainをserver1.example.comに置き換えます。コメントがない場合、変更されたファイルは次のようになります。
nano /etc/munin/munin.conf
# Example configuration file for Munin, generated by 'make build'

# The next three variables specifies where the location of the RRD
# databases, the HTML output, logs and the lock/pid files. They all
# must be writable by the user running munin-cron. They are all
# defaulted to the values you see here.
#
dbdir /var/lib/munin
htmldir /var/cache/munin/www
logdir /var/log/munin
rundir /var/run/munin

# Where to look for the HTML templates
#
tmpldir /etc/munin/templates

# Where to look for the static www files
#
#staticdir /etc/munin/static

# temporary cgi files are here. note that it has to be writable by
# the cgi user (usually nobody or httpd).
#
# cgitmpdir /var/lib/munin/cgi-tmp

# (Exactly one) directory to include all files from.
includedir /etc/munin/munin-conf.d
[...]
# a simple host tree
[server1.example.com]
 address 127.0.0.1
 use_node_name yes
[...]
Munin /etc/munin/apache.confのApache構成ファイルが見つかります。 -muninというエイリアスをmuninのHTML出力ディレクトリ/var/ cache / munin / wwwに定義します。これは、相対パス/ munin(http://www.example.comなど)を使用して、このサーバー上のすべてのWebサイトからmuninにアクセスできることを意味します。 /munin)。
Ubuntu 14.04に同梱されているapache.confファイルには、apache2.4では正しくない古いapache2.2構文がまだ含まれているため、そのファイルを新しいファイルに置き換えます。まず、古いファイルのバックアップを作成します。
mv /etc/munin/apache.conf /etc/munin/apache.conf_bak
エディターで新しいファイルを開きます:
nano /etc/munin/apache.conf
そして、以下のコンテンツを貼り付けてください:
Alias /munin /var/cache/munin/www
<Directory /var/cache/munin/www>
 # Require local
 Require all granted
 Options FollowSymLinks SymLinksIfOwnerMatch
 Options None
</Directory>

ScriptAlias /munin-cgi/munin-cgi-graph /usr/lib/munin/cgi/munin-cgi-graph
<Location /munin-cgi/munin-cgi-graph>
 # Require local
 Require all granted
 Options FollowSymLinks SymLinksIfOwnerMatch
 <IfModule mod_fcgid.c>
 SetHandler fcgid-script
 </IfModule>
 <IfModule !mod_fcgid.c>
 SetHandler cgi-script
 </IfModule>
</Location>
Apacheを再起動します:
service apache2 restart
次に、Muninを再起動します:
service munin-node restart
ここで、Muninが最初の出力を生成できるように数分待ってから、ブラウザーでhttp://www.example.com/munin/にアクセスすると、最初の統計が表示されます。
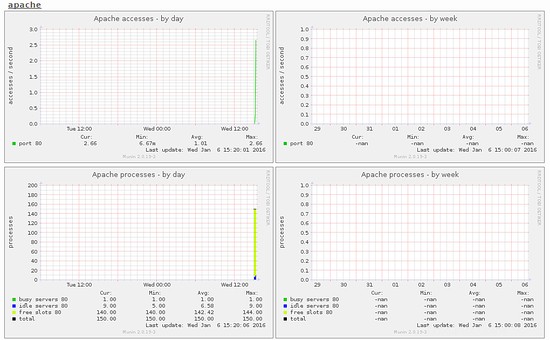
(これは、muninが生成する多くのグラフィックのほんの一部です...)
3パスワード-Munin出力ディレクトリを保護します(オプションですが、強くお勧めします)
サーバーに関するすべての小さな統計をすべての人が見ることができるようにしたい場合を除いて、munin出力ディレクトリをパスワードで保護することをお勧めします。
これを行うには、パスワードファイル/ etc / munin/munin-htpasswdを作成する必要があります。ユーザー名adminでログインしたいので、これを行います:
htpasswd -c /etc/munin/munin-htpasswd admin
adminのパスワードを入力します。次に、/ etc / munin/apache.confをもう一度開きます...
nano /etc/munin/apache.conf
...コメントアウト「すべての許可を要求し、赤でマークした行を追加します:
Alias /munin /var/cache/munin/www
<Directory /var/cache/munin/www>
 # Require local
 # Require all granted
 AuthUserFile /etc/munin/munin-htpasswd
 AuthName "Munin"
 AuthType Basic
 Require valid-user
 Options None
</Directory>

ScriptAlias /munin-cgi/munin-cgi-graph /usr/lib/munin/cgi/munin-cgi-graph
<Location /munin-cgi/munin-cgi-graph>
 # Require local
 # Require all granted
 AuthUserFile /etc/munin/munin-htpasswd
 AuthName "Munin"
 AuthType Basic
 Require valid-user
 <IfModule mod_fcgid.c>
 SetHandler fcgid-script
 </IfModule>
 <IfModule !mod_fcgid.c>
 SetHandler cgi-script
 </IfModule>
</Location>
次に、Apacheを再起動します:
service apache2 restart
4Muninで追加のモジュールを有効にする
Muninコマンド「munin-node-configure--suggest」を使用して、サーバーで有効にできる追加のMuninモジュールの推奨事項を取得できます。実行:
munin-node-configure --suggest
出力は次のようになります:

「使用済み」列はモジュールが有効かどうかを示し、「提案」列はサーバーがこのモジュールで監視できるサービスを実行しているかどうかを示します。 / etc / munin / pluginsにモジュールのシンボリックリンクを作成して、有効にします。
ここでは、たとえばapache_*モジュールを有効にします。
cd /etc/munin/plugins
ln -s /usr/share/munin/plugins/apache_accesses
ln -s /usr/share/munin/plugins/apache_processes
ln -s /usr/share/munin/plugins/apache_volume
Muninを再起動して、新しい構成をロードします。
service munin-node restart
5 ISPConfigでMuninを構成する(オプション)
ISPConfigホスティングコントロールパネルには、ISPConfigモニターモジュール内のMuninデータを表示するオプションがあります。 Muninデータはiframeに読み込まれます。ほとんどのブラウザは、httpsサイト内のhttpから読み込まれるコンテンツをブロックするため、SSLを介してMunin統計にアクセスする方法を見つける必要があります。最も簡単な方法は、SSL対応のISPConfig vhostを使用して、ISPConfigWebディレクトリ内にMuninwwwデータディレクトリへのシンボリックリンクを作成することです。
ln -s /var/cache/munin/www /usr/local/ispconfig/interface/web/munin
これで、 https://server1.example.com:8080/muninを使用してブラウザでMuninにアクセスできます。 ISPConfigApachevhostを介して。
次のステップは、ISPConfigに構成を追加することです。
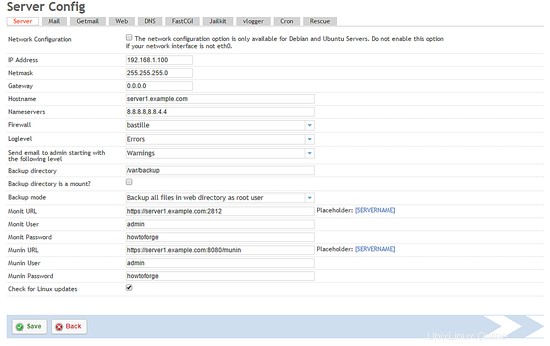
管理者(admin)ユーザーとしてISPConfigにログインし、[システム]> [サーバー構成]に移動し、以下に示すようにMuninのURL、ユーザー名、パスワードを入力します。
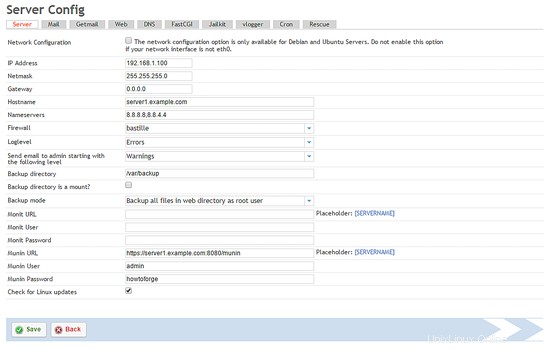
munin URLでhttps://およびポート8080を使用していることを確認してください。
6Monitのインストールと構成
Monitをインストールするには、次のようにします。
apt-get install monit
次に、/ etc / monit/monitrcを編集する必要があります。デフォルトの/etc/ monit / monitrcには多くの例があり、http://mmonit.com/monit/documentation/で他の構成例を見つけることができます。ただし、私の場合、proftpd、sshd、mysql、apache、およびpostfixを監視したい、ポート2812でMonit Webインターフェイスを有効にしたい、https Webインターフェイスが必要、ユーザー名でWebインターフェイスにログインしたいadminとパスワードhowtoforge、そしてMonitがexample@unixlinux.onlineにメールアラートを送信するようにしたいので、私のファイルは次のようになります(必要に応じてファイルを調整できるように、他のデーモンの例を構成に追加しました):
cp /etc/monit/monitrc /etc/monit/monitrc_orig
cat /dev/null > /etc/monit/monitrc
nano /etc/monit/monitrc
set daemon 60
set logfile syslog facility log_daemon
set mailserver localhost
set mail-format { from: [email protected] }
set alert [email protected]
set httpd port 2812 and
 SSL ENABLE
 PEMFILE /var/certs/monit.pem
 allow admin:howtoforge

check process sshd with pidfile /var/run/sshd.pid
 start program "/usr/sbin/service ssh start"
 stop program "/usr/sbin/service ssh stop"
 if failed port 22 protocol ssh then restart
 if 5 restarts within 5 cycles then timeout

check process apache with pidfile /var/run/apache2/apache2.pid
 group www
 start program = "/usr/sbin/service apache2 start"
 stop program = "/usr/sbin/service apache2 stop"
 if failed host localhost port 80 protocol http
 and request "/monit/token" then restart
 if cpu is greater than 60% for 2 cycles then alert
 if cpu > 80% for 5 cycles then restart
 if totalmem > 500 MB for 5 cycles then restart
 if children > 250 then restart
 if loadavg(5min) greater than 10 for 8 cycles then stop
 if 3 restarts within 5 cycles then timeout

#check process mysql with pidfile /var/run/mysqld/mysqld.pid
# group database
# start program = "/usr/sbin/service mysql start"
# stop program = "/usr/sbin/service mysql stop"
# if failed host 127.0.0.1 port 3306 then restart
# if 5 restarts within 5 cycles then timeout

#check process proftpd with pidfile /var/run/proftpd.pid
# start program = "/usr/sbin/service proftpd start"
# stop program = "/usr/sbin/service proftpd stop"
# if failed port 21 protocol ftp then restart
# if 5 restarts within 5 cycles then timeout
#
#check process postfix with pidfile /var/spool/postfix/pid/master.pid
# group mail
# start program = "/usr/sbin/service postfix start"
# stop program = "/usr/sbin/service postfix stop"
# if failed port 25 protocol smtp then restart
# if 5 restarts within 5 cycles then timeout
#
#check process nginx with pidfile /var/run/nginx.pid
# start program = "/usr/sbin/service nginx start"
# stop program = "/usr/sbin/service nginx stop"
# if failed host 127.0.0.1 port 80 then restart
#
#check process memcached with pidfile /var/run/memcached.pid
# start program = "/usr/sbin/service memcached start"
# stop program = "/usr/sbin/service memcached stop"
# if failed host 127.0.0.1 port 11211 then restart
#
#check process pureftpd with pidfile /var/run/pure-ftpd/pure-ftpd.pid
# start program = "/usr/sbin/service pure-ftpd-mysql start"
# stop program = "/usr/sbin/service pure-ftpd-mysql stop"
# if failed port 21 protocol ftp then restart
# if 5 restarts within 5 cycles then timeout
#
#check process named with pidfile /var/run/named/named.pid
# start program = "/usr/sbin/service bind9 start"
# stop program = "/usr/sbin/service bind9 stop"
# if failed host 127.0.0.1 port 53 type tcp protocol dns then restart
# if failed host 127.0.0.1 port 53 type udp protocol dns then restart
# if 5 restarts within 5 cycles then timeout
#
#check process ntpd with pidfile /var/run/ntpd.pid
# start program = "/usr/sbin/service ntp start"
# stop program = "/usr/sbin/service ntp stop"
# if failed host 127.0.0.1 port 123 type udp then restart
# if 5 restarts within 5 cycles then timeout
#
#check process mailman with pidfile /var/run/mailman/mailman.pid
# group mail
# start program = "/usr/sbin/service mailman start"
# stop program = "/usr/sbin/service mailman stop"
#
#check process amavisd with pidfile /var/run/amavis/amavisd.pid
# group mail
# start program = "/usr/sbin/service amavis start"
# stop program = "/usr/sbin/service amavis stop"
# if failed port 10024 protocol smtp then restart
# if 5 restarts within 5 cycles then timeout
#
#check process courier-imap with pidfile /var/run/courier/imapd.pid
# group mail
# start program = "/usr/sbin/service courier-imap start"
# stop program = "/usr/sbin/service courier-imap stop"
# if failed host localhost port 143 type tcp protocol imap then restart
# if 5 restarts within 5 cycles then timeout
#
#check process courier-imap-ssl with pidfile /var/run/courier/imapd-ssl.pid
# group mail
# start program = "/usr/sbin/service courier-imap-ssl start"
# stop program = "/usr/sbin/service courier-imap-ssl stop"
# if failed host localhost port 993 type tcpssl sslauto protocol imap then restart
# if 5 restarts within 5 cycles then timeout
#
#check process courier-pop3 with pidfile /var/run/courier/pop3d.pid
# group mail
# start program = "/usr/sbin/service courier-pop start"
# stop program = "/usr/sbin/service courier-pop stop"
# if failed host localhost port 110 type tcp protocol pop then restart
# if 5 restarts within 5 cycles then timeout
#
#check process courier-pop3-ssl with pidfile /var/run/courier/pop3d-ssl.pid
# group mail
# start program = "/usr/sbin/service courier-pop-ssl start"
# stop program = "/usr/sbin/service courier-pop-ssl stop"
# if failed host localhost port 995 type tcpssl sslauto protocol pop then restart
# if 5 restarts within 5 cycles then timeout
#
#check process dovecot with pidfile /var/run/dovecot/master.pid
# group mail
# start program = "/usr/sbin/service dovecot start"
# stop program = "/usr/sbin/service dovecot stop"
# if failed host localhost port 143 type tcp protocol imap then restart
# if 5 restarts within 5 cycles then timeout
構成ファイルはかなり自明です。オプションについて不明な点がある場合は、Monitのドキュメントを参照してください:http://mmonit.com/monit/documentation/monit.html
Monit構成のapache部分には、次のものがあります。
   if failed host localhost port 80 protocol http
      and request "/monit/token" then restart
これは、Monitがポート80でローカルホストに接続しようとし、Webサイトのドキュメントルートが/ var / www / htmlであるため、/ var / www / html / monit/tokenであるファイル/monit/tokenにアクセスしようとすることを意味します。 Monitが成功しない場合は、Apacheが実行されていないことを意味し、Monitはそれを再起動します。次に、ファイル/ var / www / html / monit / tokenを作成し、それにランダムな文字列を書き込む必要があります。
mkdir /var/www/html/monit
echo "hello" > /var/www/html/monit/token
次に、SSLで暗号化されたMonit Webインターフェイスに必要なpem証明書(/var/certs/monit.pem)を作成します。
mkdir /var/certs
cd /var/certs
証明書を作成するには、OpenSSL構成ファイルが必要です。次のようになります:
nano /var/certs/monit.cnf
# create RSA certs - Server

RANDFILE = ./openssl.rnd

[ req ]
default_bits = 2048
encrypt_key = yes
distinguished_name = req_dn
x509_extensions = cert_type

[ req_dn ]
countryName = Country Name (2 letter code)
countryName_default = MO

stateOrProvinceName             = State or Province Name (full name)
stateOrProvinceName_default     = Monitoria

localityName                    = Locality Name (eg, city)
localityName_default            = Monittown

organizationName                = Organization Name (eg, company)
organizationName_default        = Monit Inc.

organizationalUnitName          = Organizational Unit Name (eg, section)
organizationalUnitName_default  = Dept. of Monitoring Technologies

commonName                      = Common Name (FQDN of your server)
commonName_default              = server.monit.mo

emailAddress                    = Email Address
emailAddress_default            = [email protected]

[ cert_type ]
nsCertType = server
次に、次のような証明書を作成します。
openssl req -new -x509 -days 365 -nodes -config ./monit.cnf -out /var/certs/monit.pem -keyout /var/certs/monit.pem
openssl gendh 1024 >> /var/certs/monit.pem
openssl x509 -subject -dates -fingerprint -noout -in /var/certs/monit.pem
chmod 600 /var/certs/monit.pem
最後に、Monitを開始できます:
service monit start
次に、ブラウザでhttps://www.example.com:2812/にアクセスし(ポート2812がファイアウォールによってブロックされていないことを確認してください)、adminとhowtoforgeでログインすると、MonitWebインターフェイスが表示されます。次のようになります:

(メイン画面)
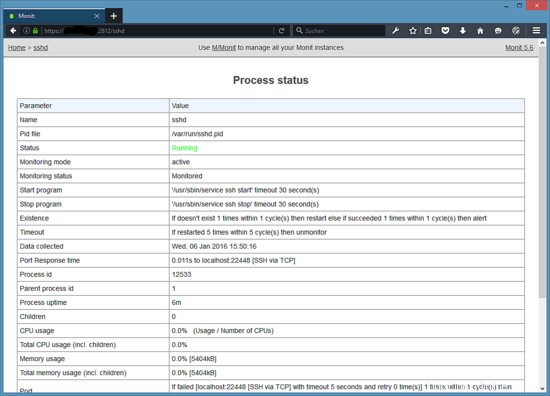
(SSHdステータスページ)
/ etc / monit / monitrcの構成に応じて、monitはサービスが失敗した場合にサービスを再起動し、サービスのプロセスIDが変更された場合などに通知メールを送信します。
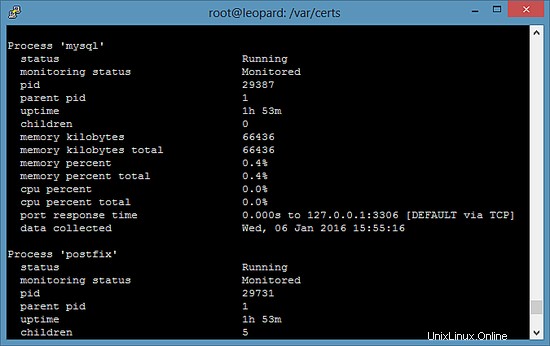
シェルでMonitステータスを取得するには、「monitstatus」コマンドを実行します。
monit status
このコマンドは、監視対象のすべてのサービスのステータスを表示します。
7ISPConfigでMonitを構成する
ISPConfigサーバーのコントロールパネルは、モニターモジュール内のMonitデータを表示できます。 ISPConfigでその機能を有効にするには、管理者(admin)ユーザーとしてISPConfigにログインし、[システム]> [サーバー構成]に移動して、以下に示すようにMonitのURL、ユーザー名、パスワードを入力します。
8リンク
- munin:http://munin-monitoring.org/
- monit:http://mmonit.com/monit/