LibreNMSは、PHPで記述された、無料のオープンソースのWebベースの自動検出ネットワーク監視ツールです。 MySQLまたはMariaDBをデータベースバックエンドとして使用し、SNMPを使用してリモートクライアントを検出します。 Linux、Cisco、Juniper、FreeBSD、HP、Windowsなどの幅広いネットワークデバイスをサポートします。これは、Radius、Active Directory、LDAP、MySQLなどを含む複数の認証方法をサポートします。シンプルで使いやすく、誰でも簡単に理解して使用できます。
このチュートリアルでは、Debian11にNginxを使用してLibreNMSをインストールする方法を説明します。
- Debian11を実行しているサーバー。
- サーバーIPで指定された有効なドメイン名。
- ルートパスワードはサーバーで構成されています。
MariaDBデータベースのインストールと構成
まず、MariaDBデータベースサーバーをサーバーにインストールする必要があります。次のコマンドを使用してインストールできます:
apt-get install mariadb-server -y
インストールが完了したら、次のスクリプトを実行してMariaDBのインストールを保護し、ルートパスワードを設定します。
mysql_secure_installation
以下に示すように、すべての質問に答えてください。
Enter current password for root (enter for none):
Switch to unix_socket authentication [Y/n] n
Change the root password? [Y/n] Y
New password:
Re-enter new password:
Remove anonymous users? [Y/n] Y
Disallow root login remotely? [Y/n] Y
Remove test database and access to it? [Y/n]
Reload privilege tables now? [Y/n] Y
MariaDBが保護されたら、MariaDB構成ファイルを編集し、いくつかの設定を微調整します。
nano /etc/mysql/mariadb.conf.d/50-server.cnf
[mysqld]セクション内に次の行を追加します:
innodb_file_per_table=1
lower_case_table_names=0
ファイルを保存して閉じてから、MariaDBを再起動して変更を適用します。
systemctl restart mariadb
次に、次のコマンドを使用してMariaDBにログインします。
mysql -u root -p
ログインしたら、LibreNMSのデータベースとユーザーを作成します。
MariaDB [(none)]> CREATE DATABASE librenms CHARACTER SET utf8mb4 COLLATE utf8mb4_unicode_ci;
MariaDB [(none)]> CREATE USER 'librenms'@'localhost' IDENTIFIED BY 'securepassword';
次に、以下のコマンドを使用して、LibreNMSデータベースにすべての権限を付与します。
MariaDB [(none)]> GRANT ALL PRIVILEGES ON librenms.* TO 'librenms'@'localhost';
最後に、特権をフラッシュし、次のコマンドを使用してMariaDBシェルを終了します。
MariaDB [(none)]> FLUSH PRIVILEGES;
MariaDB [(none)]> EXIT;
完了したら、次のステップに進むことができます。
Nginx、PHP、および必要な依存関係をインストールする
次に、Nginx Webサーバー、PHP、およびLibreNMSに必要なその他の依存関係をインストールする必要があります。次のコマンドを実行して、それらすべてをインストールできます。
apt-get install nginx-full nmap php-cli php-curl php-fpm php-gd php-json php-mbstring php-mysql php-snmp php-xml php-zip python3-dotenv python3-pip python3-pymysql python3-redis python3-setuptools python3-systemd rrdtool snmp snmpd whois acl curl composer fping git graphviz imagemagick mtr-tiny
すべてのパッケージがインストールされたら、php.iniファイルを編集して、タイムゾーンを設定します。
nano /etc/php/7.4/fpm/php.ini
次の行を変更します:
date.timezone = UTC
終了したら、ファイルを保存して閉じます。
LibreNMSのインストールと構成
まず、次のコマンドを使用してLibreNMSの専用ユーザーを作成します。
useradd librenms -d /opt/librenms -M -r -s /bin/bash
次に、次のコマンドを使用して、LibreNMSユーザーをwww-dataグループに追加します。
usermod -a -G librenms www-data
次に、最新バージョンのLibreNMSをGitHubリポジトリから/optディレクトリにダウンロードします。
git clone https://github.com/librenms/librenms.git /opt/librenms
次に、LibreNMSディレクトリの所有権と権限を設定します:
chown -R librenms:librenms /opt/librenms
chmod 775 /opt/librenms setfacl -d -m g::rwx /opt/librenms/rrd /opt/librenms/logs /opt/librenms/bootstrap/cache/ /opt/librenms/storage/
setfacl -R -m g::rwx /opt/librenms/rrd /opt/librenms/logs /opt/librenms/bootstrap/cache/ /opt/librenms/storage/
次に、次のコマンドを使用して、ユーザーをLibreNMSに変更します。
su - librenms
次に、次のコマンドを使用してPHPComposerをインストールします。
cd /opt/librenms
./scripts/composer_wrapper.php install --no-dev
Composerとその他のPHP依存関係をインストールすると、次の出力が表示されます。
> @php artisan optimize
Configuration cache cleared!
Configuration cached successfully!
Route cache cleared!
Routes cached successfully!
Files cached successfully!
> @php artisan config:clear
Configuration cache cleared!
> scripts/dynamic_check_requirements.py || pip3 install --user -r requirements.txt || :
Requirement already satisfied: PyMySQL!=1.0.0 in /usr/lib/python3/dist-packages (from -r requirements.txt (line 1)) (0.9.3)
Requirement already satisfied: python-dotenv in /usr/lib/python3/dist-packages (from -r requirements.txt (line 2)) (0.15.0)
Requirement already satisfied: redis>=3.0 in /usr/lib/python3/dist-packages (from -r requirements.txt (line 3)) (3.5.3)
Requirement already satisfied: setuptools in /usr/lib/python3/dist-packages (from -r requirements.txt (line 4)) (52.0.0)
Collecting psutil>=5.6.0
  Downloading psutil-5.8.0-cp39-cp39-manylinux2010_x86_64.whl (293 kB)
Collecting command_runner>=1.3.0
  Downloading command_runner-1.3.0-py3-none-any.whl (17 kB)
Installing collected packages: psutil, command-runner
Successfully installed command-runner-1.3.0 psutil-5.8.0
次に、以下のコマンドを使用してLibreNMSユーザーを終了します。
exit
次に、PHP-FPM用に別の構成ファイルを作成する必要があります。次のコマンドで作成できます:
cp /etc/php/7.4/fpm/pool.d/www.conf /etc/php/7.4/fpm/pool.d/librenms.conf
次に、お気に入りのエディターでlibrenms.conf構成ファイルを編集します。
nano /etc/php/7.4/fpm/pool.d/librenms.conf
[www-data]を[librenms]に変更し、リスニングソケットも更新します:
user = librenms
group = librenms
listen = /run/php-fpm-librenms.sock
ファイルを保存して閉じてから、PHP-FPMサービスを再起動して、構成の変更を適用します。
systemctl restart php7.4-fpm
終了したら、次のステップに進むことができます。
LibreNMS用にNginxを構成する
次に、LibreNMS用のNginx仮想ホスト構成ファイルを作成する必要があります。次のコマンドで作成できます:
nano /etc/nginx/conf.d/librenms.conf
次の行を追加します:
server {
  listen 80;
  server_name libre.yourdomain.com;
  root /opt/librenms/html;
  index index.php;

  charset utf-8;
  gzip on;
  gzip_types text/css application/javascript text/javascript application/x-javascript image/svg+xml text/plain text/xsd text/xsl text/xml image/x-icon;
  location / {
   try_files $uri $uri/ /index.php?$query_string;
  }
  location ~ [^/]\.php(/|$) {
   fastcgi_pass unix:/run/php-fpm-librenms.sock;
   fastcgi_split_path_info ^(.+\.php)(/.+)$;
   include fastcgi.conf;
  }
  location ~ /\.(?!well-known).* {
   deny all;
  }
}
ファイルを保存して閉じ、次のコマンドを使用して構文エラーがないかNginxを確認します。
nginx -t
すべてが正常であれば、次の出力が得られます:
nginx: the configuration file /etc/nginx/nginx.conf syntax is ok
nginx: configuration file /etc/nginx/nginx.conf test is successful
最後に、Nginxを再起動して変更を適用します。
systemctl restart nginx php7.4-fpm
次のコマンドを使用して、Nginxのステータスを確認することもできます。
systemctl status nginx
次の出力が表示されます。
? nginx.service - A high performance web server and a reverse proxy server
     Loaded: loaded (/lib/systemd/system/nginx.service; enabled; vendor preset: enabled)
     Active: active (running) since Fri 2021-12-03 14:39:18 UTC; 18s ago
       Docs: man:nginx(8)
    Process: 39888 ExecStartPre=/usr/sbin/nginx -t -q -g daemon on; master_process on; (code=exited, status=0/SUCCESS)
    Process: 39892 ExecStart=/usr/sbin/nginx -g daemon on; master_process on; (code=exited, status=0/SUCCESS)
   Main PID: 39893 (nginx)
      Tasks: 2 (limit: 2341)
     Memory: 2.7M
        CPU: 42ms
     CGroup: /system.slice/nginx.service
             ??39893 nginx: master process /usr/sbin/nginx -g daemon on; master_process on;
             ??39894 nginx: worker process

Dec 03 14:39:18 debian11 systemd[1]: Starting A high performance web server and a reverse proxy server...
Dec 03 14:39:18 debian11 systemd[1]: nginx.service: Failed to parse PID from file /run/nginx.pid: Invalid argument
Dec 03 14:39:18 debian11 systemd[1]: Started A high performance web server and a reverse proxy server.
次に、cronジョブ構成ファイルをコピーして、新しく追加されたデバイスの自動検出とポーリングを有効にします。
cp /opt/librenms/librenms.nonroot.cron /etc/cron.d/librenms
次に、logrotate構成ファイルをコピーして、古いログをローテーションします。
cp /opt/librenms/misc/librenms.logrotate /etc/logrotate.d/librenms
終了したら、次のステップに進むことができます。
LibreNMSWebインストールウィザードにアクセス
この時点で、LibreNMSがインストールされ、Nginxで構成されています。これで、URL http://libre.yourdomain.comを使用してLibreNMSWebベースのセットアップにアクセスできます。 。インストール前のチェックページが表示されます:
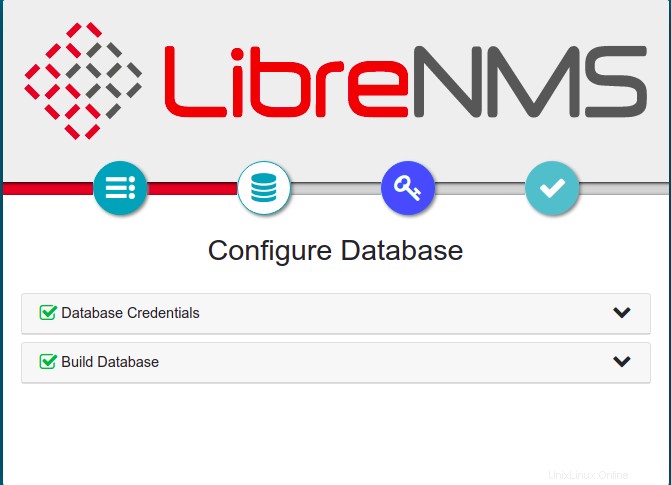
すべてのチェックが正常に行われたことを確認してから、データベースをクリックします アイコン。データベース構成ページが表示されます:
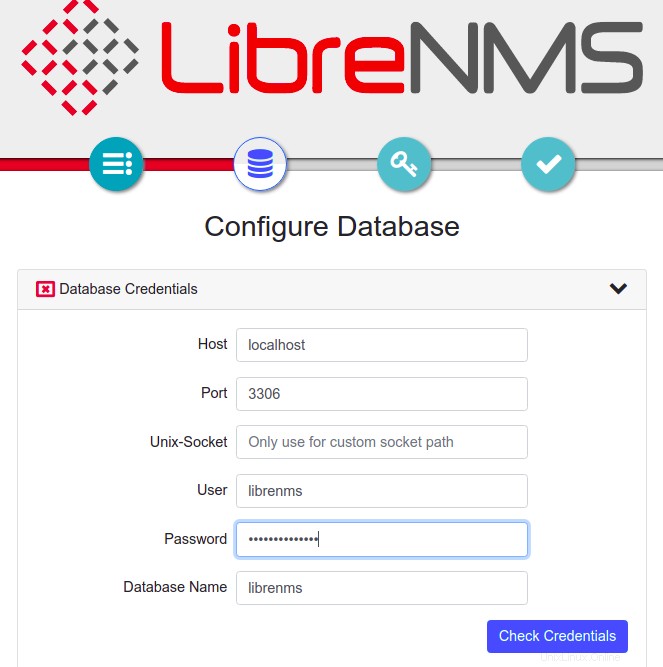
データベース情報を入力し、チェックをクリックします クレデンシャル 。次のページが表示されます:
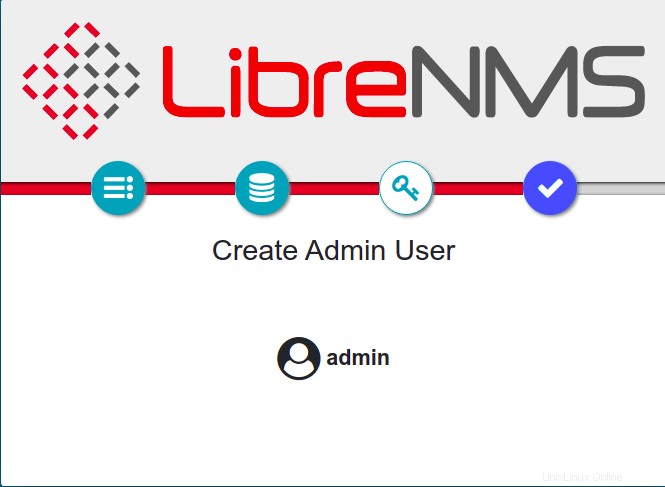
次に、キーをクリックします 管理者ユーザーを設定するためのアイコン:

管理者のユーザー名とパスワードを入力し、追加をクリックします ユーザー ボタン。ユーザーが作成されると、次のページが表示されます。
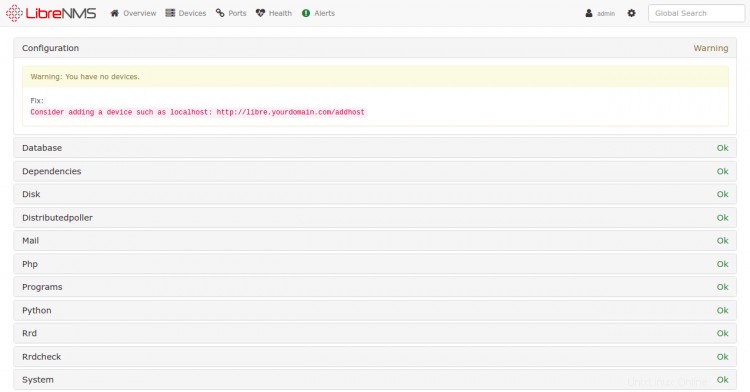
はいをクリックします アイコンボタン。次のページが表示されます:

次に、ウェブブラウザで別のタブを開き、URL https://libre.yourdomain.com/validateを入力して、インストールを検証します。次のページが表示されます:

管理者のユーザー名とパスワードを入力し、ログインをクリックします ボタン。次のページが表示されます:
おめでとう!これで、Debian 11にNginxを使用してLibreNMSが正常にインストールされました。これで、リモートデバイスをLibreNMSに追加し、中央の場所から監視を開始できます。ご不明な点がございましたら、お気軽にお問い合わせください。