sysPassは、PHPで記述されたWebベースのパスワード管理アプリケーションです。安全で信頼性が高く、ビジネスおよび個人使用のマルチユーザー環境で実行されます。マスターパスワードを使用した双方向暗号化を使用してパスワードをデータベースに保存します。 LDAP認証、メール、監査、バックアップ、インポート/エクスポートなどのオプションを設定するのに役立つ直感的なWebUIを提供します。
機能
- 無料でオープンソース
- グループ/プロファイルのアクセス制御
- パスワードの暗号化
- インライン画像ビューアを使用したファイルストレージ
- OpenLDAPとActiveDirectoryの統合
- メールで通知する
このチュートリアルでは、sysPassパスワードマネージャーアプリケーションをインストールし、Debian11で無料のLet'sEncryptSSL証明書を使用して保護する方法を紹介します。
- Debian11を実行しているサーバー。
- サーバーIPで指定された有効なドメイン名。
- ルートパスワードはサーバーで構成されています。
Apache、MariaDB、PHPをインストール
sysPassはWebサーバー上で実行され、MariaDBをデータベースバックエンドとして使用し、PHPで記述されています。そのため、Apache Webサーバー、MariaDBデータベースサーバー、PHP、およびその他のPHP拡張機能をサーバーにインストールする必要があります。次のコマンドを使用して、それらすべてをインストールできます。
apt-get install apache2 mariadb-server libapache2-mod-php php php-mysqli php-pdo php-pear php php-cgi php-cli php-common php-gd php-json php-readline php-curl php-intl php-ldap php-xml php-mbstring git -y
すべてのパッケージがインストールされたら、php.iniファイルを編集して変更を加えます。
nano /etc/php/7.4/apache2/php.ini
次の設定を変更します:
post_max_size = 100M
upload_max_filesize = 100M
max_execution_time = 7200
memory_limit = 512M
date.timezone = Asia/Kolkata
終了したら、ファイルを保存して閉じます。次に、Apacheサービスを再起動して、構成の変更を適用します。
systemctl restart apache2
sysPassのデータベースを作成する
デフォルトでは、MariaDBのインストールは保護されていません。したがって、最初にそれを保護する必要があります。次のコマンドを使用して保護できます:
mysql_secure_installation
以下に示すようにすべての質問に答えて、MariaDBルートパスワードを設定し、インストールを保護します。
Enter current password for root (enter for none):
Switch to unix_socket authentication [Y/n] Y
Change the root password? [Y/n] Y
New password:
Re-enter new password:
Remove anonymous users? [Y/n] Y
Disallow root login remotely? [Y/n] Y
Remove test database and access to it? [Y/n] Y
Reload privilege tables now? [Y/n] Y
完了したら、次のコマンドを使用してMariaDBインターフェースにログインします。
mysql -u root -p
MariaDBのルートパスワードを入力するように求められます。ログインしたら、次のコマンドを使用してデータベースとユーザーを作成します。
MariaDB [(none)]> create database syspassdb;
MariaDB [(none)]> grant all privileges on syspassdb.* to [email protected] identified by "password";
次に、特権をフラッシュし、次のコマンドを使用してMariaDBシェルを終了します。
MariaDB [(none)]> flush privileges;
MariaDB [(none)]> exit;
この時点で、MariaDBデータベースとユーザーはsysPassの準備ができています。これで、次のステップに進むことができます。
sysPassをインストール
まず、Gitリポジトリから最新バージョンのsysPassをダウンロードする必要があります。次のコマンドを使用してダウンロードできます:
git clone https://github.com/nuxsmin/sysPass.git
ダウンロードが完了したら、ダウンロードしたディレクトリをApacheWebルートディレクトリに移動します。
mv sysPass /var/www/html/syspass
次に、次のコマンドを使用して、syspassディレクトリに適切な所有権を設定します。
chown -R www-data:www-data /var/www/html/syspass
次に、他のディレクトリに適切な権限を設定します:
chmod 750 /var/www/html/syspass/app/{config,backup} 次に、Composerをシステムにインストールする必要があります。
まず、次のコマンドを使用してComposerインストールスクリプトを作成します。
nano /var/www/html/syspass/install-composer.sh
次の行を追加します:
#!/bin/sh
 EXPECTED_SIGNATURE="$(wget -q -O - https://composer.github.io/installer.sig)"
 php -r "copy('https://getcomposer.org/installer', 'composer-setup.php');"
 ACTUAL_SIGNATURE="$(php -r "echo hash_file('sha384', 'composer-setup.php');")"
 if [ "$EXPECTED_SIGNATURE" != "$ACTUAL_SIGNATURE" ]
 then
     >&2 echo 'ERROR: Invalid installer signature'
     rm composer-setup.php
     exit 1
 fi
 php composer-setup.php --quiet
 RESULT=$?
 rm composer-setup.php
 exit $RESULT
ファイルを保存して閉じ、次のコマンドを使用してComposerインストールスクリプトを実行します。
cd /var/www/html/syspass/
sh install-composer.sh
Composerがインストールされたら、次のコマンドを実行して、必要なすべてのPHP依存関係をインストールします。
php composer.phar install --no-dev
すべての依存関係がインストールされたら、次のステップに進むことができます。
sysPass用にApache仮想ホストを構成する
次に、インターネット上でsysPassをホストするためのApache仮想ホスト構成ファイルを作成する必要があります。次のコマンドを使用して作成できます:
nano /etc/apache2/sites-available/syspass.conf
次の行を追加します:
<VirtualHost *:80>
ServerAdmin [email protected]
DocumentRoot "/var/www/html/syspass"
ServerName syspass.example.com
<Directory "/var/www/html/syspass/">
Options MultiViews FollowSymlinks
AllowOverride All
Order allow,deny
Allow from all
</Directory>
TransferLog /var/log/apache2/syspass_access.log
ErrorLog /var/log/apache2/syspass_error.log
</VirtualHost>
終了したら、ファイルを保存して閉じ、次のコマンドを使用してApache仮想ホストをアクティブ化します。
a2ensite syspass
次に、Apacheサービスを再起動して、変更を適用します。
systemctl restart apache2
次のコマンドを使用して、Apacheサービスのステータスを確認することもできます。
systemctl status apache2
次の出力が得られるはずです:
? apache2.service - The Apache HTTP Server
     Loaded: loaded (/lib/systemd/system/apache2.service; enabled; vendor preset: enabled)
     Active: active (running) since Sat 2021-10-16 13:41:36 UTC; 4s ago
       Docs: https://httpd.apache.org/docs/2.4/
    Process: 17819 ExecStart=/usr/sbin/apachectl start (code=exited, status=0/SUCCESS)
   Main PID: 17824 (apache2)
      Tasks: 6 (limit: 2341)
     Memory: 14.7M
        CPU: 76ms
     CGroup: /system.slice/apache2.service
             ??17824 /usr/sbin/apache2 -k start
             ??17825 /usr/sbin/apache2 -k start
             ??17826 /usr/sbin/apache2 -k start
             ??17827 /usr/sbin/apache2 -k start
             ??17828 /usr/sbin/apache2 -k start
             ??17829 /usr/sbin/apache2 -k start

Oct 16 13:41:36 debian11 systemd[1]: Starting The Apache HTTP Server...
終了したら、次のステップに進むことができます。
sysPassWebUIにアクセス
この時点で、sysPassがApacheWebサーバーにインストールされてホストされています。次に、Webブラウザーを開き、URL http://syspass.example.comを使用してsysPassWebインターフェースにアクセスします。 。次のページにリダイレクトされます:

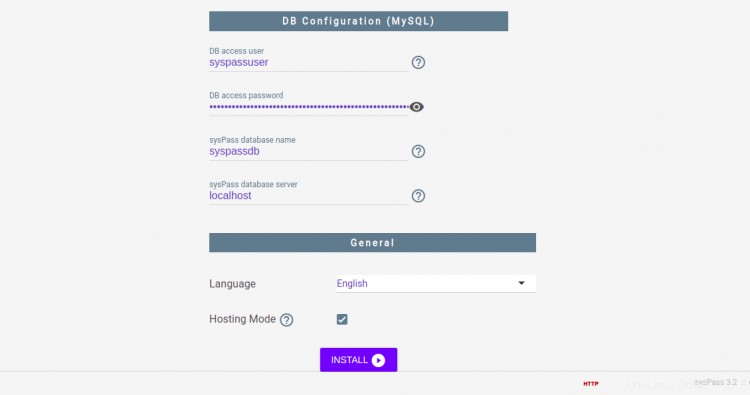
管理者のユーザー名、パスワード、マスターパスワード、データベースクレデンシャルを入力し、言語、ホスティングモードを選択して、インストールをクリックします。 ボタン。インストールが完了すると、sysPassログインページにリダイレクトされます。

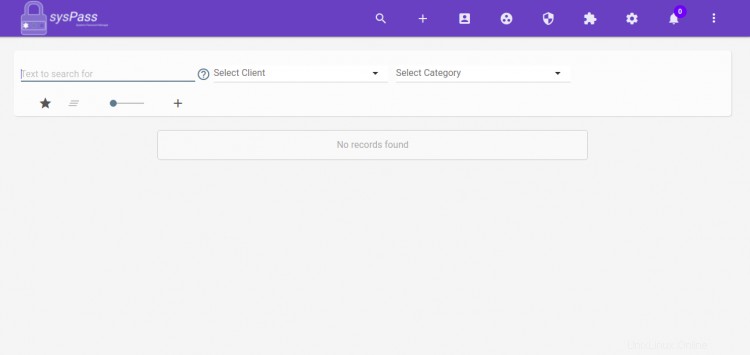
管理者のユーザー名とパスワードを入力し、>をクリックします ボタン。次のページにsysPassダッシュボードが表示されます。
sysPassでLet'sEncryptSSLサポートを有効にする
Let'sEncryptSSLを使用してWebサイトを保護することは常に良い考えです。まず、SSLをインストールして管理するためにCertbotクライアントをインストールする必要があります。デフォルトでは、CertbotパッケージはDebian 11のデフォルトリポジトリに含まれているため、次のコマンドでインストールできます。
apt-get install python3-certbot-apache -y
Certbotをインストールしたら、次のコマンドを実行して、Let'sEncryptSSLでWebサイトを保護します。
certbot --apache -d syspass.example.com
以下に示すように、メールアドレスを提供し、利用規約に同意するよう求められます。
Saving debug log to /var/log/letsencrypt/letsencrypt.log
Plugins selected: Authenticator standalone, Installer None
Enter email address (used for urgent renewal and security notices) (Enter 'c' to
cancel): [email protected]

- - - - - - - - - - - - - - - - - - - - - - - - - - - - - - - - - - - - - - - -
Please read the Terms of Service at
https://letsencrypt.org/documents/LE-SA-v1.2-November-15-2017.pdf. You must
agree in order to register with the ACME server at
https://acme-v02.api.letsencrypt.org/directory
- - - - - - - - - - - - - - - - - - - - - - - - - - - - - - - - - - - - - - - -
(A)gree/(C)ancel: A

- - - - - - - - - - - - - - - - - - - - - - - - - - - - - - - - - - - - - - - -
Would you be willing to share your email address with the Electronic Frontier
Foundation, a founding partner of the Let's Encrypt project and the non-profit
organization that develops Certbot? We'd like to send you email about our work
encrypting the web, EFF news, campaigns, and ways to support digital freedom.
- - - - - - - - - - - - - - - - - - - - - - - - - - - - - - - - - - - - - - - -
(Y)es/(N)o: Y
Plugins selected: Authenticator apache, Installer apache
Obtaining a new certificate
Performing the following challenges:
http-01 challenge for syspass.example.com
Enabled Apache rewrite module
Waiting for verification...
Cleaning up challenges
Created an SSL vhost at /etc/apache2/sites-available/syspass-le-ssl.conf
Enabled Apache socache_shmcb module
Enabled Apache ssl module
Deploying Certificate to VirtualHost /etc/apache2/sites-available/syspass-le-ssl.conf
Enabling available site: /etc/apache2/sites-available/syspass-le-ssl.conf
次に、以下に示すように、HTTPトラフィックをHTTPSにリダイレクトするかどうかを選択します。
Please choose whether or not to redirect HTTP traffic to HTTPS, removing HTTP access.
- - - - - - - - - - - - - - - - - - - - - - - - - - - - - - - - - - - - - - - -
1: No redirect - Make no further changes to the webserver configuration.
2: Redirect - Make all requests redirect to secure HTTPS access. Choose this for
new sites, or if you're confident your site works on HTTPS. You can undo this
change by editing your web server's configuration.
- - - - - - - - - - - - - - - - - - - - - - - - - - - - - - - - - - - - - - - -
Select the appropriate number [1-2] then [enter] (press 'c' to cancel): 2
2と入力し、Enterキーを押して、WebサイトにLet'sEncryptSSLをインストールします。
Enabled Apache rewrite module
Redirecting vhost in /etc/apache2/sites-enabled/syspass.conf to ssl vhost in /etc/apache2/sites-available/syspass-le-ssl.conf

- - - - - - - - - - - - - - - - - - - - - - - - - - - - - - - - - - - - - - - -
Congratulations! You have successfully enabled https://syspass.example.com

You should test your configuration at:
https://www.ssllabs.com/ssltest/analyze.html?d=syspass.example.com
- - - - - - - - - - - - - - - - - - - - - - - - - - - - - - - - - - - - - - - -

IMPORTANT NOTES:
 - Congratulations! Your certificate and chain have been saved at:
   /etc/letsencrypt/live/syspass.example.com/fullchain.pem
   Your key file has been saved at:
   /etc/letsencrypt/live/syspass.example.com/privkey.pem
   Your cert will expire on 2021-07-20. To obtain a new or tweaked
   version of this certificate in the future, simply run certbot again
   with the "certonly" option. To non-interactively renew *all* of
   your certificates, run "certbot renew"
 - If you like Certbot, please consider supporting our work by:

   Donating to ISRG / Let's Encrypt:   https://letsencrypt.org/donate
   Donating to EFF:                    https://eff.org/donate-le
おめでとう!これで、Debian 11にApacheを使用してsysPassパスワードマネージャーが正常にインストールされました。これで、別のアカウントを作成し、ユーザーを追加し、権限にアクセスして、実稼働環境にデプロイできます。