Giteaは、Goプログラミング言語で記述された、無料のオープンソースのセルフホスト型の有名なGitサーバーです。これは、Githubに似たバージョン管理プラットフォームです。堅牢でスケーラブルであり、問題と時間の追跡、リポジトリの分岐、ファイルのロック、タグ付け、マージなど、多くの機能を提供します。セルフホストのGitサービスをお探しの場合は、おそらくGiteaが最適なオプションです。
このチュートリアルでは、Debian11にGiteaをインストールする方法を紹介します。
- Debian11を実行しているサーバー。
- ルートパスワードはサーバーで構成されています。
MariaDBデータベースのインストールと構成
Giteaは、MariaDB/MySQLをデータベースバックエンドとして使用します。したがって、データベースサーバーをサーバーにインストールする必要があります。インストールされていない場合は、次のコマンドを実行してインストールできます。
apt-get install mariadb-server -y
MariaDBをインストールしたら、MariaDBパスワードを設定し、インストールを保護する必要があります。 mysql_secure_installationスクリプトを実行することでそれを行うことができます:
mysql_secure_installation
以下に示すように、すべての質問に答えてください。
Enter current password for root (enter for none):
OK, successfully used password, moving on...
Set root password? [Y/n] Y
Remove anonymous users? [Y/n] Y
Disallow root login remotely? [Y/n] Y
Remove test database and access to it? [Y/n] Y
Reload privilege tables now? [Y/n] Y
次に、次のコマンドを使用してMariaDBインターフェースに接続します。
mysql -u root -p
接続したら、次のコマンドを使用してGiteaのデータベースとユーザーを作成します。
MariaDB [(none)]> CREATE DATABASE gitea;
MariaDB [(none)]> GRANT ALL PRIVILEGES ON gitea.* TO 'gitea'@'localhost' IDENTIFIED BY 'password';
次に、特権をフラッシュし、次のコマンドでMariaDBを終了します。
MariaDB [(none)]> FLUSH PRIVILEGES;
MariaDB [(none)]> QUIT;
まず、Giteaを実行するための専用ユーザーを作成する必要があります。次のコマンドで作成できます:
adduser --system --shell /bin/bash --gecos 'Git Version Control' --group --disabled-password --home /opt/git git
次の出力が表示されます。
Adding system user `git' (UID 109) ...
Adding new group `git' (GID 115) ...
Adding new user `git' (UID 109) with group `git' ...
Creating home directory `/opt/git' ...
次に、次のコマンドを使用して最新バージョンのGiteaをダウンロードします。
curl -s https://api.github.com/repos/go-gitea/gitea/releases/latest |grep browser_download_url | cut -d '"' -f 4 | grep '\linux-amd64$' | wget -i -
次に、次のコマンドを使用して、Giteaバイナリをシステムパスに移動します。
mv gitea-*-linux-amd64 /usr/local/bin/gitea
次に、実行可能ファイルの権限をGiteaバイナリに設定します:
chmod +x /usr/local/bin/gitea
次に、次のコマンドを使用してGiteaのバージョンを確認します。
gitea --version
次の出力が表示されます。
Gitea version 1.15.3 built with GNU Make 4.1, go1.16.8 : bindata, sqlite, sqlite_unlock_notify
次に、Giteaのディレクトリ構造を作成する必要があります。次のコマンドで作成できます:
mkdir -p /etc/gitea /var/lib/gitea/{custom,data,indexers,public,log} 次に、次のコマンドを使用して適切な権限と所有権を設定します。
chown git:git /var/lib/gitea/{data,indexers,log}
chmod 750 /var/lib/gitea/{data,indexers,log}
chown root:git /etc/gitea
chmod 770 /etc/gitea
終了したら、次のステップに進むことができます。
GiteaのSystemdサービスファイルを作成する
次に、Giteaのsystemdサービスファイルを作成する必要があります。次のコマンドで作成できます:
nano /etc/systemd/system/gitea.service
次の行を追加します:
[Unit]
Description=Gitea (Git with a cup of tea)
After=syslog.target
After=network.target
After=mysql.service

[Service]
LimitMEMLOCK=infinity
LimitNOFILE=65535
RestartSec=2s
Type=simple
User=git
Group=git
WorkingDirectory=/var/lib/gitea/
ExecStart=/usr/local/bin/gitea web -c /etc/gitea/app.ini
Restart=always
Environment=USER=git HOME=/opt/git GITEA_WORK_DIR=/var/lib/gitea

[Install]
WantedBy=multi-user.target
ファイルを保存して閉じてから、次のコマンドを使用してsystemdデーモンをリロードします。
systemctl daemon-reload
次に、次のコマンドを使用してGiteaサービスを開始して有効にします。
systemctl start gitea
systemctl enable gitea
Giteaサービスを確認するには、次のコマンドを実行します。
systemctl status gitea
次の出力が表示されます。
? gitea.service - Gitea (Git with a cup of tea)
     Loaded: loaded (/etc/systemd/system/gitea.service; disabled; vendor preset: enabled)
     Active: active (running) since Sat 2021-10-02 12:59:27 UTC; 9s ago
   Main PID: 19179 (gitea)
      Tasks: 8 (limit: 4679)
     Memory: 128.3M
        CPU: 1.415s
     CGroup: /system.slice/gitea.service
             ??19179 /usr/local/bin/gitea web -c /etc/gitea/app.ini

Oct 02 12:59:28 debian11 gitea[19179]: 2021/10/02 12:59:28 cmd/web.go:102:runWeb() [I] Starting Gitea on PID: 19179
Oct 02 12:59:28 debian11 gitea[19179]: 2021/10/02 12:59:28 ...s/setting/setting.go:569:NewContext() [W] Custom config '/etc/gitea/app.ini' not>
Oct 02 12:59:28 debian11 gitea[19179]: 2021/10/02 12:59:28 ...s/install/setting.go:21:PreloadSettings() [I] AppPath: /usr/local/bin/gitea
Oct 02 12:59:28 debian11 gitea[19179]: 2021/10/02 12:59:28 ...s/install/setting.go:22:PreloadSettings() [I] AppWorkPath: /var/lib/gitea
Oct 02 12:59:28 debian11 gitea[19179]: 2021/10/02 12:59:28 ...s/install/setting.go:23:PreloadSettings() [I] Custom path: /var/lib/gitea/custom
Oct 02 12:59:28 debian11 gitea[19179]: 2021/10/02 12:59:28 ...s/install/setting.go:24:PreloadSettings() [I] Log path: /var/lib/gitea/log
Oct 02 12:59:28 debian11 gitea[19179]: 2021/10/02 12:59:28 ...s/install/setting.go:25:PreloadSettings() [I] Preparing to run install page
Oct 02 12:59:28 debian11 gitea[19179]: 2021/10/02 12:59:28 ...s/install/setting.go:28:PreloadSettings() [I] SQLite3 Supported
Oct 02 12:59:29 debian11 gitea[19179]: 2021/10/02 12:59:29 cmd/web.go:196:listen() [I] Listen: http://0.0.0.0:3000
Oct 02 12:59:29 debian11 gitea[19179]: 2021/10/02 12:59:29 ...s/graceful/server.go:62:NewServer() [I] Starting new Web server: tcp:0.0.0.0:300>
この時点で、Giteaが起動し、ポート3000でリッスンします。次のコマンドで確認できます。
ss -antpl | grep 3000
次の出力が表示されます。
LISTEN 0 4096 *:3000 *:* users:(("gitea",pid=19179,fd=6))
終了したら、次のステップに進むことができます。
Gitea用にNginxを構成する
次に、NginxをGiteaのリバースプロキシとしてインストールして構成する必要があります。まず、次のコマンドを使用してNginxをインストールします。
apt-get install nginx -y
次に、次のコマンドを使用してNginx仮想ホスト構成ファイルを作成します。
nano /etc/nginx/conf.d/gitea.conf
次の行を追加します:
server {
    listen 80;
    server_name gitea.example.com;
    access_log /var/log/nginx/gitea_access.log;
    error_log /var/log/nginx/gitea_error.log;


    location / {
        proxy_pass http://localhost:3000;
    }
}
ファイルを保存して閉じ、構文エラーがないかNginxを確認します:
nginx -t
次の出力が表示されます。
nginx: the configuration file /etc/nginx/nginx.conf syntax is ok
nginx: configuration file /etc/nginx/nginx.conf test is successful
次に、次のコマンドを使用してNginxサービスを再起動します。
systemctl restart nginx
Nginxのステータスを確認するには、次のコマンドを実行します。
systemctl status nginx
次の出力が表示されます。
? nginx.service - A high performance web server and a reverse proxy server
     Loaded: loaded (/lib/systemd/system/nginx.service; enabled; vendor preset: enabled)
     Active: active (running) since Sat 2021-10-02 13:00:33 UTC; 4s ago
       Docs: man:nginx(8)
    Process: 19209 ExecStartPre=/usr/sbin/nginx -t -q -g daemon on; master_process on; (code=exited, status=0/SUCCESS)
    Process: 19211 ExecStart=/usr/sbin/nginx -g daemon on; master_process on; (code=exited, status=0/SUCCESS)
   Main PID: 19212 (nginx)
      Tasks: 3 (limit: 4679)
     Memory: 3.2M
        CPU: 50ms
     CGroup: /system.slice/nginx.service
             ??19212 nginx: master process /usr/sbin/nginx -g daemon on; master_process on;
             ??19213 nginx: worker process
             ??19214 nginx: worker process

Oct 02 13:00:33 debian11 systemd[1]: Starting A high performance web server and a reverse proxy server...
Oct 02 13:00:33 debian11 systemd[1]: Started A high performance web server and a reverse proxy server.
次に、Gitea app.iniファイルを編集して、ドメイン情報を定義する必要があります。
nano /etc/gitea/app.ini
次の行を変更します:
DOMAIN           = gitea.example.com
ROOT_URL         = http://gitea.example.com/
ファイルを保存して閉じてから、Giteaサービスを再起動して変更を適用します。
systemctl restart gitea
終了したら、次のステップに進むことができます。
次に、Webブラウザーを開き、URL http://gitea.example.comを使用してGiteaWebインターフェースにアクセスします。 。次のページにリダイレクトされます:
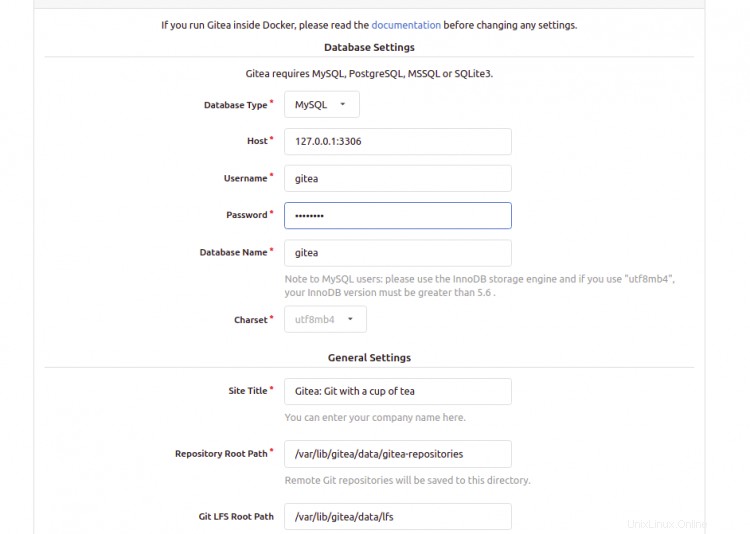
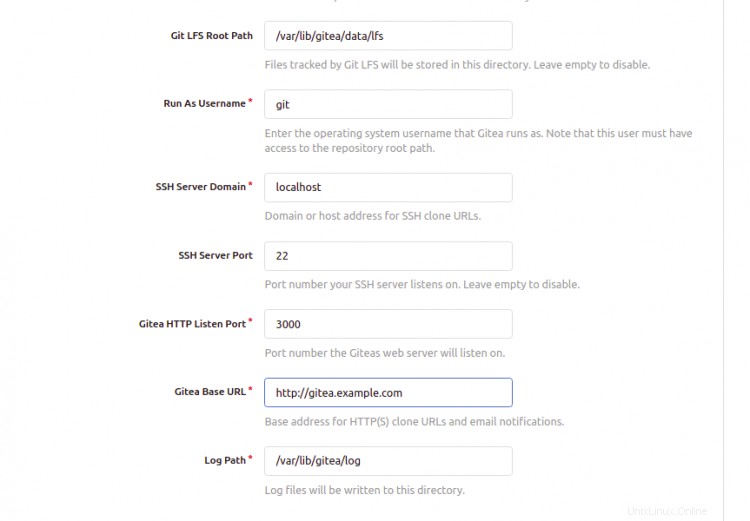
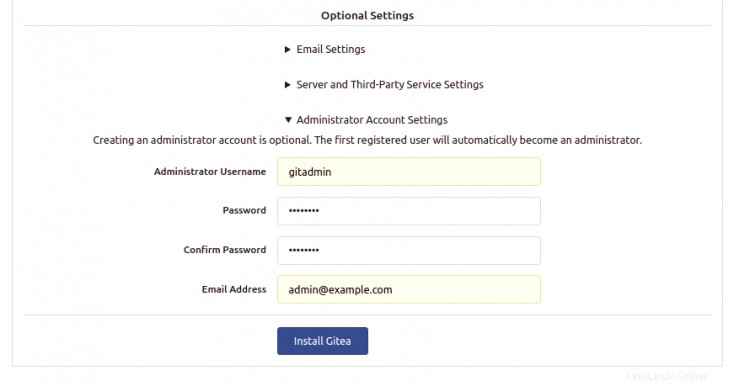
Giteaデータベース情報、URL、管理者ユーザー名、パスワード、ポートを入力し、インストールをクリックします Gitea ボタン。次のページにGiteaダッシュボードが表示されます:

おめでとう!これで、Debian 11にリバースプロキシとしてNginxを使用してGiteaが正常にインストールされました。開発環境にGiteaを実装して、プロジェクトを追跡および管理できます。