WildFlyは、Javaで記述され、Red Hatによって開発された無料のオープンソースおよびクロスプラットフォームのアプリケーションランタイムであり、単一のIDEから優れたアプリケーションを開発できます。軽量、高速、柔軟性があり、プラグ可能なサブシステムに基づいています。 WindowsおよびLinuxオペレーティングシステムで実行され、高速で安定したJavaランタイム環境をユーザーに提供することを目的としています。 Wildflyには、高速、カスタマイズ可能なランタイム、スケーラビリティ、統合された構成と管理、同時ロード、高速リンク、ドメイン管理などの豊富な機能セットが付属しています。
このチュートリアルでは、Debian10にリバースプロキシとしてNginxを使用してWildflyをインストールする手順を示します。
- Debian10を実行しているサーバー。
- ルートパスワードがサーバーに設定されます。
開始する前に、システムを最新バージョンに更新する必要があります。これを行うには、次のコマンドを実行します。
apt-get update -y
apt-get upgrade -y
サーバーが更新されたら、サーバーを再起動して変更を適用します。
Javaのインストール
WildFlyでは、Javaバージョン8がサーバーにインストールされている必要があります。デフォルトでは、Java8はDebian10のデフォルトリポジトリでは使用できません。そのため、公式WebサイトからJava8をダウンロードする必要があります。
Java 8をダウンロードした後、次のコマンドを使用してJavaソースを/ usr / lib/jvmディレクトリに抽出します。
mkdir /usr/lib/jvm/
tar -zxvf jdk-8u221-linux-x64.tar.gz -C /usr/lib/jvm/
次に、次のコマンドを実行して、デフォルトのJavaバージョンを変更します。
update-alternatives --config java
Javaバージョン8を選択し、Enterキーを押します。次の出力が表示されます。
There are 2 choices for the alternative java (providing /usr/bin/java). Selection Path Priority Status ------------------------------------------------------------ * 0 /usr/lib/jvm/java-11-openjdk-amd64/bin/java 1111 auto mode 1 /usr/lib/jvm/java-11-openjdk-amd64/bin/java 1111 manual mode 2 /usr/lib/jvm/jdk1.8.0_221/bin/java 1 manual mode Pressto keep the current choice[*], or type selection number: 2 update-alternatives: using /usr/lib/jvm/jdk1.8.0_221/bin/java to provide /usr/bin/java (java) in manual mode
次に、次のコマンドを使用してJavaのバージョンを確認します。
java -version
次の出力が得られるはずです:
java version "1.8.0_221"
Java(TM) SE Runtime Environment (build 1.8.0_221-b11)
Java HotSpot(TM) 64-Bit Server VM (build 25.221-b11, mixed mode)
まず、Wildflyのユーザーとグループを作成する必要があります。次のコマンドで作成できます:
groupadd -r wildfly
useradd -r -g wildfly -d /opt/wildfly -s /sbin/nologin wildfly
次に、次のコマンドを使用して最新バージョンのWildflyをダウンロードします。
wget https://download.jboss.org/wildfly/17.0.1.Final/wildfly-17.0.1.Final.zip
ダウンロードが完了したら、次のコマンドを使用してダウンロードしたファイルを抽出します。
unzip wildfly-17.0.1.Final.zip
次に、次のコマンドを使用して、抽出したディレクトリを/opt/にコピーします。
cp -r wildfly-17.0.1.Final /opt/wildfly
次に、以下に示すように、wildflyディレクトリの所有権をwildflyユーザーに変更します。
chown -RH wildfly:wildfly /opt/wildfly
終了したら、次のステップに進むことができます。
次に、WildFlyを設定するために必要なファイルをコピーする必要があります。
まず、WildFly設定ファイルを/ etc/wildflyディレクトリにコピーします。
mkdir /etc/wildfly
cp /opt/wildfly/docs/contrib/scripts/systemd/wildfly.conf /etc/wildfly/
次に、次のコマンドを使用して、launch.shファイルを/ opt / wildfly /bin/ディレクトリにコピーします。
cp /opt/wildfly/docs/contrib/scripts/systemd/launch.sh /opt/wildfly/bin/
次に、launch.shファイルの実行権限を付与します:
sh -c 'chmod +x /opt/wildfly/bin/*.sh'
次に、Wildflysystemdユニットファイルを/etc / systemd /system/ディレクトリにコピーします。
cp /opt/wildfly/docs/contrib/scripts/systemd/wildfly.service /etc/systemd/system/
次に、次のコマンドを使用してsystemdデーモンをリロードします。
systemctl daemon-reload
次に、WildFlyサービスを開始し、次のコマンドを使用して起動時に開始できるようにします。
systemctl start wildfly
systemctl enable wildfly
次のコマンドを使用して、Wildflyサービスのステータスを確認できるようになりました。
systemctl status wildfly
次の出力が得られるはずです:
? wildfly.service - The WildFly Application Server
   Loaded: loaded (/etc/systemd/system/wildfly.service; disabled; vendor preset: enabled)
   Active: active (running) since Tue 2019-09-10 00:19:27 EDT; 1s ago
 Main PID: 1142 (launch.sh)
    Tasks: 7 (limit: 1138)
   Memory: 24.7M
   CGroup: /system.slice/wildfly.service
           ??1142 /bin/bash /opt/wildfly/bin/launch.sh standalone standalone.xml 0.0.0.0
           ??1143 /bin/sh /opt/wildfly/bin/standalone.sh -c standalone.xml -b 0.0.0.0
           ??1200 java -D[Standalone] -server -Xms64m -Xmx512m -XX:MetaspaceSize=96M -XX:MaxMetaspaceSize=256m -Djava.net.preferIPv4Stack=true -

Sep 10 00:19:27 debian systemd[1]: Started The WildFly Application Server.
次に、Wildfly管理コンソールにアクセスするためのWildflyの管理者ユーザーを作成する必要があります。次のコマンドで作成できます:
/opt/wildfly/bin/add-user.sh
次の出力が表示されます。
What type of user do you wish to add?
 a) Management User (mgmt-users.properties)
 b) Application User (application-users.properties)
(a): a
aと入力します Enterを押します 管理ユーザーを作成します。ユーザー作成プロセス中に、以下に示すように、ユーザー名、パスワード、およびグループ名を提供する必要があります。
Enter the details of the new user to add.
Using realm 'ManagementRealm' as discovered from the existing property files.
Username : wildflyadmin
Password recommendations are listed below. To modify these restrictions edit the add-user.properties configuration file.
 - The password should be different from the username
 - The password should not be one of the following restricted values {root, admin, administrator}
 - The password should contain at least 8 characters, 1 alphabetic character(s), 1 digit(s), 1 non-alphanumeric symbol(s)
Password :
Re-enter Password :
What groups do you want this user to belong to? (Please enter a comma separated list, or leave blank for none)[  ]:
About to add user 'wildflyadmin' for realm 'ManagementRealm'
Is this correct yes/no? yes
Added user 'wildflyadmin' to file '/opt/wildfly/standalone/configuration/mgmt-users.properties'
Added user 'wildflyadmin' to file '/opt/wildfly/domain/configuration/mgmt-users.properties'
Added user 'wildflyadmin' with groups  to file '/opt/wildfly/standalone/configuration/mgmt-groups.properties'
Added user 'wildflyadmin' with groups  to file '/opt/wildfly/domain/configuration/mgmt-groups.properties'
Is this new user going to be used for one AS process to connect to another AS process?
e.g. for a slave host controller connecting to the master or for a Remoting connection for server to server EJB calls.
yes/no? yes
To represent the user add the following to the server-identities definition
完了したら、次のステップに進むことができます。
デフォルトでは、Wildflyはローカルシステムからのみアクセスできます。したがって、リモートシステムからアクセスするように構成する必要があります。ファイル/etc/wildfly/wildfly.confを編集することでそれを行うことができます:
nano /etc/wildfly/wildfly.conf
ファイルの最後に次の行を追加します。
WILDFLY_CONSOLE_BIND=0.0.0.0
終了したら、ファイルを保存して閉じます。次に、以下に示すように/opt/wildfly/bin/launch.shファイルを開きます。
nano /opt/wildfly/bin/launch.sh
以下に示すようにファイルを変更します:
if [ "x$WILDFLY_HOME" = "x" ]; then
    WILDFLY_HOME="/opt/wildfly"
fi

if [[ "$1" == "domain" ]]; then
    $WILDFLY_HOME/bin/domain.sh -c $2 -b $3 -bmanagement $4
else
    $WILDFLY_HOME/bin/standalone.sh -c $2 -b $3 -bmanagement $4
fi
ファイルを保存して閉じます。次に、ファイル/etc/systemd/system/wildfly.serviceを開きます。
nano /etc/systemd/system/wildfly.service
以下に示すようにファイルを変更します:
[Unit]
Description=The WildFly Application Server
After=syslog.target network.target
Before=httpd.service

[Service]
Environment=LAUNCH_JBOSS_IN_BACKGROUND=1
EnvironmentFile=-/etc/wildfly/wildfly.conf
User=wildfly
LimitNOFILE=102642
PIDFile=/var/run/wildfly/wildfly.pid
ExecStart=/opt/wildfly/bin/launch.sh $WILDFLY_MODE $WILDFLY_CONFIG $WILDFLY_BIND $WILDFLY_CONSOLE_BIND
StandardOutput=null

[Install]
WantedBy=multi-user.target
ファイルを保存します。次に、/ var / run / wildflyディレクトリを作成し、正しい権限を設定します
mkdir /var/run/wildfly/
chown wildfly:wildfly /var/run/wildfly/
最後に、systemdデーモンをリロードし、Wildflyサービスを再起動して変更を適用します。
systemctl daemon-reload
systemctl restart wildfly
完了したら、次のステップに進むことができます。
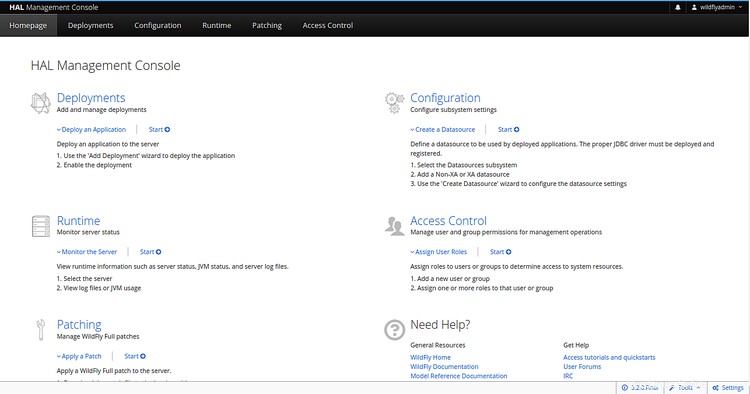
これで、Wildflyがインストールされ、リモートシステムからアクセスするように設定されました。デフォルトでは、Wildfly管理コンソールはポート9990でリッスンしています。URL http://192.168.0.4:9990にアクセスしてアクセスできます。 。次のページにリダイレクトされます:

次に、管理者のユーザー名とパスワードを入力し、署名をクリックします。 で ボタン。次の画面にWildfly管理コンソールが表示されます。

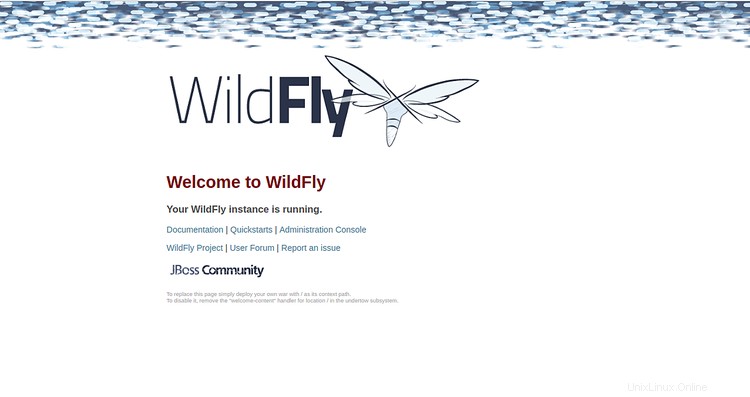
URL http://192.168.0.4:8080 にアクセスして、Wildflyアプリケーションにアクセスすることもできます。 。次のページが表示されます:

NginxをWildflyのリバースプロキシとして構成する
次に、ポート80から8080で着信するリクエストをプロキシするためのリバースプロキシとしてNginxを構成する必要があります。
まず、次のコマンドを使用してNginxをインストールします。
apt-get install nginx -y
Nginxがインストールされたら、次のコマンドを使用してNginxの新しい仮想ホストファイルを作成します。
nano /etc/nginx/sites-available/wildfly.conf
次の行を追加します:
upstream wildfly {
  server 127.0.0.1:8080 weight=100 max_fails=5 fail_timeout=5;
}

server {
  listen          80;
  server_name     192.168.0.4;

  location / {
        proxy_set_header X-Forwarded-Host $host;
        proxy_set_header X-Forwarded-Server $host;
        proxy_set_header X-Forwarded-For $proxy_add_x_forwarded_for;
        proxy_pass http://wildfly/;
  }
}
終了したら、ファイルを保存して閉じます。次に、次のコマンドを使用して、構文エラーがないかNginxを確認します。
nginx -t
次の出力が得られるはずです:
nginx: the configuration file /etc/nginx/nginx.conf syntax is ok
nginx: configuration file /etc/nginx/nginx.conf test is successful
次に、Nginx仮想ホストを有効にし、次のコマンドでNginxを再起動します。
ln -s /etc/nginx/sites-available/wildfly.conf /etc/nginx/sites-enabled/
systemctl restart nginx
これで、ポート8080を指定せずにWildflyアプリケーションにアクセスできます。
それでおしまい。これで、Wildfly with NginxがDebian10にリバースプロキシとして正常にインストールおよび設定されました。ご不明な点がございましたら、お気軽にお問い合わせください。