Django は、Model-Template-Views(MTV) に従う Python ベースの Web フレームワークです。 Django は、Web サイトの迅速な開発を可能にするため、Web 開発で人気のあるツールです。
このチュートリアルでは、Django のセットアップ方法について説明します。仮想環境を使用した最適な本番セットアップをご案内します。
VPS を探している場合 アプリケーションを実行するためのプロバイダーである場合、サーバー間サービスを確認できます。
セットアップから始めましょう。
1 1. システムの更新
sudo apt update -y && apt upgrade -y2 2. pip と仮想環境のインストール
まず、システムの Python3 バージョンを確認してください。
# python3 -V
Python 3.8.10
PIP と Venv をインストールしましょう。
sudo apt install python3-pip python3-venv
3 3. プロジェクト ディレクトリの作成
プロジェクト ディレクトリを作成しましょう。
sudo mkdir /var/www/djangoディレクトリをプロジェクト ディレクトリに変更します。
cd /var/www/django仮想環境を作成しましょう。
python3 -m venv django_venv
仮想環境をアクティブ化します。
source django_venv/bin/activate4 4. Django 3.2 のインストール
PIP で Django をインストールします。
(django_venv) pip install django==3.2
インストールを確認してください。
(django_venv) django-admin --versionOutput:
3.2
5 5. プロジェクトの作成
Django プロジェクトを作成しましょう。
注: ネストされたディレクトリが多くなりすぎないように、末尾にドット (.) を含めることを忘れないでください。
(django_venv) django-admin startproject myproject .プロジェクトを作成したら、データベースを移行する必要があります。ただし、移行を行う前に、まず MySQL/MariaDB データベースを作成する必要があります。 MySQL/MariaDb サービスが既に実行されていると想定しています。
データベースを作成しましょう。
MariaDB [(none)]> create database django;
MariaDB [(none)]> grant all privileges on django.* to 'django'@'localhost' identified by 'mypassword';
MariaDB [(none)]> flush privileges;
MariaDB [(none)]> exit;
注意 :パスワードの変更をお忘れなく 選択したパスワードで。
settings.py を更新しましょう .
sudo nano myproject/settings.pyDjango に設定されているデフォルトのデータベースは SQLite です。本番サイトを設定しているので、MySQL/MariaDB を使用するように更新します。
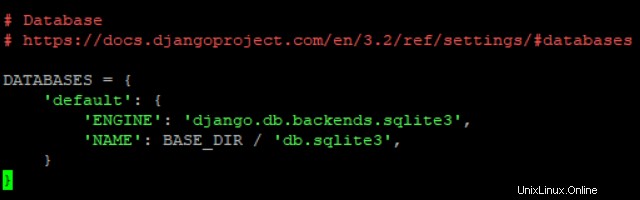
以下で更新しましょう:
DATABASES = {
    'default': {
        'ENGINE'  : 'django.db.backends.mysql',
        'NAME'    : 'django',                 # database name
        'USER'    : 'django',                 # Mysql user
        'PASSWORD': 'mypassword',             # Mysql password
        'HOST'    : 'localhost',
        'PORT'    : '3306',
    }
}
移行を実行する前に、まず mysql-config をインストールしましょう .
MySQL を使用している場合は、このコマンドを実行してください。
sudo apt-get install libmysqlclient-devMariaDB を使用している場合は、これを実行してください。
sudo apt-get install libmariadbclient-dev次に、Python MySQL ドライバーをインストールしましょう。
(django_venv) pip install mysqlclientそれでは、移行を実行しましょう。
(django_venv) python3 manage.py migrateOutput:
Operations to perform:
Apply all migrations: admin, auth, contenttypes, sessions
Running migrations:
Applying contenttypes.0001_initial... OK
Applying auth.0001_initial... OK
Applying admin.0001_initial... OK
Applying admin.0002_logentry_remove_auto_add... OK
Applying admin.0003_logentry_add_action_flag_choices... OK
Applying contenttypes.0002_remove_content_type_name... OK
Applying auth.0002_alter_permission_name_max_length... OK
Applying auth.0003_alter_user_email_max_length... OK
Applying auth.0004_alter_user_username_opts... OK
Applying auth.0005_alter_user_last_login_null... OK
Applying auth.0006_require_contenttypes_0002... OK
Applying auth.0007_alter_validators_add_error_messages... OK
Applying auth.0008_alter_user_username_max_length... OK
Applying auth.0009_alter_user_last_name_max_length... OK
Applying auth.0010_alter_group_name_max_length... OK
Applying auth.0011_update_proxy_permissions... OK
Applying auth.0012_alter_user_first_name_max_length... OK
Applying sessions.0001_initial... OK
6 6. Django アプリへのアクセス
Django アプリにアクセスする前に、IP アドレスまたはドメインを settings.py の ALLOWED_HOSTS に追加する必要があります。 . settings.py を更新しましょう。
sudo nano myproject/settings.py「ALLOWED_HOSTS」に移動
ALLOWED_HOSTS = ['your_server_ip', 'domain.com']「your_server_ip」を更新します 」および「domain.com」 」に IP アドレスとドメインを入力して保存します。
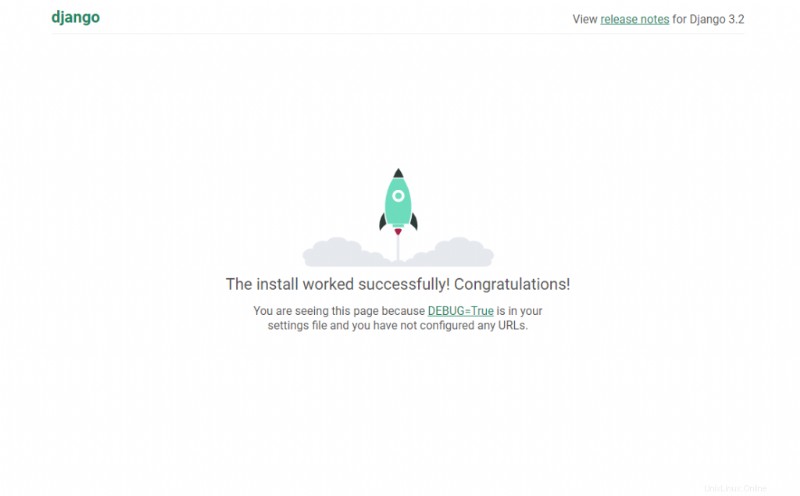
Django アプリにアクセスする前に、このコマンドを実行する必要があります。
python3 manage.py runserver 0.0.0.0:8000http://IPaddress:8000 で Django アプリにアクセスできるようになりました
プロジェクトの管理者ユーザーを作成しましょう
(django_venv) python3 manage.py createsuperuserコマンドを実行したら、管理者のユーザー名、電子メール、パスワードを入力してください。
7 7. Apache と WSGI を使用したプロダクションのセットアップ
プロダクションをセットアップするには、Apache と Apache mod_wsgi モジュールをインストールします。
sudo apt-get install apache2 libapache2-mod-wsgi-py3仮想ホストを作成しましょう。
sudo nano /etc/apache2/sites-available/django.conf以下を仮想ホストに追加します。
注:domain.com を置き換えることを忘れないでください
<VirtualHost *:80>
        ServerName domain.com
        ServerAlias www.domain.com
        DocumentRoot /var/www/django
        ErrorLog ${APACHE_LOG_DIR}/error.log
        CustomLog ${APACHE_LOG_DIR}/access.log combined

        Alias /static/ /var/www/django/myproject/static/
        <Directory /var/www/django/myproject/static>
                Require all granted
        </Directory>

        Alias /media/ /var/www/django/myproject/media/
        <Directory /var/www/django/myproject/media>
                Require all granted
        </Directory>

        <Directory /var/www/django/myproject>
                <Files wsgi.py>
                        Require all granted
                </Files>
        </Directory>

        WSGIDaemonProcess mydjangoproject python-path=/var/www/django python-home=/var/www/django/django_venv
        WSGIProcessGroup mydjangoproject
        WSGIScriptAlias / /var/www/django/myproject/wsgi.py
</VirtualHost>
仮想ホストを有効にしましょう:
sudo a2ensite django.confApache ウェブサーバーを再起動します。
sudo systemctl restart apache2settings.py をもう一度編集しましょう。 ウェブサーバーが静的ファイルを提供するためです。
sudo nano myproject/settings.pyファイルの先頭に次を追加:
import os次にに移動します " 静的ファイル “ セクションに次の値を追加してください:
PROJECT_ROOT =os.path.dirname(os.path.abspath(__file__))
STATIC_ROOT =os.path.join(PROJECT_ROOT, 'static')
以下のようになります。
# Static files (CSS, JavaScript, Images)
# https://docs.djangoproject.com/en/3.2/howto/static-files/
PROJECT_ROOT = os.path.dirname(os.path.abspath(__file__))
STATIC_URL = '/static/'
STATIC_ROOT = os.path.join(PROJECT_ROOT, 'static')
それでは、すべての静的コンテンツを収集しましょう。
(django_venv) python3 manage.py collectstaticOutput:
128 static files copied to '/var/www/django/myproject/static'.Apache サービスを再起動します:
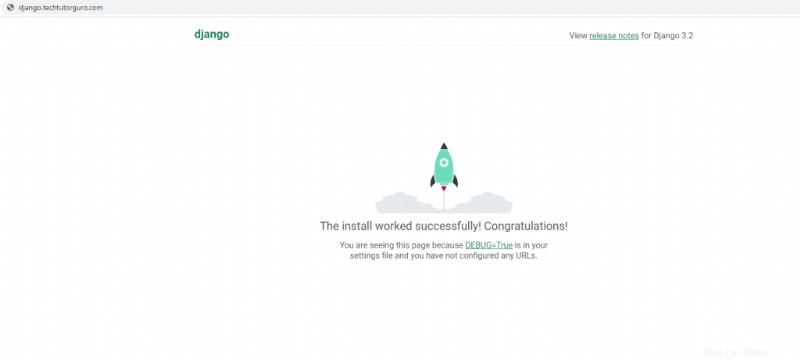
sudo systemctl restart apache2以上で制作現場が整いました。 http://domain.com でドメインを使用して Django アプリにアクセスできるようになりました。サイトを保護して SSL 証明書をインストールする場合は、この記事を確認してください。
8 まとめ
Apache と WSGI を使用して Ubuntu 20.04 に Django 3.2 をインストールする方法を学習しました。この記事が気に入ったら、このサイトの他の記事も気に入るかもしれません。