この記事では、Ubuntu 20.04 LTS に Samba をインストールして構成するために必要な手順について説明しました。このチュートリアルを続行する前に、sudo を持つユーザーとしてログインしていることを確認してください 特権。このチュートリアルのすべてのコマンドは、root 以外のユーザーとして実行する必要があります。
Samba は、エンドユーザーがファイル、プリンター、その他の共有リソースにアクセスできるようにする SMB/CIFS ネットワーク ファイル共有プロトコルを無料でオープンソースに再実装したものです。
Ubuntu 20.04 に Samba をインストール
ステップ 1. まず、Ubuntu サーバーにパッケージのインストールを開始する前に、すべてのシステム パッケージが更新されていることを確認することを常にお勧めします。
sudo apt update
sudo apt upgrade
ステップ 2. Ubuntu システムに Samba をインストールします。
Samba をインストールするには、以下のコマンドを実行します:
sudo apt install samba
Samba サービスが実行されているかどうかを確認するには、以下のコマンドを実行します:
sudo systemctl status smbd
ステップ 3. Samba の構成。
ここで、最初のデフォルト構成ファイルをバックアップします:
sudo cp /etc/samba/smb.conf{,.backup} 次に、Samba 構成ファイルを開きます。
sudo nano /etc/samba/smb.conf
次のファイルを追加します:
======================= Global Settings =======================
[global]
## Browsing/Identification ###
# Change this to the workgroup/NT-domain name your Samba server will part of
   workgroup = WORKGROUPnetbios name = linuxtips
   security = user
   proxy = no
   map to guest = bad user
#### Networking ####
# The specific set of interfaces / networks to bind to
# This can be either the interface name or an IP address/netmask;
# interface names are normally preferred
   interfaces = 127.0.0.0/8 eth0
# Only bind to the named interfaces and/or networks; you must use the
# 'interfaces' option above to use this.
bind interfaces only = yes

#Most people will want "standalone server" or "member server".
#Running as "active directory domain controller" will require firstserver role = standalone server
obey pam restrictions = yes
#This boolean parameter controls whether Samba attempts to sync the Unix[public]
   path = /samba/public
   browseable = yes
   guest ok = yes
   guest only = yes
   read only = no
   force user = nobody
   force create mode = 0777
   force directory mode = 0777
新しい共有を構成したので、保存して Samba を再起動して有効にします。
sudo systemctl restart nmbd
ステップ 4. ユーザー アカウントの設定と共有への接続。
Samba はシステム ユーザー アカウントを使用しないため、他のユーザーとファイルを共有するには Samba アカウントを作成する必要があります。ユーザーを作成するには、次のコマンドを実行します:
sudo smbpasswd -a yourusername
ステップ 5. 共有に接続します。
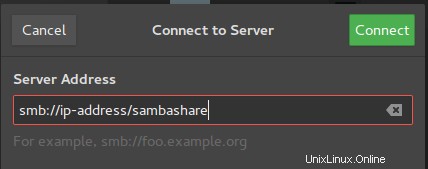
デフォルトのファイル マネージャーを開き、サーバーに接続 をクリックします。 次に入力してください:

Samba を Ubuntu 20.04 LTS Focal Fossa にインストールするために必要なことはこれだけです。この簡単なヒントがお役に立てば幸いです。 Samba の詳細については、公式ナレッジ ベースを参照してください。質問や提案がある場合は、下にコメントを残してください。