
このチュートリアルでは、Ubuntu 20.04 LTSにWonderCMSをインストールする方法を紹介します。知らなかった方のために、WonderCMSは無料のオープンソースのフラットファイルです。 PHPとjQueryで記述されたコンテンツ管理システム。WonderCMSはMariaDBのような従来の/リレーショナルデータベースも必要としません。フラットファイルテクノロジーにより、WonderCMSはすべてのデータをJSONで構造化されたdatabase.jsというテキストファイル(フラットファイル)に保存できます。フォーマット。カスタムログインURL、SEOフレンドリー、WYSIWYG、柔軟なCSSフレームワーク、ネイティブマークダウンなど、豊富な機能セットも提供します。
この記事は、少なくともLinuxの基本的な知識があり、シェルの使用方法を知っていること、そして最も重要なこととして、サイトを独自のVPSでホストしていることを前提としています。インストールは非常に簡単で、ルートアカウントで実行されていますが、そうでない場合は、'sudoを追加する必要があります。 ‘ルート権限を取得するコマンドに。 Ubuntu 20.04FocalFossaサーバーにWonderCMSを段階的にインストールする方法を紹介します。 Ubuntu 18.04、16.04、およびLinuxMintなどの他のDebianベースのディストリビューションでも同じ手順に従うことができます。
前提条件
- 次のオペレーティングシステムのいずれかを実行しているサーバー:Ubuntu 20.04、18.04、およびLinuxMintやエレメンタリーOSなどの他のDebianベースのディストリビューション。
- 潜在的な問題を防ぐために、OSの新規インストールを使用することをお勧めします。
- サーバーへのSSHアクセス(またはデスクトップを使用している場合はターミナルを開く)
non-root sudo userまたはroot userへのアクセス 。non-root sudo userとして行動することをお勧めします ただし、ルートとして機能するときに注意しないと、システムに害を及ぼす可能性があるためです。
Ubuntu 20.04 LTSFocalFossaにWonderCMSをインストールする
手順1.まず、次のaptを実行して、すべてのシステムパッケージが最新であることを確認します。 ターミナルのコマンド。
sudo apt update
sudo apt upgrade
手順2.LAMPサーバーをインストールします。
Ubuntu 20.04 LAMPサーバーが必要です。LAMPがインストールされていない場合は、こちらのガイドに従ってください。
ステップ3.Ubuntu20.04にWonderCMSをインストールします。
デフォルトでは、WonderCMSはUbuntu 20.04ベースリポジトリでは使用できません。次に、以下のコマンドを実行して、GitHubからインストーラーWonderCMSを複製します。
git clone https://github.com/robiso/wondercms.git /var/www/html/wondercms
いくつかのフォルダの権限を変更する必要があります:
chown -R www-data:www-data /var/www/html/wondercms
ステップ4.ApacheWonderCMSサイトを構成します。
次に、Apacheで新しい仮想ホストディレクティブを作成します。たとえば、「wondercms.conf」という名前の新しいApache構成ファイルを作成します。 ’仮想サーバー上:
sudo nano /etc/apache2/sites-available/wondercms.conf
次のファイルを追加します:
<VirtualHost *:80>
    ServerAdmin admin@your-domain.com
    ServerName your-domain.com
    ServerAlias www.your-domain.com
    DocumentRoot /var/www/html/wondercms/

    <Directory />
        Options +Indexes +FollowSymLinks +ExecCGI
        AllowOverride All
        Order deny,allow
        Allow from all
        Require all granted
    </Directory>

    <Directory /var/www/html/wondercms>
        Require all denied
    </Directory>

    ErrorLog /var/log/apache2/wondercms_error_log
    TransferLog /var/log/apache2/wondercms_access_log
</VirtualHost>
ファイルを保存して閉じてから、Apache Webサーバーを再起動して、変更を加えます。
sudo a2enmod rewrite
sudo a2ensite wondercms.conf
sudo systemctl restart apache2
手順5.HTTPSを設定します。
PrestaShopで安全なHTTPS接続を有効にする必要があります。Let’s Encryptから無料のTLS証明書を取得できます。Ubuntu20.04リポジトリからLet’s Encryptクライアント(certbot)をインストールします。
sudo apt install certbot python3-certbot-apache
次に、次のコマンドを実行して、Apacheプラグインを使用して無料のTLS証明書を取得します。
certbot --apache -d your-domain.com
メールアドレスを入力し、利用規約に同意するよう求められます:
Enabled Apache rewrite module
Redirecting vhost in /etc/apache2/sites-available/wondercms.conf to ssl vhost in /etc/apache2/sites-available/wondercms-le-ssl.conf

- - - - - - - - - - - - - - - - - - - - - - - - - - - - - - - - - - - - - - - -
Congratulations! You have successfully enabled https://your-domain.com

You should test your configuration at:
https://www.ssllabs.com/ssltest/analyze.html?d=your-domain.com
- - - - - - - - - - - - - - - - - - - - - - - - - - - - - - - - - - - - - - - -

IMPORTANT NOTES:
 - Congratulations! Your certificate and chain have been saved at:
   /etc/letsencrypt/live/your-domain.com/fullchain.pem
   Your key file has been saved at:
   /etc/letsencrypt/live/your-domain.com/privkey.pem
   Your cert will expire on 2022-06-11. To obtain a new or tweaked
   version of this certificate in the future, simply run certbot again
   with the "certonly" option. To non-interactively renew *all* of
   your certificates, run "certbot renew"
 - If you like Certbot, please consider supporting our work by:

   Donating to ISRG / Let's Encrypt:   https://letsencrypt.org/donate
   Donating to EFF:                    https://eff.org/donate-le
テストが成功した場合、変更を有効にするためにApacheをリロードします:
sudo apache2ctl -t
sudo systemctl reload apache2
手順6.ファイアウォールを構成します。
デフォルトでは、UFWファイアウォールはUbuntuで有効になっています。Apache仮想ホスト構成ファイルに応じて、ポート80と443を開いてHTTPおよびHTTPSトラフィックを許可します。
sudo ufw allow 80/tcp
sudo ufw allow 443/tcp
sudo ufw reload
ステップ7.WonderCMSWebインターフェイスへのアクセス。
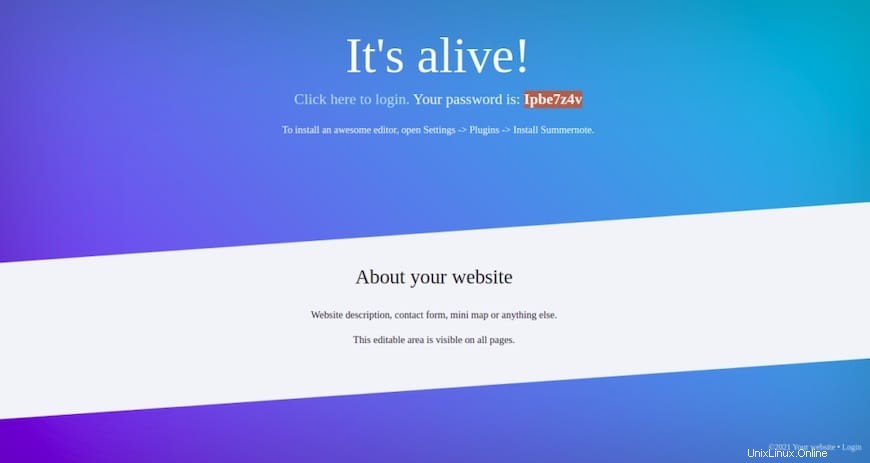
正常にインストールされたら、Webブラウザーを開き、URL https://your-domain.comを使用してWonderCMSWebインターフェースにアクセスします。 。ログインパスワードを含むWonderCMSが表示されます:
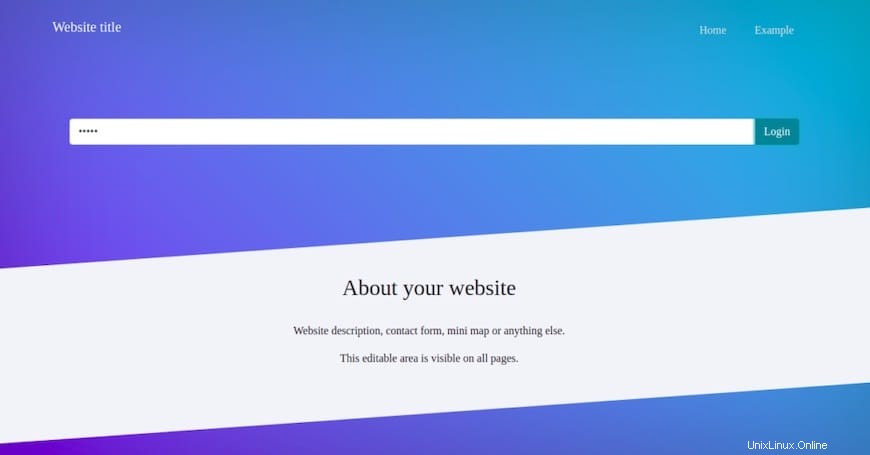
次に、URL https://your-domian/loginURLを使用してWonderCMSログインページにアクセスします。 。 WonderCMSログインページが表示されます:
おめでとうございます!WonderCMSが正常にインストールされました。Ubuntu20.04LTS Focal FossaにWonderCMSをインストールするためにこのチュートリアルを使用していただき、ありがとうございます。追加のヘルプや役立つ情報については、Matomoの公式Webサイトを確認することをお勧めします。 。