
このチュートリアルでは、Ubuntu 20.04 LTSにNagiosをインストールする方法を紹介します。知らない人のために、NagiosはさまざまなLinuxマシンを監視するために使用されるオープンソースの監視ツールです。または別のクライアントホスト。HTTP、FTP、SSH、SMTPなどを、CPU使用率、RAM、ディスク使用量、および実行中のさまざまなプロセスとともに監視します。
この記事は、少なくともLinuxの基本的な知識があり、シェルの使用方法を知っていること、そして最も重要なこととして、サイトを独自のVPSでホストしていることを前提としています。インストールは非常に簡単で、ルートアカウントで実行されていますが、そうでない場合は、' sudoを追加する必要があります。 ‘ルート権限を取得するコマンドに。 Ubuntu 20.04(Focal Fossa)サーバーにNagiosを段階的にインストールする方法を紹介します。
前提条件
- 次のオペレーティングシステムのいずれかを実行しているサーバー:Ubuntu 20.04、18.04、16.04、およびLinuxMintなどの他のDebianベースのディストリビューション。
- 潜在的な問題を防ぐために、OSの新規インストールを使用することをお勧めします。
非rootsudoユーザーまたはrootユーザーへのアクセス 。非rootsudoユーザーとして行動することをお勧めします ただし、ルートとして機能するときに注意しないと、システムに害を及ぼす可能性があるためです。
Ubuntu 20.04 LTSFocalFossaにNagiosをインストールする
手順1.まず、次の apt を実行して、すべてのシステムパッケージが最新であることを確認します。 ターミナルのコマンド。
sudo apt update
sudo apt upgrade
sudo apt install build-essential apache2 php openssl perl make php-gd libgd-dev libapache2-mod-php libperl-dev libssl-dev daemon wget apache2-utils unzip
ステップ2.ユーザーとグループを作成します。
ユーザーをApache Webサーバーグループに追加します:
sudo useradd nagios
sudo groupadd nagcmd
sudo usermod -a -G nagcmd nagios
sudo usermod -a -G nagcmd www-data
ステップ3.Ubuntu20.04にNagiosをインストールします。
ここで、公式ページからNagiosをダウンロードするか、ターミナルから以下のコマンドで入手できます:
cd /tmp
wget https://assets.nagios.com/downloads/nagioscore/releases/nagios-4.4.6.tar.gz
tar -zxvf /tmp/nagios-4.4.6.tar.gz
cd /tmp/nagios-4.4.6/
次に、ソースコードからNagiosをコンパイルします:
sudo ./configure --with-nagios-group=nagios --with-command-group=nagcmd --with-httpd_conf=/etc/apache2/sites-enabled/
sudo make all
sudo make install
sudo make install-init
sudo make install-config
sudo make install-commandmode
ステップ4.Nagiosを構成します。
Nagiosは構成ファイルを/ usr / local / nagios /に配置します etcディレクトリ。次に、お気に入りのエディターを使用してファイルを編集します。
sudo nano /usr/local/nagios/etc/objects/contacts.cfg
通知を受信するようにメールアドレスフィールドを変更します:
define contact{
        contact_name                    nagiosadmin             ; Short name of user
        use                             generic-contact         ; Inherit default values from generic-contact template (defined above)
        alias                           Nagios Admin            ; Full name of user

        email                           admin@idroot.us      ; <<***** CHANGE THIS TO YOUR EMAIL ADDRESS ******

             }
ステップ5.NagiosWebインターフェイスをインストールします。
以下のコマンドを使用してNagios Webインターフェースをインストールします:
sudo make install-webconf
次に、Nagios Webインターフェースにアクセスするための「nagiosadmin」としてユーザーアカウントを作成します。提供したパスワードは安全な場所に保存するか、覚えておいてください。後で必要になります:
sudo htpasswd -c /usr/local/nagios/etc/htpasswd.users nagiosadmin
以下のコマンドを実行した後:
sudo a2enmod cgi
次に、変更を有効にするためにApacheを再起動します:
sudo systemctl restart apache2
ステップ6.Nagiosプラグインをインストールします。
次のステップでは、最新のnagios-pluginsソースをダウンロードし、次のコマンドを使用してインストールします。
cd /tmp
wget https://nagios-plugins.org/download/nagios-plugins-2.3.3.tar.gz
tar -zxvf /tmp/nagios-plugins-2.3.3.tar.gz
cd /tmp/nagios-plugins-2.3.3/
プラグインをコンパイルしてインストールします:
sudo ./configure --with-nagios-user=nagios --with-nagios-group=nagios
sudo make
sudo make install
ステップ7.Ubuntu20.04でNagiosを起動します。
指定されたコマンドを押して上記の構成を再確認し、すべての構成の事前チェックに問題がないことを確認します。
sudo /usr/local/nagios/bin/nagios -v /usr/local/nagios/etc/nagios.cfg
Output:

Nagios Core 4.4.5
Copyright (c) 2009-present Nagios Core Development Team and Community Contributors
Copyright (c) 1999-2009 Ethan Galstad
Last Modified: 2019-08-20
License: GPL

Website: https://www.nagios.org
Reading configuration data...
   Read main config file okay...
   Read object config files okay...

Running pre-flight check on configuration data...

Checking objects...
        Checked 8 services.
        Checked 1 hosts.
        Checked 1 host groups.
        Checked 0 service groups.
        Checked 1 contacts.
        Checked 1 contact groups.
        Checked 24 commands.
        Checked 5 time periods.
        Checked 0 host escalations.
        Checked 0 service escalations.
Checking for circular paths...
        Checked 1 hosts
        Checked 0 service dependencies
        Checked 0 host dependencies
        Checked 5 timeperiods
Checking global event handlers...
Checking obsessive compulsive processor commands...
Checking misc settings...

Total Warnings: 0
Total Errors:   0
次に、システムの起動時にNagiosサービスが自動的に開始するようにします:
sudo systemctl enable nagios
sudo systemctl start nagios
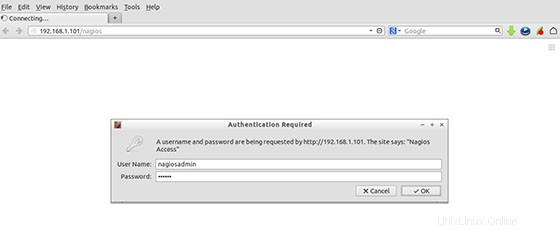
ステップ8.Nagiosにアクセスします。
NagiosはデフォルトでHTTPポート80で使用できます。お気に入りのブラウザを開き、http://your-domain.com/nagios またはhttp:// your-server-ip / nagios インストールを完了するために必要な手順を完了します。ユーザー名とパスワードの入力を求められたら、ユーザー名「nagiosadmin」と手順5で入力したパスワードを入力します。
おめでとうございます!Nagiosが正常にインストールされました。Ubuntu20.04LTS(Focal Fossa)システムにNagios監視ツールをインストールするためにこのチュートリアルを使用していただきありがとうございます。追加のヘルプや役立つ情報については、次のことをお勧めします。 Nagiosの公式ウェブサイトを確認してください。