Netboxは、無料で強力なIPアドレス(IPAM)およびデータセンターインフラストラクチャ管理(DCIM)ツールです。ネットワーク、VM、インベントリなどに関する情報を保存するために使用されます。もともとはDigitalOceanのネットワークエンジニアリングチームによって開発されました。このツールはDjangoPythonフレームワークで記述されており、PostgreSQLデータベースに依存しています。その目的は、ネットワーク操作の信頼できる唯一の情報源として機能することです。
このチュートリアルでは、Ubuntu20.04にリバースプロキシとしてNginxを使用してNetboxをインストールする方法を説明します。
- Ubuntu20.04を実行しているサーバー。
- ルートパスワードはサーバーで構成されています。
開始する前に、Netboxに必要ないくつかの依存関係をインストールする必要があります。次のコマンドを実行して、それらすべてをインストールできます。
apt-get install nginx git gcc supervisor python3 python3-dev python3-pip python3-setuptools build-essential libxml2-dev libxslt1-dev libffi-dev graphviz libpq-dev libssl-dev zlib1g-dev -y
すべてのパッケージがインストールされたら、次のステップに進むことができます。
PostgreSQLデータベースのインストールと構成
Netboxは、データストレージをPostgreSQLデータベースに依存しています。次のコマンドでインストールできます:
apt-get install postgresql postgresql-contrib -y
PostgreSQLがインストールされたら、次のコマンドを使用してPostgreSQLにログインします。
su - postgres
[email protected]:~$ psql
次の出力が得られるはずです:
psql (12.2 (Ubuntu 12.2-4))
Type "help" for help.
次に、次のコマンドを使用してNetboxのデータベースとユーザーを作成します。
postgres=# CREATE DATABASE netbox;
postgres=# CREATE USER netbox WITH PASSWORD 'password';
次に、次のコマンドを使用して、Netboxデータベースにすべての権限を付与します。
postgres=# GRANT ALL PRIVILEGES ON DATABASE netbox TO netbox;
次に、次のコマンドを使用してPostgreSQLシェルを終了します。
postgres=# exit
[email protected]:~$ exit
NetBoxのインストールと構成
まず、ディレクトリを/ optに変更し、次のコマンドを使用してGitHubリポジトリから最新バージョンのNetboxをダウンロードします。
cd /opt/
git clone -b master https://github.com/digitalocean/netbox.git
次に、次のコマンドを使用してPythonバイナリのシンボリックリンクを作成します。
ln -s /usr/bin/python3 /usr/bin/python
次に、ディレクトリを/ opt / netbox / netbox /に変更し、次のコマンドを実行してDjangoSECRETキーを生成します。
cd /opt/netbox/netbox/
./generate_secret_key.py
次の出力が得られるはずです:
[email protected])eTDpo(k^f4Sm9bariUnK0syCPMGEIjW6XV_8l5xhB7z
次に、ディレクトリをnetboxに変更し、設定ファイルの名前を変更します。
cd netbox
mv configuration.example.py configuration.py
次に、Netbox構成ファイルを編集し、データベース、秘密鍵、および許可されるホストを定義します。
nano configuration.py
次の変更を行います:
ALLOWED_HOSTS = ['your-server-ip']

# PostgreSQL database configuration. See the Django documentation for a complete list of available parameters:
#   https://docs.djangoproject.com/en/stable/ref/settings/#databases
DATABASE = {
    'NAME': 'netbox',         # Database name
    'USER': 'netbox',               # PostgreSQL username
    'PASSWORD': 'password',           # PostgreSQL password
    'HOST': 'localhost',      # Database server
    'PORT': '',               # Database port (leave blank for default)
    'CONN_MAX_AGE': 300,      # Max database connection age
}

SECRET_KEY = '[email protected])eTDpo(k^f4Sm9bariUnK0syCPMGEIjW6XV_8l5xhB7z'
ファイルを保存して閉じてから、次のコマンドを使用してすべてのPython依存関係をインストールします。
pip3 install -r /opt/netbox/requirements.txt
次に、次のコマンドを使用してデータベースを移行します。
cd /opt/netbox/netbox/
python3 manage.py migrate
次に、次のコマンドを使用してNetbox管理ユーザーを作成します。
python3 manage.py createsuperuser
以下に示すように、ユーザー名とパスワードを入力するように求められます。
Username (leave blank to use 'root'): netboxadmin
Email address: [email protected]
Password:
Password (again):
Superuser created successfully.
次に、次のコマンドを使用して静的ファイルを収集します。
python3 manage.py collectstatic
次の出力が表示されます。
976 static files copied to '/opt/netbox/netbox/static'.
Gunicornのインストールと構成
NetboxはDjangoベースのアプリケーションです。そのため、システムにGunicornをインストールする必要があります。次のコマンドを実行してインストールできます:
pip3 install gunicorn
Gunicornをインストールした後、次のコマンドを使用してNetbox用の新しいGunicorn構成ファイルを作成します。
nano /opt/netbox/gunicorn_config.py
次の行を追加します:
command = '/usr/local/bin/gunicorn'
pythonpath = '/opt/netbox/netbox'
bind = 'your-server-ip:8001'
workers = 3
user = 'www-data'
終了したら、ファイルを保存して閉じます。
スーパーバイザーは、NetBoxサービスを監視および制御できるようにするクライアント/サーバーシステムです。次のコマンドを使用して、Netboxの新しいスーパーバイザー構成ファイルを作成できます。
nano /etc/supervisor/conf.d/netbox.conf
次の行を追加します:
[program:netbox]
command = gunicorn -c /opt/netbox/gunicorn_config.py netbox.wsgi
directory = /opt/netbox/netbox/
user = www-data
完了したら、ファイルを保存して閉じます。次に、次のコマンドを使用してスーパーバイザサービスを再起動します。
systemctl restart supervisor
次のコマンドを使用して、スーパーバイザサービスのステータスを確認することもできます。
systemctl status supervisor
次の出力が得られるはずです:
? supervisor.service - Supervisor process control system for UNIX
     Loaded: loaded (/lib/systemd/system/supervisor.service; enabled; vendor preset: enabled)
     Active: active (running) since Sat 2020-05-30 05:49:08 UTC; 14s ago
       Docs: http://supervisord.org
   Main PID: 550606 (supervisord)
      Tasks: 5 (limit: 4691)
     Memory: 184.3M
     CGroup: /system.slice/supervisor.service
             ??550606 /usr/bin/python3 /usr/bin/supervisord -n -c /etc/supervisor/supervisord.conf
             ??550626 /usr/bin/python3 /usr/local/bin/gunicorn -c /opt/netbox/gunicorn_config.py netbox.wsgi
             ??550628 /usr/bin/python3 /usr/local/bin/gunicorn -c /opt/netbox/gunicorn_config.py netbox.wsgi
             ??550629 /usr/bin/python3 /usr/local/bin/gunicorn -c /opt/netbox/gunicorn_config.py netbox.wsgi
             ??550630 /usr/bin/python3 /usr/local/bin/gunicorn -c /opt/netbox/gunicorn_config.py netbox.wsgi

May 30 05:49:08 ubuntu2004 systemd[1]: Started Supervisor process control system for UNIX.
May 30 05:49:08 ubuntu2004 supervisord[550606]: 2020-05-30 05:49:08,664 CRIT Supervisor is running as root.  Privileges were not dropped becau>
May 30 05:49:08 ubuntu2004 supervisord[550606]: 2020-05-30 05:49:08,664 INFO Included extra file "/etc/supervisor/conf.d/netbox.conf" during p>
May 30 05:49:08 ubuntu2004 supervisord[550606]: 2020-05-30 05:49:08,671 INFO RPC interface 'supervisor' initialized
May 30 05:49:08 ubuntu2004 supervisord[550606]: 2020-05-30 05:49:08,671 CRIT Server 'unix_http_server' running without any HTTP authentication>
May 30 05:49:08 ubuntu2004 supervisord[550606]: 2020-05-30 05:49:08,672 INFO supervisord started with pid 550606
May 30 05:49:09 ubuntu2004 supervisord[550606]: 2020-05-30 05:49:09,676 INFO spawned: 'netbox' with pid 550626
May 30 05:49:11 ubuntu2004 supervisord[550606]: 2020-05-30 05:49:11,060 INFO success: netbox entered RUNNING state, process has stayed up for
NetBox用にNginxを構成する
ポート80でネットボックスにアクセスするためのリバースプロキシとしてNginxを構成することをお勧めします。次のコマンドを使用して、新しいNginx仮想ホスト構成を作成できます。
nano /etc/nginx/sites-available/netbox.conf
次の行を追加します:
server {
    listen 80;
    server_name your-server-ip;
    client_max_body_size 25m;

    location /static/ {
        alias /opt/netbox/netbox/static/;
    }

    location / {
        proxy_pass http://your-server-ip:8001;
    }
}
ファイルを保存して閉じます。次に、/ etc / nginx /sites-enabled/ディレクトリへのシンボリックリンクを作成します。
ln -s /etc/nginx/sites-available/netbox.conf /etc/nginx/sites-enabled/
次に、次のコマンドを使用して、構文エラーがないかNginxを確認します。
nginx -t
すべてが正常であれば、次の出力が得られるはずです:
nginx: the configuration file /etc/nginx/nginx.conf syntax is ok
nginx: configuration file /etc/nginx/nginx.conf test is successful
最後に、Nginxサービスを再起動して変更を実装します。
systemctl restart nginx
次のコマンドを使用してNginxを確認することもできます:
systemctl status nginx
次の出力が得られるはずです:
? nginx.service - The nginx HTTP and reverse proxy server
   Loaded: loaded (/usr/lib/systemd/system/nginx.service; disabled; vendor preset: disabled)
   Active: active (running) since Sat 2020-05-30 22:28:13 EST; 4min 14s ago
  Process: 984 ExecStart=/usr/sbin/nginx (code=exited, status=0/SUCCESS)
  Process: 982 ExecStartPre=/usr/sbin/nginx -t (code=exited, status=0/SUCCESS)
  Process: 980 ExecStartPre=/usr/bin/rm -f /run/nginx.pid (code=exited, status=0/SUCCESS)
 Main PID: 985 (nginx)
    Tasks: 3 (limit: 25028)
   Memory: 5.5M
   CGroup: /system.slice/nginx.service
           ??985 nginx: master process /usr/sbin/nginx
           ??986 nginx: worker process
           ??987 nginx: worker process

May 30 21:28:12 ubuntu2004 systemd[1]: Starting The nginx HTTP and reverse proxy server...
Mar 30 21:28:12 ubuntu2004 nginx[982]: nginx: the configuration file /etc/nginx/nginx.conf syntax is ok
Mar 30 21:28:12 ubuntu2004 nginx[982]: nginx: configuration file /etc/nginx/nginx.conf test is successful
Mar 30 21:28:13 ubuntu2004 systemd[1]: Started The nginx HTTP and reverse proxy server.
この時点で、Nginx Webサーバーはポート80でNetboxにサービスを提供するように構成されています。これで、NetboxWebインターフェイスへのアクセスに進むことができます。
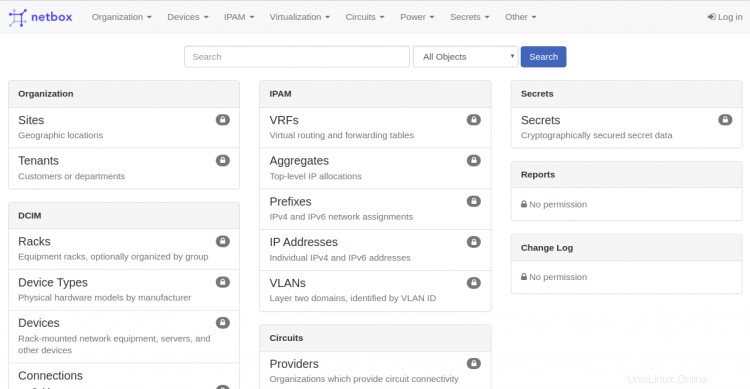
Webブラウザーを開き、URL http://your-server-ipにアクセスします。次のページにリダイレクトされます:

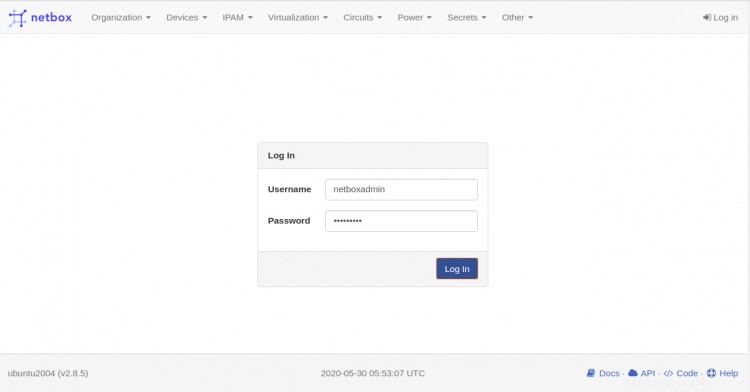
ログをクリックします で ボタン。次の画面にNetboxのログインページが表示されます。

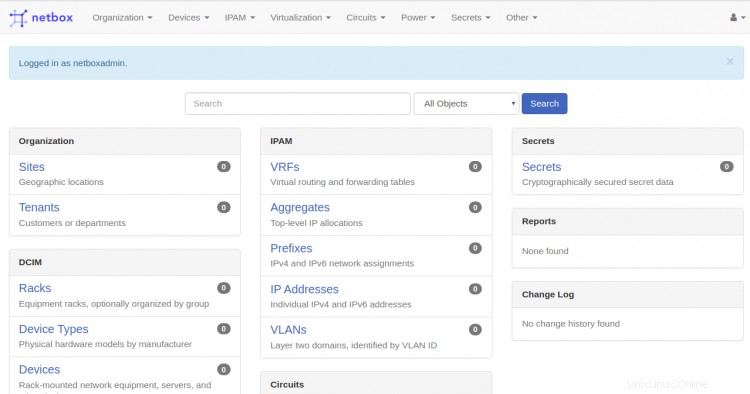
Netbox管理者のユーザー名とパスワードを入力し、ログインをクリックします。 ボタン。次のページにNetboxのデフォルトのダッシュボードが表示されます。

このガイドでは、Nginxを使用してUbuntu20.04にNetboxをインストールする方法を学習しました。これで、ネットワークインフラストラクチャの文書化を開始できます。詳細については、Netboxの公式ドキュメントをご覧ください。ご不明な点がございましたら、無料でお問い合わせください。