XWikiは、Javaで記述された無料のオープンソースWikiソフトウェアであり、Tomcat、JBossなどのサーブレットコンテナで実行されます。XWikiは、MySQLやPostgreSQLなどのデータベースを使用して情報を保存します。 XWikiを使用すると、構造化データを保存し、Wikiインターフェイス内でサーバースクリプトを実行できます。 XWikiを使用して、複数のブログをホストし、ファイルやフォルダーを管理または表示できます。
XWikiには多くの機能が付属しており、そのうちのいくつかを以下に示します。
- バージョン管理とACLをサポートします。
- ワイルドカードを使用して完全なwikiを検索できます。
- wikiページをPDF、ODT、RTF、XML、HTMLに簡単にエクスポートできます。
- コンテンツの編成とコンテンツのインポート。
- WYSIWYGエディターを使用したページ編集。
- Ubuntu16.04を実行しているサーバー。
- sudo権限を持つroot以外のユーザー。
開始する前に、Ubuntuリポジトリを最新バージョンに更新する必要があります。これは、次のコマンドを使用して実行できます。
sudo apt-get update -y
sudo apt-get upgrade -y
リポジトリが更新されたら、システムを再起動してすべての更新を適用します。
Javaのインストール
XwikiはJavaベースのアプリケーションであるため、最初にJava8をインストールする必要があります。デフォルトでは、Java8はUbuntuリポジトリでは使用できません。 webupd8teamPPAリポジトリをシステムに追加することでJava8をインストールできます。
まず、次のコマンドを実行してPPAを追加します。
sudo add-apt-repository ppa:webupd8team/java
次に、次のコマンドでリポジトリを更新します。
sudo apt-get update -y
リポジトリが最新の状態になったら、次のコマンドを実行してJava8をインストールできます。
sudo apt-get install oracle-java8-installer -y
Javaをインストールした後、次のコマンドでJavaのバージョンを確認できます。
java -version
次の出力が表示されます。
Java version "1.8.0_91"
Java(TM) SE Runtime Environment (build 1.8.0_91-b14)
Java HotSpot(TM) 64-Bit Server VM (build 25.91-b14, mixed mode)
Xwikiをダウンロードしてインストールする
次に、XWikiが提供するセットアップファイルをダウンロードする必要があります。次のコマンドを使用してダウンロードできます:
wget http://download.forge.ow2.org/xwiki/xwiki-enterprise-installer-generic-8.1-standard.jar
ダウンロードが完了したら、以下に示すように、javaコマンドを使用してダウンロードしたパッケージファイルをインストールできます。
sudo java -jar xwiki-enterprise-installer-generic-8.1-standard.jar
次の出力が表示されます。
28 Jan, 2018 6:57:37 PM INFO: Logging initialized at level 'INFO'
28 Jan, 2018 6:57:37 PM INFO: Commandline arguments:
28 Jan, 2018 6:57:37 PM INFO: Detected platform: ubuntu_linux,version=3.19.0-25-generic,arch=x64,symbolicName=null,javaVersion=1.7.0_151
28 Jan, 2018 6:57:37 PM WARNING: Failed to determine hostname and IP address
Welcome to the installation of XWiki Enterprise 8.1!
The homepage is at: http://xwiki.org/

Press 1 to continue, 2 to quit, 3 to redisplay
次に、 1を押します インストールを続行するには、次の出力が表示されます。
Please read the following information:

 XWiki Enterprise - Readme


 XWiki Enterprise Overview
XWiki Enterprise is a second generation Wiki engine, features professional features like
 Wiki, Blog, Comments, User Rights, LDAP Authentication, PDF Export, and a lot more.
XWiki Enterprise also includes an advanced form and scripting engine which makes it an ideal
 development environment for constructing data-based intranet applications. It has powerful
 extensibility features, supports scripting, extensions and is based on a highly modular
 architecture. The scripting engine allows to access a powerful API for accessing the XWiki
 repository in read and write mode.
XWiki Enterprise is used by major companies around the world and has strong
 Support for a professional usage of XWiki.
 Pointers
Here are some pointers to get you started with XWiki once you have finished installing it:

The documentation can be found on the XWiki.org web site
If you notice any issue please file a an issue in our issue tracker
If you wish to talk to XWiki users or developers please use our
 Mailing lists & Forum
You can also access XWiki's
 source code
If you need commercial support please visit the
 Support page


Press 1 to continue, 2 to quit, 3 to redisplay
次に、 1を押します インストールを続行するには、次の出力が表示されます。
See the NOTICE file distributed with this work for additional
information regarding copyright ownership.
This is free software; you can redistribute it and/or modify it
under the terms of the GNU Lesser General Public License as
published by the Free Software Foundation; either version 2.1 of
the License, or (at your option) any later version.
This software is distributed in the hope that it will be useful,
but WITHOUT ANY WARRANTY; without even the implied warranty of
MERCHANTABILITY or FITNESS FOR A PARTICULAR PURPOSE. See the GNU
Lesser General Public License for more details.
You should have received a copy of the GNU Lesser General Public
License along with this software; if not, write to the Free
Software Foundation, Inc., 51 Franklin St, Fifth Floor, Boston, MA
02110-1301 USA, or see the FSF site: http://www.fsf.org.

Press 1 to accept, 2 to reject, 3 to redisplay
次に、 1を押します 使用許諾契約に同意するには、次の出力が表示されます。
Select the installation path:  [/usr/local/XWiki Enterprise 8.1]

Press 1 to continue, 2 to quit, 3 to redisplay
次に、Enterキーを押して、 1を押します。 デフォルトのインストールパスを選択するには、次の出力が表示されます。
  [x] Pack 'Core' required
????????????????????????????????????????????????????????????????????????????????
  [x] Include optional pack 'Default Wiki'
????????????????????????????????????????????????????????????????????????????????
Enter Y for Yes, N for No:
Y
Press 1 to continue, 2 to quit, 3 to redisplay
次に、 Yを押します 1を押します インストールを続行するには、次の出力が表示されます。
[ Starting to unpack ]
[ Processing package: Core (1/2) ]
[ Processing package: Default Wiki (2/2) ]
[ Unpacking finished ]
ここで、ユーザーのショートカットを作成するように求められます。「Y'を押すことができます。 それらを追加します。次に、自動インストールスクリプトを生成するように求められます。Enterキーを押してデフォルト値を選択します。インストールが完了すると、次の出力が表示されます。
????????????????????????????????????????????????????????????????????????????????????????????????????????????????????????????????????????????????
Generate an automatic installation script
????????????????????????????????????????????????????????????????????????????????????????????????????????????????????????????????????????????????
Enter Y for Yes, N for No:
Y
Select the installation script (path must be absolute)[/usr/local/XWiki Enterprise 8.1/auto-install.xml]

Installation was successful
application installed on /usr/local/XWiki Enterprise 8.1
[ Writing the uninstaller data ... ]
[ Console installation done ]
これで、XWikiがシステムにインストールされました。次に、以下に示すようにXWiki起動スクリプトを開始します。
cd /usr/local/XWiki Enterprise 8.1
sudo bash start_xwiki.sh
しばらく待ってからプロセスを開始してください。これで、以下に示すように、ターミナルにいくつかのメッセージが表示されるはずです。
start_xwiki.sh: 79: start_xwiki.sh:
Starting Jetty on port 8080, please wait...
2018-01-28 19:12:41.842:INFO::main: Logging initialized @1266ms
2018-01-28 19:12:42.905:INFO:oejs.Server:main: jetty-9.2.13.v20150730
2018-01-28 19:12:42.956:INFO:oejs.AbstractNCSARequestLog:main: Opened /usr/local/XWiki Enterprise 8.1/data/logs/2018_01_28.request.log
2018-01-28 19:12:42.965:INFO:oejdp.ScanningAppProvider:main: Deployment monitor [file:/usr/local/XWiki%20Enterprise%208.1/jetty/contexts/] at interval 0
2018-01-28 19:13:31,485 [main] INFO  o.x.s.s.i.EmbeddedSolrInstance - Starting embedded Solr server...
2018-01-28 19:13:31,507 [main] INFO  o.x.s.s.i.EmbeddedSolrInstance - Using Solr home directory: [data/solr]
2018-01-28 19:13:43,371 [main] INFO  o.x.s.s.i.EmbeddedSolrInstance - Started embedded Solr server.
2018-01-28 19:13:46.556:INFO:oejsh.ContextHandler:main: Started [email protected]{/xwiki,file:/usr/local/XWiki%20Enterprise%208.1/webapps/xwiki/,AVAILABLE}{/xwiki}
2018-01-28 19:13:46.697:INFO:oejsh.ContextHandler:main: Started [email protected]{/,file:/usr/local/XWiki%20Enterprise%208.1/webapps/root/,AVAILABLE}{/root}
2018-01-28 19:13:46.776:INFO:oejs.ServerConnector:main: Started [email protected]{HTTP/1.1}{0.0.0.0:8080}
XWikiが稼働しているので、XWikiWebインターフェイスにアクセスします。
XWikiはポート8080で実行されます 、したがって、ファイアウォールを通過するポート8080を許可する必要があります。まず、次のコマンドでUFWファイアウォールを有効にします。
sudo ufw enable
次に、ポート 8080を許可します 次のコマンドを使用してUFWファイアウォールを通過します:
sudo ufw allow 8080/tcp
次に、次のコマンドを実行して、ファイアウォールルールを再読み込みし、すべての変更を適用します。
sudo ufw reload
次のコマンドを使用して、UFWファイアウォールのステータスを取得できます。
sudo ufw status
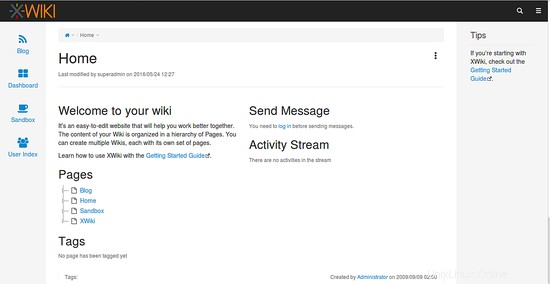
次に、Webブラウザーを開き、URL http:// your-server-ip:8080を入力します。 、以下に示すようにXWikiホームページにリダイレクトされます:
Ctrl + Cを押すと、いつでもXWikiサーバーを停止できます。 ターミナルのボタン。
おめでとう!これで、Ubuntu16.04サーバーにXWikiが正常にインストールおよび構成されました。 Ubuntu 16.04サーバーでXWikiを使用して、独自のWikiサイトを簡単にホストできるようになったことを願っています。詳細については、XWikiの公式ドキュメントページ(https://www.xwiki.org/xwiki/bin/view/Documentation/)を確認してください。ご不明な点がございましたら、お気軽にコメントしてください。