OpenLiteSpeedは、LiteSpeedTechnologiesによって開発されたLiteSpeedサーバーの軽量でオープンソースバージョンです。 Apache Rewriteルール、HTTP/2およびHTTP/3、TLSv1.3およびQUICプロトコルをサポートします。 WebGUIベースの管理パネルが付属しているため、他のサーバーとは異なり、管理が容易です。
このチュートリアルでは、PHP7.4およびMariaDBサーバーとともにFedora31にOpenLiteSpeedサーバーをインストールする方法を学習します。
-
Fedora31ベースのWebサーバー。
-
sudo権限を持つroot以外のユーザーアカウント。
-
システムを更新します。
$ sudo dnf update -
libnslパッケージ。このパッケージには、NISサービスのパブリッククライアントインターフェースが含まれています。インストールするには、次のコマンドを発行します。
$ sudo dnf install libnsl -y
チュートリアルを開始する前に、通常はデフォルトで有効になっているFedoraファイアウォールを構成する必要があります。まず、ファイアウォールのステータスを確認しましょう。
$ sudo systemctl status firewalld
動作しない場合は、ファイアウォールを起動します。
$ sudo systemctl start firewalld
次に、ファイアウォールでSSH、HTTP、HTTPS、およびポート7080、8088を有効にする必要があります。
$ sudo firewall-cmd --permanent --add-service=ssh
$ sudo firewall-cmd --permanent --add-service=http
$ sudo firewall-cmd --permanent --add-service=https
$ sudo firewall-cmd --permanent --add-port=7080/tcp
$ sudo firewall-cmd --permanent --add-port=8088/tcp
終了すると、実装される免除のリストが表示されます。
$ sudo firewall-cmd --permanent --list-all
変更に満足したら、ファイアウォールをリロードして変更を有効にします。
$ sudo firewall-cmd --reload
ファイアウォールを有効にして、起動するたびに再ロードされるようにします。
$ sudo systemctl enable firewalld
次のコマンドを実行して、WebサイトからOpenLiteSpeedバイナリパッケージをダウンロードします。このチュートリアルを書いている時点で、利用可能な最新バージョンは1.6.4でした。ダウンロードページから最新バージョンを確認し、必要に応じてURLを変更してください。
$ wget https://openlitespeed.org/packages/openlitespeed-1.6.4.tgz
アーカイブを抽出します。
$ tar -zxvf openlitespeed-1.6.4.tgz
openlitespeedに切り替えます ディレクトリを作成し、インストールスクリプトを実行します。
$ cd openlitespeed
$ sudo ./install.sh
Webサーバーを起動します。
$ sudo /usr/local/lsws/bin/lswsctrl start
サーバーのステータスを確認してください。
$ sudo /usr/local/lsws/bin/lswsctrl status
http://

OpenLiteSpeedサーバーには、事前に有効になっているPHP5.6が付属しています。ただし、PHP 7.4を使用したいので、コピーをインストールします。
PHPパッケージをインストールするための公式FedoraリポジトリであるREMIリポジトリをインストールします。
$ sudo dnf -y install https://rpms.remirepo.net/fedora/remi-release-31.rpm
remiを有効にします およびremi-php74 リポジトリを作成し、remi-modularを無効にします リポジトリ。これにより、PHP7.4パッケージのインストールに必要なリポジトリが有効になります。
$ sudo dnf config-manager --set-enabled remi
$ sudo dnf config-manager --set-enabled remi-php74
$ sudo dnf config-manager --set-disabled remi-modular
PHP7.4をいくつかの追加パッケージと一緒にインストールします。
$ sudo dnf install php php-mysqlnd php-gd php-mcrypt php-bcmath php-litespeed
PHPのインストールを確認します。
$ php -v
PHP 7.4.0 (cli) (built: Nov 26 2019 20:13:36) ( NTS )
Copyright (c) The PHP Group
Zend Engine v3.4.0, Copyright (c) Zend Technologies
   with Zend OPcache v7.4.0, Copyright (c), by Zend Technologies
有効なPHPモジュールを確認できます。
$ php --modules
後でOpenLiteSpeedで動作するようにPHPを構成します。
MariaDBサーバーをインストールします。
$ sudo dnf install mariadb-server
MariaDBサービスを開始して有効にします。
$ sudo systemctl start mariadb
$ sudo systemctl enable mariadb
MariaDBのインストールを保護します。このスクリプトは、rootパスワードを設定し、匿名ユーザーを削除し、リモートrootログインを禁止し、テストテーブルを削除します。強力なパスワードを選択し、以下の説明に従って質問に答えてください。
$ sudo mysql_secure_installation
[sudo] password for username:

NOTE: RUNNING ALL PARTS OF THIS SCRIPT IS RECOMMENDED FOR ALL MariaDB
SERVERS IN PRODUCTION USE!  PLEASE READ EACH STEP CAREFULLY!

In order to log into MariaDB to secure it, we'll need the current
password for the root user.  If you've just installed MariaDB, and
you haven't set the root password yet, the password will be blank,
so you should just press enter here.

Enter current password for root (enter for none):
OK, successfully used password, moving on...

Setting the root password ensures that nobody can log into the MariaDB
root user without the proper authorisation.

Set root password? [Y/n] y
New password:
Re-enter new password:
Password updated successfully!
Reloading privilege tables..
 ... Success!

By default, a MariaDB installation has an anonymous user, allowing anyone
to log into MariaDB without having to have a user account created for
them.  This is intended only for testing, and to make the installation
go a bit smoother.  You should remove them before moving into a
production environment.

Remove anonymous users? [Y/n] y
 ... Success!

Normally, root should only be allowed to connect from 'localhost'.  This
ensures that someone cannot guess at the root password from the network.

Disallow root login remotely? [Y/n] y
 ... Success!

By default, MariaDB comes with a database named 'test' that anyone can
access.  This is also intended only for testing, and should be removed
before moving into a production environment.

Remove test database and access to it? [Y/n] y
 - Dropping test database...
 ... Success!
 - Removing privileges on test database...
 ... Success!

Reloading the privilege tables will ensure that all changes made so far
will take effect immediately.

Reload privilege tables now? [Y/n] y
 ... Success!

Cleaning up...

All done!  If you've completed all of the above steps, your MariaDB
installation should now be secure.

Thanks for using MariaDB!
これが完了すると、次のコマンドを使用してMySQLシェルにログインできます。
$ sudo mysql -u root -p
テストデータベースとアクセス許可を持つユーザーを作成します。 testdbを置き換えます およびtestuser セットアップに適切な名前を付けます。 passwordを置き換えます 強力なパスワードを使用します。
CREATE DATABASE testdb;
CREATE USER 'testuser' IDENTIFIED BY 'password';
GRANT ALL PRIVILEGES ON testdb.* TO 'testuser';
FLUSH PRIVILEGES;
MySQLシェルを終了します。
exit
管理者パネルの資格情報を設定します。
$ sudo /usr/local/lsws/admin/misc/admpass.sh
このコマンドを使用して、ユーザー名とパスワードの両方を設定できます。ログイン情報を忘れた場合にも、このコマンドを使用できます。
管理パネルにアクセスするには、 http://
HTTPポートを80に戻します
デフォルトのHTTPポートを80に変更しましょう。http://
次の画面が表示されます。
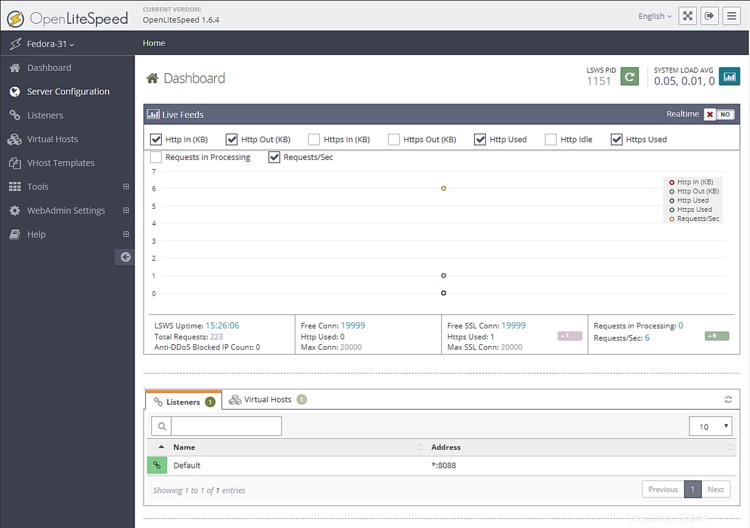
左からリスナーセクションにアクセスします。ポート8080のデフォルトのリスナーが表示されます。
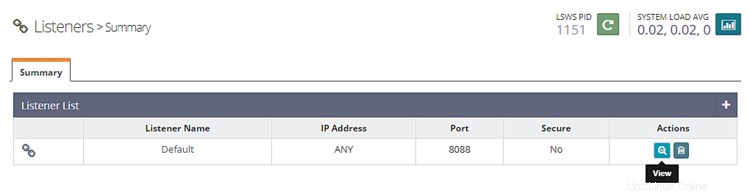
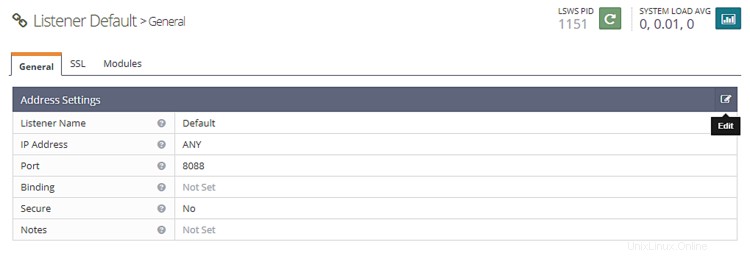
表示をクリックします ボタンをクリックして、詳細設定を表示します。次のページのリスナーのデフォルト>一般ページ 、編集アイコンをクリックします ポートを8088から80に変更します。
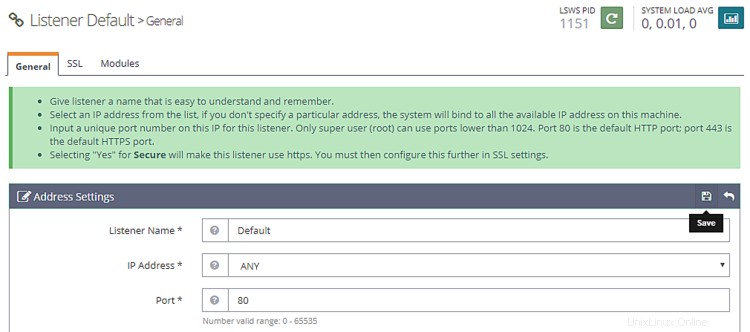
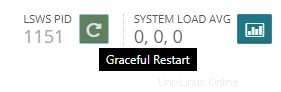
[保存]をクリックし、[正常な再起動]をクリックしてサーバーを再起動します ボタン。
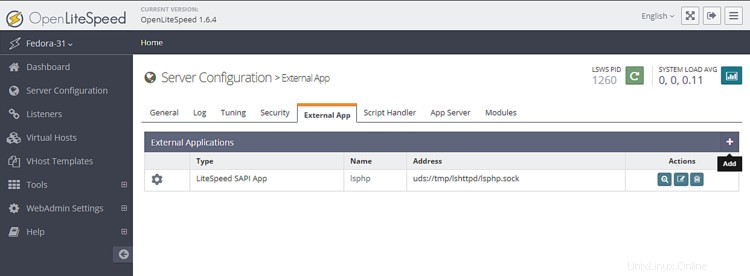
このステップでは、PHP7.4のコピーをサーバーに関連付ける必要があります。
サーバー構成をクリックします 左側のセクション、次にタブ外部アプリ 。 PHP5.6用の既存のLiteSpeedアプリが表示されます。 PHP7.4用の独自のLiteSpeedアプリを作成します。必要に応じて、後で簡単に切り替えることができます。
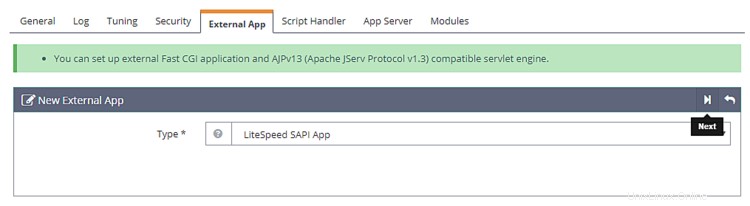
[追加]ボタンをクリックして、新しいアプリを作成します。タイプとして、LiteSpeedSAPIアプリを選択します [次へ]をクリックします。
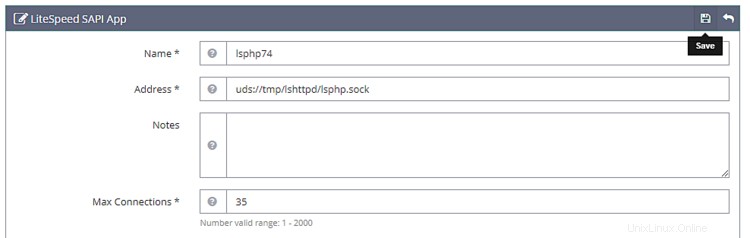
次に、以下の構成を追加します。他のすべてのフィールドは空白のままにします。
Name: lsphp74
Address: uds://tmp/lshttpd/lsphp.sock
Max Connections: 35
Environment: PHP_LSAPI_MAX_REQUESTS=500
             PHP_LSAPI_CHILDREN=35
			LSAPI_AVOID_FORK=200M
Initial Request Timeout (secs): 60
Retry Timeout : 0
Persistent Connection: Yes
Response Buffering: no
Start By Server: Yes(Through CGI Daemon)
Command: /usr/bin/lsphp
Back Log: 100
Instances: 1
Priority: 0
Memory Soft Limit (bytes): 2047M
Memory Hard Limit (bytes): 2047M
Process Soft Limit: 1400
Process Hard Limit: 1500
終了したら[保存]をクリックします。
独自のPHP7.4ベースのアプリを作成したので、サーバーに使用を開始するように指示する必要があります。
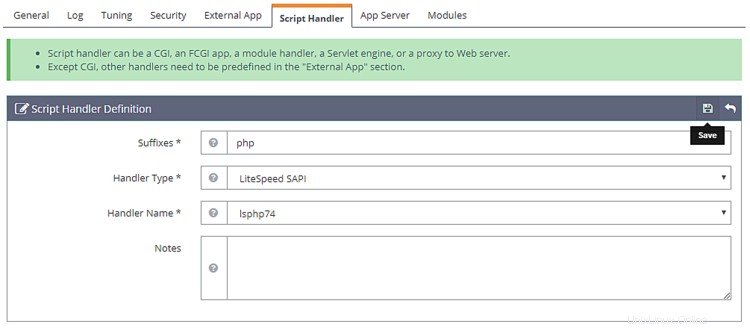
スクリプトハンドラーに移動します タブをクリックして、lsphpハンドラーを編集します 。ハンドル名をlsphp74に切り替えます ドロップダウンメニューから。
[保存]をクリックし、[正常な再起動]をクリックしてサーバーを再起動します ボタン。
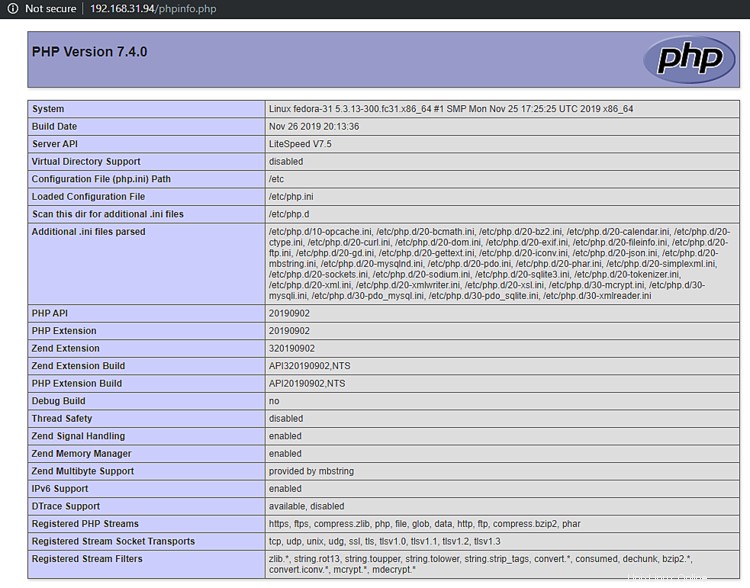
PHPが正しく切り替えられたかどうかをテストするには、 http://
まず、仮想ホストのディレクトリを作成する必要があります。
$ sudo mkdir /usr/local/lsws/example.com/{html,logs} -p
html ディレクトリは公開ファイルとlogsを保持します ディレクトリにはサーバーログが含まれます。
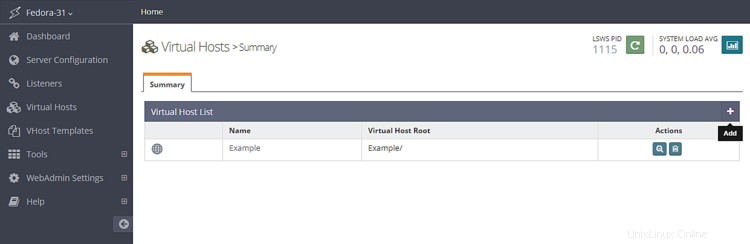
次に、管理コンソールを開き、仮想ホストにアクセスします 左からセクションを選択し、[追加]ボタンをクリックします。
指定された値を入力してください
Virtual Host Name: example.com
Virtual Host Root: $SERVER_ROOT/example.com/
Config File: $SERVER_ROOT/conf/vhosts/$VH_NAME/vhconf.conf
Follow Symbolic Link: Yes
Enable Scripts/ExtApps: Yes
Restrained: Yes
External App Set UID Mode: Server UID
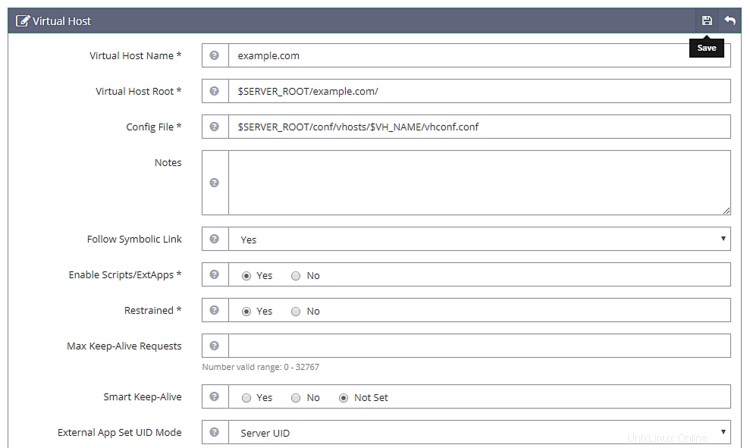
終了したら、[保存]ボタンをクリックします。現在、構成ファイルが存在しないため、次のエラーが発生します。リンクをクリックして、構成ファイルを作成します。
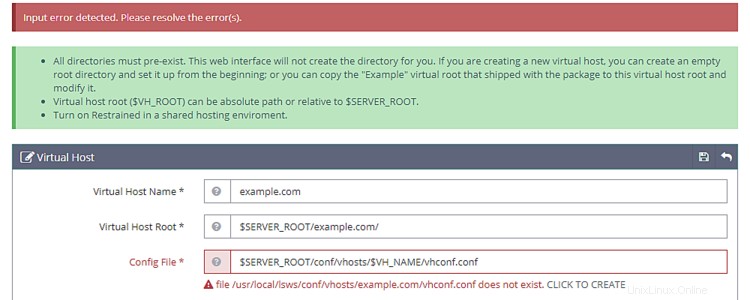
[保存]ボタンをもう一度クリックして、仮想ホストの作成を終了します。
仮想ホストが作成されたら、仮想ホスト->仮想ホスト(example.com)->一般に移動します。 与えられたように構成を変更します。
Document Root: $VH_ROOT/html/
Domain Name: example.com
Enable Compression: Yes
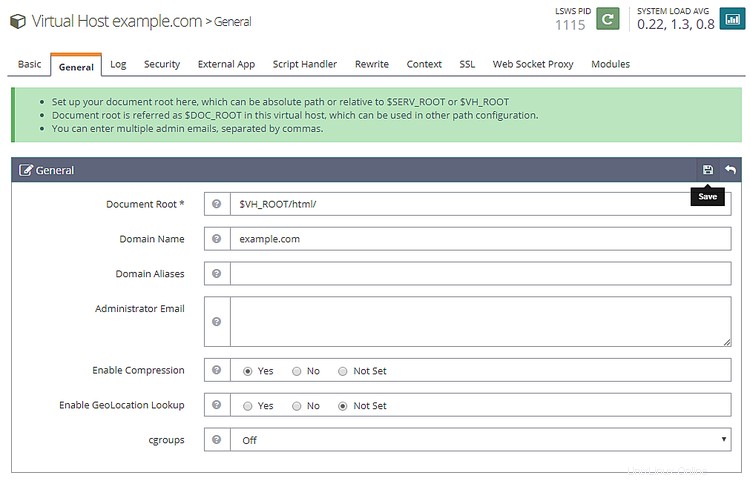
終了したら、[保存]ボタンをクリックします。次に、インデックスファイルを設定する必要があります。一般セクションの下にあるインデックスファイルに対して編集ボタンをクリックします。次のオプションを設定します。
Use Server Index Files: No
Index files: index.php, index.html, index.htm
Auto Index: No
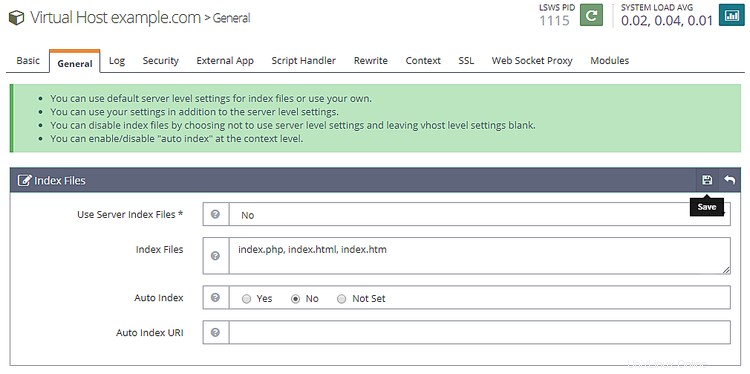
完了したら、[保存]をクリックします。次に、ログファイルを選択する必要があります。 [ログ]セクションに移動し、[仮想ホストログに対して編集]をクリックします 次の値を入力します。
Use Server’s Log: Yes
File Name: $VH_ROOT/logs/error.log
Log Level: ERROR
Rolling Size (bytes): 10M
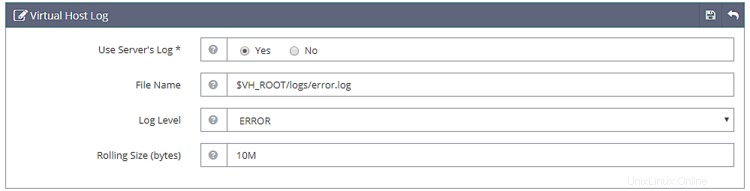
ログレベルはDEBUGとして選択できます 生産/開発マシンを使用している場合。
[保存]をクリックして、アクセスログを開きます セクション。次の値を入力してください。
Log Control: Own Log File
File Name: $VH_ROOT/logs/access.log
Piped Logger: Not Set
Log Format: Not Set
Log Headers: Not Set
Rolling Size (bytes): 10M
Keep Days: 30
Bytes log: Not Set
Compress Archive: Yes
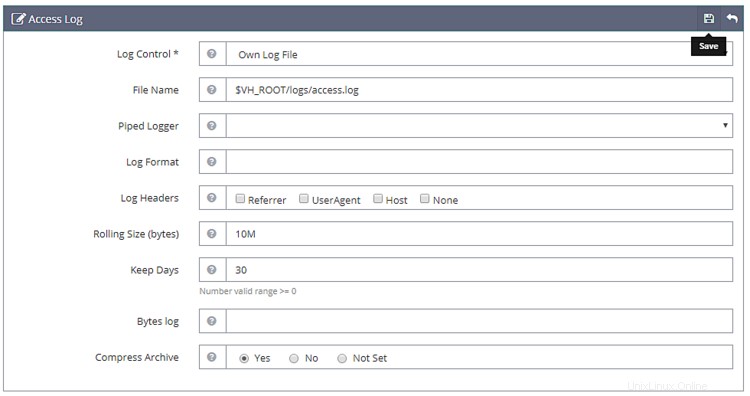
完了したら、[保存]をクリックします。次に、アクセス制御を構成する必要があります セキュリティの下 セクション。次の値を設定します。
Allowed List: *
Denied List: Not set
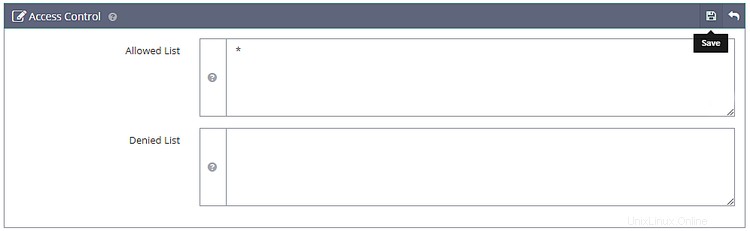
完了したら、[保存]をクリックします。次に、スクリプトハンドラーを設定する必要があります。次の値を設定します。
Suffixes: php
Handler Type: LiteSpeed SAPI
Handler Name: [Server Level]: lsphp74
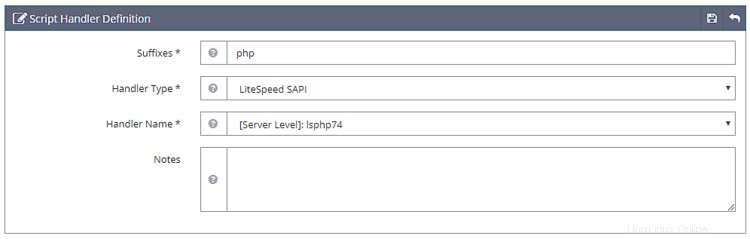
次に、書き換え制御を設定する必要があります [書き換え]セクションの下。次の値を設定します。
Enable Rewrite: Yes
Auto Load from .htaccess: Yes
Log Level: Not Set
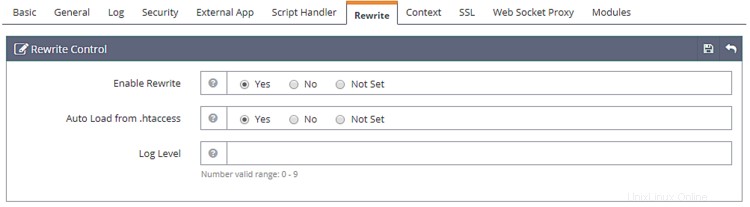
そして最後に、リスナーを設定する必要があります。 [リスナー]セクションに移動し、デフォルトのリスナーに対して[表示]ボタンをクリックします 。次に、仮想ホストマッピングに対して[追加]ボタンをクリックします 新しいマッピングを追加し、次の値を設定します。
Virtual Host: example.com
Domains: example.com

完了したら、[保存]をクリックします。次に、[グレースフル再起動]ボタンをクリックして、上記のすべての変更を適用し、サーバーを再起動します。
Let's Encryptを使用するには、Certbotツールをインストールする必要があります。
$ sudo dnf install certbot
SSL証明書を取得します。
$ sudo certbot certonly --webroot -w /usr/local/lsws/example.com/html/ -d example.com
インタラクティブプロンプトに従います。
Saving debug log to /var/log/letsencrypt/letsencrypt.log
Plugins selected: Authenticator webroot, Installer None
Enter email address (used for urgent renewal and security notices) (Enter 'c' to
cancel): [email protected]
Starting new HTTPS connection (1): acme-v01.api.letsencrypt.org

-------------------------------------------------------------------------------
Please read the Terms of Service at
https://letsencrypt.org/documents/LE-SA-v1.2-November-15-2017.pdf. You must agree
in order to register with the ACME server at
https://acme-v02.api.letsencrypt.org/directory
-------------------------------------------------------------------------------
(A)gree/(C)ancel: A

-------------------------------------------------------------------------------
Would you be willing to share your email address with the Electronic Frontier
Foundation, a founding partner of the Let's Encrypt project and the non-profit
organization that develops Certbot? We'd like to send you email about our work
encrypting the web, EFF news, campaigns, and ways to support digital freedom.
-------------------------------------------------------------------------------
(Y)es/(N)o: N
Obtaining a new certificate
Performing the following challenges:
http-01 challenge for example.com
Using the webroot path /usr/local/lsws/example.com/html for all unmatched domains.
Waiting for verification...
Cleaning up challenges

IMPORTANT NOTES:
 - Congratulations! Your certificate and chain have been saved at:
   /etc/letsencrypt/live/example/fullchain.pem. Your key file has
   been saved at:
   /etc/letsencrypt/live/linode.nspeaks.com/privkey.pem Your cert will
   expire on 2020-03-07. To obtain a new or tweaked version of this
   certificate in the future, simply run certbot again. To
   non-interactively renew *all* of your certificates, run "certbot
   renew"
 - Your account credentials have been saved in your Certbot
   configuration directory at /etc/letsencrypt. You should make a
   secure backup of this folder now. This configuration directory will
   also contain certificates and private keys obtained by Certbot so
   making regular backups of this folder is ideal.
 - If you like Certbot, please consider supporting our work by:

   Donating to ISRG / Let's Encrypt:   https://letsencrypt.org/donate
   Donating to EFF:                    https://eff.org/donate-le
次に、管理コンソールを開き、リスナー>>新しいリスナーの追加に移動します。 次の値を追加します。
Listener Name: SSL
IP Address: ANY
Port: 443
Secure: Yes
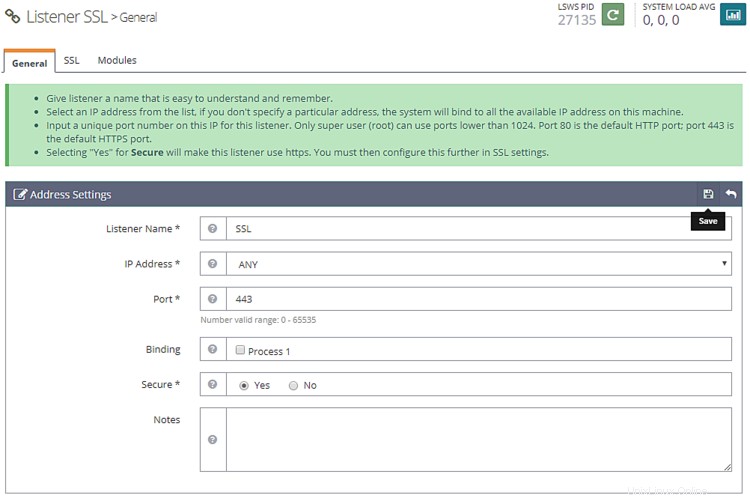
完了したら、[保存]をクリックします。次に、仮想ホストマッピングに移動します SSLリスナーの下のセクション 、[追加]ボタンをクリックして、次の値を入力します。
Virtual Host: example.com
Domains: example.com
完了したら[保存]をクリックします。
次に、リスナー>>SSLリスナー>>SSLタブ>>SSL秘密鍵と証明書に移動します (編集ボタン)そして次の値を入力します
Private Key File: /etc/letsencrypt/live/example.com/privkey.pem
Certificate File: /etc/letsencrypt/live/example.com/fullchain.pem
Chained Certificate: Yes
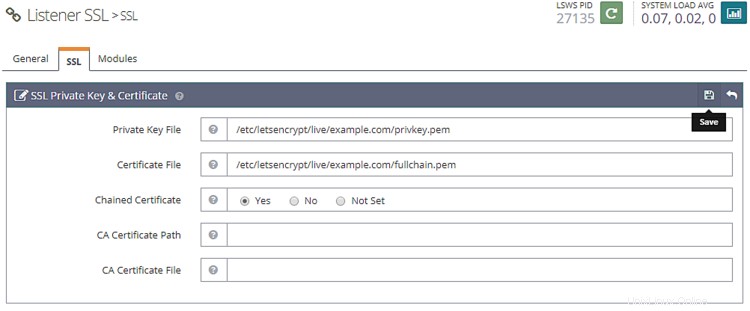
終了したら、[保存]をクリックします。 Gracefulrestartボタンをクリックしてサーバーを再起動します。
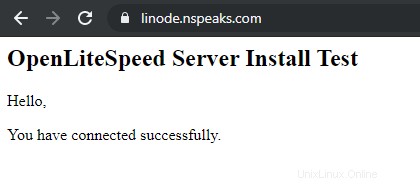
htmlにテストファイルを作成します ディレクトリ。
$ sudo nano /usr/local/lsws/example.com/html/index.php
次のコードをNanoエディターに貼り付けます。
<html>
<head>
    <h2>OpenLiteSpeed Server Install Test</h2>
</head>
    <body>
    <?php echo '<p>Hello,</p>';

    // Define PHP variables for the MySQL connection.
    $servername = "localhost";
    $username = "testuser";
    $password = "password";

    // Create a MySQL connection.
    $conn = mysqli_connect($servername, $username, $password);

    // Report if the connection fails or is successful.
    if (!$conn) {
        exit('<p>Your connection has failed.<p>' .  mysqli_connect_error());
    }
    echo '<p>You have connected successfully.</p>';
    ?>
</body>
</html>
https://example.comでサイトにアクセスします ブラウザで次のページが表示されます。
このチュートリアルは以上です。ご不明な点がございましたら、下のコメント欄にご記入ください。