RabbitMQ メッセージ キュー サーバーに接続するには、さまざまなプログラミング言語を使用してクライアント プログラムを記述できます。現在、C#、erlang、java、perl、PHP、python、および ruby を使用してクライアントを作成できます。
このチュートリアルでは、RabbitMQ クライアント ライブラリと AMQP PHP 拡張機能をインストールして構成する方法について説明します。
AMQP PHP 拡張機能をインストールしたら、AMQP を使用して PHP プログラムを作成できます。これにより、RabbitMQ サーバーに接続してメッセージを操作できます。 .
パート 1:RabbitMQ クライアント ライブラリをインストールする
1. cmake をインストール
cmake は、rabbitmq-c ライブラリで使用されるオープン ソースのビルド システムです。 AMQP PHP 拡張機能をインストールする前に、rabbitmq-c ライブラリをインストールする必要があります。しかし、rabbitmq-c ライブラリをインストールするには、cmake が必要です。
cmake ダウンロード ページから Linux i386 セクションまでスクロールし、cmake-2.8.10.2-Linux-i386.sh ファイルをダウンロードします。または、wget を使用してシステムにダウンロードします。
cd /usr/src
wget http://www.cmake.org/files/v2.8/cmake-2.8.10.2-Linux-i386.sh
以下に示すように、cmake-2.8.10.2-Linux-i386.sh ファイルを実行すると、現在のディレクトリに cmake がインストールされます。
# /bin/sh cmake-2.8.10.2-Linux-i386.sh
Do you accept the license? [yN]: y
By default the CMake will be installed in:
  "/usr/src/cmake-2.8.10.2-Linux-i386"
Do you want to include the subdirectory cmake-2.8.10.2-Linux-i386?
Saying no will install in: "/usr/src" [Yn]: y
Using target directory: /usr/src/cmake-2.8.10.2-Linux-i386
Extracting, please wait...
tar: Read 4096 bytes from -
Unpacking finished successfully
cmake ディレクトリの名前を変更し、cmake が正しくインストールされていることを確認します。
# cd /usr/src
# mv cmake-2.8.10.2-Linux-i386 cmake
# /usr/save/cmake/bin/cmake --version
cmake version 2.8.10.2
2. RabbitMQ クライアントをダウンロード
最初に、AMQP PHP 拡張機能に必要な librabbitmq ライブラリをインストールします。
rabbitmq-c git リポジトリから zip ファイルをダウンロードします。
cd /usr/src
unzip rabbitmq-c-master.zip
cd rabbitmq-c-master
3. RabbitMQ クライアントの構成
cmake を使用して、インストール用の rabbitmq クライアントを構成します。 PREFIX は、rabbitmq クライアントがインストールされる /usr/local として指定してください。
# mkdir build
# cd build
# /usr/src/cmake/bin/cmake -DCMAKE_INSTALL_PREFIX=/usr/local ..
-- The C compiler identification is GNU 4.1.2
-- Check for working C compiler: /usr/bin/cc
-- Check for working C compiler: /usr/bin/cc -- works
-- Detecting C compiler ABI info
-- Detecting C compiler ABI info - done
-- CMAKE_BUILD_TYPE not specified. Creating Release build
-- Found C inline keyword: inline
-- Looking for getaddrinfo
-- Looking for getaddrinfo - found
-- Looking for socket
-- Looking for socket - found
-- Looking for htonll
-- Looking for htonll - not found
-- Found POPT: /usr/include
-- Could NOT find XMLTO (missing:  XMLTO_EXECUTABLE)
-- Building rabbitmq as a shared library - yes
-- Building rabbitmq as a static library - no
-- Configuring done
-- Generating done
-- Build files have been written to: /usr/save/rabbitmq-c-master/build
4. RabbitMQ クライアントをインストール
設定後、以下に示すようにcmakeを使用してrabbitmqクライアントをインストールします。これにより、librabbitmq ライブラリが /usr/local にインストールされます。部分的な出力を以下に示します。
#  /usr/src/cmake/bin/cmake --build . --target install
Scanning dependencies of target rabbitmq
[  2%] Building C object librabbitmq/CMakeFiles/rabbitmq.dir/amqp_framing.c.o
[  4%] Building C object librabbitmq/CMakeFiles/rabbitmq.dir/amqp_api.c.o
..
[ 95%] Built target amqp-publish
[ 97%] Building C object tests/CMakeFiles/test_parse_url.dir/test_parse_url.c.o
[100%] Building C object tests/CMakeFiles/test_tables.dir/test_tables.c.o
[100%] Built target test_tables
Install the project...
-- Install configuration: "Release"
-- Installing: /usr/local/lib/pkgconfig/librabbitmq.pc
-- Installing: /usr/local/lib/librabbitmq.so.1.0.1
-- Installing: /usr/local/lib/librabbitmq.so.1
-- Installing: /usr/local/lib/librabbitmq.so
-- Installing: /usr/local/include/amqp.h
-- Installing: /usr/local/include/amqp_framing.h
-- Installing: /usr/local/bin/amqp-publish
-- Removed runtime path from "/usr/local/bin/amqp-publish"
-- Installing: /usr/local/bin/amqp-get
-- Removed runtime path from "/usr/local/bin/amqp-get"
-- Installing: /usr/local/bin/amqp-consume
-- Removed runtime path from "/usr/local/bin/amqp-consume"
-- Installing: /usr/local/bin/amqp-declare-queue
-- Removed runtime path from "/usr/local/bin/amqp-declare-queue"
-- Installing: /usr/local/bin/amqp-delete-queue
-- Removed runtime path from "/usr/local/bin/amqp-delete-queue"
5. RabbitMQ クライアントの確認
ライブラリには、期待どおりに動作することを確認するために使用できるサンプル プログラムが付属しています。
ターミナルから、次の操作を行います。これは待機状態になります。
# cd /usr/src/rabbitmq-c-master/build
# ./examples/amqp_listen localhost 5672 amq.direct test
別の r ターミナルを開き、次の操作を行います。これにより、「hello world」メッセージがキューに送信されます。
# cd /usr/src/rabbitmq-c-master/build
# ./examples/amqp_sendstring localhost 5672 amq.direct test "hello world"
次に、待機状態にあった最初の端末に戻ります。ここで、以下に示すように「hello world」メッセージが表示されます。
# ./examples/amqp_listen localhost 5672 amq.direct test
Result 0
Frame type 1, channel 1
Method AMQP_BASIC_DELIVER_METHOD
Delivery 1, exchange amq.direct routingkey test
Content-type: text/plain
----
00000000: 68 65 6C 6C 6F 20 77 6F : 72 6C 64                 hello world
0000000B:
パート 2:AMQP PHP 拡張機能をインストールする
pecl を使用して amqp をインストールするか、ソースからコンパイルすることができます。
pecl を使用してインストールするには、次の手順を実行します:
# pecl search amqp
amqp    1.0.9/(1.0.9 stable)       Communicate with any AMQP compliant server

# pecl install amqp
ソースからインストールするには (私が好む)、以下の手順に従います。
6. AMQP PHP 拡張機能をダウンロード
AMQP PHP 拡張機能の最新の安定バージョンをダウンロードします。現在の安定版は 1.0.10 です
cd /usr/src
wget http://pecl.php.net/get/amqp-1.0.10.tgz
tar xvfz amqp-1.0.10.tgz
cd amqp-1.0.9
7. AMQP の構成
phpize を実行し、以下のように設定します。
# phpize
Configuring for:
PHP Api Version:         20090626
Zend Module Api No:      20090626
Zend Extension Api No:   220090626

# ./configure --with-amqp
checking for egrep... grep -E
checking for a sed that does not truncate output... /bin/sed
..
creating libtool
appending configuration tag "CXX" to libtool
configure: creating ./config.status
config.status: creating config.h
8. AMQP をインストール
以下に示すように、make および make install を使用して AMQP をインストールします。部分的な出力が示されています。
# make
..
creating amqp.la
(cd .libs && rm -f amqp.la && ln -s ../amqp.la amqp.la)
/bin/sh /usr/save/amqp-1.0.9/libtool --mode=install
cp ./amqp.la /usr/save/amqp-1.0.9/modules
cp ./.libs/amqp.so /usr/save/amqp-1.0.9/modules/amqp.so
cp ./.libs/amqp.lai /usr/save/amqp-1.0.9/modules/amqp.la
PATH="$PATH:/sbin" ldconfig -n /usr/save/amqp-1.0.9/modules
----------------------------------------------------------------------
Libraries have been installed in:
   /usr/save/amqp-1.0.9/modules

If you ever happen to want to link against installed libraries
in a given directory, LIBDIR, you must either use libtool, and
specify the full pathname of the library, or use the `-LLIBDIR'
flag during linking and do at least one of the following:
   - add LIBDIR to the `LD_LIBRARY_PATH' environment variable
     during execution
   - add LIBDIR to the `LD_RUN_PATH' environment variable
     during linking
   - use the `-Wl,--rpath -Wl,LIBDIR' linker flag
   - have your system administrator add LIBDIR to `/etc/ld.so.conf'

See any operating system documentation about shared libraries for
more information, such as the ld(1) and ld.so(8) manual pages.
----------------------------------------------------------------------
Build complete.
# make install Installing shared extensions: /usr/local/lib/php/extensions/no-debug-non-zts-20090626/ .. You should add "extension=amqp.so" to php.ini
9. php.ini を変更し、AMQP 拡張機能を追加
システムで php.ini ファイルを見つけて、次の行を追加します。
# vi /usr/local/lib/php.ini
extension=amqp.so
10. AMQP PHP 拡張機能の確認
phpinfo を表示する次のテスト ページを作成し、これを Apache の htdocs の下に配置します。
# vi /usr/local/apache2/htdocs/test.php
<?php
phpinfo();
?>
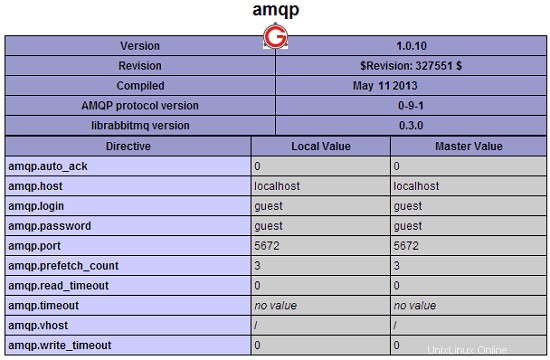
ここで、ブラウザーから test.php を呼び出すと、以下に示すように AMQP PHP 拡張機能がページに表示されることがわかります。これで、PHP コードに AMQP 呼び出しを記述して、RabbitMQ サーバーと通信できるようになりました。