高可用性と冗長性をサポートしながら、強力で最新の機能を備えた DNS サーバーの作成に苦労していませんか? PowerDNS が最適なソリューションです。 PowerDNS(pdns)は、Unix 系オペレーティング システム向けの無料のオープンソース DNS サーバー ソフトウェアです。
この記事では、Debian/Ubuntu Linux システムで MariaDB データベースを使用して PowerDNS をインストールおよび構成する方法を学習します。
完全に機能する DNS サーバーを用意する準備はできましたか?すぐに飛び込め!
前提条件
このチュートリアルは実践的なデモンストレーションです。次のものが揃っていることを確認してください:
- Linux マシン – このチュートリアルでは、最新の Debian 11 Bullseye を使用しています。
- ルート権限を持つユーザー
MariaDB データベースのインストールと構成
デフォルトでは、PowerDNS はデータベース バックエンド (PostgreSQL および MySQL/MariaDB)、バインド ゾーン ファイル、JSON API などの多くのバックエンドをサポートしています。このチュートリアルでは、MariaDB データベースを PowerDNS データベース バックエンドとして使用します。
1. まず、端末を開いてサーバーに SSH で接続します。
2. 次に、apt install を実行します。 以下のコマンドを実行して、基本的なパッケージの依存関係をインストールします (software-properties-common dirmngr apt-transport-https ) をシステムに追加します。
sudo apt install software-properties-common dirmngr apt-transport-https -y
3. 以下のコマンドを実行して、MariaDB リポジトリと GPG キーをシステムに追加します。 MariaDB リポジトリ構成は /etc/apt/sources.list.d/ に保存されます ディレクトリ、GPG キーは /etc/apt/trusted.gpg. に保存されます ディレクトリ。
# Add MariaDB repository for Debian system
sudo add-apt-repository 'deb [arch=amd64,i386,arm64,ppc64el] https://mirror.23m.com/mariadb/repo/10.6/debian bullseye main'

# Add GPG key for MariaDB repository
wget -qO- https://mariadb.org/mariadb_release_signing_key.asc | gpg --dearmor > /etc/apt/trusted.gpg.d/mariadb_release_signing_key.gpg
4. 次に、次のコマンドを実行してリポジトリを更新し、パッケージ (mariadb-server) をインストールします。 )。
MariaDB サービスは、Debian および Ubuntu ディストリビューションへのインストール後に開始され、システムの起動/起動時に自動的に実行されます。
# refresh package index
sudo apt update

# install MariaDB database
sudo apt install mariadb-server -y
5. mysql_secure_installation を実行します 以下のコマンドを使用して、MariaDB インストールを保護します。 mysql_secure_installation
mysql_secure_installation
6. root の入力を求められたら、端末画面で Enter キーを押します。 デフォルトの MariaDB インストールにはパスワードがないため、MariaDB のパスワード。
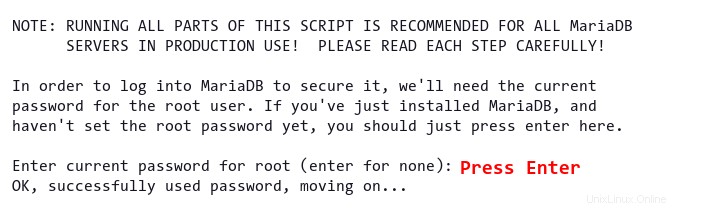
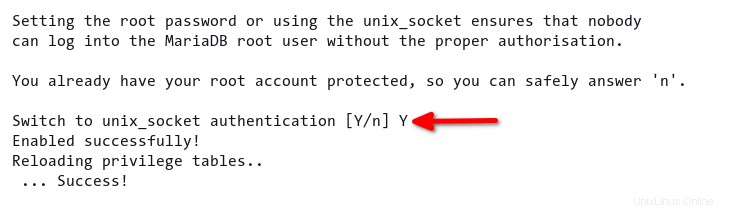
7. Y を入力します 以下に示すプロンプトで、デフォルトの認証を unix_socket に変更します .
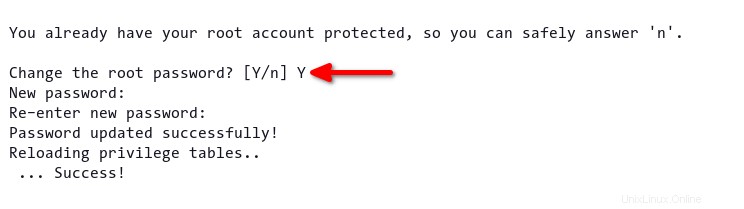
8. Y を入力します 以下のプロンプトで再度、MariaDB サーバーの新しい強力なパスワードを入力します。
9. Y を入力します 以下に示すプロンプトで。デフォルトの MariaDB インストールには、本番レベルのデフォルトの匿名ユーザーが付属しているため、匿名ユーザーを削除する必要があります。
10. 次のプロンプトで、Y と入力します root ユーザーのリモート ログインを無効にします。 MariaDB root を禁止する必要があります セキュリティ上の理由から、ユーザーは他のサーバーからリモートでログインできません。

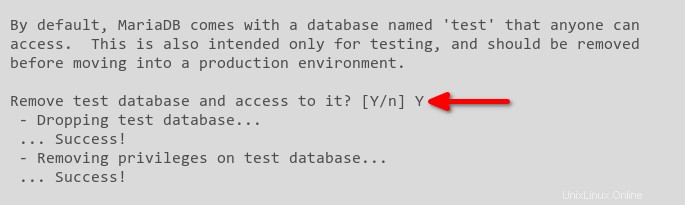
11. Y と入力します もう一度クリックして、デフォルトのテスト データベースを削除し、すべてのアクセスと権限を削除します。
12. 最後に Y と入力します もう一度すべてのテーブル権限をリロードし、MariaDB サーバーに新しい変更を適用します。

すべての MariaDB 構成が完了すると、以下のスクリーンショットのような確認メッセージが表示されます。

Debian/Ubuntu Linux への PowerDNS のインストール
PowerDNS データベース バックエンド用の MariaDB のインストールが完了したら、PowerDNS パッケージをインストールする準備が整いました。公式の PowerDNS リポジトリと GPG キーを追加し、PowerDNS サーバー パッケージをインストールします。
公式リポジトリから最新の PowerDNS パッケージをインストールするには:
1. 以下のコマンドを実行して、PowerDNS リポジトリと GPG キーをシステムに追加します。
# Download PowerDNS GPG Key
wget -qO- https://repo.powerdns.com/FD380FBB-pub.asc | gpg --dearmor > /etc/apt/trusted.gpg.d/pdns.gpg

# Adding the PowerDNS Repository for Debian 11 Bullseye System
echo "deb [arch=amd64] http://repo.powerdns.com/debian bullseye-auth-45 main" | sudo tee /etc/apt/sources.list.d/pdns.list

# Adding the PowerDNS Repository for Ubuntu 20.04 System
echo "deb [arch=amd64] http://repo.powerdns.com/ubuntu focal-auth-45 main" | sudo tee /etc/apt/sources.list.d/pdns.list
2. 次に、/etc/apt/preferences.d/pdns という名前の新しい構成ファイルを作成します。 好みのエディターで、次の構成でファイルに入力します。
以下の構成では、名前が pdns- で始まるすべてのパッケージ PowerDNS リポジトリから自動的にインストールされます (repo.powerdns.com ) Debian/Ubuntu リポジトリの代わりに。
# all packages with first name pdns- will be installed from the repo.powerdns.com repository
Package: pdns-*
Pin: origin repo.powerdns.com
Pin-Priority: 600
3. 次のコマンドを実行してリポジトリを更新および更新し、PowerDNS (pdns-server ) および PowerDNS MariaDB/MySQL バックエンド (pdns-backend-mysql )。
インストール後、PowerDNS サービス (pdns.service ) stats であり、自動的に有効になります。
# refresh package index after adding new repository
sudo apt update

# install PowerDNS and PowerDNS MySQL/MariaDB backend
sudo apt install pdns-server pdns-backend-mysql -y
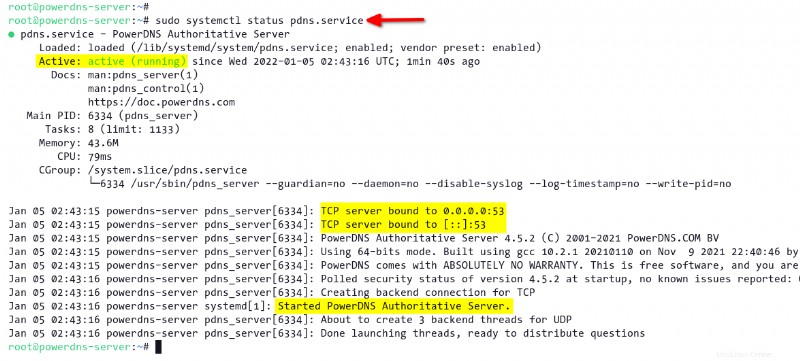
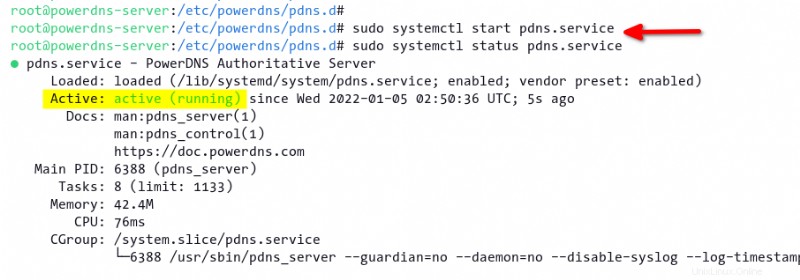
4. 最後に、systemctl を実行します。 以下のコマンドで status を確認します PowerDNS サービス (pdns.service )。
sudo systemctl status pdns.service以下に示すように、PowerDNS サービスはアクティブ (実行中) です。 デフォルトの TCP ポート 53 で PowerDNS Authoritative Server として開始されます .
PowerDNS のデータベースの作成とデータベース スキーマのインポート
PowerDNS をインストールしたら、MariaDB を PowerDNS のデータベース バックエンドとして設定します。そのためには、新しいデータベースとユーザーを作成してから、PowerDNS データベース スキーマをインポートします。
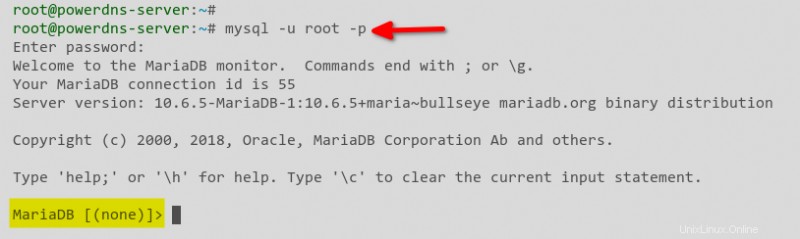
1. 次のコマンドを実行して、ユーザー root として MySQL シェルにログインします。 .プロンプトが表示されたら、MariaDB ルート パスワードを入力します。
mysql -u root -pMySQL シェルにログインすると、以下のスクリーンショットのようなウェルカム メッセージが表示されます。
2. 次に、次のクエリを実行して新しいデータベースを作成します (pdns ) 管理者のユーザー名を pdnsadmin に設定 .
# creating database named pdns
create database pdns;

# create user pdnsadmin and grant privileges to the database pdns
grant all on pdns.* to example@unixlinux.online identified by 'StrongPdnsPasswd';

# reload database privileges to apply new changes
flush privileges;

# exit from the MySQL shell
exit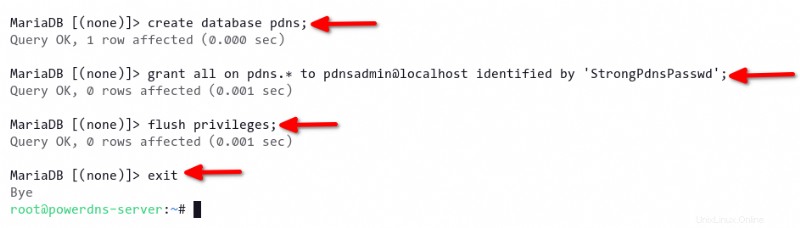
3. 次のコマンドを実行して、PowerDNS データベース スキーマを pdns にインポートします。 データベース。 pdnsadmin の正しいパスワードを入力してください。 ユーザー。
PowerDNS MySQL バックエンドのデフォルト インストールにはデータベース スキーマが含まれており、/usr/share/pdns-backend-mysql/schema/ で利用できます。 ディレクトリ。
# import the schema.mysql.sql to the pdns database
mysql -u pdnsadmin -p pdns < /usr/share/pdns-backend-mysql/schema/schema.mysql.sql
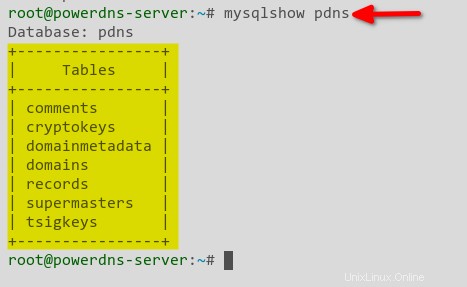
4. 次に、以下の mysqlshow を実行します pdns のデータベース スキーマを確認するコマンド データベース。このコマンドは、pdns で利用可能なすべてのテーブルを表示します データベース。
# Check list of tables on the pdns database
mysqlshow pdns以下に、pdn で利用可能なテーブルを示します。 データベース。
MariaDB バックエンドで PowerDNS をセットアップする
MariaDB を構成し、データベースをセットアップしました。しかし、PowerDNS が機能しているかどうかはどうすればわかりますか? PowerDNS 用の新しい MariaDB バックエンド構成を作成します。 PowerDNS サービスは、この構成を使用して MySQL データベースに接続し、すべての DNS データをデータベースに保存します。
1. stop に対して次のコマンドを実行します。 PowerDNS サービス (pdns.service ) 最初に、PowerDNS バックエンド構成を作成する前に。
sudo systemctl stop pdns.service2. 次に、myself.conf という名前のファイルを作成します /etc/powerdns/pdns.d/ 内 ディレクトリをテキスト エディターで編集し、次の構成でファイルに入力します。
データベースのユーザー名とパスワードを自分の情報で変更し、変更を保存します。
PowerDNS のすべての追加構成は、
/etc/powerdns/pdns.dに保存する必要があります ディレクトリ
# Define the gmysql backend
launch+=gmysql

# Details MariaDB database for PowerDNS
gmysql-host=127.0.0.1
gmysql-port=3306
gmysql-dbname=pdns
gmysql-user=pdnsadmin
gmysql-password=StrongPdnsPasswd
gmysql-dnssec=yes
# gmysql-socket=
3. 次のコマンドを実行して、mysql.conf の権限と所有権を変更します。 ファイル。この時点で、PowerDNS の MySQL バックエンド構成が作成されます。
# change the ownership to user and group pdns
sudo chown pdns:pdns /etc/powerdns/pdns.d/mysql.conf

# change permission of the file
sudo chmod 640 /etc/powerdns/pdns.d/mysql.conf
4. 次のコマンドを実行して、PowerDNS サービス (pdns.service) を開始します。 )、サービス status を確認します .
# start PowerDNS service
sudo systemctl start pdns.service

# verify status of the PowerDNS service
sudo systemctl status pdns.service
PowerDNS の構成が正しい場合は、PowerDNS サービスのステータスが active (running) であることを示す次の出力が表示されます。 .
5. 最後に、以下のコマンドを実行して syslog を確認します。 ファイル。このコマンドを使用すると、MySQL バックエンド モジュールが PowerDNS サーバーにロードされていることを確認できます。
grep -rin pdns_server /var/log/syslog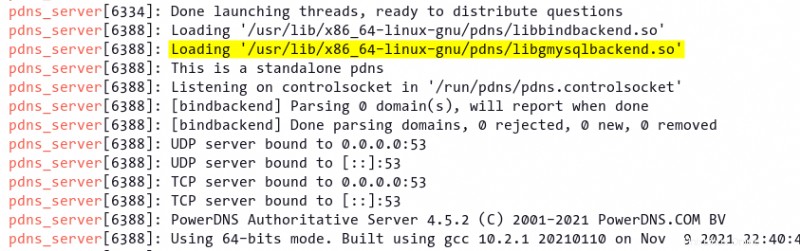
PowerDNS での DNS ゾーンの作成
PowerDNS は、pdnsutil というコマンドライン ユーティリティを提供します。 ゾーンと DNSSEC の管理用。 pdnsutil コマンドをリモートで実行して、PowerDNS バックエンド データベースに変更を加えることができます。
このデモでは、example.io の新しい DNS ゾーンを作成します ドメイン。
1. pdnsutil を実行します 以下のコマンドで新しい DNS ゾーンを作成します (create-zone ) example.io という名前 .
pdnsutil create-zone example.io2. 次に、次のコマンドを実行して新しいネームサーバーを作成し、ネームサーバーを PowerDNS サーバーの IP アドレスに割り当てます。
# define ns1 A record to IP address 172.16.5.10
pdnsutil add-record example.io ns1 A 172.16.5.10

# define nameserver for example.io to the ns1.example.io
pdnsutil add-record example.io @ NS ns1.example.io
3. 以下のコマンドを実行して、example.io の新しい A レコードを追加します。 ドメイン。このドメインは IP アドレス 172.16.5.20 を使用します .
pdnsutil add-record example.io @ A 172.16.5.204. 次のコマンドを実行して、アプリケーションの新しいサブドメインを追加します。
# add subdomain www
pdnsutil add-record example.io www A 172.16.5.20

# add subdomain storage with the target server 172.16.5.50
pdnsutil add-record example.io storage A 172.16.5.50
5. 次に、以下のコマンドを実行して MX レコードを追加します。 MX レコードは、メイン ドメイン (example.io) のメール配信を処理します )。
pdnsutil add-record example.io @ MX "10 example.io"
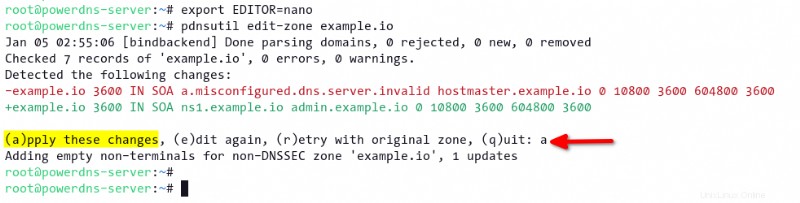
6. 以下のコマンドを実行して nano を設定します デフォルトのエディタとして example.io を開きます ファイル。
# setup default editor on the system temporary
export EDITOR=nano

# edit DNS zone example.io manually
pdnsutil edit-zone example.io
example.io のデフォルトの SOA レコードを変更します 以下の構成のファイル。その後、変更を保存してエディターを終了します。
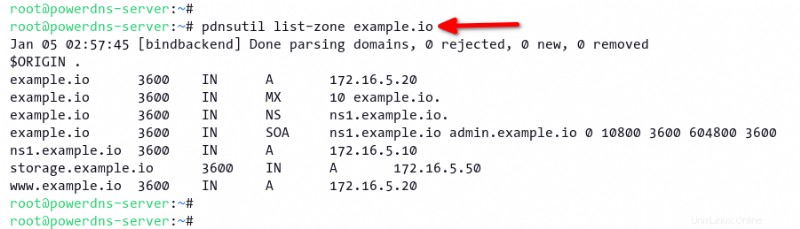
example.io 3600 IN SOA ns1.example.io admin.example.io 0 10800 3600 604800 3600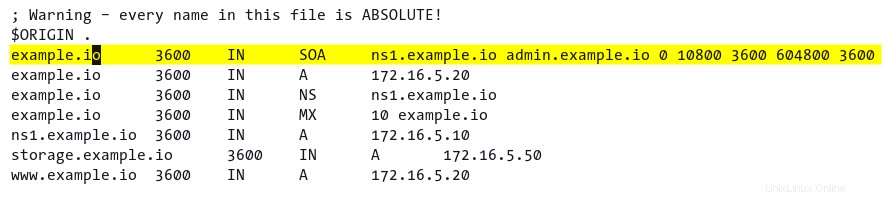
7. a と入力します 次に示すように、Enter を押して新しい変更の適用を確認します。
8. 次のコマンドを実行して、example.io で利用可能なすべての DNS レコードを表示します。 ゾーン。
pdnsutil list-zone example.io変更した SOA レコード (手順 6) が DNS レコード リストに反映されていることを以下で確認できます。
9. 最後に、以下のコマンドを実行して、PowerDNS ゾーンの構成を確認します。
pdnsutil check-all-zones以下では、example.io に 7 つのレコードがあることがわかります。 エラーや警告のないゾーン。

DNS 伝播の検証
example.io の DNS ゾーンが正常に作成されました ドメイン、それは素晴らしいです!次に、example.io の DNS 伝播を確認します。 Domain Information Groper (DIG) ツールを使用してドメインを管理します。 dig コマンドは、DNS 伝播を確認し、DNS サーバーのトラブルシューティングを行うことができる DNS ルックアップ ツールです。
1. install に対して次のコマンドを実行します。 dnsutils システム上のパッケージ。
digコマンドはdnsutilsの一部です パッケージ。
sudo apt install dnsutils -y
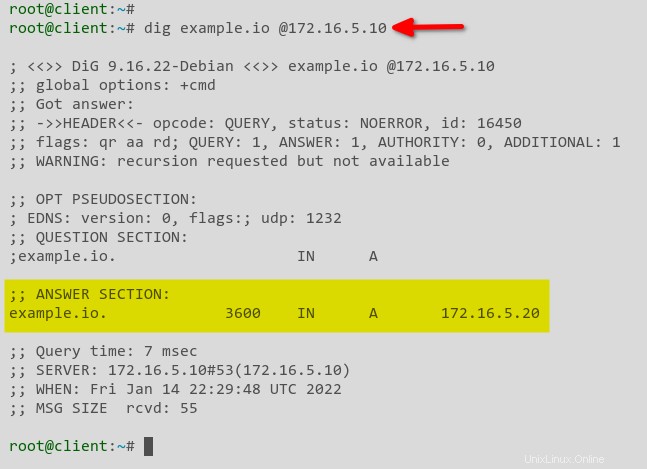
2. 次に、dig を実行します 以下のコマンドで example.io の A レコードを確認します ドメイン。この例では、PowerDNS サーバーの IP アドレスは 172.16.5.10 です。 .
dig example.io @172.16.5.10
ANSWER SECTION で 、以下のような出力が表示されます。
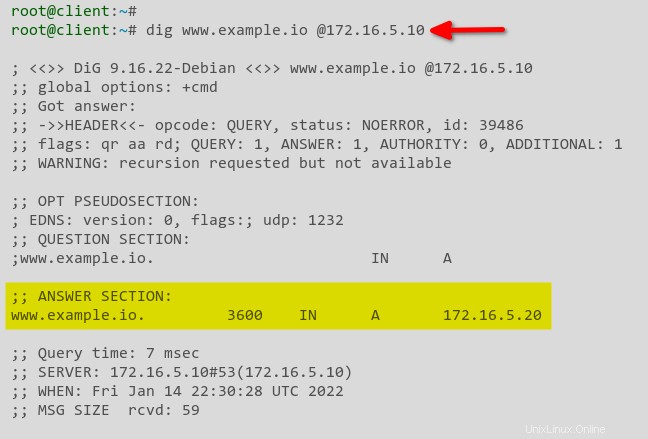
3.さらに、次のコマンドを実行して、www.example.io などの別のサブドメインを確認します。 および storage.example.io .
# check subdomain www.example.io
dig www.example.io @172.16.5.10
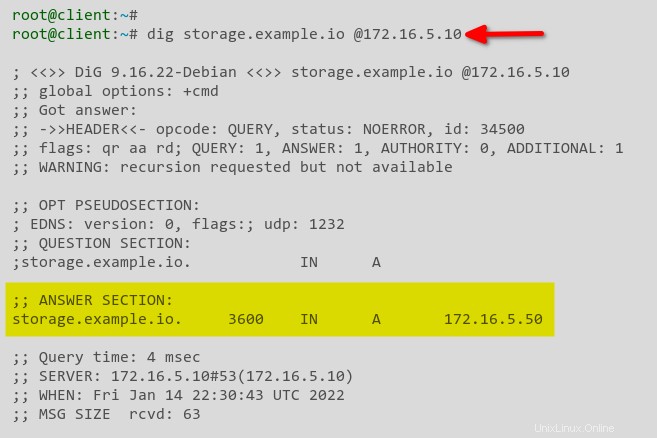
# check subdomain storage.example.io
dig storage.example.io @172.16.5.10
以下、www.example.io サブドメインは example.io と同じサーバーに解決されます ドメイン。
storage.example.io サブドメインは、IP アドレスが 172.16.5.50 の別のサーバーに解決されます 、以下に示すように。
4. 最後に、dig を実行します。 以下のコマンドで、example.io の MX レコードを確認します ドメイン。
TXTなどの他の DNS レコードも確認できます 、MX、SOAなどです。
dig MX example.io @172.16.5.10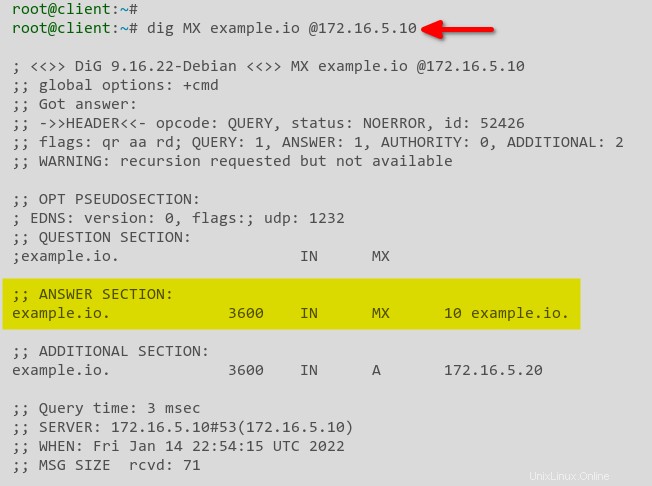
結論
このチュートリアルを通して、Debian/Ubuntu Linux で PowerDNS と MariaDB データベース バックエンドをセットアップする方法を学びました。また、PowerDNS を使用すると、他の DNS サーバー アプリケーションとは異なり、少ないリソースで DNS サーバーを作成および管理できることにも気付きました。さらに、dig を使用して DNS 構成と伝播をチェックする方法を学びました。 コマンド。
PowerDNS を次のレベルに引き上げるには?おそらく、PowerDNS recursor を追加することによって DNS キャッシュを有効にして dnsdist を設定する DNSロードバランサーとして?さあ、気を取り直して、高可用性の分散型 DNS サーバーの作成を始めましょう。