次のチュートリアルでは、Node.js で簡単な Web アプリを作成する方法と、Jelastic Cloud を使用してオンラインで公開する方法を学習します。
このガイドで使用されるサンプル アプリケーションは REST 呼び出しに応答し、クライアントが書籍のアーカイブを保存して読み取ることができるようにします。
Express は Web リクエストを管理するためのフレームワークとして使用され、SQLite ライブラリは情報を保存するために使用されます。
サーバー アプリケーションの作成
Node.js が提供する標準に準拠したアプリケーションを作成するには、まず npm の基本構成を初期化します。ここでは「books」というプロジェクト用のフォルダーを作成します。
次に、新しく作成されたフォルダーで次のコンソール コマンドを実行します。
npm init
ウィザードは、プロジェクトとその依存関係に関するすべての基本情報を含む package.json ファイルの作成を開始します。
以下に示すように、提案された値を使用して先に進みます。
This utility will walk you through creating a package.json file.
It only covers the most common items, and tries to guess sensible defaults.

See `npm help json` for definitive documentation on these fields
and what exactly they do.

Use `npm install ` afterwards to install a package and
save it as a dependency in the package.json file.

Press ^C at any time to quit.
package name: (books)
version: (1.0.0)
description:
entry point: (index.js)
test command:
git repository:
keywords:
author:
license: (ISC)
About to write to package.json:

{
 "name": "books",
 "version": "1.0.0",
 "description": "",
 "main": "index.js",
 "scripts": {
   "test": "echo \"Error: no test specified\" && exit 1"
 },
 "author": "",
 "license": "ISC"
}


Is this OK? (yes) yes
「はい」と答えて手順を完了してください。
次に、2 つのメイン モジュールをインストールします。
npm install --save express sqlite3
- express:着信 HTTP リクエストを処理するフレームワーク;
- sqlite3:ブックを保存する小さなデータベースを管理するためのクライアント モジュールです。
--save パラメーターを追加すると、npm は package.json を更新するように要求され、これら 2 つの依存関係がプロジェクトに追加されます。
次に、package.json と同じディレクトリに index.js ファイルを作成して、アプリケーションのエントリ ポイントを作成します。
お気に入りのテキスト エディターを使用して、次の内容を新しく作成したファイルに貼り付けます。
/**
* Per prima cosa, includiamo i due moduli installati
* precedentemente
*/
var express = require('express');

var sqlite3 = require('sqlite3').verbose();

/**
*  At this point, create a database in the memory
* (i.e. without saving it on the disk)
* where to save your data
*/
var db = new sqlite3.Database(':memory:');

/**
* So, create a new chart with just two fields
* - title : Il titolo del libro
* - author : Il nome completo dell'autore
*/
db.run("CREATE TABLE books (title TEXT, author TEXT)");

/**
* Initialize a new express application
*/
var app = express();

/**
* Use the main server root to
* list all the books available
*/
app.get('/', function (req, res) {

   db.all(`SELECT * FROM books` , (err,rows) => {

       /**
        * Send all the lines found to the “books” chart
        */
       res.send( rows );
   });

});

/**
* For saving, instead, use
*  /save/ followed by the title and the author
*/
app.get('/save/:title/:author', function (req, res) {

   /**
    * Prepare INSERT instruction in your chart
    */
   var stmt = db.prepare("INSERT INTO books VALUES (?, ?)");

   /**
    * And run the query above, by transferring all the data
    * to the url
    */
   stmt.run( req.params.title, req.params.author , (err,rows) =>{

       /**
        * Finally, send a ‘true’ status to show that
        * the saving was successful
        */
       res.send(true);
   });

   stmt.finalize();

});

/**
* Therefore, run the server which listens on 8001 port.
*/

app.listen( 8001 , function () {
   console.log('Books server ready');
});
新しい Jelastic 環境の作成
Jelastic Cloud 管理パネルに入り、左上にある [新しい環境] ボタンを押します。

新しい環境の構成タブが開きます。
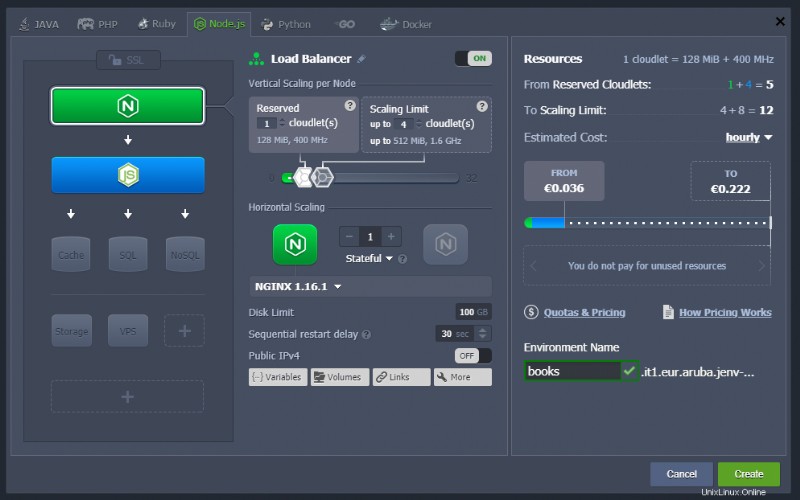
上のタブから「Node.js」を選択し、上記のように環境を準備します。
[作成] ボタンをクリックしてインストールを完了します。
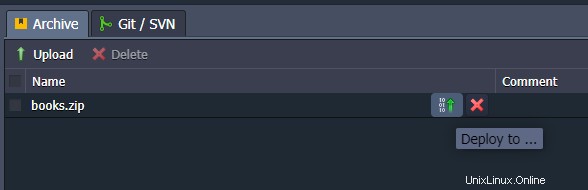
Node.js アプリケーションのデプロイ
実際の展開を行う前に、次のように、以前に作成したファイルを使用して zip または tar アーカイブを作成します。
- index.js
- package.json
アーカイブが作成されたら、インスタンス内にパッケージをアップロードします。 [アップロード] ボタンをクリックして、Deployment Manager を使用します。
先ほど作成したアーカイブを選択し、アップロードを完了してください。
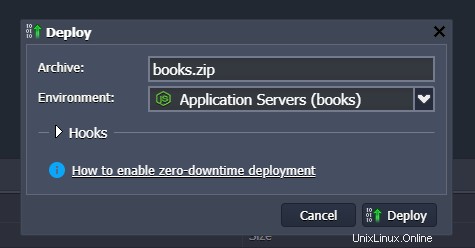
完了したら、図に示すように [Deploy to] ボタンを使用します。
アプリケーション用に作成された環境を選択し、[デプロイ] ボタンをクリックします。
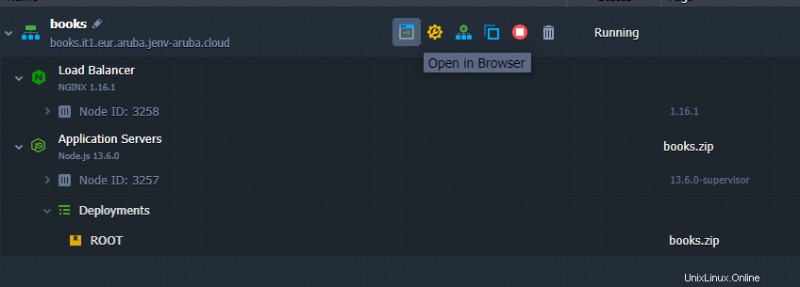
手順が完了したら、[ブラウザーで開く] ボタンをクリックしてインスタンスにアクセスします。
すべてが正常に機能すると、インスタンスは次のように応答します:
[]
次に、ブラウザを使用して次の URL にアクセスし、最初の 3 冊を保存します。アドレスをインスタンスのアドレスに置き換えることを忘れないでください:
http://books.it1.eur.aruba.jenv-aruba.cloud/save/Il%20Decamerone/Giovanni%20Boccaccio

http://books.it1.eur.aruba.jenv-aruba.cloud/save/Il%20fu%20Mattia%20Pascal/Luigi%20Pirandello

http://books.it1.eur.aruba.jenv-aruba.cloud/save/Il%20barone%20rampante/Italo%20Calvino
そのため、インスタンスのメイン URL に移動して、本が保存されていることを確認してください:
http://books.it1.eur.aruba.jenv-aruba.cloud/
サーバーは次の内容で応答する必要があります:
[{"title":"Il Decamerone","author":"Giovanni Boccaccio"},{"title":"Il fu Mattia Pascal","author":"Luigi Pirandello"},{"title":"Il barone rampante","author":"Italo Calvino"}]