Jitsiは、Webおよびモバイル向けの無料のオープンソースマルチプラットフォームビデオ会議およびインスタントメッセージングアプリケーションです。 Linux、macOS、Windows、iOS、Androidで動作し、スタンドアロンアプリとして使用することも、Webアプリケーションに埋め込むこともできます。 Jitsi Meetオーディオ/ビデオチャットは完全に暗号化されており、SIP、XMPP / Jabber、ICQ / AIM、Yahoo!、GTalk /ハングアウト拡張機能、ZRTPなどのいくつかのプロトコルをサポートしています。
Jitsi Meetを使用すると、デスクトップとプレゼンテーションを共有したり、簡単なURLを介してユーザーを会議に招待したり、Etherpadでドキュメントを編集したり、すべての会議で楽しい会議URLを選択したりできます。
このチュートリアルでは、Ubuntu20.04にJitsiMeetビデオ会議サーバーをインストールする方法を説明します。
前提条件
- Atlantic.netクラウドプラットフォーム上の新しいUbuntu20.04VPS
- サーバーIPを指す有効なドメイン名
- サーバーで構成されているrootパスワード
ステップ1-Atlantic.Netクラウドサーバーを作成する
まず、Atlantic.Netクラウドサーバーにログインします。少なくとも1GBのRAMを搭載したオペレーティングシステムとしてUbuntu20.04を選択して、新しいサーバーを作成します。 SSH経由でクラウドサーバーに接続し、ページの上部で強調表示されているクレデンシャルを使用してログインします。
Ubuntu 20.04サーバーにログインしたら、次のコマンドを実行して、ベースシステムを最新の利用可能なパッケージで更新します。
apt-get update -y
ステップ2–JitsiMeetをインストールする
開始する前に、サーバーに必要な依存関係をインストールする必要があります。次のコマンドを実行してインストールできます:
apt-get install apt-transport-https software-properties-common -y
インストールしたら、次のコマンドを使用してJitsiGPGキーをダウンロードして追加します。
wget -qO - https://download.jitsi.org/jitsi-key.gpg.key | apt-key add -
次に、次のコマンドを使用してJitsiリポジトリを追加します。
echo 'deb https://download.jitsi.org stable/' | tee /etc/apt/sources.list.d/jitsi-stable.list
次に、リポジトリを更新し、次のコマンドを使用してJitsiMeetをインストールします。
apt-get update -y
apt-get install jitsi-meet
インストール中に、以下に示すように有効なドメイン名を指定する必要があります。
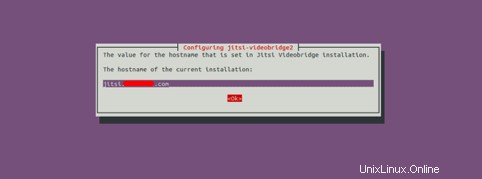
ドメイン名を入力して、 OKをクリックします ボタン。以下に示すように、後で信頼できるLet’s Encrypt証明書を取得してインストールできるように、新しい自己署名TLS証明書を生成するように求められます。
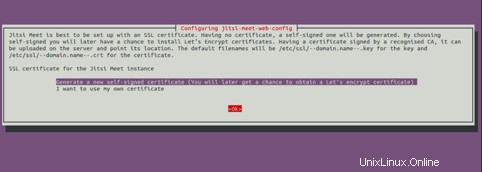
最初のオプションを選択し、 Enterを押します インストールを開始します。インストールが正常に完了すると、次のコマンドを使用してJitsiサービスのステータスを確認できます。
systemctl status jitsi-videobridge2
次の出力が得られるはずです:

ステップ3– Let’sEncrypt証明書を使用してJitsiMeetを保護する
開始する前に、サーバーにCertbotクライアントをインストールして、Let’sEncrypt証明書をインストールおよび管理する必要があります。
まず、次のコマンドを使用してCertbotリポジトリを追加します。
add-apt-repository ppa:ahasenack/certbot-tlssni01-1875471
sudo add-apt-repository ppa:certbot/certbot
次に、リポジトリを更新し、次のコマンドを使用してCertbotクライアントをインストールします。
apt-get update -y
apt-get install certbot python3-certbot-nginx -y
Jitsi Let’sEncryptのインストールスクリプトは/usr / local / sbinディレクトリにcertbotを想定していますが、Ubuntuは/ usr / binにインストールしているため、次のコマンドを使用してスクリプトのシンボリックリンクを作成します。
ln -s /usr/bin/certbot /usr/local/sbin/certbot
次に、install-letsencrypt-cert.shを更新して、certbot-autoの代わりにcertbotを使用します。
sed -i 's/\.\/certbot-auto/certbot/g' /usr/share/jitsi-meet/scripts/install-letsencrypt-cert.sh
次に、install-letsencrypt-cert.shスクリプトを実行して、Jitsi MeetをLet’sEncryptSSLで保護します。
/usr/share/jitsi-meet/scripts/install-letsencrypt-cert.sh
以下に示すように、メールアドレスを入力し、利用規約に同意するよう求められます。
————————————————————————-
This script will:
- Need a working DNS record pointing to this machine(for domain jitsi.example.com)
- Download certbot-auto from https://dl.eff.org to /usr/local/sbin
- Install additional dependencies in order to request Let’s Encrypt certificate
- If running with jetty serving web content, will stop Jitsi Videobridge
- Configure and reload nginx or apache2, whichever is used
- Configure the coturn server to use Let's Encrypt certificate and add required deploy hooks
- Add command in weekly cron job to renew certificates regularly

You need to agree to the ACME server's Subscriber Agreement (https://letsencrypt.org/documents/LE-SA-v1.1.1-August-1-2016.pdf)
by providing an email address for important account notifications
Enter your email and press [ENTER]: example@unixlinux.online
有効なメールアドレスを入力して、 Enterを押してください 。インストールが完了すると、次の出力が表示されます。
Saving debug log to /var/log/letsencrypt/letsencrypt.log
Plugins selected: Authenticator webroot, Installer None
Obtaining a new certificate
Performing the following challenges:
http-01 challenge for jitsi.example.com
Using the webroot path /usr/share/jitsi-meet for all unmatched domains.
Waiting for verification...
Cleaning up challenges
Running deploy-hook command: /etc/letsencrypt/renewal-hooks/deploy/0000-coturn-certbot-deploy.sh
Output from deploy-hook command 0000-coturn-certbot-deploy.sh:
Configuring turnserver
IMPORTANT NOTES:
- Congratulations! Your certificate and chain have been saved at:
/etc/letsencrypt/live/jitsi.example.com/fullchain.pem
Your key file has been saved at:
/etc/letsencrypt/live/jitsi.example.com/privkey.pem
Your cert will expire on 2020-08-31. To obtain a new or tweaked
version of this certificate in the future, simply run certbot
again. To non-interactively renew *all* of your certificates, run
"certbot renew"
- Your account credentials have been saved in your Certbot
configuration directory at /etc/letsencrypt. You should make a
secure backup of this folder now. This configuration directory will
also contain certificates and private keys obtained by Certbot so
making regular backups of this folder is ideal.
- If you like Certbot, please consider supporting our work by:

Donating to ISRG / Let's Encrypt: https://letsencrypt.org/donate
Donating to EFF: https://eff.org/donate-le
ステップ4–JitsiMeetにアクセスする
次に、Webブラウザーを開き、URLhttps://jitsi.example.comを入力します。次のページにリダイレクトされます:
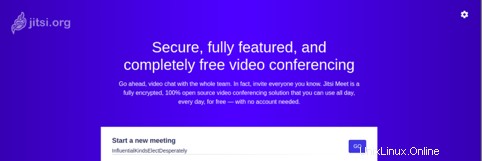
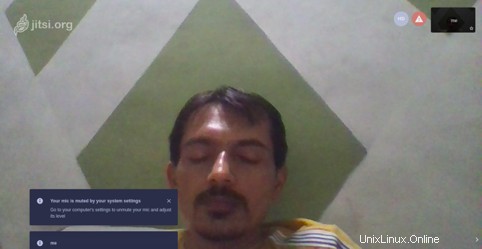
会議の名前を入力し、[移動]をクリックします ボタン。会議が開始されると、次の画面が表示されます。
結論
おめでとう!これで、Ubuntu20.04にJitsiMeetビデオ会議サーバーが正常に展開されました。これで、モバイルデバイスにJitsiクライアントアプリをインストールして、Jitsiの探索を開始できます。 Atlantic.NetのVPSホスティングでJitsiを試してみてください。詳細については、Jitsiのドキュメントをご覧ください。