Dgraphは、Go言語で記述されたグラフバックエンドを備えた無料のオープンソースの分散GraphQLデータベースです。これは、大量のデータを処理する中小企業が利用できる最も高度なグラフ作成およびマルチモデルNoSQLデータベースシステムの1つです。 Dgraphは、Googleの本番レベルのスケールとスループットを提供し、リアルタイムのユーザークエリを提供することを目的としています。コモディティハードウェア上で実行されるテラバイトの構造化データを、リアルタイムのユーザークエリの低レイテンシで処理できます。 Dgraphは高速で可用性が高く、柔軟なスキーマ、分散グラフとトランザクショングラフなどを提供します。
このチュートリアルでは、CentOS8にDgraphデータベースシステムをインストールする方法を紹介します。
前提条件
- Atlantic.netクラウドプラットフォーム上の新しいCentOS8VPS
- サーバーで構成されているrootパスワード
ステップ1–Atlantic.Netクラウドサーバーを作成する
まず、Atlantic.Netクラウドサーバーにログインします。 1GB以上のRAMを搭載したオペレーティングシステムとしてCentOS8を選択して、新しいサーバーを作成します。 SSH経由でクラウドサーバーに接続し、ページの上部で強調表示されているクレデンシャルを使用してログインします。
CentOS 8サーバーにログインしたら、次のコマンドを実行して、ベースシステムを最新の利用可能なパッケージで更新します。
dnf update -y
ステップ2–Dgraphをインストールする
Dgraphをインストールする簡単で簡単な方法は、Dgraph自動インストールスクリプトを実行することです。次のコマンドを使用して、Dgraphインストールスクリプトを実行できます。
curl https://get.dgraph.io -sSf | bash
以下に示すように、システムにDgraphをインストールするには、利用規約に同意する必要があります。
By downloading Dgraph you agree to the Dgraph Community License (DCL) terms
shown above. An open-source (Apache 2.0) version of Dgraph without any
DCL-licensed enterprise features is available by building from the Dgraph
source code. See the source installation instructions for more info:

https://github.com/dgraph-io/dgraph#install-from-source

Do you agree to the terms of the Dgraph Community License? [Y/n] Y
Latest release version is v20.07.0.
Downloading checksum file for v20.07.0 build.
######################################################################## 100.0%##O#- # ######################################################################## 100.0%
Download complete.
Comparing checksums for dgraph binaries
Downloading https://github.com/dgraph-io/dgraph/releases/download/v20.07.0/dgraph-linux-amd64.tar.gz
######################################################################## 100.0%#=#=# ######################################################################## 100.0%
Download complete.
Inflating binaries (password may be required).
Dgraph binaries v20.07.0 have been installed successfully in /usr/local/bin.
Please visit https://dgraph.io/docs/get-started for further instructions on usage.
Dgraphをインストールしたら、次の手順に進むことができます。
ステップ3–Dgraphのユーザーを作成する
次に、Dgraphサービスを実行するために、個別のユーザーとグループを作成する必要があります。次のコマンドで作成できます:
groupadd --system dgraph
useradd --system -d /var/run/dgraph -s /bin/false -g dgraph dgraph
次に、Dgraphログと状態ファイルを保存するためのディレクトリを作成する必要があります。次のコマンドで作成できます:
mkdir -p /var/log/dgraph
mkdir -p /var/run/dgraph/{p,w,zw}
次に、以下に示すように、ディレクトリの所有権をdgraphに変更します。
chown -R dgraph:dgraph /var/{run,log}/dgraph ステップ4–Dgraph用のSystemdサービスファイルを作成する
次に、Dgraphを管理するためにいくつかのsystemdサービスファイルを作成する必要があります。
まず、次のコマンドを使用してdgraph.serviceファイルを作成します。
nano /etc/systemd/system/dgraph.service
次の行を追加します:
[Unit]
Description=dgraph.io data server
Wants=network.target
After=network.target dgraph-zero.service
Requires=dgraph-zero.service

[Service]
Type=simple
ExecStart=/usr/local/bin/dgraph alpha --lru_mb 2048 -p /var/run/dgraph/p -w /var/run/dgraph/w
StandardOutput=journal
StandardError=journal
User=dgraph
Group=dgraph

[Install]
WantedBy=multi-user.target
終了したら、ファイルを保存して閉じます。
次に、次のコマンドを使用してdgraph-zero.serviceファイルを作成します。
nano /etc/systemd/system/dgraph-zero.service
次の行を追加します:
[Unit]
Description=dgraph.io zero server
Wants=network.target
After=network.target

[Service]
Type=simple
ExecStart=/usr/local/bin/dgraph zero --wal /var/run/dgraph/zw
StandardOutput=journal
StandardError=journal
User=dgraph
Group=dgraph

[Install]
WantedBy=multi-user.target
RequiredBy=dgraph.service
終了したら、ファイルを保存して閉じます。
次に、次のコマンドを使用してgraph-ui.serviceファイルを作成します。
nano /etc/systemd/system/dgraph-ui.service
次の行を追加します:
[Unit]
Description=dgraph.io UI server
Wants=network.target
After=network.target

[Service]
Type=simple
ExecStart=/usr/local/bin/dgraph-ratel
StandardOutput=journal
StandardError=journal
User=dgraph
Group=dgraph

[Install]
WantedBy=multi-user.target
ファイルを保存して閉じてから、次のコマンドを使用してsystemdデーモンをリロードします。
systemctl daemon-reload
次に、次のコマンドを使用して、システムの再起動時にすべてのサービスを開始して有効にします。
systemctl enable --now dgraph
systemctl enable --now dgraph-ui
systemctl enable --now dgraph-zero
systemctl start dgraph
systemctl start dgraph-ui
systemctl start dgraph-zero
この時点で、すべてのDgraphサービスが実行され、ポート8000および8080でリッスンしています。次のコマンドでそれらを確認できます。
ss -tunelp | grep 8000
次の出力が得られるはずです:
tcp6 0 0 :::8000 :::* LISTEN 990 24437 1066/dgraph-ratel

ss -tunelp | grep 8080
次の出力が得られるはずです:
tcp6 0 0 :::8080 :::* LISTEN 990 24979 1083/dgraph
ステップ5–DgraphWebインターフェイスにアクセスする
次に、Webブラウザーを開き、URL http:// your-server-ip:8000を使用してDgraphWebインターフェースにアクセスします。次のページが表示されます:
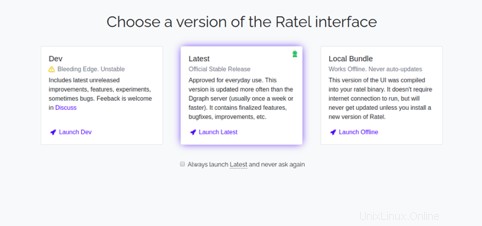
起動をクリックします 最新 ボタン。次のページにリダイレクトされます:
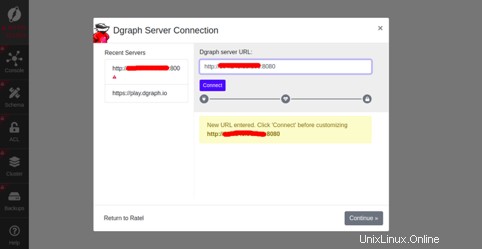
DgraphサーバーのURLを入力し、続行をクリックします ボタン。次のページが表示されます:
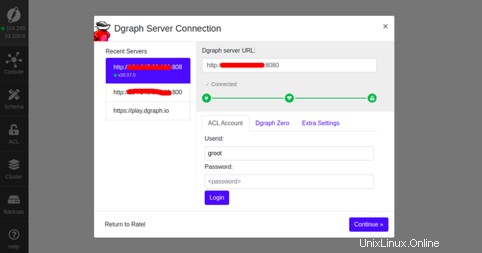
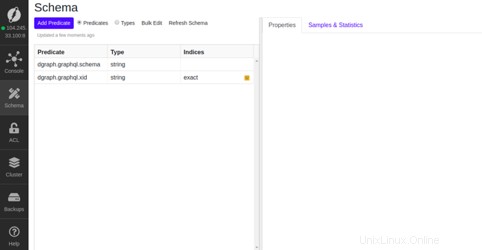
続行をクリックします ボタン。次のページのDgraphダッシュボードにリダイレクトされます:
結論
おめでとう!これで、CentOS8にDgraphが正常にインストールされました。これでAtlantic.NetVPSでDgraphとGraphQLを使用してアプリケーションの構築を開始できます。詳細については、Dgraphの公式ドキュメントをご覧ください。