はじめに
IPv6(インターネットプロトコルバージョン6)は、インターネットプロトコル(IP)の最新バージョンであり、ネットワーク上のコンピューターの識別およびロケーションシステムを提供し、インターネットを介してトラフィックをルーティングします。
IPv6は、利用可能なIPv4アドレス空間の不足の問題に対処するために開発され、IPv4を置き換えることを目的としています(IPv6は、IPv4によって提供される43億のアドレスの7.9×1028倍です!)。
IPv6アドレスは、4つの16進(0-9、a-f)文字の8つのグループとして表され、グループはコロンで区切られます。例:
2607:f170:0054:0012:0000:0000:0000:0bf0
幸いなことに、IPv6アドレスは簡略化された形式(省略形/圧縮形式)で記述でき、記述すべきです。これにより、より高速で読みやすくなります。
上記の例をとると、先行ゼロをすべて削除し、連続するゼロのグループを二重コロンで省略できます。はるかに読みやすいです。
2607:f170:54:12 ::bf0
クラウドサーバーでIPv6を有効にするにはどうすればよいですか
クラウドサーバーでIPv6を有効にするには2つのオプションがあります。サーバーの作成中またはサーバーの詳細ページから。どちらのオプションも、再起動を必要とせずに、その特定のクラウドサーバーで使用するために16個のIPv6アドレスを割り当てます。
16のIPv6アドレス範囲は、次のようにクラウドポータルのユーザーに表示されます。
2607:f170:54:12 ::bf0 – 2607:f170:54:12 ::bff
最後の文字のみが変更されていることに気付くでしょう。これは、ユーザーのために物事を単純化するために行いました(16文字の16進範囲:0〜9、a〜fを利用)。
上記の例の16個のIPv6アドレスの全リストは次のとおりです。
2607:f170:54:12 ::bf0
2607:f170:54:12 ::bf1
2607:f170:54:12 ::bf2
2607:f170:54:12: :bf3
2607:f170:54:12 ::bf4
2607:f170:54:12 ::bf5
2607:f170:54:12 ::bf6
2607: f170:54:12 ::bf7
2607:f170:54:12 ::bf8
2607:f170:54:12 ::bf9
2607:f170:54:12 ::bfa
2607:f170:54:12 ::bfb
2607:f170:54:12 ::bfc
2607:f170:54:12 ::bfd
2607:f170: 54:12 ::bfe
2607:f170:54:12 ::bff
クラウドサーバーでIPv6を有効にするオプション :
1)クラウドサーバーの作成中に、[IPv6を有効にする]チェックボックスをオンにすると、クラウドサーバーは次のようになります。
–そのクラウドサーバーで使用するために16個のIPv6アドレスを割り当てます
–そのクラウドサーバーで最初のIPv6アドレスを構成します

2)Cloud Serverの詳細ページで[IPv6を有効にする]をクリックすると、CloudServerは次のようになります。
–そのCloud Serverで使用するために16個のIPv6アドレスが割り当てられますが、CloudServerのネットワーク設定を手動で構成する必要があります。 IPv6アドレスを使用します。

サーバーでIPv6を構成する方法
Cloud Serverの作成時に「IPv6を有効にする」を選択した場合、最初のIPv6アドレスはすでに構成されています。最初にIPv6を有効にしたクラウドサーバーのIPv6アドレスを構成する場合、またはクラウドサーバーに追加のIPv6アドレスを構成する場合は、以下の例でさまざまなオペレーティングシステムにIPv6アドレスを構成する方法を示します。 。変更を構成した後、サーバーを再起動して、変更が完全に有効になるようにすることをお勧めします。
まず、Cloud Serverの詳細ページにアクセスして、サーバーのIPv6情報を取得します

Ubuntu 14.04、16.04
/ etc / network / interfaces構成ファイルを編集して、以下のサンプルを参照として適切な情報を追加します。
[email protected]:~# cat /etc/network/interfaces

# This file describes the network interfaces available on your system
# and how to activate them. For more information, see interfaces(5).

# The loopback network interface
auto lo
iface lo inet loopback

# The primary network interface
auto eth0
iface eth0 inet static
        hwaddress ether 00:00:d0:75:57:99
        address 208.117.87.153
        netmask 255.255.255.0
        gateway 208.117.87.1

# dns-* options are implemented by the resolvconf package, if installed
    dns-nameservers 209.208.127.65 209.208.25.18


# Primary IPv6 Address
iface eth0 inet6 static
        address 2607:f170:54:12::bf0/64
        gateway 2607:F170:54:12::1
        dns-nameservers 2001:4860:4860::8888 2001:4860:4860::8844

# Additional IPv6 Address
iface eth0 inet6 static
        address 2607:f170:54:12::bf1/64
Ubuntu 18.04
/etc/netplan/01-netcfg.yaml構成ファイルを編集して、以下のサンプルを参照として使用して適切な情報を追加します。
[email protected]:~# cat /etc/netplan/01-netcfg.yaml

# This file describes the network interfaces available on your system
# For more information, see netplan(5).

network:
  version: 2
  renderer: networkd
  ethernets:
    eth0:
      addresses:
        - 208.117.87.153/24
        - 2607:f170:54:12::bf0/64  # IPv6 Primary Address
        - 2607:f170:54:12::bf1/64  # Additional IPv6 Address
      gateway4: 208.117.87.1
      gateway6: 2607:F170:54:12::1  # IPv6 Gateway
      nameservers:
        addresses:
          - 209.208.127.65
          - 209.208.25.18
          - 2001:4860:4860::8888  # IPv6 DNS Address
          - 2001:4860:4860::8844  # IPv6 DNS Address
CentOS、Fedora
/ etc / sysconfig / network-scripts / ifcfg-eth0構成ファイルを編集して、以下のサンプルを参照として適切な情報を追加します。
[[email protected] ~]# cat /etc/sysconfig/network-scripts/ifcfg-eth0

# Virtio Network Device Public Interface
DEVICE=eth0
BOOTPROTO=static
HWADDR=00:00:d0:75:57:99
ONBOOT=yes
IPADDR=208.117.87.153
NETMASK=255.255.255.0
GATEWAY=208.117.87.1
DNS1=209.208.127.65
DNS2=209.208.25.18

#IPv6 Configuration
IPV6INIT=yes
IPV6ADDR=2607:f170:54:12::bf0/64
IPV6_DEFAULTGW=2607:F170:54:12::1
DNS1=2001:4860:4860::8888
DNS2=2001:4860:4860::8844

# Additional IPv6 Addresses separated by spaces
IPV6ADDR_SECONDARIES="2607:f170:54:12::bf1/64 2607:f170:54:12::bf2/64"
Debian
/ etc / network / interfaces構成ファイルを編集して、以下のサンプルを参照として適切な情報を追加します。
[email protected]:~# cat /etc/network/interfaces

# This file describes the network interfaces available on your system
# and how to activate them. For more information, see interfaces(5).

source /etc/network/interfaces.d/*

# The loopback network interface
auto lo
iface lo inet loopback

# The primary network interface
auto eth0
iface eth0 inet static
        hwaddress ether 00:00:d0:75:57:99
        address 208.117.87.153
        netmask 255.255.255.0
        gateway 208.117.87.1

# Primary IPv6 Address
iface eth0 inet6 static
        address 2607:f170:54:12::bf0/64
        gateway 2607:F170:54:12::1
        dns-nameservers 2001:4860:4860::8888 2001:4860:4860::8844

# Additional IPv6 Address
iface eth0 inet6 static
        address 2607:f170:54:12::bf1/64
FreeBSD
/etc/rc.conf構成ファイルを編集して、以下のサンプルを参照として適切な情報を追加します。
[email protected]:~ # cat /etc/rc.conf

# Disable crash dumps by default
dumpdev="NO"

# Public Networking
hostname="FreeBSD"
ifconfig_vtnet0="inet 208.117.87.153 netmask 255.255.255.0"
defaultrouter="208.117.87.1"

# IPv6 Networking
ipv6_activate_all_interfaces="yes"
ifconfig_vtnet0_ipv6="inet6 2607:f170:54:12::bf0 prefixlen 64" # Primary IPv6 Address
ifconfig_vtnet0_alias1_ipv6="inet6 2607:f170:54:12::bf1 prefixlen 64" # Additional IPv6 Address
ipv6_defaultrouter="2607:F170:54:12::1"

# Private Networking (Please check the Cloud Control Panel for information on your Private IP range)
#ifconfig_vtnet1="inet <private-ip-addres> netmask <private-netmask>"
#static_routes="net1"
#route_net1="-net <private-network> <private-gateway>"

# System Configuration
sshd_enable="YES"
ntpd_enable="YES"
Arch Linux
/ etc / netctl / eth0構成ファイルを編集して、以下のサンプルを参照として適切な情報を追加します。
[[email protected] ~]# cat /etc/netctl/eth0

Description='Public ethernet connection'
Interface=eth0
Connection=ethernet
IP=static
Address=('208.117.87.153/24')
Gateway='208.117.87.1'
DNS=('209.208.127.65' '209.208.25.18')

## For IPv6 static address configuration
IP6=static
# Primary IPv6 Address and Additional IPv6 Addresses separated by spaces
Address6=('2607:f170:54:12::bf0/64' '2607:f170:54:12::bf1/64')
Gateway6='2607:F170:54:12::1'
Windows Server
メインイーサネットアダプタのネットワーク設定を開きます
Windows Server 2008
– WindowsServerの右下のトレイにあるネットワークアイコンを右クリックします
–[ネットワークと共有センターを開く]をクリックします
–[ローカルエリア接続]をクリックします
–[プロパティ]をクリックします
WindowsServer2012および2016
– WindowsServerの右下のトレイにあるネットワークアイコンを右クリックします
–[ネットワークと共有センターを開く]をクリックします
–[イーサネット]をクリックします
–[プロパティ]をクリックします
Windows 2019
– WindowsServerの右下のトレイにあるネットワークアイコンを右クリックします
–[ネットワークとインターネットの設定を開く]をクリックします
–[アダプタオプションの変更]をクリックします
–イーサネットを右クリック
–[プロパティ]をクリック
プライマリIPv6アドレスを構成する
「インターネットプロトコルバージョン6(TCP / IPv6)」を選択し、「プロパティ」をクリックします 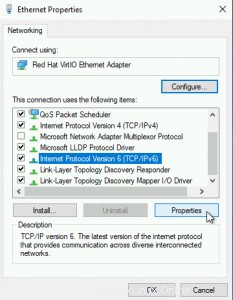
プライマリIPv6アドレスとDNSを構成し、[OK]、[OK]をクリックします
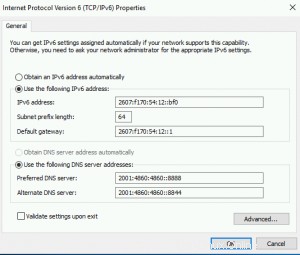
[詳細...]をクリックして設定を確認できるようになりました
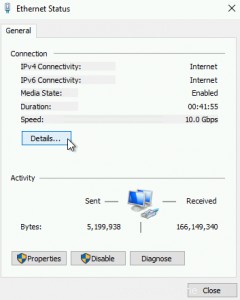
追加のIPv6アドレスを構成する
「詳細…」をクリックして、追加のIPv6アドレスを構成します 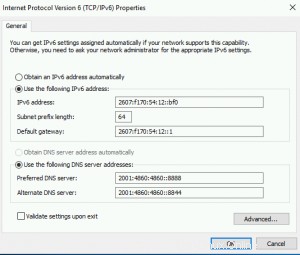
「IPアドレス」セクションの下にある「追加…」をクリックします
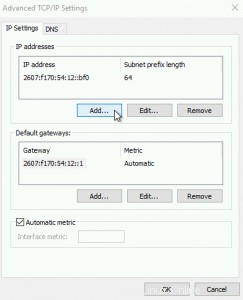
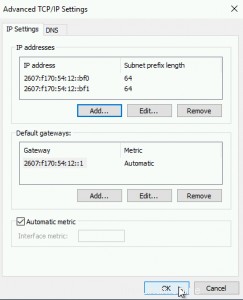
追加のIPv6アドレスを構成し、[追加]、[OK]の順にクリックします

「OK」、「OK」、「OK」をもう一度クリックします
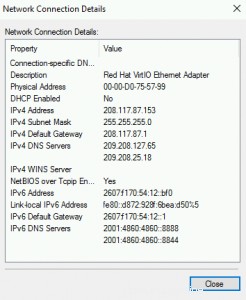
これで、[詳細...]をクリックして設定を確認できます

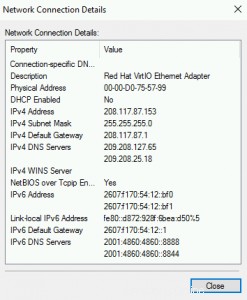
これで、IPv6アドレスを必要に応じて構成する必要があります。
