
WalkerCahallによるNGINXカー
はじめに
このハウツーは、NGINXのインストールと構成に役立ち、顧客が期待する高レベルのパフォーマンスを維持しながら、トラフィックの多いWebサイトを実行できます。また、NGINXを最大限に活用するために追加のソフトウェアをインストールする予定なので、このガイドには、MySQL、PHP-APC、およびPHP-FPMのインストールと構成も含まれています。
なぜNGINXなのか? ApacheとNGINXのどちらを使用するかについては、長い間議論が交わされています。2つのWebサーバープラットフォームの全体的なパフォーマンスはほぼ同じですが、NGINXのイベントベースの処理モデルは、シンプルで軽量で、大規模な処理が優れていることで輝いています。サーバーハードウェアに過度の負担をかけずに、静的コンテンツの同時ヒット数。
何が必要ですか?
–静的IPアドレスで構成されたCentOS7サーバーが必要です。サーバーをまだお持ちでない場合は、VPSホスティングページにアクセスして、30秒以内に新しいサーバーを起動できます。
サーバーの準備
開始するには、SSH経由でCentOSサーバーにログインします。 Atlantic.Net Cloudサーバーは、不要なパッケージがインストールされて使用されないようにするために、最小限のインストールとしてセットアップされています。このため、デフォルトではないパッケージをいくつかインストールすることから始めます。
yum install wget
yum install nano
ログインしたら、サーバーが完全に最新であることを確認してください。
yum update
サーバーを最新の状態にすると、プロセスを続行してNGINXをインストールできます。 NGINXはデフォルトのCentOSリポジトリに含まれていないため、Enterprise Linux用の追加パッケージ(EPEL)リポジトリを使用します。このプロセスでは、REMIリポジトリのパッケージも使用する予定なので、それもダウンロードしてインストールしましょう。
次のコマンドを使用して、最新バージョンのEPELをインストールできます。
yum install epel-release -y
先に進む前に、NGINXとPHP-FPMで使用される新しいユーザーとグループも作成します。デフォルト設定を使用してユーザーとグループを離れても、すべてが機能するはずですが、セキュリティを少し強化するために、変更を加えます。
groupadd www-data
useradd -g www-data www-data
サーバーの準備に取り組んでいる間に、先に進んでWebサーバー用の新しいディレクトリを設定しましょう。通常、人々は / var / www / htmlを使用します 彼らのサイトのために、しかし私は常に /home/domainname.tld/htmlにサイトファイルを持っている方が快適でした 、それが私たちが使用するものです。ウォークスルーでは、 example.tldを使用します ドメインとして—太字のエントリを更新して、構成しているドメインと一致するようにしてください。
mkdir -p /home/example.tld/html
chown -R www-data:www-data /home/example.tld/
chmod -R 0755 /home/example.tld/html
サーバーの準備が完了したので、ソフトウェアパッケージのインストールに進むことができます。
CentOS7にMariaDBをインストールして構成する
まず、次のコマンドを使用してMariaDBサーバーパッケージをインストールします。
yum install mariadb-server -y
MariaDBをインストールした後、MariaDBサービスを開始し、システムの再起動時に開始できるようにします。
systemctl start mariadb
systemctl enable mariadb
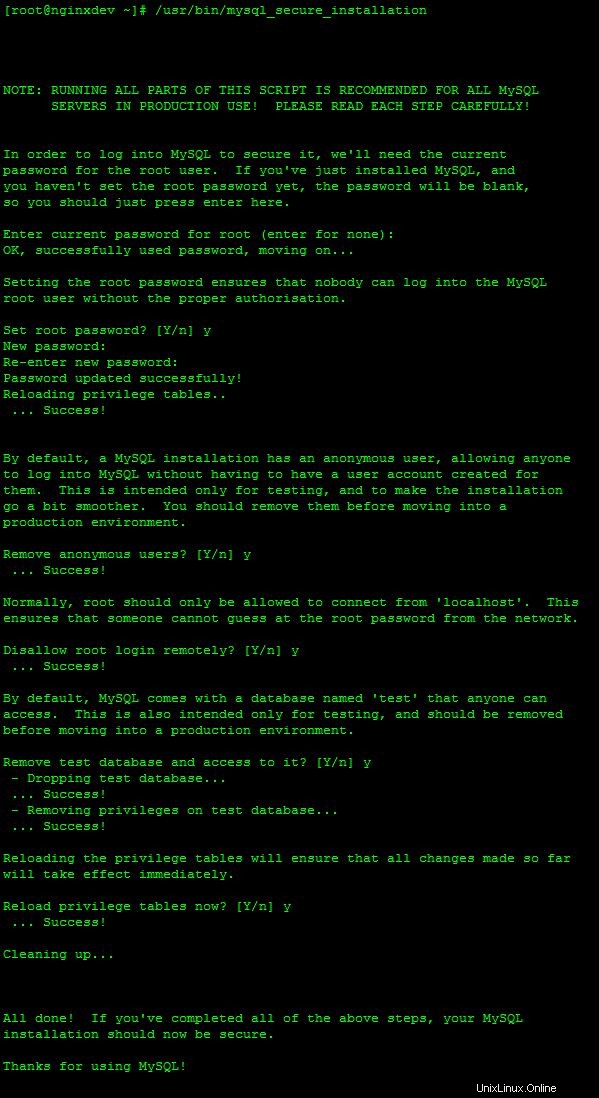
次に、次のコマンドを使用してMariaDBのインストールを保護します。
mysql_secure_installation
MySQL Secure Installationプロセスでは、新しいMySQLインスタンスに適用する必要のある初期のセキュリティ変更について説明します。
注:安全なパスワードを選択し、rootアクセスをローカルホストのみに制限してください。
mysql_secure_installation
/etc/my.cfを編集します 以下に一致するファイル。サーバーをローカル接続のみをリッスンするように制限します。
[mysqld]
bind-address = 127.0.0.1
datadir=/var/lib/mysql
socket=/var/lib/mysql/mysql.sock
user=mysql

# Disabling symbolic-links is recommended to prevent assorted security risks
symbolic-links=0

[mysqld_safe]
log-error=/var/log/mysqld.log
pid-file=/var/run/mariadb/mariadb.pid
最後にすべてのサービスを再開するので、次に進みましょう。
CentOS7にNGINXをインストールして構成する
yum install nginx
インストールしたら、サーバーで使用可能なCPU論理コアの数を確認する必要があります。これを行うには、次のコマンドを実行します。
grep -c 'model name' /proc/cpuinfo
これはworker_processes設定も表示されるため、結果をメモしてください。 /etc/nginx/nginx.confを開きます 現在の内容を次のように置き換えます。
user    www-data;
worker_processes  2;

pid        /var/run/nginx.pid;

events {
        worker_connections  1024;
}

http {
        include       /etc/nginx/mime.types;
        default_type  application/octet-stream;

        server_names_hash_bucket_size 64;

        error_log  /var/log/nginx/error_log;

        log_format  main  '$remote_addr - $remote_user [$time_local] "$request" '
                '$status $body_bytes_sent "$http_referer" '
                '"$http_user_agent" "$http_x_forwarded_for"';

        sendfile        on;

        keepalive_timeout  30;
        server_tokens off;

        gzip on;
        gzip_disable "MSIE [1-6]\.(?!.*SV1)";
        gzip_http_version 1.1;
        gzip_vary on;
        gzip_proxied any;
        gzip_comp_level 6;
        gzip_buffers 16 8k;
        gzip_types text/plain text/css application/json application/x-javascript text/xml application/xml application/xml+rss text/javascript application/javascript text/x-js;

        # enabled sites
        include /etc/nginx/conf.d/*.conf;
}
が含まれます
次に、ドメイン構成ファイルを設定する必要があります。これは、 /etc/nginx/conf.d/ example.confという名前の新しいファイルを作成することによって行われます。 。 繰り返しになりますが、追加するドメインに一致するように太字のエントリを更新してください。
server {
        listen  80;

        server_name     example.tld;

        client_max_body_size 5m;
        client_body_timeout 60;

        access_log /var/log/nginx/example.tld_access;
        error_log  /var/log/nginx/example.tld_error error;

        root /home/example.tld/html/;
        index  index.html index.php;

        ### SEO sitemaps ###
        rewrite ^/sitemap_index\.xml$ /index.php?sitemap=1 last;
        rewrite ^/([^/]+?)-sitemap([0-9]+)?\.xml$ /index.php?sitemap=$1&sitemap_n=$2 last;

        ### www directory ###
        location / {
                try_files $uri $uri/ /index.php?$args;
        }

        ### security ###
        error_page 403 =404;
        location ~ /\. { access_log off; log_not_found off; deny all; }
        location ~ ~$ { access_log off; log_not_found off; deny all; }
        location ~* wp-admin/includes { deny all; }
        location ~* wp-includes/theme-compat/ { deny all; }
        location ~* wp-includes/js/tinymce/langs/.*\.php { deny all; }
        location /wp-content/ { internal; }
        location /wp-includes/ { internal; }
        location ~* wp-config.php { deny all; }

        ### disable logging ###
        location = /robots.txt { access_log off; log_not_found off; }
        location = /favicon.ico { access_log off; log_not_found off; }

        ### caches ###
        location ~* \.(jpg|jpeg|gif|css|png|js|ico|html)$ { access_log off; expires max; }
        location ~* \.(woff|svg)$ { access_log off; log_not_found off; expires 30d; }

        ### php block ###
        location ~ \.php?$ {
                try_files $uri =404;
                include fastcgi_params;
                fastcgi_pass unix:/var/run/php-www.socket;
                fastcgi_param SCRIPT_FILENAME $document_root$fastcgi_script_name;
                fastcgi_intercept_errors on;
                fastcgi_split_path_info ^(.+\.php)(.*)$;
                fastcgi_hide_header X-Powered-By;
        }
}
NGINXを実行するユーザーを変更したため、NGINX一時ファイルの所有権を変更する必要があります。
chown -R www-data:www-data /var/lib/nginx/
chmod 700 /var/lib/nginx/
繰り返しになりますが、最後にすべてのサービスを再開します。次に、サーバーにPHPのフルバージョンをインストールする代わりに、PHP-FPM(代替のPHP FastCGI実装)を使用します。
CentOS7にPHP-FPMをインストールして構成する
注:インストール後、「cgi.fix_pathinfo」設定を更新して、サードパーティが新しいサーバーで独自のPHPコードを実行できる可能性のある潜在的な脆弱性を無効にする必要があります。
まず、次のコマンドを使用してRemiリポジトリをインストールします。
yum install http://rpms.famillecollet.com/enterprise/remi-release-7.rpm
次に、次のコマンドを使用して、他の必要な拡張機能を備えたPHP-FPMをインストールします。
yum --enablerepo=remi-php74 install php-fpm php-mysql
nano /etc/php.ini
変更
;cgi.fix_pathinfo=1
に
cgi.fix_pathinfo=0
/etc/php-fpm.d/www.confを開きます 構成を次のように変更します。
[www]
listen = /var/run/php-www.socket

user = www-data
group = www-data

listen.owner = www-data
listen.group = www-data
listen.mode = 0660
listen = /var/run/php-www.socket
request_slowlog_timeout = 5s
slowlog = /var/log/php-fpm/blogcms_log
listen.allowed_clients = 127.0.0.1

pm = dynamic
pm.max_children = 10
pm.start_servers = 3
pm.min_spare_servers = 2
pm.max_spare_servers = 4
pm.max_requests = 400
listen.backlog = -1
pm.status_path = /status

request_terminate_timeout = 120s
rlimit_files = 131072
rlimit_core = unlimited

catch_workers_output = yes

php_value[session.save_handler] = files
php_value[session.save_path] = /var/lib/php/session
php_admin_value[error_log] = /var/log/php-fpm/www-error_log
php_admin_flag[log_errors] = on
変更を保存します。
CentOS7にPHP-APCをインストールして構成する
パズルの最後のピースは、静的ファイルのロード時間をさらに改善するためにPHPアクセラレーターをインストールすることです。
yum --enablerepo=remi-php74 install php-pecl-apc
インストールが完了したら、 /etc/php.d/50-apc.iniを開きます。 内容を次のように置き換えます:
extension = apc.so
apc.enabled=1
apc.shm_segments=1
apc.shm_size=128M
apc.num_files_hint=1024
apc.user_entries_hint=4096
apc.ttl=7200
apc.use_request_time=1
apc.user_ttl=7200
apc.gc_ttl=3600
apc.cache_by_default=1
apc.filters
apc.mmap_file_mask=/tmp/apc.XXXXXX
apc.file_update_protection=2
apc.enable_cli=0
apc.max_file_size=1M
apc.stat=1
apc.stat_ctime=0
apc.canonicalize=0
apc.write_lock=1
apc.report_autofilter=0
apc.rfc1867=0
apc.rfc1867_prefix =upload_
apc.rfc1867_name=APC_UPLOAD_PROGRESS
apc.rfc1867_freq=0
apc.rfc1867_ttl=3600
apc.include_once_override=0
apc.lazy_classes=0
apc.lazy_functions=0
apc.coredump_unmap=0
apc.file_md5=0
apc.preload_path
最後の仕上げ
すべてが完了したので、次を実行してNGINX構成を確認できます:
nginx -t
構成が「nginx:構成ファイル/etc/nginx/nginx.confテストが成功しました」で戻ってきた場合、すべてのサービスを開始(または再起動)し、システムの起動時にすべてのサービスが開始するように設定されていることを確認できます。
>systemctl start mariadb ; systemctl enable mariadb systemctl start nginx ; systemctl enable mariadb systemctl start php-fpm ; systemctl enable php-fpm
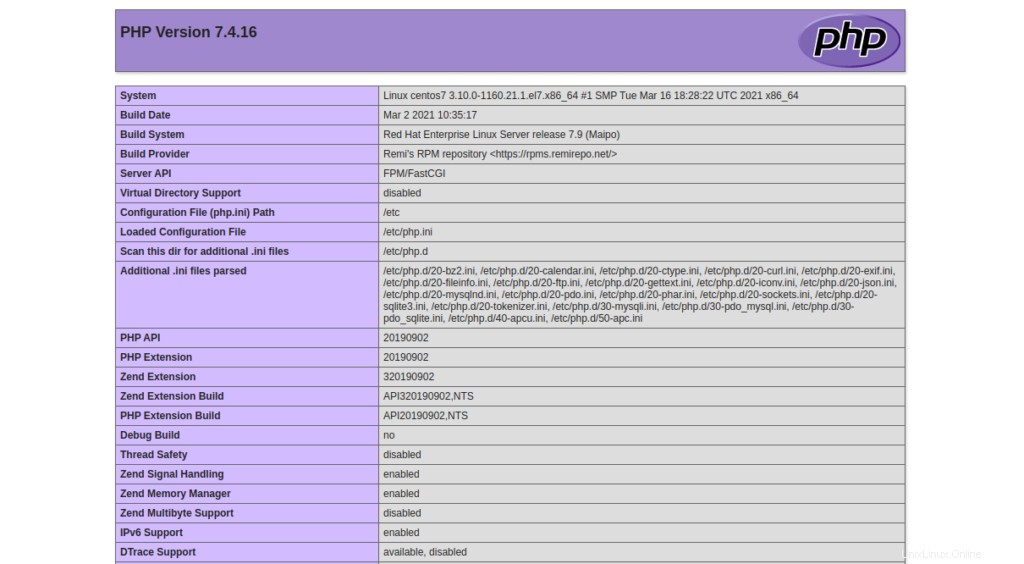
最後のステップとして、info.phpテストページを作成し、デフォルトのindex.htmlのコピーをサイトのホームディレクトリに移動して、構成が機能していることを確認します。以前と同様に、太字のエントリを設定しているドメインで更新してください。
cp -R /usr/share/nginx/html/* /home/example.tld/html/
nano /home/example.tld/html/info.php
<?php

// Show all information, defaults to INFO_ALL
phpinfo();

?>
すべてをテストする
http:// example.tldにアクセスする デフォルトのindex.htmlファイルを表示する必要があります。 http:// example.tldにアクセスする /info.php PHPに関する情報を表示する必要があります。
これで、Webサイトを実行するために必要なすべてのコンポーネントを実行するサーバーができました!
その他の更新については、ここに戻って確認し、Atlantic.Netの市場をリードする仮想プライベートサーバーを検討してください。