この簡単なチュートリアルでは、 lm_sensorsを使用してLinuxでCPU温度を表示する方法について説明します。 。 Lm_sensors、 Lの略 inux- m onitoringセンサー は、CPUの温度、電圧、湿度、ファンを監視するために必要なツールとドライバを提供する無料のソフトウェアです。また、シャーシへの侵入を検出することもできます。そのため、欠陥のあるハードウェアコンポーネントを見つけて交換し、システムのハングや過熱の問題を回避できます。
Linuxにlm_sensorsをインストールする
Lm_sensorsには、最新のLinuxオペレーティングシステムのほとんどがプリインストールされています。まだインストールされていない場合は、以下のようにインストールできます。
Arch Linuxとその派生物について:
$ sudo pacman -S lm_sensors
RHEL、CentOS、Fedoraの場合:
$ sudo yum install lm_sensors
または、
$ sudo dnf install lm_sensors
Debian、Ubuntu、Linux Mintの場合:
$ sudo apt-get install lm-sensors
SUSEでは、openSUSE:
$ sudo zypper in sensorsダウンロード -無料のチートシート:「Linuxコマンドラインチートシート」
Lm_sensorsを構成する
インストールしたら、次のコマンドを実行してlm_sensorsを構成します。
$ sudo sensors-detect
センサー-検出 は、インストールされているハードウェアを検出し、特定のモジュールをロードするように推奨するためのスタンドアロンプログラムです。 「安全な」回答がデフォルトであるため、Enterキーを押してデフォルト値を受け入れます。問題は発生しません。これにより、 /etc/conf.d/lm_sensorsが作成されます lm_sensors.serviceによって使用される構成ファイル 起動時にカーネルモジュールを自動的にロードします。
DELLノートパソコンでの上記のコマンドの出力例:
# sensors-detect version 3.6.0
# System: Dell Inc. Inspiron N5050 [Not Specified] (laptop)
# Board: Dell Inc. 01HXXJ
# Kernel: 5.4.0-42-generic x86_64
# Processor: Intel(R) Core(TM) i3-2350M CPU @ 2.30GHz (6/42/7)

This program will help you determine which kernel modules you need
to load to use lm_sensors most effectively. It is generally safe
and recommended to accept the default answers to all questions,
unless you know what you're doing.

Some south bridges, CPUs or memory controllers contain embedded sensors.
Do you want to scan for them? This is totally safe. (YES/no):
Module cpuid loaded successfully.
Silicon Integrated Systems SIS5595... No
VIA VT82C686 Integrated Sensors... No
VIA VT8231 Integrated Sensors... No
AMD K8 thermal sensors... No
AMD Family 10h thermal sensors... No
AMD Family 11h thermal sensors... No
AMD Family 12h and 14h thermal sensors... No
AMD Family 15h thermal sensors... No
AMD Family 16h thermal sensors... No
AMD Family 15h power sensors... No
AMD Family 16h power sensors... No
Intel digital thermal sensor... Success!
 (driver `coretemp')
Intel AMB FB-DIMM thermal sensor... No
Intel 5500/5520/X58 thermal sensor... No
VIA C7 thermal sensor... No
VIA Nano thermal sensor... No

Some Super I/O chips contain embedded sensors. We have to write to
standard I/O ports to probe them. This is usually safe.
Do you want to scan for Super I/O sensors? (YES/no):
Probing for Super-I/O at 0x2e/0x2f
Trying family `National Semiconductor/ITE'... No
Trying family `SMSC'... No
Trying family `VIA/Winbond/Nuvoton/Fintek'... No
Trying family `ITE'... No
Probing for Super-I/O at 0x4e/0x4f
Trying family `National Semiconductor/ITE'... Yes
Found unknown chip with ID 0xfc11

Some hardware monitoring chips are accessible through the ISA I/O ports.
We have to write to arbitrary I/O ports to probe them. This is usually
safe though. Yes, you do have ISA I/O ports even if you do not have any
ISA slots! Do you want to scan the ISA I/O ports? (YES/no):
Probing for `National Semiconductor LM78' at 0x290... No
Probing for `National Semiconductor LM79' at 0x290... No
Probing for `Winbond W83781D' at 0x290... No
Probing for `Winbond W83782D' at 0x290... No

Lastly, we can probe the I2C/SMBus adapters for connected hardware
monitoring devices. This is the most risky part, and while it works
reasonably well on most systems, it has been reported to cause trouble
on some systems.
Do you want to probe the I2C/SMBus adapters now? (YES/no):
Using driver `i2c-i801' for device 0000:00:1f.3: Intel Cougar Point (PCH)
Module i2c-dev loaded successfully.

Next adapter: SMBus I801 adapter at f040 (i2c-0)
Do you want to scan it? (YES/no/selectively):
Client found at address 0x50
Probing for `Analog Devices ADM1033'... No
Probing for `Analog Devices ADM1034'... No
Probing for `SPD EEPROM'... Yes
 (confidence 8, not a hardware monitoring chip)
Probing for `EDID EEPROM'... No

Next adapter: i915 gmbus ssc (i2c-1)
Do you want to scan it? (yes/NO/selectively):

Next adapter: i915 gmbus vga (i2c-2)
Do you want to scan it? (yes/NO/selectively):

Next adapter: i915 gmbus panel (i2c-3)
Do you want to scan it? (yes/NO/selectively):

Next adapter: i915 gmbus dpc (i2c-4)
Do you want to scan it? (yes/NO/selectively):

Next adapter: i915 gmbus dpb (i2c-5)
Do you want to scan it? (yes/NO/selectively):

Next adapter: i915 gmbus dpd (i2c-6)
Do you want to scan it? (yes/NO/selectively):

Next adapter: DPDDC-B (i2c-7)
Do you want to scan it? (yes/NO/selectively):


Now follows a summary of the probes I have just done.
Just press ENTER to continue:

Driver `coretemp':
 * Chip `Intel digital thermal sensor' (confidence: 9)

Do you want to overwrite /etc/conf.d/lm_sensors? (YES/no):
Unloading i2c-dev... OK
Unloading cpuid... OK
終わり!先に進んで、CPU温度を見つけるための使用方法を見てみましょう。
lm_sensorsを使用してLinuxのCPU温度を表示する
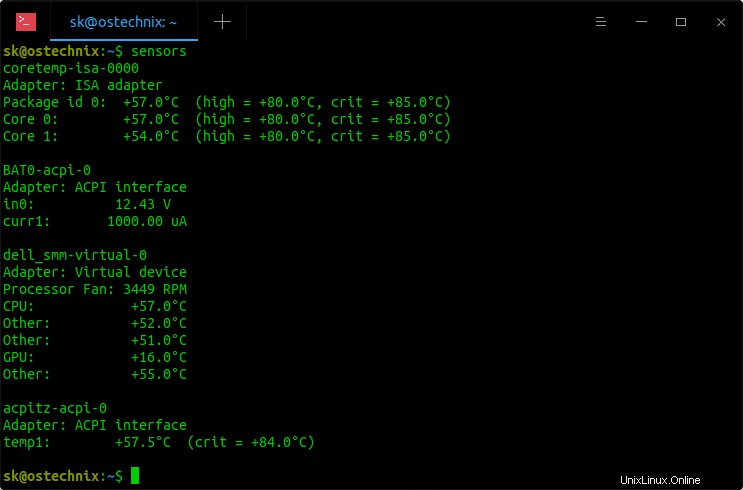
次のコマンドを入力して、LinuxボックスのCPU温度情報を表示します。
$ sensors
出力例:
coretemp-isa-0000
Adapter: ISA adapter
Package id 0:  +57.0°C  (high = +80.0°C, crit = +85.0°C)
Core 0:        +57.0°C  (high = +80.0°C, crit = +85.0°C)
Core 1:        +54.0°C  (high = +80.0°C, crit = +85.0°C)

BAT0-acpi-0
Adapter: ACPI interface
in0:          12.43 V
curr1:       1000.00 uA

dell_smm-virtual-0
Adapter: Virtual device
Processor Fan: 3449 RPM
CPU:            +57.0°C
Other:          +52.0°C
Other:          +51.0°C
GPU:            +16.0°C
Other:          +55.0°C

acpitz-acpi-0
Adapter: ACPI interface
temp1:        +57.5°C  (crit = +84.0°C)

Lm_sensorsを使用してLinuxのCPU温度を表示する
上記の出力にあるように、lm_sensorsは、CPUの現在の温度、最高および臨界温度を括弧内に表示します。ハードウェアデバイスのいずれかが高温または臨界温度に達していることがわかった場合は、おそらくそのハードウェアデバイスを確認する必要があります。
デフォルトでは、Lm_sensorsは摂氏で温度を表示します。
華氏で温度を表示するには 摂氏の代わりに、 -fを使用します オプション。
$ sensors -f
出力例:
coretemp-isa-0000
Adapter: ISA adapter
Package id 0: +131.0°F  (high = +176.0°F, crit = +185.0°F)
Core 0:       +131.0°F  (high = +176.0°F, crit = +185.0°F)
Core 1:       +123.8°F  (high = +176.0°F, crit = +185.0°F)

BAT0-acpi-0
Adapter: ACPI interface
in0:          12.43 V
curr1:       1000.00 uA

dell_smm-virtual-0
Adapter: Virtual device
Processor Fan: 3510 RPM
CPU:           +127.4°F
Other:         +120.2°F
Other:         +120.2°F
GPU:            +60.8°F
Other:         +123.8°F

acpitz-acpi-0
Adapter: ACPI interface
temp1:       +128.3°F  (crit = +183.2°F)
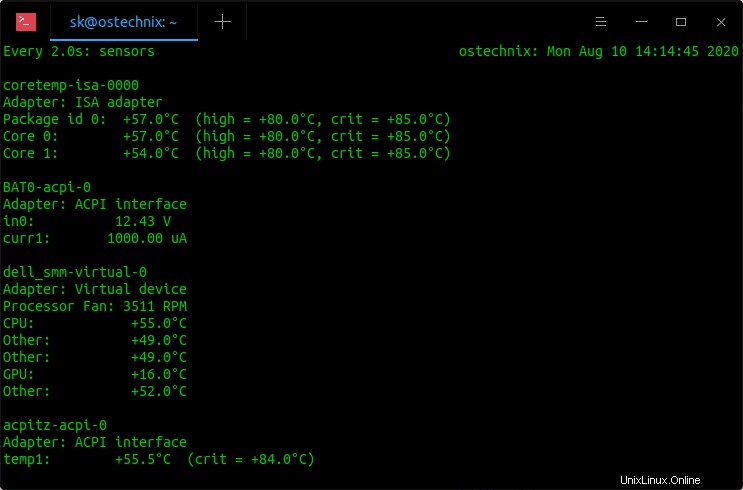
CPU温度をリアルタイムで監視するには、「監視」を使用できます。 以下のようなコマンド。
$ watch sensors
出力例:

Linuxのlm_sensorsを使用してCPU温度をリアルタイムで監視する
結果は2秒ごとに更新されます。 CTRL + Cを押します いつでも監視を停止します。
詳細については、manページを参照してください。
$ man sensors