このチュートリアルでは、 WordPressをインストールする方法を学習します FAMP FreeBSDでスタック 。 FAMP スタックは、 FreeBSD Unixを表す頭字語です。 オペレーティングシステム、 Apache HTTP サーバー(人気のある人気のあるオープンソースWebサーバー)、 MariaDB リレーショナルデータベース管理システム( MySQL データベースフォークは現在コミュニティによって維持されています)、および PHP サーバーサイドで実行される動的プログラミング言語。
WordPress は、簡単なブログや専門的なWebサイトの構築に使用される世界で最も有名なCMSフレームワークです。
要件
- FreeBSDインストールガイド
ステップ1:FreeBSDにFAMPスタックをインストールする
1。 WordPressを展開するため 敷地内のウェブサイトでは、次の FAMPを確認する必要があります コンポーネントはFreeBSDにインストールされ、動作します。
FreeBSDにインストールする必要がある最初のサービスはApacheHTTP です サーバ。 Apache 2.4をインストールするには 公式のFreeBSDポートリポジトリを介したHTTPサーバーバイナリパッケージ。サーバーコンソールで次のコマンドを発行します。
# pkg install apache24
2。 次に、次のコマンドを実行して、FreeBSDでApacheHTTPデーモンを有効にして起動します。
# sysrc apache24_enable="yes"
# service apache24 start
3。 ブラウザを開き、HTTPプロトコルを介してサーバーのIPアドレスまたはFQDNに移動し、ApacheのデフォルトのWebページを表示します。 「機能します! ’メッセージがブラウザに表示されます。
http://yourdomain.tld
4。 次に、 PHP 7.1をインストールします 以下のコマンドを発行して、以下の必要な拡張子を持つサーバーのバージョン。私たちのWordPressWebサイトは、このPHPバージョンの上にデプロイされます。
# pkg install php71 php71-mysqli mod_php71 php71-mbstring php71-gd php71-json php71-mcrypt php71-zlib php71-curl
5。 次のステップで、 php.confを作成します 次の内容のApacheWebサーバーの構成ファイル。
# nano /usr/local/etc/apache24/Includes/php.conf
次の構成をphp.confに追加します ファイル。
<IfModule dir_module>
    DirectoryIndex index.php index.html
    <FilesMatch "\.php$">
        SetHandler application/x-httpd-php
    </FilesMatch>
    <FilesMatch "\.phps$">
        SetHandler application/x-httpd-php-source
    </FilesMatch>
</IfModule>
6。 以下のコマンドを発行して変更を適用するには、このファイルを保存して閉じ、Apacheデーモンを再起動します。
# service apache24 restart
7。 欠落している最後のコンポーネントはMariaDBです データベース。最新バージョンのMariaDBデータベースサーバーをFreeBSDにインストールするには、次のコマンドを実行します。
# pkg install mariadb102-client mariadb102-server
8。 次に、FreeBSDでMariaDBサービスを有効にし、以下のコマンドを実行してデータベースデーモンを起動します。
# sysrc mysql_enable="YES"
# service mysql-server start
9。 次のステップで、 mysql_secure_installationを実行します MariaDBを保護するためのスクリプト。 MariaDBデータベースを保護するには、以下のスクリプト出力サンプルを使用してください。
# /usr/local/bin/mysql_secure_installation
サンプル出力
NOTE: RUNNING ALL PARTS OF THIS SCRIPT IS RECOMMENDED FOR ALL MariaDB
      SERVERS IN PRODUCTION USE!  PLEASE READ EACH STEP CAREFULLY!

In order to log into MariaDB to secure it, we'll need the current
password for the root user.  If you've just installed MariaDB, and
you haven't set the root password yet, the password will be blank,
so you should just press enter here.

Enter current password for root (enter for none):
OK, successfully used password, moving on...

Setting the root password ensures that nobody can log into the MariaDB
root user without the proper authorisation.
Set root password? [Y/n] y
New password:
Re-enter new password:
Password updated successfully!
Reloading privilege tables..
 ... Success!
By default, a MariaDB installation has an anonymous user, allowing anyone
to log into MariaDB without having to have a user account created for
them.  This is intended only for testing, and to make the installation
go a bit smoother.  You should remove them before moving into a
production environment.
Remove anonymous users? [Y/n] y
 ... Success!
Normally, root should only be allowed to connect from 'localhost'.  This
ensures that someone cannot guess at the root password from the network.
Disallow root login remotely? [Y/n] y
 ... Success!
By default, MariaDB comes with a database named 'test' that anyone can
access.  This is also intended only for testing, and should be removed
before moving into a production environment.
Remove test database and access to it? [Y/n] y
 - Dropping test database...
 ... Success!
 - Removing privileges on test database...
 ... Success!
Reloading the privilege tables will ensure that all changes made so far
will take effect immediately.
Reload privilege tables now? [Y/n] y
 ... Success!
Cleaning up...
All done!  If you've completed all of the above steps, your MariaDB
installation should now be secure.
Thanks for using MariaDB!
10。 最後に、MariaDBサーバーにWordPressインストールデータベースを作成します。データベースを作成するには、MariaDBコンソールにログインし、次のコマンドを発行します。
このデータベースのわかりやすい名前を選択し、このデータベースを管理するためのデータベースユーザーとパスワードを作成します。
# mysql -u root -p
MariaDB [(none)]> create database wordpress;
MariaDB [(none)]> grant all privileges on wordpress.* to 'user_wordpress'@'localhost' identified by 'password';
MariaDB [(none)]> flush privileges;
ステップ2:FreeBSDにWordPressをインストールする
11。 FreeBSDに最新バージョンのWordPressをインストールするには、WordPressダウンロードページにアクセスし、wgetユーティリティを使用して利用可能な最新のtraballバージョンを入手してください。
次のコマンドを発行して、tarballを抽出し、すべてのWordPressインストールファイルをApacheドキュメントルートにコピーします。
# wget https://wordpress.org/latest.tar.gz
# tar xfz latest.tar.gz
# cp -rf wordpress/* /usr/local/www/apache24/data/
12。 次に、Apacheに wwwを付与します 以下のコマンドを発行して、WordPressインストールディレクトリへの書き込み権限をグループ化します。
# chown -R root:www /usr/local/www/apache24/data/
# chmod -R 775 /usr/local/www/apache24/data/
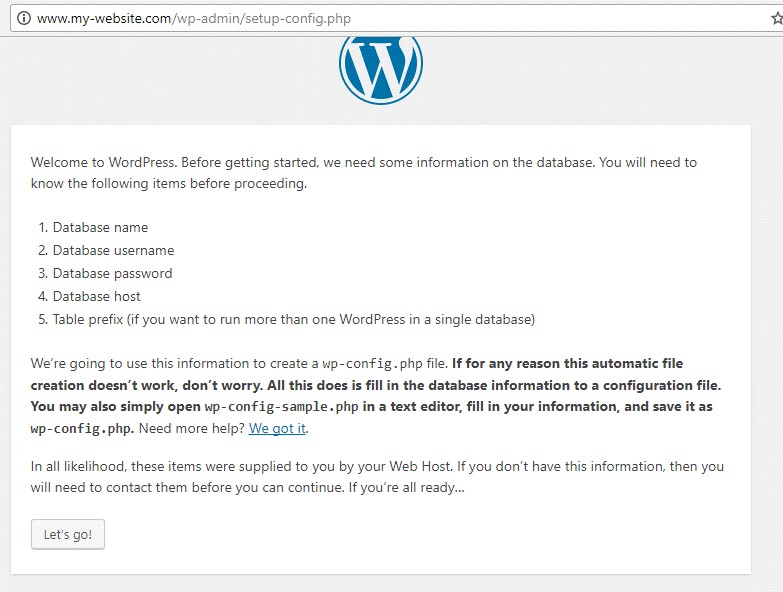
13。 次に、WordPressのインストールを開始します。ブラウザを開き、HTTPプロトコルを介してサーバーのIPアドレスまたはドメイン名に移動します。最初の画面で、 Let's go!を押します。 ボタンをクリックしてインストールプロセスを開始します。
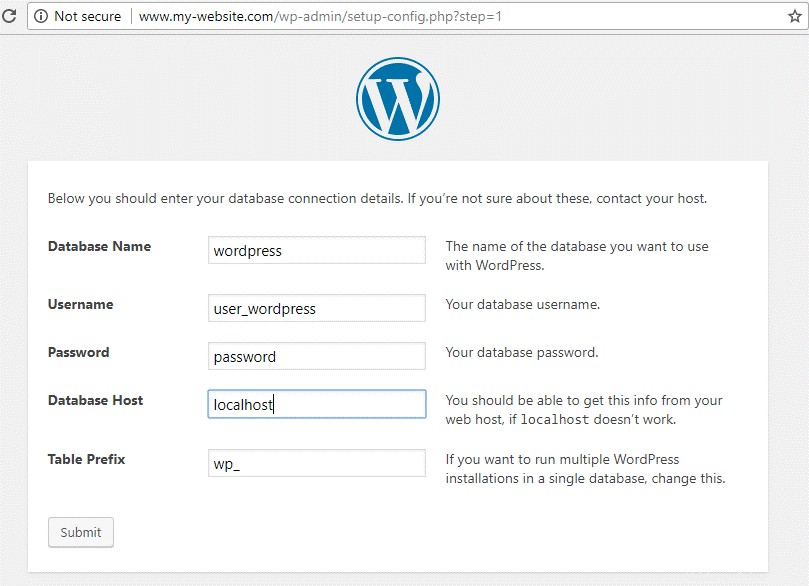
14。 次に、MySQLデータベース名、ユーザー、パスワードを追加し、送信をクリックします。 下のスクリーンショットに示すように、ボタンを押して続行します。
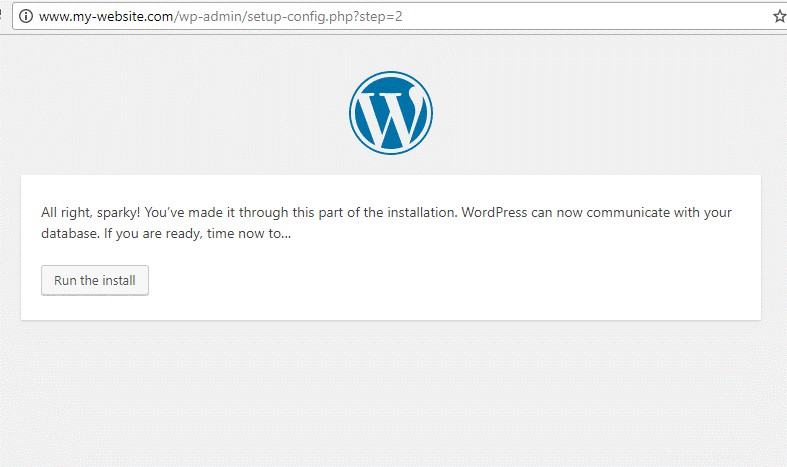
15。 次の画面で、WordPressインストーラーはMySQLデータベースに正常に接続できることを通知します。 インストールの実行を押します データベーススキーマをインストールするためのボタン。
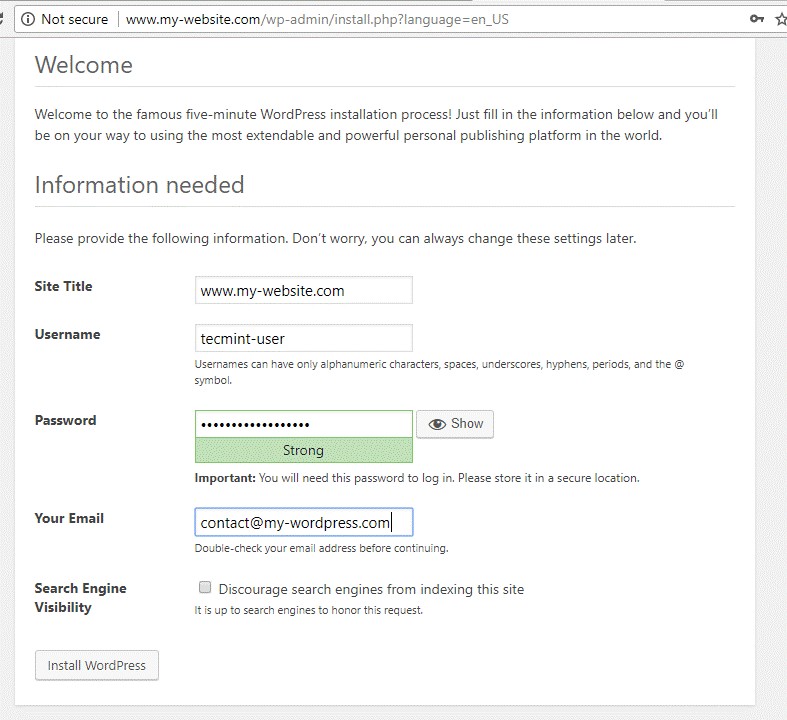
16。 次の画面で、WordPressサイトを管理するために、サイトのタイトルと強力なパスワードを持つユーザー名を選択します。また、メールアドレスを追加してWordPressのインストールを押してください ボタンをクリックして、インストールプロセスを終了します。
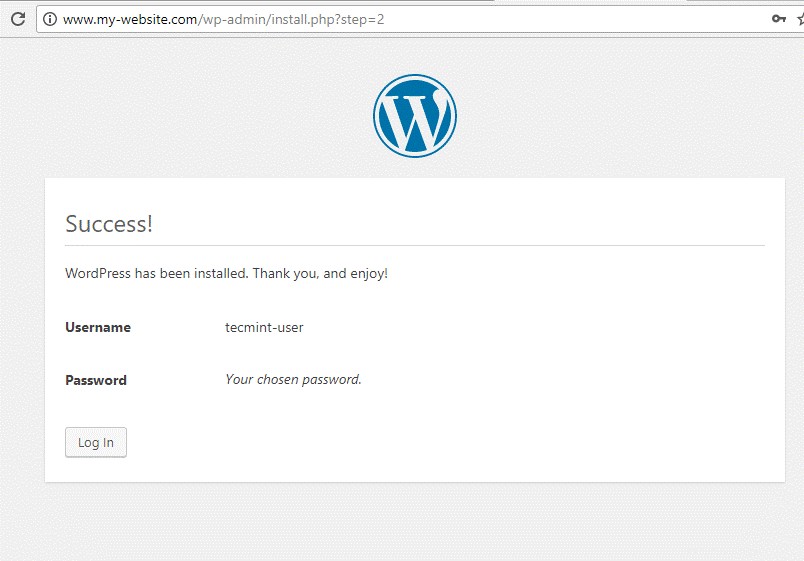
17。 インストールプロセスが完了すると、WordPressCMSが正常にインストールされたことを通知するメッセージが表示されます。このページには、下の画像に示すように、Webサイトの管理パネルにログインするために必要な資格情報もあります。
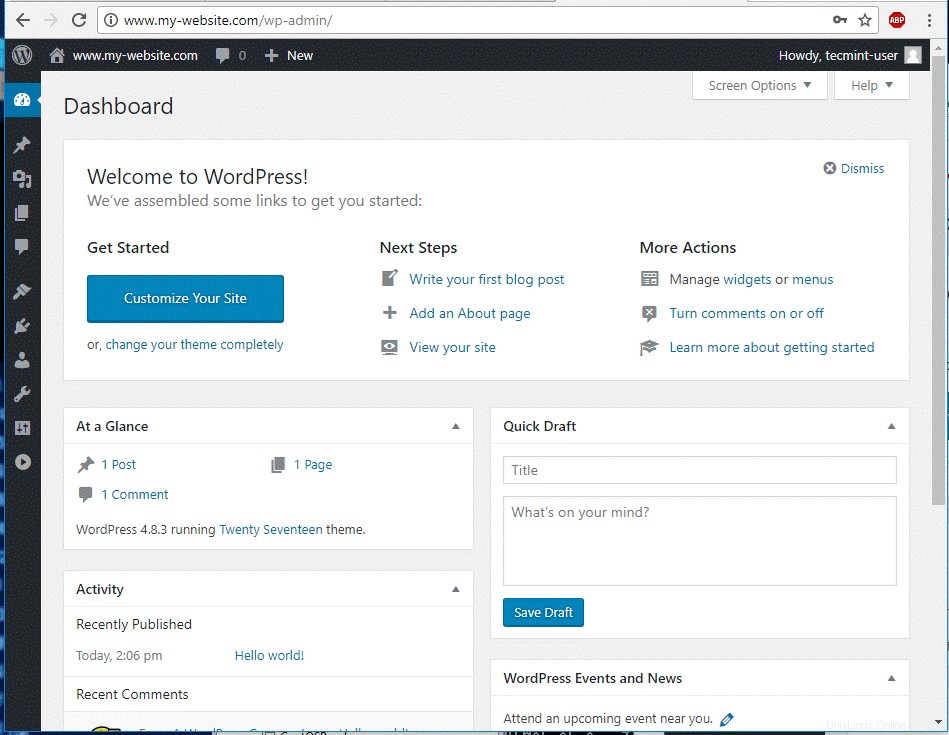
18。 最後に、前の手順で示した資格情報を使用してWordPress管理ダッシュボードにログインすると、Webサイトに新しい投稿を追加できるようになります。
19。 Webサイトのフロントエンドページにアクセスするには、サーバーのIPアドレスまたはドメイン名に移動します。ここに「 HelloWorld!」という名前のデフォルトの投稿が表示されます。 」、下の画像に示すように。
http://yourdomain.tld
おめでとう! FreeBSDのFAMPスタックの下にWordPressコンテンツ管理システムが正常にインストールされました。