Apache仮想ホストとは何ですか?
仮想ホスト 用語は、host1.domain.com、host2.domain.com、またはwww.domain1.com、www.domain2.comなどの複数のWebサイトを単一のシステムで実行する方法を指します。 Apacheには、IPベースの2種類の仮想ホスティングがあります。 仮想ホスティングと名前ベース 仮想ホスティング。 IPベースの仮想ホスティングを使用すると、同じシステム上で複数のWebサイトまたはドメインをホストできますが、各Webサイト/ドメインには異なるIPアドレスがあります。名前ベースの仮想ホスティングを使用すると、同じIPアドレスで複数のWebサイト/ドメインをホストできます。仮想ホスティングは、単一の物理サーバーまたはVPSから複数のWebサイトとドメインをホストする場合に役立ちます。 Apache仮想ホストの基本的な考え方を理解していただければ幸いです。今日は、Ubuntu18.04LTSでApache仮想ホストを構成する方法を見ていきます。
ダウンロード -無料の電子書籍:「ApacheHTTPサーバークックブック」Ubuntu18.04LTSでApache仮想ホストを構成する
テストボックスのIPアドレスは192.168.225.22です ホスト名はubuntuserver 。
まず、ApacheWebサーバーで名前ベースの仮想ホストを構成する方法を説明します。
名前ベースの仮想ホストを構成する
1。 Apacheウェブサーバーをインストールします
ApacheWebサーバーがインストールされていることを確認してください。 Ubuntuにインストールするには、次のコマンドを実行します:
$ sudo apt-get install apache2
apacheをインストールしたら、ブラウザでapacheテストページを参照して、動作しているかどうかをテストします。
ウェブブラウザを開き、 http:// IP_Addressをポイントします またはhttp:// localhost 。以下のようなページが表示されます。

良い! ApacheWebサーバーが稼働しています!!
2。ホストごとにWebディレクトリを作成する
2つの仮想ホスト、つまり ostechnix1.lanを作成します およびostechnix2.lan 。
最初の仮想ホストostechnix1.lanのディレクトリを作成しましょう。このディレクトリは、仮想ホストのデータを保存するために必要です。
これを行うには、次のように入力します:
$ sudo mkdir -p /var/www/html/ostechnix1.lan/public_html
同様に、以下に示すように、2番目の仮想ホストostechnix2.lanのディレクトリを作成します。
$ sudo mkdir -p /var/www/html/ostechnix2.lan/public_html
上記の2つのディレクトリは、rootユーザーが所有しています。所有権を通常のユーザーに変更する必要があります。
これを行うには、次を実行します:
$ sudo chown -R $USER:$USER /var/www/html/ostechnix1.lan/public_html
$ sudo chown -R $USER:$USER /var/www/html/ostechnix2.lan/public_html
ここでは、 $ USER 現在ログインしているユーザーを指します。
次に、コマンドを使用して、Apacheルートディレクトリ、つまり/ var / www /html/に読み取り権限を設定します。
$ sudo chmod -R 755 /var/www/html/
これを行うのは、仮想ホストごとにデータを保存するための個別のディレクトリをすでに作成しているためです。そのため、ルートユーザーを除くすべてのユーザーに対して読み取り専用としてapacheルートディレクトリを作成しました。
各仮想ホストのデータを保存するために必要なディレクトリを作成し、適切な権限を設定しました。次に、各仮想ホストから提供されるサンプルページをいくつか作成します。
3。ホストごとにデモWebページを作成する
ostechnix1.lanサイトのサンプルページを作成しましょう。これを行うには、次を実行します:
$ sudo vi /var/www/html/ostechnix1.lan/public_html/index.html
その中に次の行を追加します:
<html>
 <head>
 <title>www.ostechnix.lan</title>
 </head>
 <body>
 <h1>Hello, This is a test page for ostechnix1.lan website</h1>
 </body>
</html>
ファイルを保存して閉じます。
同様に、ostechnix2.lanサイトのサンプルページを作成します。
$ sudo vi /var/www/html/ostechnix2.lan/public_html/index.html
その中に次の行を追加します:
<html>
 <head>
 <title>www.ostechnix.lan</title>
 </head>
 <body>
 <h1>Hello, This is a test page for ostechnix2.lan website</h1>
 </body>
</html>
ファイルを保存して閉じます。
4。ホストごとに構成ファイルを作成する
次に、仮想ホストごとに構成ファイルを作成する必要があります。まず、ostechnix1.lanサイトでこれを実行しましょう。
000-default.confというデフォルトの仮想ホストファイルをコピーします 以下のような新しい仮想ホストファイルへのコンテンツ。
$ sudo cp /etc/apache2/sites-available/000-default.conf /etc/apache2/sites-available/ostechnix1.lan.conf
$ sudo cp /etc/apache2/sites-available/000-default.conf /etc/apache2/sites-available/ostechnix2.lan.conf
すべての構成ファイルを.confで保存する必要があることに注意してください 最後に拡張子を付けないと、機能しません。
次に、仮想ホストと一致するように構成ファイルを変更します。
ostechnix.lan1.confを編集します ファイル:
$ sudo vi /etc/apache2/sites-available/ostechnix1.lan.conf
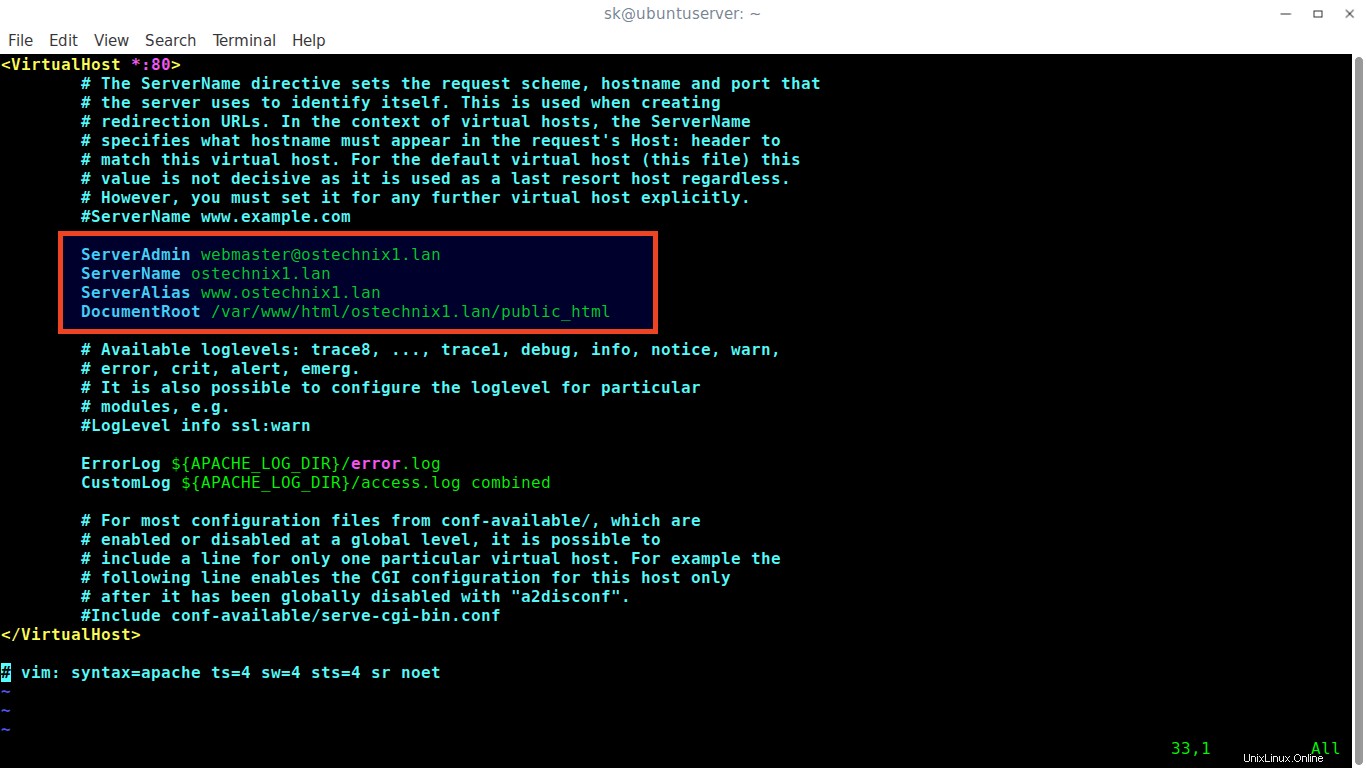
ServerAdmin、ServerName、ServerAlias、およびDocumentRootの値が仮想ホストと一致するように編集/変更します。
<VirtualHost *:80>
 # The ServerName directive sets the request scheme, hostname and port that
 # the server uses to identify itself. This is used when creating
 # redirection URLs. In the context of virtual hosts, the ServerName
 # specifies what hostname must appear in the request's Host: header to
 # match this virtual host. For the default virtual host (this file) this
 # value is not decisive as it is used as a last resort host regardless.
 # However, you must set it for any further virtual host explicitly.
 #ServerName www.example.com

   ServerAdmin [email protected]
   ServerName ostechnix1.lan
   ServerAlias www.ostechnix1.lan
   DocumentRoot /var/www/html/ostechnix1.lan/public_html

# Available loglevels: trace8, ..., trace1, debug, info, notice, warn,
 # error, crit, alert, emerg.
 # It is also possible to configure the loglevel for particular
 # modules, e.g.
 #LogLevel info ssl:warn

ErrorLog ${APACHE_LOG_DIR}/error.log
 CustomLog ${APACHE_LOG_DIR}/access.log combined

# For most configuration files from conf-available/, which are
 # enabled or disabled at a global level, it is possible to
 # include a line for only one particular virtual host. For example the
 # following line enables the CGI configuration for this host only
 # after it has been globally disabled with "a2disconf".
 #Include conf-available/serve-cgi-bin.conf
</VirtualHost>
ファイルを保存して閉じます。
次に、 ostechnix2.lan.confを編集します ファイル:
$ sudo vi /etc/apache2/sites-available/ostechnix2.lan.conf
必要な変更を加えます。
<VirtualHost *:80>
 # The ServerName directive sets the request scheme, hostname and port that
 # the server uses to identify itself. This is used when creating
 # redirection URLs. In the context of virtual hosts, the ServerName
 # specifies what hostname must appear in the request's Host: header to
 # match this virtual host. For the default virtual host (this file) this
 # value is not decisive as it is used as a last resort host regardless.
 # However, you must set it for any further virtual host explicitly.
 #ServerName www.example.com

    ServerAdmin [email protected]
    ServerName ostechnix2.lan
    ServerAlias www.ostechnix2.lan
    DocumentRoot /var/www/html/ostechnix2.lan/public_html

# Available loglevels: trace8, ..., trace1, debug, info, notice, warn,
 # error, crit, alert, emerg.
 # It is also possible to configure the loglevel for particular
 # modules, e.g.
 #LogLevel info ssl:warn

ErrorLog ${APACHE_LOG_DIR}/error.log
 CustomLog ${APACHE_LOG_DIR}/access.log combined

# For most configuration files from conf-available/, which are
 # enabled or disabled at a global level, it is possible to
 # include a line for only one particular virtual host. For example the
 # following line enables the CGI configuration for this host only
 # after it has been globally disabled with "a2disconf".
 #Include conf-available/serve-cgi-bin.conf
</VirtualHost>

ファイルを保存/閉じます。
5。仮想ホスト構成ファイルを有効にする
必要な変更を加えた後、デフォルトの仮想ホスト構成ファイル、つまり 000.default.confを無効にします 、以下に示すように、新しく作成されたすべての仮想ホスト構成ファイルを有効にします。
$ sudo a2dissite 000-default.conf
$ sudo a2ensite ostechnix1.lan.conf
$ sudo a2ensite ostechnix2.lan.conf
Apache Webサーバーを再起動して、変更を有効にします。
$ sudo systemctl restart apache2
それでおしまい。 Apacheで仮想ホストを正常に構成しました。先に進んで、それらが機能しているかどうかを確認しましょう。
6。仮想ホストをテストする
任意のエディタで/etc/ hostsファイルを開きます:
$ sudo vi /etc/hosts
以下のように、すべての仮想Webサイト/ドメインを1つずつ追加します。
[...]
192.168.225.22   ostechnix1.lan
192.168.225.22   ostechnix2.lan
[...]
リモートシステムから仮想ホストにアクセスする場合は、各リモートシステムの/ etc/hostsファイルに上記の行を追加する必要があることに注意してください。
ファイルを保存して閉じます。
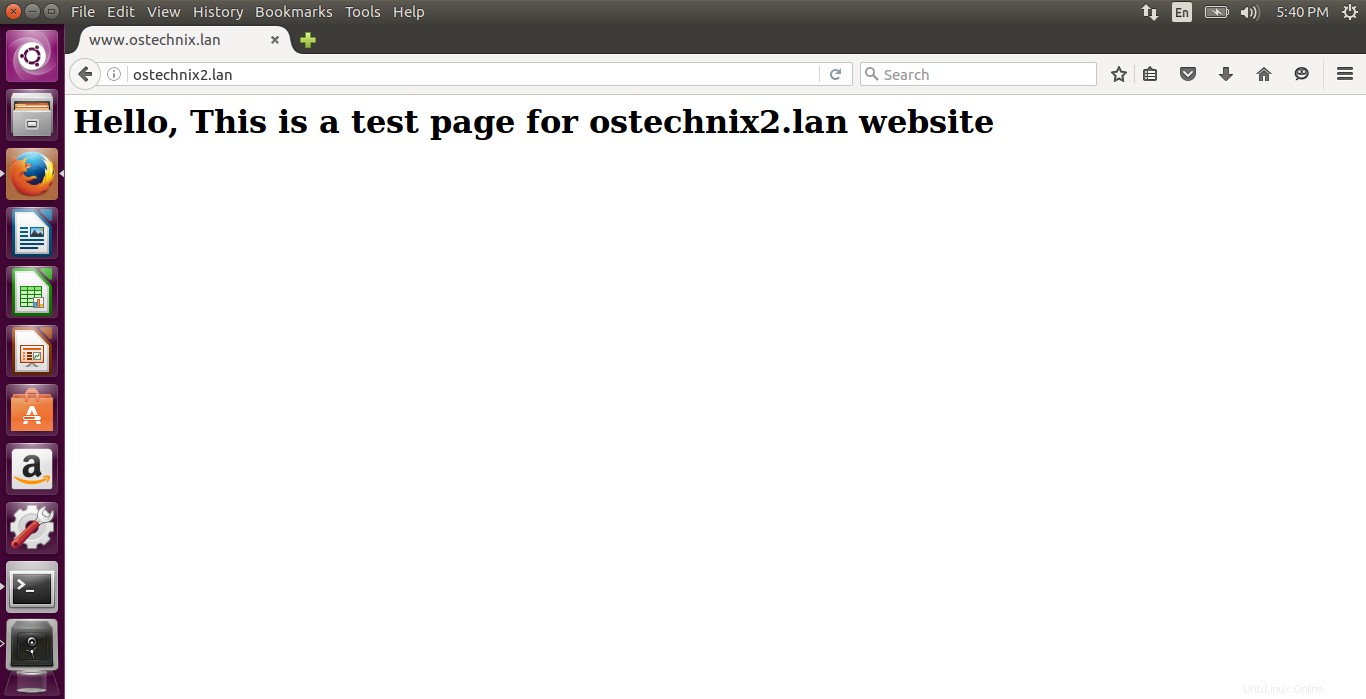
Webブラウザーを開き、 http://ostechnix1.lanをポイントします。 またはhttp://ostechnix2.lan 。
ostechnix1.lanテストページ:

ostechnix2.lanテストページ:
おめでとう!これで、すべてのWebサイトにアクセスできるようになります。今後は、データをアップロードして、さまざまなウェブサイトから提供できるようになります。
お気づきのとおり、2つの異なるWebサイト(http://ostechnix1.lanとhttp://ostechnix2.lan)をホストするために同じIPアドレス(つまり、192.168.225.22)を使用しました。これは、名前ベースの仮想ホスティングと呼ばれるものです。お役に立てれば。次のガイドでは、IPベースの仮想ホスティングを構成する方法を説明します。それまでは、お楽しみに!