Nextcloudは、無料の(オープンソース)Dropboxのようなソフトウェアであり、ownCloudプロジェクトのフォークです。 NextcloudはPHPとJavaScriptで記述されており、MySQL / MariaDB、PostgreSQL、Oracle Database、SQLiteなどの多くのデータベースシステムをサポートしています。デスクトップと独自のサーバー間でファイルの同期を維持するために、Nextcloudは、Windows、Linux、およびMacデスクトップ用のアプリケーションと、AndroidおよびiOS用のモバイルアプリを提供します。 Nextcloudは単なるDropboxクローンではなく、カレンダー、連絡先、スケジュールタスク、Ampacheを使用したストリーミングメディアなどの追加機能を提供します。
このチュートリアルでは、Ubuntu 18.04サーバーに最新のNextcloudリリース(これを書いている時点では、最新のリリースは13.0.2です)をインストールして構成する方法を示します。 Nginx WebサーバーとPHP7.1-FPMを使用してNextcloudを実行し、データベースシステムとしてMySQLサーバーを使用します。
- Ubuntu 18.04
- root権限
- NginxWebサーバーをインストールする
- PHP7.1-FPMのインストールと構成
- MySQLサーバーのインストールと構成
- SSLLetsencryptを生成する
- Nextcloud13をダウンロード
- Nextcloud用にNginx仮想ホストを構成する
- UFWファイアウォールの構成
- Nextcloudのインストール後
このnextcloudガイドで行う最初のステップは、NginxWebサーバーをインストールすることです。 ApacheWebサーバーの代わりにNginxWebサーバーを使用します。
サーバーにログインしてリポジトリを更新し、次に示すようにaptコマンドを使用してNginxWebサーバーをインストールします。
sudo apt update
sudo apt install nginx -y
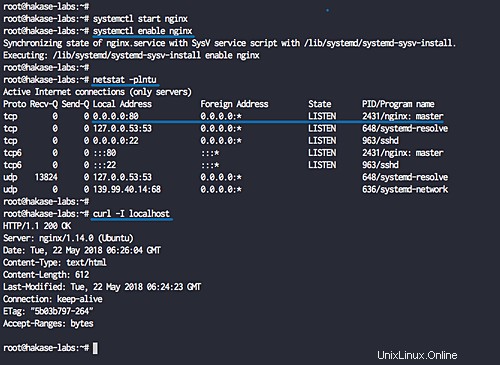
インストールが完了したら、Nginxサービスを開始し、systemctlを使用してシステムの起動時に毎回サービスを起動できるようにします。
systemctl start nginx
systemctl enable nginx
NginxWebサーバーがUbuntu18.04にインストールされました。以下のnetstatまたはcurlコマンドを使用して確認してください。
netstat -plntu
curl -I localhost
Nginx Webサーバーは、Ubuntuで標準のHTTPポート80で実行されています。
このチュートリアルでは、nextcloudにPHP7.1-FPMを使用します。 PPAリポジトリのPHP7.1-FPMを使用するため、システムに新しいPPAリポジトリを追加する必要があります。
次のコマンドを実行して、「software-properties-common」パッケージをインストールし、「ondrejPHP」PPAリポジトリを追加します。
sudo apt install software-properties-common -y
sudo add-apt-repository ppa:ondrej/php -y
注:
Ubuntu 18.04では、「add-apt-repository」コマンドによってリポジトリが自動的に更新されます。
次に、以下の単一のaptコマンドを使用して、必要なすべての拡張機能を備えたPHP7.1およびPHP7.1-FPMをインストールします。
sudo apt install php7.1-fpm php7.1-mcrypt php7.1-curl php7.1-cli php7.1-mysql php7.1-gd php7.1-iconv php7.1-xsl php7.1-json php7.1-intl php-pear php-imagick php7.1-dev php7.1-common php7.1-mbstring php7.1-zip php7.1-soap -y
インストールが完了したら、php-fpmとphp-cliのphp.iniファイルを構成します。
'/etc/php/7.1'ディレクトリに移動します。
cd /etc/php/7.1/
vimを使用してphp-fpmおよびphp-cliのphp.iniファイルを編集します。
vim fpm/php.ini
vim cli/php.ini
'date.timezone'行のコメントを解除し、独自のタイムゾーンで値を変更します。
date.timezone = Asia/Jakarta
'cgi.fix_pathinfo'行のコメントを解除し、値を'0'に変更します。
cgi.fix_pathinfo=0
保存して終了します。
次に、php-fpmプール構成「www.conf」を編集します。
vim fpm/pool.d/www.conf
以下の行のコメントを解除してください。
env[HOSTNAME] = $HOSTNAME
env[PATH] = /usr/local/bin:/usr/bin:/bin
env[TMP] = /tmp
env[TMPDIR] = /tmp
env[TEMP] = /tmp
保存して終了します。
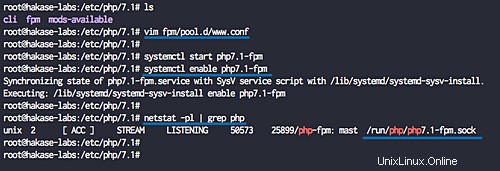
PHP7.1-FPMサービスを再起動し、システムの起動時に毎回起動できるようにします。
systemctl restart php7.1-fpm
systemctl enable php7.1-fpm
次に、netstatコマンドを使用して確認します。
netstat -pl | grep php
そして、php-fpmがsockファイル「/run/php/php7.1-fpm.sock」で実行されていることがわかります。
このステップでは、最新のMySQLバージョンをインストールし、nextcloudインストール用の新しいデータベースを作成します。最新バージョンのMySQLパッケージは、デフォルトでリポジトリから入手できます。
以下のaptコマンドを使用してMySQLサーバーの最新バージョンをインストールします。
sudo apt install mysql-server mysql-client -y
インストールが完了したら、MySQLサービスを開始し、システムの起動時に毎回起動できるようにします。
systemctl start mysql
systemctl enable mysql
次に、「mysql_secure_installation」コマンドを使用してMySQLルートパスワードを構成します。
次のコマンドを実行します。
mysql_secure_installation
このMySQL5.8バージョンでは、MySQLパスワードポリシーのセキュリティが向上しています。パスワードポリシーを選択する必要があります。LOWポリシーの場合は0、MEDIUMポリシーの場合は1、STRONGパスワードポリシーの場合は2です。
このガイドでは、「MEDIUM」パスワードポリシーを使用します。本番サーバーでは「STRONG」パスワードポリシーを使用することをお勧めします。
番号「1」を選択してEnterキーを押し、新しいMySQLの「root」パスワードを入力します。
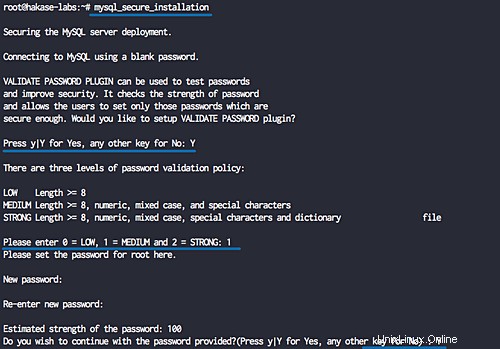
Remove anonymous users? (Press y|Y for Yes, any other key for No) : Y
Disallow root login remotely? (Press y|Y for Yes, any other key for No) : Y
Remove test database and access to it? (Press y|Y for Yes, any other key for No) : Y
Reload privilege tables now? (Press y|Y for Yes, any other key for No) : Y
そして、MySQLのルートパスワードが設定されました。
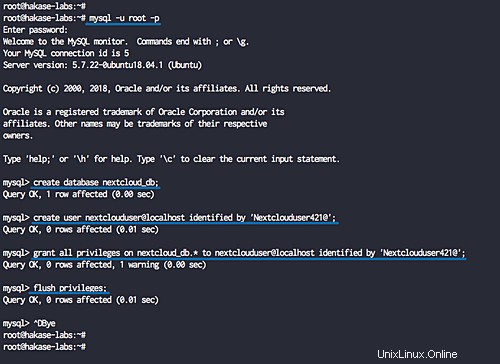
次に、nextcloudインストール用の新しいデータベースを作成します。ユーザー「nextclouduser」とパスワード「[emailprotected]」を使用して「nextcloud_db」という名前の新しいデータベースを作成します。
mysqlコマンドを使用してrootユーザーとしてMySQLシェルにログインします。
mysql -u root -p
TYPE THE MYSQL ROOT PASSWORD
次に、次のMySQLクエリを実行して、パスワードを使用してデータベースとユーザーを作成します。
create database nextcloud_db;
create user [email protected] identified by '[email protected]';
grant all privileges on nextcloud_db.* to [email protected] identified by '[email protected]';
flush privileges;
そして、nextcloudインストール用の新しいデータベースとユーザーが作成されました。
nextcloudのMySQLのインストールと構成が完了しました。
このチュートリアルでは、Letsencryptの無料SSLを使用してnextcloudを保護し、letsencryptツールを使用して証明書ファイルを生成します。
ドメイン名がない場合、またはローカルコンピューターにnextcloudをインストールしていない場合は、OpenSSLを使用して自己署名証明書を生成できます。
以下のaptコマンドを使用して「letsencrypt」ツールをインストールします。
sudo apt install letsencrypt -y
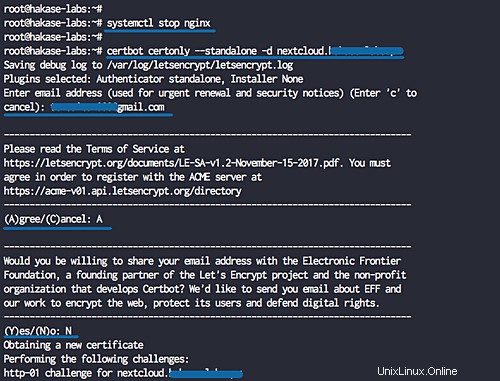
インストールが完了したら、nginxサービスを停止します。
systemctl stop nginx
次に、cerbotコマンドラインを使用して、ドメイン名「nextcloud.hakase-labs.io」のSSL証明書を生成します。以下のコマンドを実行します。
certbot certonly --standalone -d nextcloud.hakase-labs.io
メールアドレスの入力を求められ、更新通知に使用されます。 Letsencrypt TOS契約の場合は「A」と入力して同意し、共有メールアドレスの場合は「N」と入力して「いいえ」と入力します。
完了すると、次のような結果が得られます。
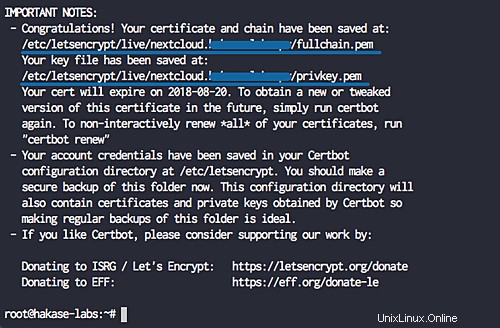
netxcloudドメイン名のSSL証明書Letsencryptが生成され、すべて「/ etc /letsencrypt / live/domain」ディレクトリにあります。
nextcloudソースコードをダウンロードする前に、unzipパッケージがシステムにインストールされていることを確認してください。パッケージがない場合は、以下のaptコマンドを使用してインストールしてください。
sudo apt install wget unzip zip -y
次に、「/ var / www」ディレクトリに移動し、nextcloud-13.0.2.zipファイルをダウンロードします。
cd /var/www/
wget https://download.nextcloud.com/server/releases/latest.zip
zipファイルを解凍すると、「nextcloud」ディレクトリが取得され、新しい「data」ディレクトリが作成されます。
unzip latest.zip
mkdir -p nextcloud/data/
次に、「nextcloud」ディレクトリの所有者を「www-data」ユーザーとグループに変更します。
chown -R www-data:www-data /var/www/nextcloud/
Nextcloudは「/var/ www / nextcloud」ディレクトリの下にダウンロードされており、Webルートディレクトリになります。
このステップでは、nextcloud用にnginx仮想ホストを構成します。 HTTPS接続で実行するようにnextcloudを構成し、HTTP接続を安全なHTTPS接続に自動的に強制します。
次に、「/ etc / nginx / sites-available」ディレクトリに移動し、新しい仮想ホストファイル「nextcloud」を作成します。
cd /etc/nginx/sites-available/
vim nextcloud
そこに、次のnextcloud仮想ホスト構成を貼り付けます。
upstream php-handler {
    #server 127.0.0.1:9000;
    server unix:/run/php/php7.1-fpm.sock;
}

server {
    listen 80;
    listen [::]:80;
    server_name nextcloud.hakase-labs.pw;
    # enforce https
    return 301 https://$server_name$request_uri;
}

server {
    listen 443 ssl http2;
    listen [::]:443 ssl http2;
    server_name nextcloud.hakase-labs.pw;

    ssl_certificate /etc/letsencrypt/live/nextcloud.hakase-labs.pw/fullchain.pem;
    ssl_certificate_key /etc/letsencrypt/live/nextcloud.hakase-labs.pw/privkey.pem;

    # Add headers to serve security related headers
    # Before enabling Strict-Transport-Security headers please read into this
    # topic first.
    # add_header Strict-Transport-Security "max-age=15552000;
    # includeSubDomains; preload;";
    #
    # WARNING: Only add the preload option once you read about
    # the consequences in https://hstspreload.org/. This option
    # will add the domain to a hardcoded list that is shipped
    # in all major browsers and getting removed from this list
    # could take several months.
    add_header X-Content-Type-Options nosniff;
    add_header X-XSS-Protection "1; mode=block";
    add_header X-Robots-Tag none;
    add_header X-Download-Options noopen;
    add_header X-Permitted-Cross-Domain-Policies none;

    # Path to the root of your installation
    root /var/www/nextcloud/;

    location = /robots.txt {
        allow all;
        log_not_found off;
        access_log off;
    }

    # The following 2 rules are only needed for the user_webfinger app.
    # Uncomment it if you're planning to use this app.
    #rewrite ^/.well-known/host-meta /public.php?service=host-meta last;
    #rewrite ^/.well-known/host-meta.json /public.php?service=host-meta-json
    # last;

    location = /.well-known/carddav {
      return 301 $scheme://$host/remote.php/dav;
    }
    location = /.well-known/caldav {
      return 301 $scheme://$host/remote.php/dav;
    }

    # set max upload size
    client_max_body_size 512M;
    fastcgi_buffers 64 4K;

    # Enable gzip but do not remove ETag headers
    gzip on;
    gzip_vary on;
    gzip_comp_level 4;
    gzip_min_length 256;
    gzip_proxied expired no-cache no-store private no_last_modified no_etag auth;
    gzip_types application/atom+xml application/javascript application/json application/ld+json application/manifest+json application/rss+xml application/vnd.geo+json application/vnd.ms-fontobject application/x-font-ttf application/x-web-app-manifest+json application/xhtml+xml application/xml font/opentype image/bmp image/svg+xml image/x-icon text/cache-manifest text/css text/plain text/vcard text/vnd.rim.location.xloc text/vtt text/x-component text/x-cross-domain-policy;

    # Uncomment if your server is built with the ngx_pagespeed module
    # This module is currently not supported.
    #pagespeed off;

    location / {
        rewrite ^ /index.php$uri;
    }

    location ~ ^/(?:build|tests|config|lib|3rdparty|templates|data)/ {
        deny all;
    }
    location ~ ^/(?:\.|autotest|occ|issue|indie|db_|console) {
        deny all;
    }

    location ~ ^/(?:index|remote|public|cron|core/ajax/update|status|ocs/v[12]|updater/.+|ocs-provider/.+)\.php(?:$|/) {
        fastcgi_split_path_info ^(.+\.php)(/.*)$;
        include fastcgi_params;
        fastcgi_param SCRIPT_FILENAME $document_root$fastcgi_script_name;
        fastcgi_param PATH_INFO $fastcgi_path_info;
        fastcgi_param HTTPS on;
        #Avoid sending the security headers twice
        fastcgi_param modHeadersAvailable true;
        fastcgi_param front_controller_active true;
        fastcgi_pass php-handler;
        fastcgi_intercept_errors on;
        fastcgi_request_buffering off;
    }

    location ~ ^/(?:updater|ocs-provider)(?:$|/) {
        try_files $uri/ =404;
        index index.php;
    }

    # Adding the cache control header for js and css files
    # Make sure it is BELOW the PHP block
    location ~ \.(?:css|js|woff|svg|gif)$ {
        try_files $uri /index.php$uri$is_args$args;
        add_header Cache-Control "public, max-age=15778463";
        # Add headers to serve security related headers (It is intended to
        # have those duplicated to the ones above)
        # Before enabling Strict-Transport-Security headers please read into
        # this topic first.
        # add_header Strict-Transport-Security "max-age=15768000; includeSubDomains; preload;";
        #
        # WARNING: Only add the preload option once you read about
        # the consequences in https://hstspreload.org/. This option
        # will add the domain to a hardcoded list that is shipped
        # in all major browsers and getting removed from this list
        # could take several months.
        add_header X-Content-Type-Options nosniff;
        add_header X-XSS-Protection "1; mode=block";
        add_header X-Robots-Tag none;
        add_header X-Download-Options noopen;
        add_header X-Permitted-Cross-Domain-Policies none;
        # Optional: Don't log access to assets
        access_log off;
    }

    location ~ \.(?:png|html|ttf|ico|jpg|jpeg)$ {
        try_files $uri /index.php$uri$is_args$args;
        # Optional: Don't log access to other assets
        access_log off;
    }
}
保存して終了します。
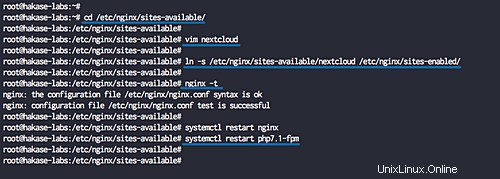
仮想ホストを有効にして構成をテストし、エラーがないことを確認します。
ln -s /etc/nginx/sites-available/nextcloud /etc/nginx/sites-enabled/
nginx -t
次に、以下のsystemctlコマンドを使用してPHP7.1-FPMサービスとnginxサービスを再起動します。
systemctl restart nginx
systemctl restart php7.1-fpm
nextcloudのNginx仮想ホスト構成が作成されました。
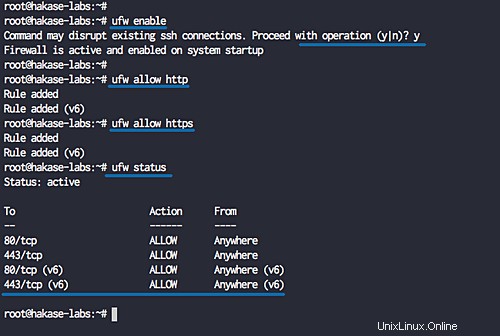
このチュートリアルでは、ファイアウォールをオンにし、UbuntuにUFWファイアウォールを使用します。
ufwファイアウォールを有効にします。
ufw enable
「y」と入力し、Enterキーを押して、UFWファイアウォールを開始して有効にします。
次に、新しいSSH、HTTP、HTTPSをUFWファイアウォールリストに追加します。
ufw allow ssh

ufw allow http
ufw allow https
以下のコマンドを使用して、UFWファイアウォールの許可リストポートを確認してください。
ufw status
そして、HTTPポート80を取得し、HTTPSポート443がリストに含まれます。
ウェブブラウザを開き、nextcloudのURLアドレスを入力します。
http://nextcloud.hakase-labs.io/
そして、安全なHTTPS接続にリダイレクトされます。
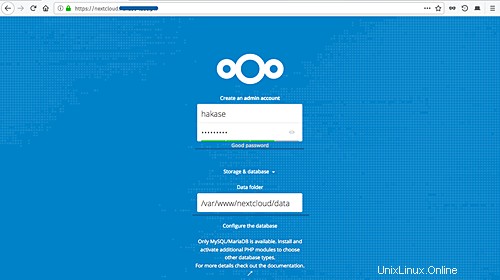
トップページで、nextcloudの管理者ユーザーを作成し、管理者ユーザーのパスワードを入力する必要があります。 「データフォルダ」設定で、「データ」ディレクトリのフルパス「/ var / www / nextcloud/data」を入力します。
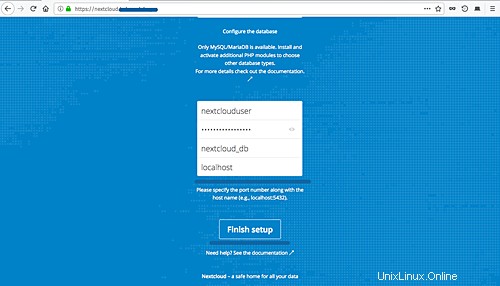
ページを一番下までスクロールすると、データベース構成が表示されます。手順3で作成したデータベース情報を入力し、[セットアップの完了]ボタンをクリックします。
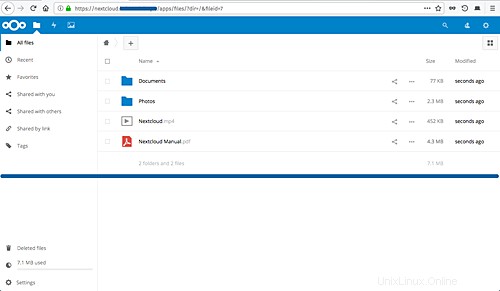
インストールが完了すると、次のようなNextcloudダッシュボードが表示されます。
Ubuntu18.04でのNginxWebサーバーとMySQLデータベースを使用したNextcloud13のインストールが正常に完了しました。