
Ghostは、Node.jsプラットフォーム上に構築された最新のソース公開プラットフォームです。完全にカスタマイズ可能で使いやすいため、ほとんど学習曲線なしでコンテンツを公開できます。
このチュートリアルでは、プロキシとしてNginx、無料のLet's Encrypt SSL証明書、最新のLTSバージョンのNode.js、データベースバックエンドとしてMySQL / MariaDBを使用して、安全なGhostブログをUbuntu18.04サーバーにデプロイする方法を紹介します。 。
前提条件#
このチュートリアルに従うための前提条件として、次のものが必要になります。
- 公式のGhostシステム要件によると、少なくとも1GのRAMが必要です。 RAMが1GB未満のサーバーを使用している場合は、スワップファイルを作成できます。
- パブリックサーバーのIPを指すドメイン名。このチュートリアルでは、
example.comを使用します 。 - Ubuntu18.04にNginxをインストールする方法に従ってインストールされたNginx。
- Ubuntu18.04でUFWを使用してファイアウォールを設定する方法に従って構成されたファイアウォール。ポートが
80であることを確認してください および443開いています。
このチュートリアルを続行する前に、sudo権限を持つユーザーとしてログインしていることを確認してください。
Node.jsとYarnのインストール#
この記事を書いている時点で、Ghostに推奨されるNode.jsバージョンはv8カーボンLTSです。 NodeSourceリポジトリからNode.jsをインストールします。
次のcurlを使用して、Node.jsv8のNodeSourceリポジトリを有効にします コマンド:
curl -sL https://deb.nodesource.com/setup_8.x | sudo bash -次のように入力してNode.jsをインストールします:
sudo apt install nodejsヤーンファーストをインストールするには、次のコマンドを使用してシステムでヤーンリポジトリを有効にします。
curl -sS https://dl.yarnpkg.com/debian/pubkey.gpg | sudo apt-key add -echo "deb https://dl.yarnpkg.com/debian/ stable main" | sudo tee /etc/apt/sources.list.d/yarn.list
リポジトリが有効になったら、次のコマンドを使用してyarnをインストールします。
sudo apt updatesudo apt-get -o Dpkg::Options::="--force-overwrite" install yarn
MySQLのインストール#
Ghostは、MySQL、MariaDB、およびSQLiteデータベースをサポートしています。このチュートリアルでは、Ghostを本番モードで実行するときに推奨されるデータベースであるMySQLを使用します。
次のコマンドを使用してMySQLパッケージをインストールします。
sudo apt install mysql-server
mysql_secure_installationを実行します MySQLインストールのセキュリティを向上させるコマンド:
sudo mysql_secure_installation
VALIDATE PASSWORD PLUGINを設定するように求められます これは、MySQLユーザーのパスワードの強度をテストするために使用されます。パスワード検証ポリシーには、低、中、強力の3つのレベルがあります。 ENTERを押します パスワード検証プラグインを設定したくない場合。
次のプロンプトで、MySQLrootユーザーのパスワードを設定するように求められます。
rootパスワードを設定すると、スクリプトは匿名ユーザーを削除し、rootユーザーのローカルマシンへのアクセスを制限し、テストデータベースを削除するように要求します。 Yと答える必要があります (はい)すべての質問に。
次に、認証方法をauth_socketから変更する必要があります mysql_native_passwordへ 、GhostインストーラーがMySQLサーバーにアクセスできるようにします。これを行うには、rootユーザーとしてMySQLサーバーにログインします。
sudo mysql
次のクエリを実行して、mysql_native_passwordを使用するときにMySQLrootユーザーのパスワードを設定します。 方法:
ALTER USER 'root'@'localhost' IDENTIFIED WITH mysql_native_password BY 'very_strong_pasword';FLUSH PRIVILEGES;
必ずvery_strong_paswordを変更してください 強力なパスワードを使用します。
Ghost-CLIのインストール#
公式のGhostCLIユーティリティを使用してGhostをインストールします。このユーティリティを使用すると、1つのコマンドでGhostをインストールまたは更新できます。
GhostCLIはnpmパッケージとして利用できます。次のコマンドは、GhostCLIをUbuntuシステムにグローバルにインストールします。
sudo yarn global add ghost-cliGhostのインストール場所の作成#
Ghostをダウンロードして/var/www/ghostにインストールします 推奨されるインストール場所であるディレクトリ。
ディレクトリタイプを作成するには:
sudo mkdir -p /var/www/ghostディレクトリの所有権をユーザーに変更します:
sudo chown $USER:$USER /var/www/ghost
$USER ユーザー名を保持する環境変数です。
正しいディレクトリ権限を設定します:
sudo chmod 775 /var/www/ghostGhost CLIがインストールされ、すべての前提条件が完了したので、インストールを開始できます。
/var/www/ghostに変更します ディレクトリ。
cd /var/www/ghost
インストールを開始するには、ghost installを実行します 、Ghostをインストールして構成し、Nginxをリバースプロキシとして構成し、SSL証明書を無料で暗号化してサイトを保護します。
ghost install✔ Checking system Node.js version
✔ Checking logged in user
✔ Checking current folder permissions
System checks failed with message: 'Linux version is not Ubuntu 16'
Some features of Ghost-CLI may not work without additional configuration.
For local installs we recommend using `ghost install local` instead.
? Continue anyway? (y/N) y
インストーラーはシステムをチェックし、上記のようにいくつかの警告を出力します。 yと入力します 続行すると、インストーラーはGhostをダウンロードしてインストールします:
ℹ Checking operating system compatibility [skipped]
✔ Checking for a MySQL installation
✔ Checking memory availability
✔ Checking for latest Ghost version
✔ Setting up install directory
✔ Downloading and installing Ghost v1.24.9
✔ Finishing install process
次に、ブログのURLとMySQL情報を設定するように求められます。 Installing MySQLで設定したrootユーザー名とパスワードを入力します セクションを作成し、デフォルトのデータベース名ghost_prodを使用します 。
? Enter your blog URL: https://example.com
? Enter your MySQL hostname: localhost
? Enter your MySQL username: root
? Enter your MySQL password: [hidden]
? Enter your Ghost database name: ghost_prod
インストーラーは、ghostという名前のシステムユーザーを作成します ゴーストMySQLユーザーを作成するかどうかを尋ねられたら、Yesと入力します。 。
✔ Configuring Ghost
✔ Setting up instance
Running sudo command: chown -R ghost:ghost /var/www/ghost/content
✔ Setting up "ghost" system user
? Do you wish to set up "ghost" mysql user? Yes
✔ Setting up "ghost" mysql user
次に、インストーラーはNginxをセットアップするかどうかを尋ねてきます。 Yesと入力して確認します 。
? Do you wish to set up Nginx? Yes
✔ Creating nginx config file at /var/www/ghost/system/files/example.com.conf
Running sudo command: ln -sf /var/www/ghost/system/files/example.com.conf /etc/nginx/sites-available/example.com.conf
Running sudo command: ln -sf /etc/nginx/sites-available/example.com.conf /etc/nginx/sites-enabled/example.com.conf
Running sudo command: nginx -s reload
✔ Setting up Nginx
Nginxがセットアップされると、インストーラーはSSLをセットアップするかどうかを尋ねてきます。 Yesと入力して確認します 構成ウィザードでメールアドレスの入力を求められると、ドメインの無料のLet’s Encrypt SSL証明書が生成され、Nginxが構成されます。
? Do you wish to set up SSL? Yes
? Enter your email (used for Let's Encrypt notifications) [email protected]
Running sudo command: mkdir -p /etc/letsencrypt
Running sudo command: ./acme.sh --install --home /etc/letsencrypt
Running sudo command: /etc/letsencrypt/acme.sh --issue --home /etc/letsencrypt --domain example.com --webroot /var/www/ghost/system/nginx-root --reloadcmd "nginx -s reload" --accountemail [email protected]
Running sudo command: openssl dhparam -out /etc/nginx/snippets/dhparam.pem 2048
Running sudo command: mv /tmp/ssl-params.conf /etc/nginx/snippets/ssl-params.conf
✔ Creating ssl config file at /var/www/ghost/system/files/example.com-ssl.conf
Running sudo command: ln -sf /var/www/ghost/system/files/example.com-ssl.conf /etc/nginx/sites-available/example.com-ssl.conf
Running sudo command: ln -sf /etc/nginx/sites-available/example.com-ssl.conf /etc/nginx/sites-enabled/example.com-ssl.conf
Running sudo command: nginx -s reload
✔ Setting up SSL
次に、インストーラーはsystemdサービスをセットアップするかどうかを尋ねてきます。 Yと入力します 受け入れると、インストーラーはghost_example-comという新しいsystemdサービスを作成し、起動時に開始できるようにします:
? Do you wish to set up Systemd? Yes
✔ Creating systemd service file at /var/www/ghost/system/files/ghost_example-com.service
Running sudo command: ln -sf /var/www/ghost/system/files/ghost_example-com.service /lib/systemd/system/ghost_example-com.service
Running sudo command: systemctl daemon-reload
✔ Setting up Systemd
最後に、インストーラーはデータベースをセットアップし、Ghostを起動するかどうかを尋ねます。Yesと入力します。 。
Running sudo command: /var/www/ghost/current/node_modules/.bin/knex-migrator-migrate --init --mgpath /var/www/ghost/current
✔ Running database migrations
? Do you want to start Ghost? Yes
Running sudo command: systemctl is-active ghost_example-com
✔ Ensuring user is not logged in as ghost user
✔ Checking if logged in user is directory owner
✔ Checking current folder permissions
Running sudo command: systemctl is-active ghost_example-com
✔ Validating config
✔ Checking folder permissions
✔ Checking file permissions
✔ Checking content folder ownership
✔ Checking memory availability
Running sudo command: systemctl start ghost_example-com
✔ Starting Ghost
Running sudo command: systemctl is-enabled ghost_example-com
Running sudo command: systemctl enable ghost_example-com --quiet
✔ Starting Ghost
You can access your publication at https://example.com
Next, go to your admin interface at https://example.com/ghost/ to complete the setup of your publication

Ghost uses direct mail by default
To set up an alternative email method read our docs at https://docs.ghost.org/docs/mail-config
ゴーストセットアップを完了します#
ブラウザを開き、https://example.com/ghost/のGhost管理インターフェースに移動します 次の画面が表示されます:
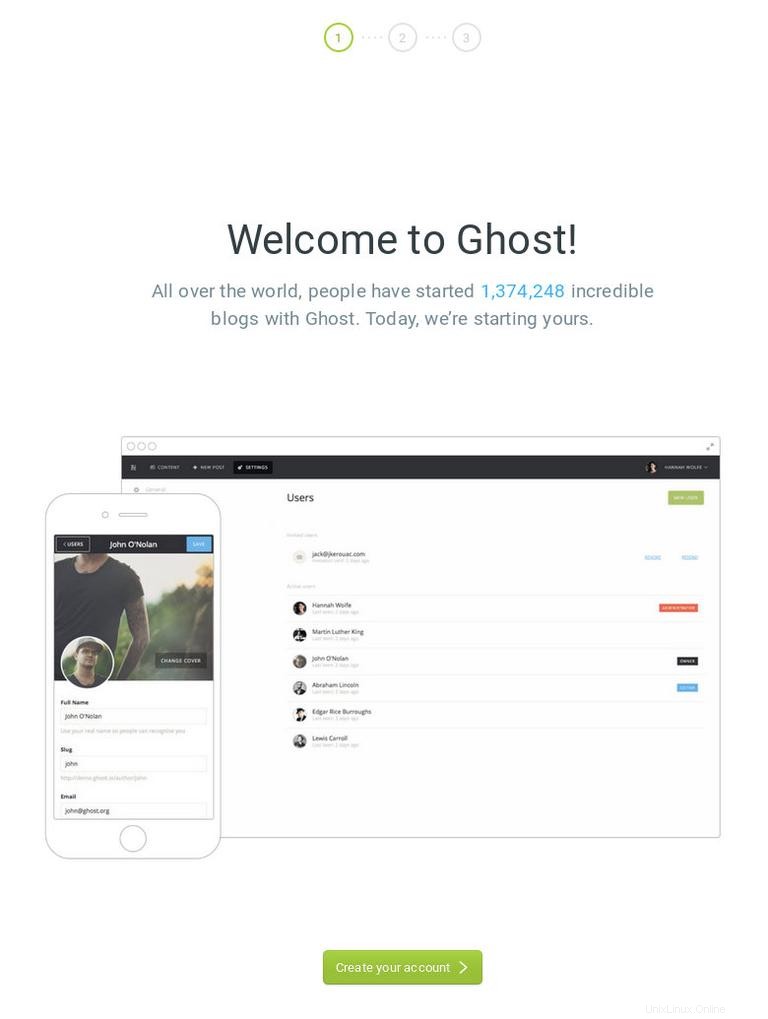
開始するには、Create your accountをクリックしてください ボタン。
[アカウントの作成]画面にリダイレクトされます。この画面で、ブログのタイトル、アカウントの氏名、メールアドレス、パスワードを入力する必要があります:

詳細を入力し、Invite your teamをクリックしたら ボタン。

この画面では、共同編集者のメールアドレスを入力するよう求められます。 I'll do this later, take me to my blog!をクリックするだけです。 リンクすると、Ghostダッシュボードにリダイレクトされます:
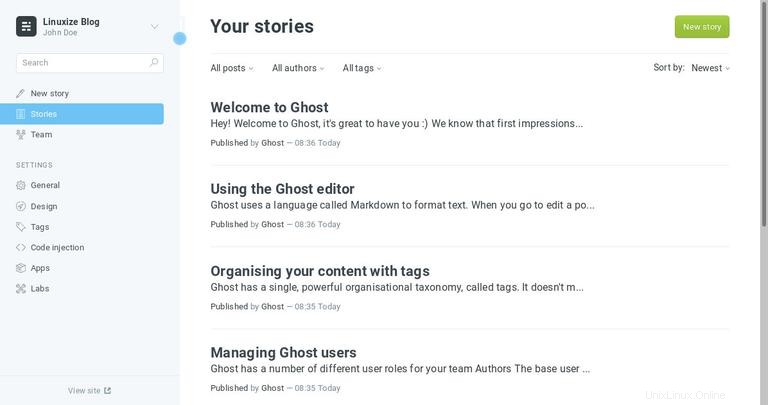
ここから、新しい投稿を作成したり、ユーザーを追加したり、Ghostsの構成を変更したりできます。