あなたのことはわかりませんが、オペレーティングシステムを再インストールするのは好きではありません。ちょうどその場で更新する必要がある何かのためにそれは私の時間の完全な無駄だと思います。多くの場合、他のプラットフォームを使用している人の中には、システムの元の速度を取り戻すために、年に1回の適切なワイプと再インストールを好む人もいます。私はこの観点に同意しません。システムを維持する方法はたくさんありますが、私は通常、ワイプして最高のものを期待するよりも、調査デバッグを好みます。
このため、私の仕事用ラップトップのようなシステムはずっと前にその寿命を開始し(i7ベースの第4世代ラップトップ上のFedora 22)、今では3回のハードウェアの更新、いくつかのソリッドステートドライブ(SSD)のアップグレード、および多くのFedoraの更新(私は現在Fedora 32を使用しています)。
システムを切り替えるときは、オペレーティングシステムを持って行き、新しいマシンで起動することを期待しています。しかし、新しいシステムと古いシステムのハードウェアの違いのために、それが起こるのを待っている災害であることがわかりました。問題は、古いシステムからハードドライブを取り出して新しいシステムにポップし、すべてが期待どおりに機能することを期待するほど簡単ではないことです。この記事では、Linuxインストールを1つのハードウェア(この場合は古いラップトップ)から新しいラップトップに移動する方法について説明します。
UEFIが私たちに与えた大きな警告または10年間の事前警告
Unified Extensible Firmware Interface(UEFI)が2000年代初頭に導入されたとき、PC(Basic Input / Output System)BIOSに取って代わり、x86ユーザーにさらに技術的に高度なものを提供するように設計されました。 OpenBoot PROM(OBP)/OpenFirmwareを備えたSPARCまたはPowerPCMacシステムを使用している人々は、何年も前にすでに未来を経験していました。 UEFIは、BIOSを削除して、その前身がPCを恥じないようにしたいと考えていました。
UEFIテクノロジーが広く採用されるために、メーカーはそれをオプション/選択可能にすることを選択しました マシンのファームウェアから:レガシーBIOSまたはUEFIモードで起動しますか? 次の10年間で、UEFIはレガシーBIOSをゆっくりと押し出し、メーカーが出荷するマシンのデフォルトモードになりました。
公平を期すために、UEFIには次のような複数の利点があります。
- マルチブートの信頼性と柔軟性が向上します。
- (Linuxユーザー)に
fwupdmgrを実行する機能を提供します Linux内からマシンのファームウェアをフラッシュします。これには、アドオンカードを含め、ほとんどすべてのファームウェアが含まれます。
私の個人的なシステムでは、UEFIの問題を無視し、入手した新しいマシンでレガシーBIOSを有効にし続けたため、LinuxOSを考え直すことなく起動できました。
その後、2020年が到来し、UEFIのみを搭載した新しいノートパソコンが登場しました。いかなる種類のレガシーブートもありません(外部USBスティックを除く)。数か月後、新しいポータブルXeonベースのワークステーションが私たちの家に登場しました。この場合も、その獣はUEFIのみを実行します。
マスターブートレコード(MBR)でフォーマットされたSSD(レガシーBIOS)と、UEFIモードでのみ起動するマシンで行き詰まりました。いじくり回す人であり、Linuxユーザーである私は、この問題の調査に着手しました。解決策はそれほど難しくなく、何をすべきかを決めてから約5分しかかからないことがわかりました。
警告の言葉といくつかの警告
物理システムの「正しい手順」を見つける際に、数回使用していたテスト仮想マシンを破損しました。また、ラップトップシステムの1つを一度破損しましたが、CloneZillaのおかげでSSDの完全なイメージが得られました。ここにいくつかのアドバイスがあります:
- 続行する前に、システムの完全なイメージレベルのバックアップを作成してください。ディスクと、確認なしで簡単に削除できるようにするために使用されるツールに触れることになります。 CloneZilla、AOMEI Partition Assistant、
ddを使用できます 、またはノートンゴーストでさえそれを行います。うまく機能するツールは数十あります。 - この手順は、デュアルブートマシンを使用している場合でも機能します。論理ボリュームマネージャー(LVM)、プレーンパーティション、およびLinux Unified Key Setup(LUKS)またはそれらの任意の組み合わせで動作します。注意して、手順を構成に適合させる必要があります。
- この手順を実行するには、最愛のSSDを、レガシーBIOSとUEFIの両方のブートモードを実行できるマシンに配置する必要があります。 BIOSのみのデバイスで手順を試みる場合は、HDDまたはSSDをUEFIマシンに移動して、それが機能したことを確認するまで待つ必要があります。
- SSDを別のマシンに物理的に移動する必要はありません。古いMBRフォーマットのSSDを別のマシンの新しいSSDに複製して、そこから作業するだけです。ディスク上のパーティションの構造を変更します。一時的なデバイスであるか、新しいラップトップの新しいSSDであるかは、完全にあなた次第です。
- SSDで簡単に解放できるディスク容量がないという残念なケースでも、操作する方法はいくつかあります。 LVM PV(Physical Volume)の最後の数百MBをPEから削除し、LVMPVのサイズを変更してEFIパーティション用のスペースを確保することができます。ここではこれについては説明しませんが、記事の最後にいくつかの参考資料があります。もう1つのオプションは、少し大きいSSDを購入し、LinuxシステムをそのSSDに復元して、空き容量を確保することです。
- プロセスをゆっくりと進め、サポートが必要な場合はオンラインで遠慮なく質問してください。行き詰まった場合に役立つLinuxユーザーグループは数十あります。
- この記事は、Fedora 33を搭載した新しく再インストールされたラップトップシステムで書かれましたが、さまざまな構成に適用されます。
- Fedora 33でBツリーファイルシステム(BTRFS)を使用している場合は、これを試さないでください。BTRFSを使用したときに、ディスクをGUIDパーティションテーブル(GPT)に変換した後、動作させることができませんでした。
レガシーBIOSを使用していますか?
レガシーBIOSで起動されたマシンの2つの良い指標があります。
1)ブートディスクにDOS / MBRパーティションがあります:
[raistlin@localhost ~]$ sudo su -

[root@localhost ~]# df -h /
Filesystem      Size  Used Avail Use% Mounted on
/dev/sda2       119G  7.1G  111G   6% /

[root@localhost ~]# file -s /dev/sda
/dev/sda: DOS/MBR boot sector 2)Linuxカーネルはしません EFI変数がある:
[root@localhost ~]# ls /sys/firmware/efi
ls: cannot access '/sys/firmware/efi': No such file or directory
UEFIモードのマシンでは、上記の結果は次のような出力になります。
[root@localhost ~]# ls /sys/firmware/efi
config_table  efivars  esrt  [...]  runtime  runtime-map  systab  vars
ブートディスクを調べて戦略を決定する
上記のことから、ブートディスクが/dev/sdaであることがわかりました。 。 partedで詳しく見てみましょう :
[root@localhost ~]# parted /dev/sda
GNU Parted 3.3
Using /dev/sda
Welcome to GNU Parted! Type' help' to view a list of commands.
(parted) p
Model: ATA LITEON L8H-128V2 (scsi)
Disk /dev/sda: 128GB
Sector size (logical/physical): 512B/512B
Partition Table: msdos

Disk Flags:
Number Start End Size Type File system Flags
1 1049kB 1075MB 1074MB primary ext4 boot
2 1075MB 128GB 127GB primary lvm
上記から、2つのパーティションのみが存在することがわかります。最初のパーティションは小さな1GiBパーティションで、 ext4としてフォーマットされています。 そしてそれはカーネルを保持します。 2番目のパーティションは別の獣であり、LVMを使用しています。 LinuxシステムのLVMに満足している限り、今のところ触れません。
したがって、最初のパーティションが占めるスペースを使用して、GPTとUEFI用のスペースを確保します。
LUKSまたはLVMを使用している場合、ブートパーティションとそのスペースを使用すると、UEFIプロシージャへの変換も安全になる可能性があることに注意してください。
BTRFSを選択した場合 (Fedora 33のデフォルト)、これはうまくいかない可能性があり、ディスクをGPTに変換した直後に最初の試行が起動に失敗しました。
ブートパーティションが1G未満で、すべてのスペースがパーティションで占められている場合、/bootを作成するのは安全ではない可能性があります。 512-600Mibよりも小さい。続行するのに十分なスペースがない可能性があります。おそらく、システムのクローンを作成できる少し大きいSSDを入手する良い機会かもしれません。
私の名前は/dev/ sda1
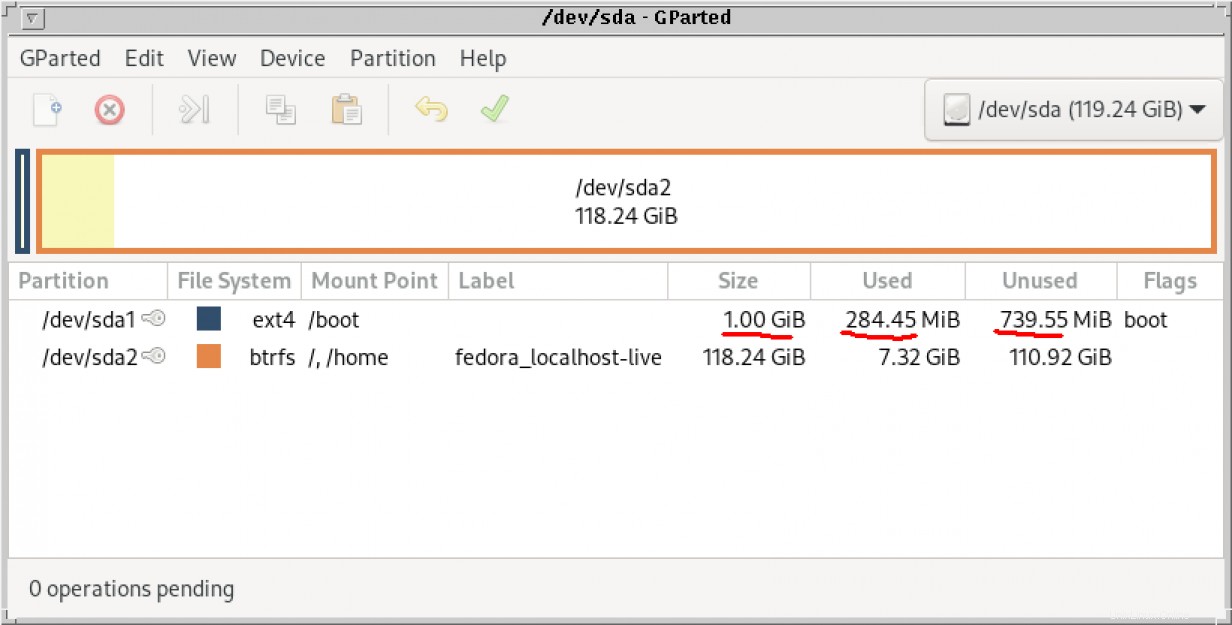
このマシンのブートパーティションのサイズは1ギブで、続行するのに十分な空き領域があります:
[root@localhost ~]# df -h /boot
Filesystem      Size  Used Avail Use% Mounted on
/dev/sda1       976M  238M  672M  21% /boot
まず、ファイルシステムのサイズを512Mに変更します:
[root@localhost ~]# resize2fs /dev/sda1 512M
resize2fs 1.45.6 (20-Mar-2020)
Filesystem at /dev/sda1 is mounted on /boot; on-line resizing required resize2fs: On-line shrinking not supported
Umount 最初にそれを実行します(Linuxは/bootのみをマウントするため、可能です 便宜上):
[root@localhost ~]# umount /boot

[root@localhost ~]# resize2fs /dev/sda1 512M
resize2fs 1.45.6 (20-Mar-2020)
Please run 'e2fsck -f /dev/sda1' first.

[root@localhost ~]# e2fsck -f /dev/sda1
e2fsck 1.45.6 (20-Mar-2020)
Pass 1: Checking inodes, blocks, and sizes
Pass 2: Checking directory structure
Pass 3: Checking directory connectivity
Pass 4: Checking reference counts
Pass 5: Checking group summary information
/dev/sda1: 414/65536 files (0.7% non-contiguous), 63590/262144 blocks

[root@localhost ~]# resize2fs /dev/sda1 512M
resize2fs 1.45.6 (20-Mar-2020)
Resizing the filesystem on /dev/sda1 to 131072 (4k) blocks.
The filesystem on /dev/sda1 is now 131072 (4k) blocks long.

[root@localhost ~]# mount /boot

[root@localhost ~]# df -h /boot
Filesystem      Size  Used Avail Use% Mounted on
/dev/sda1       472M  200M  237M  46% /boot
ext4 ファイルシステムのサイズは変更されましたが、パーティションのサイズは1Gibのままです。次にサイズを変更します。パーティションを少しのサイズに縮小します /bootのそれ 丸め誤差から安全にするためのファイルシステム。 700Mibに縮小すると、約300Mibが解放されます。そのパーティション内のファイルシステムは512Mibになっているため、パーティションを1024Mibから700Mibに安全に縮小できます。
[root@localhost ~]# fdisk  -l /dev/sda|grep sda1
/dev/sda1  *       2048   2099199   2097152     1G 83 Linux

[root@localhost ~]# parted /dev/sda
GNU Parted 3.3
Using /dev/sda
Welcome to GNU Parted! Type 'help' to view a list of commands.
(parted) resizepart 1 700M
Warning: Shrinking a partition can cause data loss, are you sure you want to continue? Yes/No? yes
(parted) p
Model: ATA LITEON L8H-128V2 (scsi)
Disk /dev/sda: 128GB
Sector size (logical/physical): 512B/512B
Partition Table: msdos

Disk Flags:
Number  Start   End    Size   Type     File system  Flags
 1      1049kB  700MB  699MB  primary  ext4         boot
 2      1075MB  128GB  127GB  primary  btrfs
(parted) quit
Information: You may need to update /etc/fstab.

[root@localhost ~]#
次に、ファイルシステムをフルパーティションサイズ(700Mib)に拡張します。
[root@localhost ~]# partprobe

[root@localhost ~]# resize2fs /dev/sda1
resize2fs 1.45.6 (20-Mar-2020)
Resizing the filesystem on /dev/sda1 to 170642 (4k) blocks.
The filesystem on /dev/sda1 is now 170642 (4k) blocks long.
サイズ変更操作は、 ext4の拡大で終了します ファイルシステムを512Mibから、基になるパーティションのサイズである700Mibに戻します。
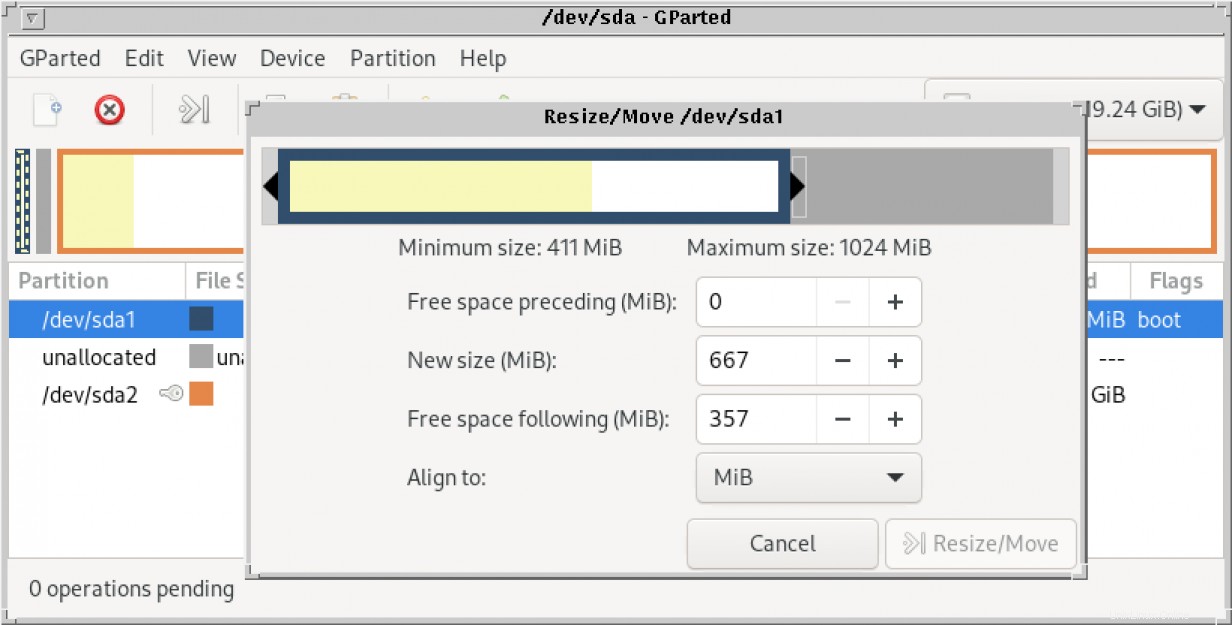
Gpartedを使用して、前の手順の進行状況を監視することもできます。これが初期状況のスクリーンショットです:
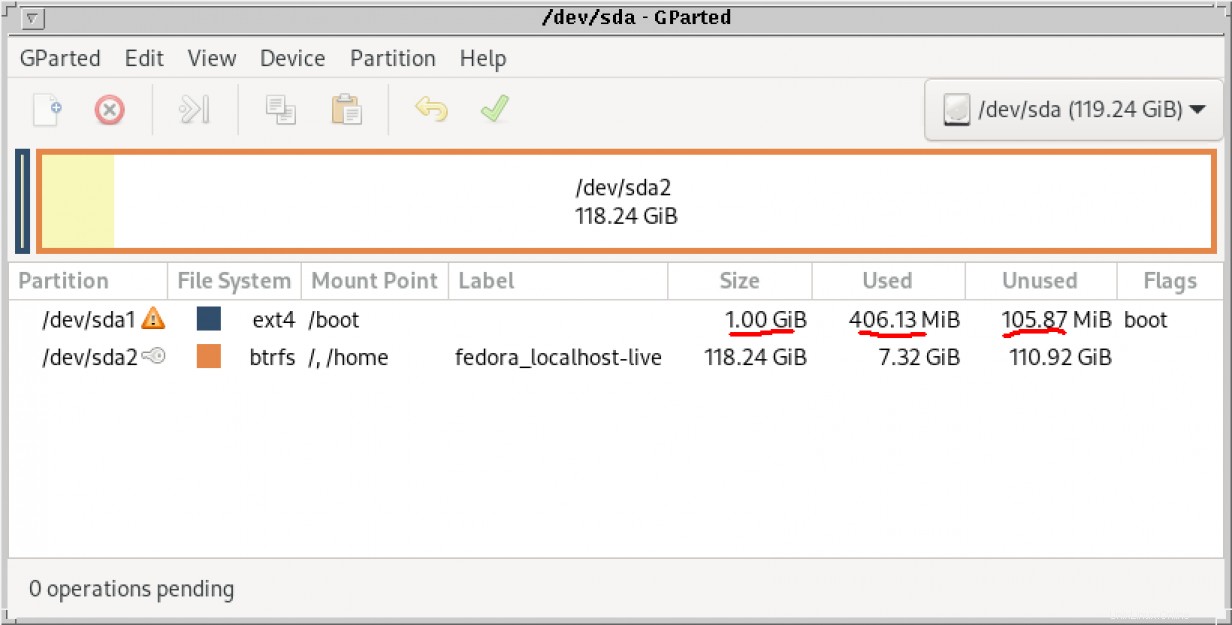
ファイルシステムのサイズを変更するとすぐに、警告が表示されます:
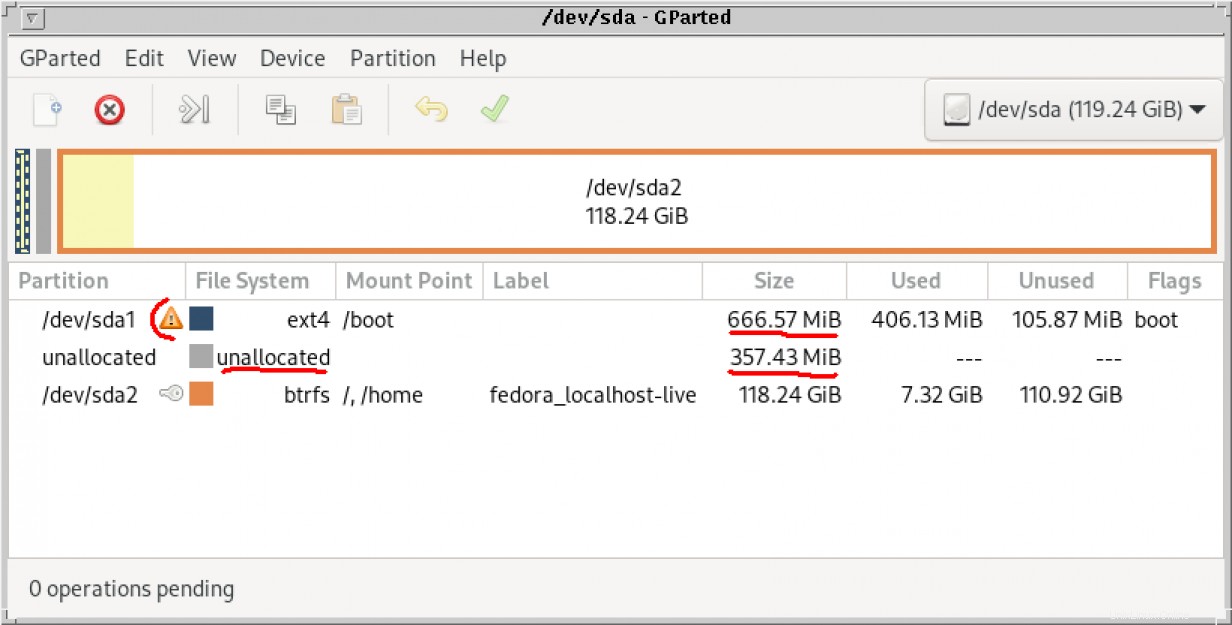
ブートパーティション自体が700Mにサイズ変更された後、未割り当て 行はGpartedに表示されます:
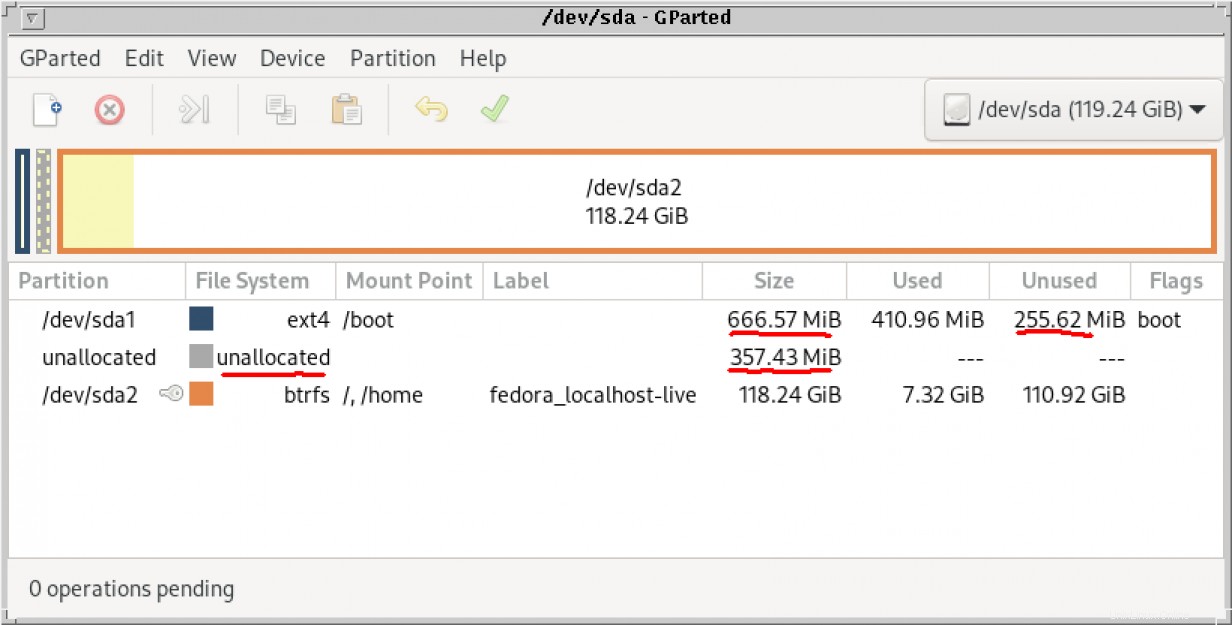
ファイルシステムがパーティションサイズに拡張されると、警告は消えます:
また、Linuxで一般的であるように、GPartedで1回クリックするだけで操作全体を実行できたはずですが、それほど面白くなかったでしょう:
ディスクをGPTに変換する
空き容量があれば、ディスクをGPTに自由に変換できます。まず、いくつかのツールをインストールする必要があります:
[root@localhost ~]# yum install gdisk grub2-efi-x64-modules efibootmgr grub2-tools-efi -y Last metadata expiration check: 1:32:33 ago on Wed 27 Jan 2021 05:01:42 PM EST.
Package gdisk-1.0.6-1.fc33.x86_64 is already installed.
Package efibootmgr-16-9.fc33.x86_64 is already installed.
Package grub2-tools-efi-1:2.04-31.fc33.x86_64 is already installed.
Dependencies resolved.[...]
gdiskを使用する パーティションテーブルをGPTに変換し、GRUBが必要とするBIOSブートパーティションを作成します。このパーティションの番号は3になります (最初に使用可能なパーティション)、ディスクの最初のセクター(セクター34から2047)から切り出されます。
[root@localhost ~]# gdisk /dev/sda
GPT fdisk (gdisk) version 1.0.6
Warning: The partition table header claims that the size of partition table entries is 12255407 bytes, but this program supports only 128-byte entries. Adjusting accordingly, but the partition table may be garbage.
Warning: Partition table header claims that the size of partition table entries is 0 bytes, but this program supports only 128-byte entries.

Adjusting accordingly, but the partition table may be garbage.
Partition table scan:
  MBR: MBR only
  BSD: not present
  APM: not present
  GPT: not present
***************************************************************
Found invalid GPT and valid MBR; converting MBR to GPT format
in memory. THIS OPERATION IS POTENTIALLY DESTRUCTIVE! Exit by
typing 'q' if you don't want to convert your MBR partitions
to GPT format!
***************************************************************
Command (? for help): p
Disk /dev/sda: 250069680 sectors, 119.2 GiB
Model: LITEON L8H-128V2
Sector size (logical/physical): 512/512 bytes
Disk identifier (GUID): 6681F0D6-F645-4F97-93A5-E7E5E3912C62
Partition table holds up to 128 entries
Main partition table begins at sector 2 and ends at sector 33
First usable sector is 34, last usable sector is 250069646
Partitions will be aligned on 2048-sector boundaries
Total free space is 734681 sectors (358.7 MiB)
Number  Start (sector)
   1            2048
   2         2099200
End (sector)  Size       Code  Name
   1367187   666.6 MiB   8300  Linux filesystem
 250068991   118.2 GiB   8300  Linux filesystem
Command (? for help): n
Partition number (3-128, default 3): 3
First sector (34-250069646, default = 1368064) or {+-}size{KMGTP}: 34
Last sector (34-2047, default = 2047) or {+-}size{KMGTP}: [Press Enter to accept 2047] Current type is 8300 (Linux filesystem)
Hex code or GUID (L to sho codes, Enter = 8300): ef02
Changed type of partition to 'BIOS boot partition'
Command (? for help): w
Final checks complete. About to write GPT data. THIS WILL OVERWRITE EXISTING
PARTITIONS!!
Do you want to proceed? (Y/N): y
OK; writing new GUID partition table (GPT) to /dev/sda.
Warning: The kernel is still using the old partition table.
The new table will be used at the next reboot or after you
run partprobe(8) or kpartx(8)
The operation has completed successfully.
ディスクは次のようになります。
[root@localhost ~]# partprobe

[root@localhost ~]# fdisk -l /dev/sda|grep sda
Disk /dev/sda: 119.24 GiB, 128035676160 bytes, 250069680 sectors
/dev/sda1     2048   1367187   1365140 666.6M Linux filesystem
/dev/sda2  2099200 250068991 247969792 118.2G Linux filesystem
/dev/sda3       34      2047      2014  1007K BIOS boot
次に、GRUBブートローダーを再インストールします。 grub2-install....を使用する代わりに、より新しいバージョンのgrubを使用している場合 dnf reinstall shim-* grub2-efi-*を使用してください 代わりに:
[root@localhost ~]# grub2-install /dev/sda
Installing for i386-pc platform.
Installation finished. No error reported.

[root@localhost ~]#
ディスクをMBRからGPTに変換するだけの場合は、その部分はこれで終了です。この時点で、システムを再起動して、BIOSベースのマシンが新しく変換されたGPTディスクを起動できることを確認することをお勧めします。
ディスクは次のようになります。
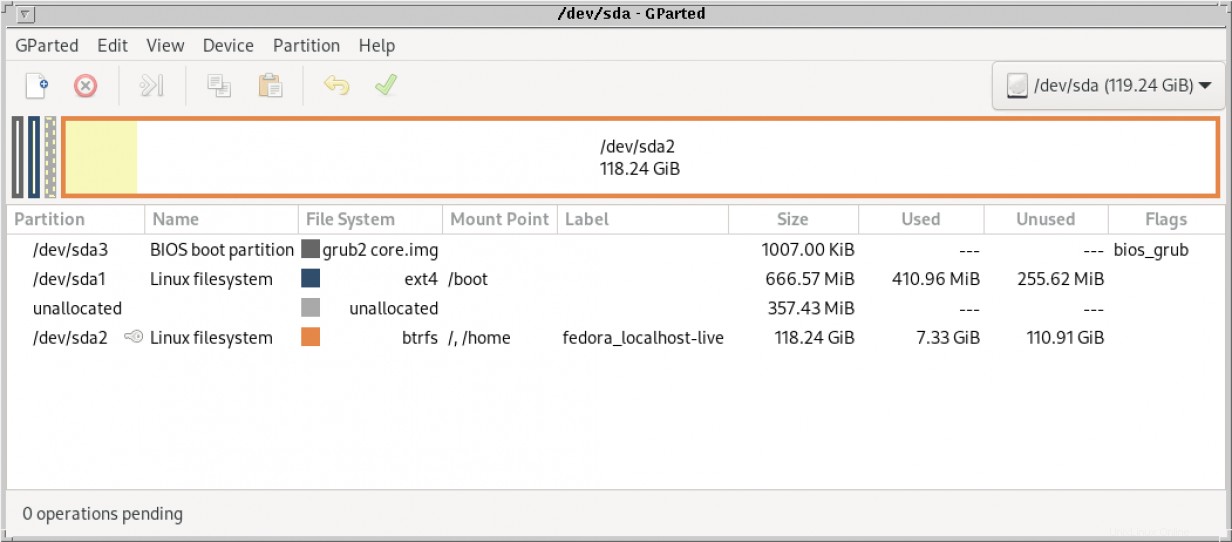
これはシェルからも見ることができます:
[root@localhost ~]# fdisk  -l /dev/sda
Disk /dev/sda: 119.24 GiB, 128035676160 bytes, 250069680 sectors
Disk model: LITEON L8H-128V2
Units: sectors of 1 * 512 = 512 bytes
Sector size (logical/physical): 512 bytes / 512 bytes

I/O size (minimum/optimal): 512 bytes / 512 bytes
Disklabel type: gpt
Disk identifier: 6681F0D6-F645-4F97-93A5-E7E5E3912C62
Device       Start       End   Sectors   Size Type
/dev/sda1     2048   1367187   1365140 666.6M Linux filesystem
/dev/sda2  2099200 250068991 247969792 118.2G Linux LVM
/dev/sda3       34      2047      2014  1007K BIOS boot
Partition table entries are not in disk order.
EFIシステムパーティションの追加
次に、前に解放したスペースを使用して、4番目のパーティションであるEFIシステムパーティションを作成します。
[root@localhost ~]# gdisk /dev/sda
GPT fdisk (gdisk) version 1.0.6
Partition table scan:
  MBR: protective
  BSD: not present
  APM: not present
  GPT: present
Found valid GPT with protective MBR; using GPT.
Command (? for help): p
Disk /dev/sda: 250069680 sectors, 119.2 GiB
Model: LITEON L8H-128V2
Sector size (logical/physical): 512/512 bytes
Disk identifier (GUID): 6681F0D6-F645-4F97-93A5-E7E5E3912C62
Partition table holds up to 128 entries
Main partition table begins at sector 2 and ends at sector 33
First usable sector is 34, last usable sector is 250069646
Partitions will be aligned on 2-sector boundaries
Total free space is 732667 sectors (357.7 MiB)
Number  Start (sector)
End (sector)  Size       Code  Name
   1367187   666.6 MiB   8300  Linux filesystem
 250068991   118.2 GiB   8E00  Linux LVM
      2047   1007.0 KiB  EF02  BIOS boot partition
1 2 3
   2048
2099200
     34
Command (? for help): n
Partition number (4-128, default 4): [Press Enter to accept 4]
First sector (1367188-250069646, default = 1367188) or {+-}size{KMGTP}: [Press Enter to accept 1367188]
Last sector (1367188-2099199, default = 2099199) or {+-}size{KMGTP}: [Press Enter to accept 2099199]
Current type is 8300 (Linux filesystem)

Hex code or GUID (L to show codes, Enter = 8300): ef00
Changed type of partition to 'EFI system partition'
Command (? for help): p
Disk /dev/sda: 250069680 sectors, 119.2 GiB
Model: LITEON L8H-128V2
Sector size (logical/physical): 512/512 bytes
Disk identifier (GUID): 6681F0D6-F645-4F97-93A5-E7E5E3912C62
Partition table holds up to 128 entries
Main partition table begins at sector 2 and ends at sector 33
First usable sector is 34, last usable sector is 250069646
Partitions will be aligned on 2-sector boundaries
Total free space is 655 sectors (327.5 KiB)
Number  Start (sector)
End (sector)  Size
   1367187   666.6 MiB
 250068991   118.2 GiB
Code  Name
8300  Linux filesystem
8E00  Linux LVM
1 2 3 4
   2048
2099200
     34
1367188
2047 1007.0 KiB EF02 BIOS boot partition 2099199 357.4 MiB EF00 EFI system partition
次に、後でより簡単に参照できるように、EFIパーティションにラベルを追加します。これはgdiskでも行われます :
Command (? for help): c
Partition number (1-4): 4
Enter name: EFI-system
Command (? for help): p
Disk /dev/sda: 250069680 sectors, 119.2 GiB
Model: LITEON L8H-128V2
Sector size (logical/physical): 512/512 bytes
Disk identifier (GUID): 6681F0D6-F645-4F97-93A5-E7E5E3912C62
Partition table holds up to 128 entries
Main partition table begins at sector 2 and ends at sector 33
First usable sector is 34, last usable sector is 250069646
Partitions will be aligned on 2-sector boundaries
Total free space is 655 sectors (327.5 KiB)
Number  Start (sector)
End (sector)  Size
   1367187   666.6 MiB
 250068991   118.2 GiB
Code  Name
8300  Linux filesystem
8E00  Linux LVM
1 2 3 4
   2048
2099200
     34
1367188
   2047   1007.0 KiB  EF02  BIOS boot partition
2099199   357.4 MiB   EF00  EFI-system
 Command (? for help): w
Final checks complete. About to write GPT data. THIS WILL OVERWRITE EXISTING
PARTITIONS!!

Do you want to proceed? (Y/N): y
OK; writing new GUID partition table (GPT) to /dev/sda.
Warning: The kernel is still using the old partition table.
The new table will be used at the next reboot or after you
run partprobe(8) or kpartx(8)
The operation has completed successfully.
これで、パーティションが/dev/disk/by-partlabelの下に表示されるはずです。 :
[root@localhost ~]# partprobe

[root@localhost ~]# ls -l /dev/disk/by-partlabel/
total 0
lrwxrwxrwx. 1 root root 10 Jan 27 21:57 'BIOS\x20boot\x20partition' -> ../../sda3 lrwxrwxrwx. 1 root root 10 Jan 27 21:57 EFI-system -> ../../sda4
lrwxrwxrwx. 1 root root 10 Jan 27 21:57 'Linux\x20filesystem' -> ../../sda1 lrwxrwxrwx. 1 root root 10 Jan 27 21:57 'Linux\x20LVM' -> ../../sda2 EFIブートパーティションはvfatとしてフォーマットする必要があります :
[root@localhost ~]# mkfs -t vfat -v /dev/disk/by-partlabel/EFI-system
mkfs.fat 4.1 (2017-01-24)
/dev/disk/by-partlabel/EFI-system has 255 heads and 63 sectors per track,
hidden sectors 0x14dc94;
logical sector size is 512,
using 0xf8 media descriptor, with 732012 sectors;
drive number 0x80;
filesystem has 2 16-bit FATs and 16 sectors per cluster.
FAT size is 192 sectors, and provides 45723 clusters.
There are 16 reserved sectors.
Root directory contains 512 slots and uses 32 sectors.
Volume ID is 855d115e, no volume label.
このパーティションをマウントし、以前は/bootの下にあったefiサブディレクトリからデータを移動するときが来ました。 ただし、最初に適切なファイルがインストールされているかどうかを確認します(名前はLinuxディストリビューションによって異なります)。これが私のFedora33システムにあるものです:
[root@localhost ~]# du /boot/efi
8       /boot/efi/System/Library/CoreServices
12      /boot/efi/System/Library
16      /boot/efi/System
2508    /boot/efi/EFI/fedora/fonts
17988   /boot/efi/EFI/fedora
2748    /boot/efi/EFI/BOOT
20740   /boot/efi/EFI
20764   /boot/efi
[root@localhost ~]# df -h /boot/efi
Filesystem      Size  Used Avail Use% Mounted on
/dev/sda1       623M  237M  340M  42% /boot

[root@localhost ~]# find /boot/efi -name shim\*
/boot/efi/EFI/fedora/shimx64.efi

/boot/efi/EFI/fedora/shim.efi
/boot/efi/EFI/fedora/shimia32.efi
/boot/efi/EFI/fedora/shimx64-fedora.efi
/boot/efi/EFI/fedora/shimia32-fedora.efi

[root@localhost ~]# mount -t vfat /dev/disk/by-partlabel/EFI-system /mnt

[root@localhost ~]# mv  /boot/efi/* /mnt

[root@localhost ~]# umount /mnt

[root@localhost ~]# du /boot/efi
4 /boot/efi
次に、このパーティションを/etc/fstabに追加します。 およびmount それ:
[root@localhost ~]# echo ‘/dev/disk/by-partlabel/EFI-system /boot/efi vfat defaults 0 2’ >> /etc/fstab

[root@localhost ~]# mount /boot/efi

[root@localhost ~]#
この段階では、いくつかの検証が必要です。 EFIパーティションをマウントし、以前にコピーしたデータを保持する必要があります:
root@localhost ~]# df /boot/efi
Filesystem     1K-blocks  Used Available Use% Mounted on
/dev/sda4         365784 20832    344952   6% /boot/efi

[root@localhost ~]# du /boot/efi
2760    /boot/efi/EFI/BOOT
2512    /boot/efi/EFI/fedora/fonts
18024   /boot/efi/EFI/fedora
20792   /boot/efi/EFI
16      /boot/efi/System/Library/CoreServices
24      /boot/efi/System/Library
32      /boot/efi/System
20848   /boot/efi
ここで、GRUBブートローダーを再インストールし、UEFIブートを強制します。上記のように、grubの新しいバージョンの場合は、grub2-install....を使用する代わりに dnf reinstall shim-* grub2-efi-*を使用します 代わりに:
[root@localhost ~]# grub2-install --target=x86_64-efi /dev/sda
Installing for x86_64-efi platform.
EFI variables are not supported on this system.
EFI variables are not supported on this system.
grub2-install: error: efibootmgr failed to register the boot entry: No such file or directory.

[root@localhost ~]#
上記の3つのエラーメッセージは正常であり、EFIファームウェア変数がないことに関連しています。これは、PCをレガシーBIOSモードで最後に起動したため、現時点で発生します。フルUEFIモードになると、これらのエラーは消えます。深呼吸してPCを再起動し、ファームウェアを入力して起動モードを変更する準備をします。
[次のこともお勧めします:UEFIハードウェア用にPXEブートを設定する方法]
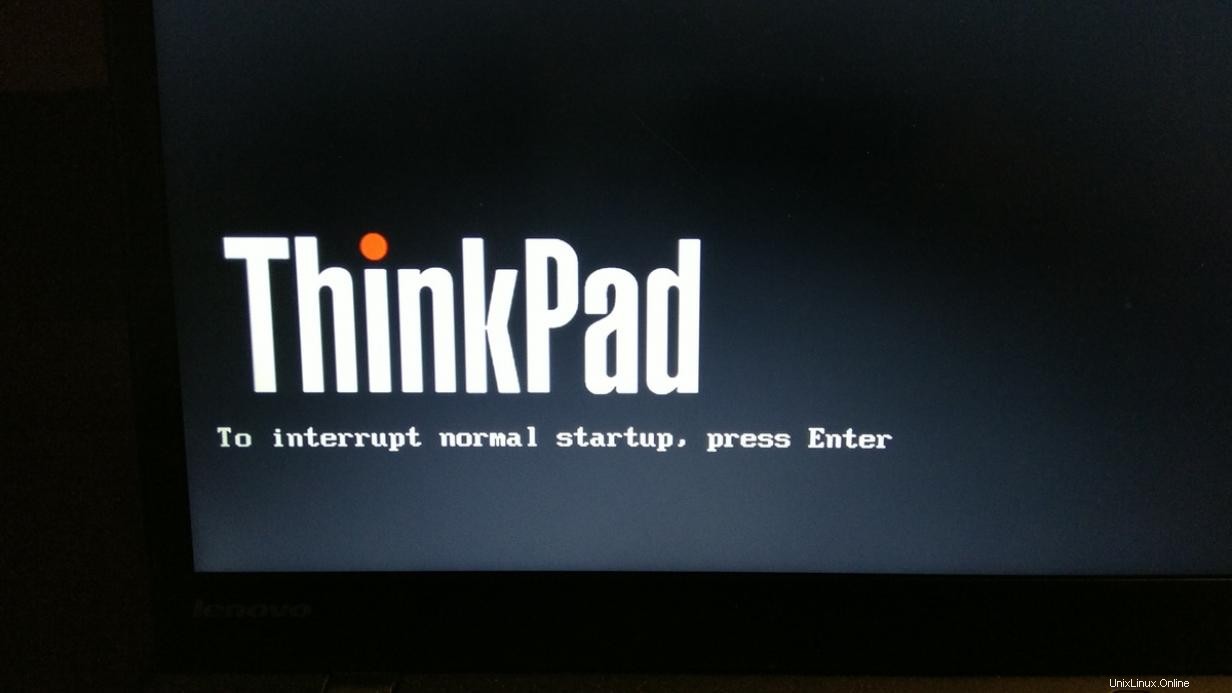
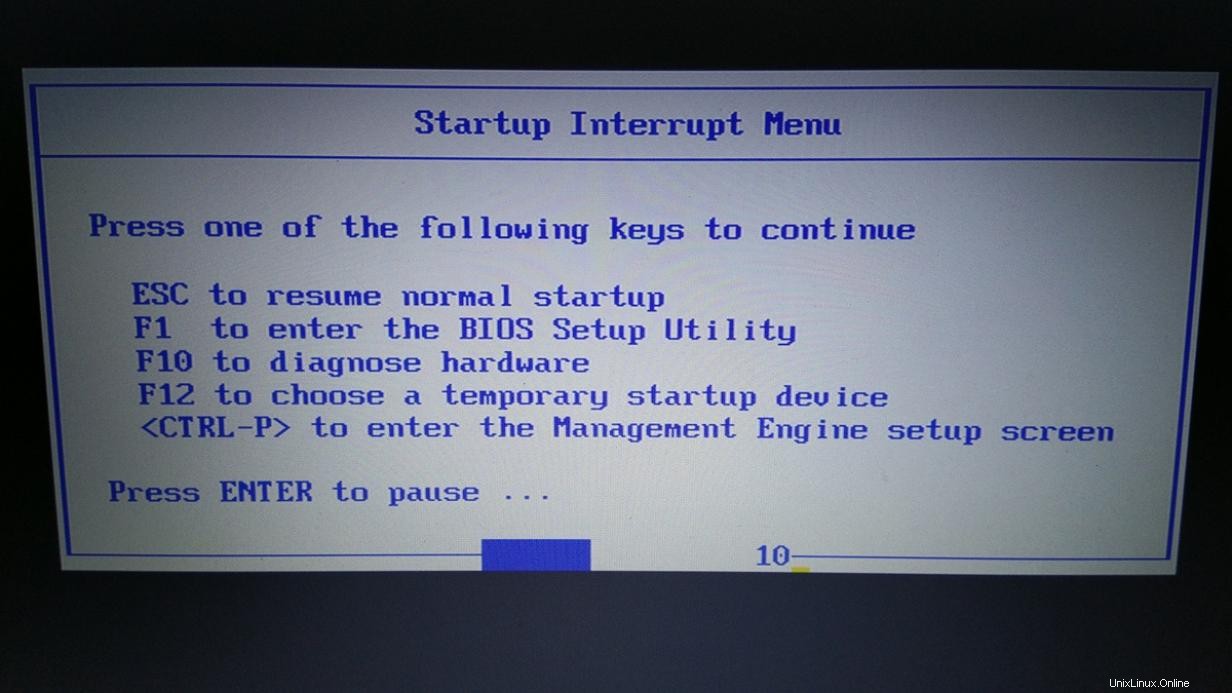
ファームウェアをシャットダウンしてレガシーBIOSからUEFIに切り替えます。
次のキャプチャは、手順を実行したシステムに固有のものです。 BIOSからUEFIに切り替える方法を理解するには、システムのマニュアルの説明を参照する必要があります。これが私のラップトップの例です:

設定を保存し、ファームウェアを終了します。 PCがリセットされ、UEFIモードでディスクから起動しようとします。 UEFIモードで初めて起動するときに、ディスクを手動で選択する必要がある場合があります。
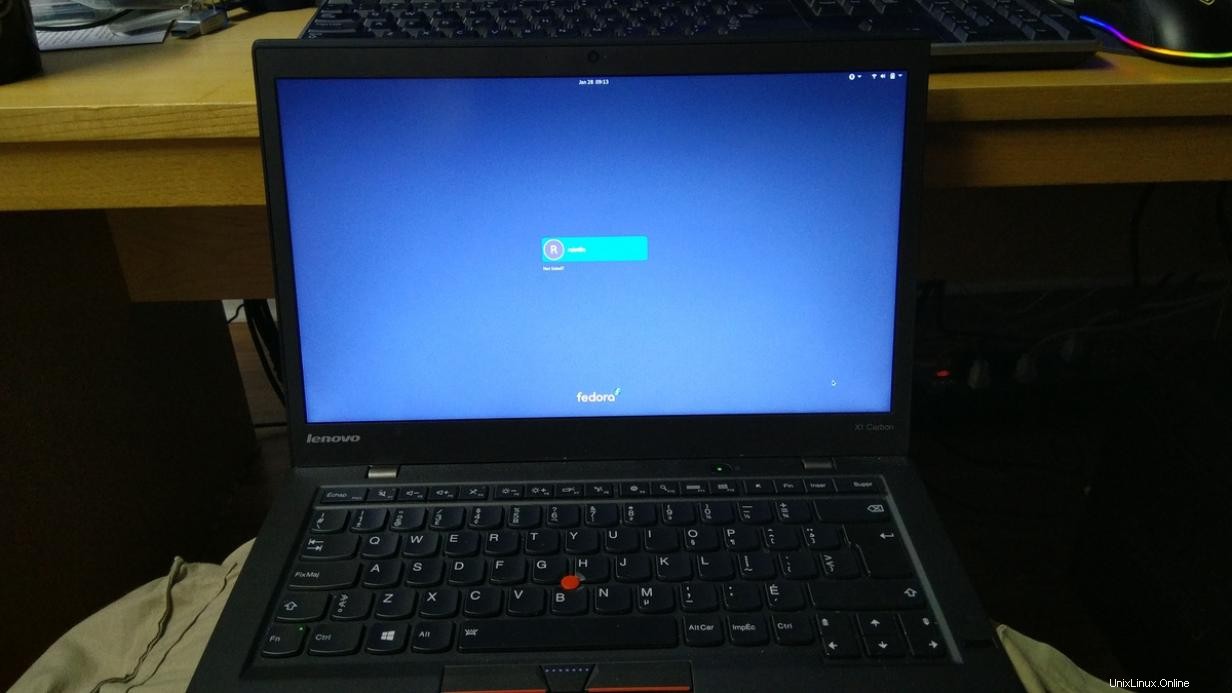
正常な起動
起動後すぐにログインして、UEFIで活性化されたLinuxを楽しんでください。はい、すべてのファイル、アカウント、およびプログラムは引き続き存在します。
[root@localhost ~]# efibootmgr
BootCurrent: 0014
Timeout: 0 seconds
BootOrder: 0014,0013,0009,000D,0007,000A,000B,000C,0008,0012
Boot0000  Setup
Boot0001  Boot Menu
Boot0002  Diagnostic Splash Screen
Boot0003  Lenovo Diagnostics
Boot0004  Startup Interrupt Menu
Boot0005  Rescue and Recovery
Boot0006  MEBx Hot Key
Boot0007* USB CD
Boot0008* USB FDD
Boot0009* ATA HDD0
Boot000A* ATA HDD1
Boot000B* ATA HDD2
Boot000C* USB HDD

Boot000D* PCI LAN
Boot000E* IDER BOOT CDROM
Boot000F* IDER BOOT Floppy
Boot0010* ATA HDD
Boot0011* ATAPI CD
Boot0012* PCI LAN
Boot0013* Windows Boot Manager
Boot0014* Fedora
[root@localhost ~]# fwupdmgr get-devices|grep -i lenovo
 │ Vendor: │ Vendor: Vendor:
LENOVO (DMI:LENOVO)
DMI:LENOVO
DMI:LENOVO
Gpartedは、ディスクの最終状態を示しています:
[無料のチートシート:サーバーとネットワークを管理するためのLinuxユーティリティとコマンドのリストを入手してください。 ]
まとめ
新しく再インストールする場合でも、オペレーティング環境を適切に更新する場合でも、そこに到達するには多くの方法があります。私は自分の好みがどこにあるかを知っています。このブログ投稿では、最近学んだヒントのいくつかを共有しようとしています。気をつけて。コマンドの出力を確認してください。必要な場合は助けを求めてください。また、他のオペレーティングシステムには、必要に応じて簡単に変換できるツールがあります。そのような例の1つに、Windowsプラットフォーム用の無料のAOMEIパーティションアシスタントがあります。
面白いことに、Fedora 33を実行しているこのラップトップはGPTを使用してBIOSからUEFIに正常に切り替えられましたが、システムが古すぎるため、LVFSを介してファームウェアの更新を利用できませんでした。