
この記事では、CentOS 8 に Icinga 2 をインストールして構成するために必要な手順について説明しました。このチュートリアルを続行する前に、ユーザーとしてログインしていることを確認してください。 sudo 特権。このチュートリアルのすべてのコマンドは、root 以外のユーザーとして実行する必要があります。
Icinga 2 は、サーバーやネットワーク リソースを監視するための無料のオープン ソース監視ツールです。 Icinga 2 は、ネットワーク リソースの可用性をチェックし、ユーザーに停止を通知し、レポート用のパフォーマンス データを生成します。 Icinga 2 は、複数の場所にまたがる大規模で複雑な環境を監視するために使用できます。
CentOS 8 に Icinga 2 をインストール
ステップ 1. 最初のコマンドはパッケージ リストを更新し、最新バージョンと依存関係を確実に取得します。
sudo dnf install epel-release
sudo dnf install 'dnf-command(config-manager)'
sudo dnf config-manager --set-enabled PowerTools
sudo dnf update
ステップ 2. CentOS 8 システムに Icinga 2 をインストールします。
ディストリビューションのパッケージ マネージャーを使用して Icinga 2 をインストールします。
sudo dnf install icinga2 icinga2-selinux icinga2-ido-mysql vim-icinga2
Icinga 2 のインストールが成功したら、通常は有効にしてサービスを開始します。そのサービスを開始して有効にするために、コマンドラインを送信します:
sudo systemctl enable icinga2
sudo systemctl start icinga2
ステップ 3. Nagios プラグインをインストールします。
Icinga 2 は、プラグインなしで外部サービスをチェックする方法を知りません。次に、以下のコマンドを使用して Nagios プラグインをインストールします:
sudo dnf install nagios-plugins-all
ステップ 4. MariaDB データベース サーバーをインストールする
次のコマンドを使用して MariaDB パッケージをインストールします:
sudo apt install mariadb-server
インストール後、MariaDB サーバーが自動的に起動します。 systemctl を使用してステータスを確認します:
systemctl status mariadb
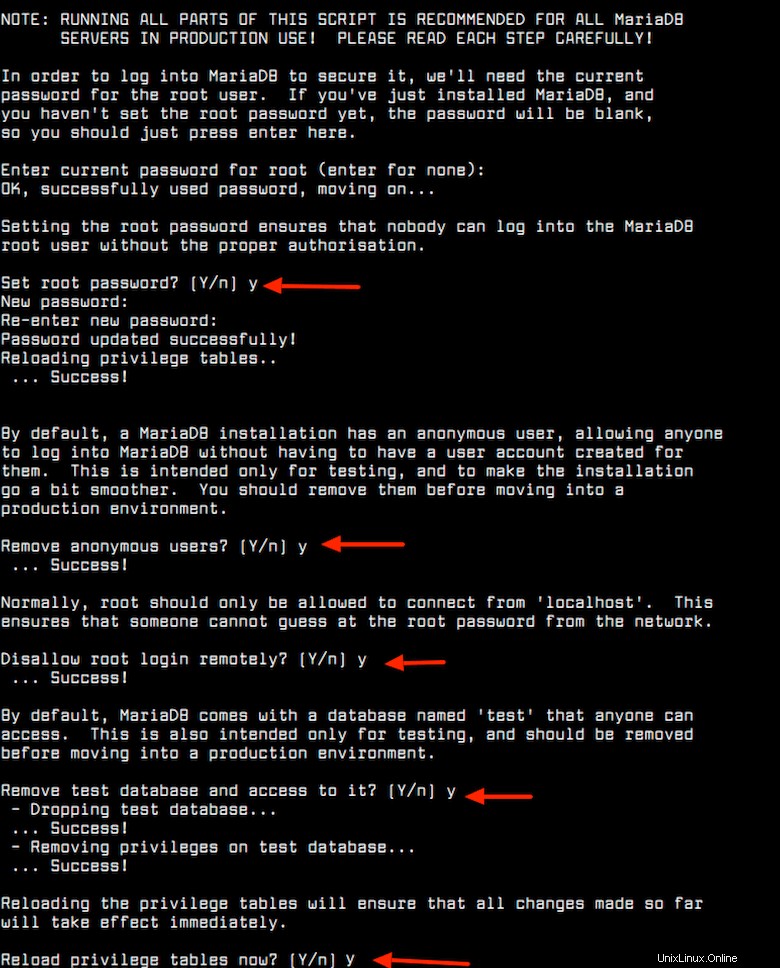
インストール後、次のように入力して MariaDB のセキュリティを改善する必要があります:
sudo mysql_secure_installation
次に、次の秘密の質問に yes/y と入力します:
Remove anonymous users? (Press y|Y for Yes, any other key for No) : y
    Disallow root login remotely? (Press y|Y for Yes, any other key for No) : y
    Remove test database and access to it? (Press y|Y for Yes, any other key for No) : y
    Reload privilege tables now? (Press y|Y for Yes, any other key for No) : y
ターミナル経由で MariaDB サーバーに接続するには、MariaDB クライアントを使用できます。 root ユーザーとして MariaDB サーバーにログインするには、次のように入力します。
$ mysql -u root -p

CREATE DATABASE icinga;
GRANT ALL PRIVILEGES ON icinga.* TO 'icinga'@'localhost' IDENTIFIED BY 'your-passwd';
FLUSH PRIVILEGES;
EXIT;
次に、Icinga 2 に必要なモジュールを有効にします:
sudo icinga2 feature enable command ido-mysql syslog
次に、Icinga 2 データベースをインポートします:
mysql -u root -p icinga < /usr/share/icinga2-ido-mysql/schema/mysql.sql
データベース アクセスの構成:
sudo nano /etc/icinga2/features-available/ido-mysql.conf
行のコメントを外し、アクセス資格情報を設定します:
/**
 * The IdoMysqlConnection type implements MySQL support
 * for DB IDO.
 */

object IdoMysqlConnection "ido-mysql" {
  user = "icinga"
  password = "your-passwd"
  host = "localhost"
  database = "icinga"
}
次に、icinga2 サービスを開始して有効にします:
sudo systemctl enable --now icinga2.service
sudo systemctl restart icinga2
sudo systemctl status icinga2
CentOS 8 に Icinga をインストールするために必要なことはこれだけです。この簡単なヒントがお役に立てば幸いです。 Icinga 2 の詳細については、公式ナレッジ ベースを参照してください。質問や提案がある場合は、下にコメントを残してください。