Prometheusは、イベントの監視とアラートに使用される無料のソフトウェアアプリケーションです。柔軟なクエリとリアルタイムアラートを使用して、HTTPプルモデルを使用して構築された時系列データベースにリアルタイムメトリックを記録します。プロジェクトはGoで記述され、Apache2ライセンスの下でライセンスされています。 、GitHubで入手可能なソースコードを使用しており、 Cloud Native Computing Foundationの段階的なプロジェクトです。 、KubernetesとEnvoyとともに。
更新システム
Linuxオペレーティングシステムを
で更新します# dnf update -yPrometheusには現在、公式のSELinuxポリシーは含まれていません。したがって、 SELinuxを無効にする必要があります または、パーミッシブモードに切り替えます。
# sed -i 's/^SELINUX=.*/SELINUX=permissive/g' /etc/sysconfig/selinux
# setenforce permissive
Prometheusユーザーとディレクトリを作成する
Prometheusソフトウェアとプロセスを所有するため。
# useradd --no-create-home -s /bin/false prometheus必要なPrometheusディレクトリを作成し、所有権を編集します。
# mkdir /etc/prometheus
# mkdir /var/lib/prometheus
# chown prometheus:prometheus /var/lib/prometheus
# chown prometheus:prometheus /etc/prometheus
Prometheusをインストール
Prometheusの公式ウェブサイトからダウンロードできます。
wgetでPrometheustarballをダウンロードする 以下のようにコマンドを実行します。
[root@unixcop ~]#  wget https://github.com/prometheus/prometheus/releases/download/v2.29.2/prometheus-2.29.2.linux-amd64.tar.gz -P /tmp
--2021-09-09 11:02:11--  https://github.com/prometheus/prometheus/releases/download/v2.29.2/prometheus-2.29.2.linux-amd64.tar.gz
Resolving github.com (github.com)... 140.82.121.3
Connecting to github.com (github.com)|140.82.121.3|:443... connected.
HTTP request sent, awaiting response... 302 Found
Location: https://github-releases.githubusercontent.com/6838921/17d3d453-5a8e-47aa-844f-d4ff56f5c1cb?X-Amz-Algorithm=AWS4-HMAC-SHA256&X-Amz-Credential=AKIAIWNJYAX4CSVEH53A%2F20210909%2Fus-east-1%2Fs3%2Faws4_request&X-Amz-Date=20210909T150118Z&X-Amz-Expires=300&X-Amz-Signature=04f95de9924949000d3cf5b51d508db4a101e6741d13540d60b0b8c7618421bc&X-Amz-SignedHeaders=host&actor_id=0&key_id=0&repo_id=6838921&response-content-disposition=attachment%3B%20filename%3Dprometheus-2.29.2.linux-amd64.tar.gz&response-content-type=application%2Foctet-stream [following]
--2021-09-09 11:02:13--  https://github-releases.githubusercontent.com/6838921/17d3d453-5a8e-47aa-844f-d4ff56f5c1cb?X-Amz-Algorithm=AWS4-HMAC-SHA256&X-Amz-Credential=AKIAIWNJYAX4CSVEH53A%2F20210909%2Fus-east-1%2Fs3%2Faws4_request&X-Amz-Date=20210909T150118Z&X-Amz-Expires=300&X-Amz-Signature=04f95de9924949000d3cf5b51d508db4a101e6741d13540d60b0b8c7618421bc&X-Amz-SignedHeaders=host&actor_id=0&key_id=0&repo_id=6838921&response-content-disposition=attachment%3B%20filename%3Dprometheus-2.29.2.linux-amd64.tar.gz&response-content-type=application%2Foctet-stream
Resolving github-releases.githubusercontent.com (github-releases.githubusercontent.com)... 185.199.111.154, 185.199.108.154, 185.199.110.154, ...
Connecting to github-releases.githubusercontent.com (github-releases.githubusercontent.com)|185.199.111.154|:443... connected.
HTTP request sent, awaiting response... 200 OK
Length: 73175122 (70M) [application/octet-stream]
Saving to: 'https://1118798822.rsc.cdn77.org/tmp/prometheus-2.29.2.linux-amd64.tar.gz'

prometheus-2.29.2.linux-amd64.tar.gz  100%[=======================================================================>]  69.79M   169KB/s    in 6m 30s

2021-09-09 11:08:43 (183 KB/s) - 'https://1118798822.rsc.cdn77.org/tmp/prometheus-2.29.2.linux-amd64.tar.gz' saved [73175122/73175122]

[root@unixcop ~]#
次に、ダウンロードしたPrometheustarballを図のように/var / lib/prometheusに抽出します。
tar -xf /tmp/prometheus-2.29.2.linux-amd64.tar.gz -C /var/lib/prometheus/ --strip-components=1抽出したファイルの所有権をPrometheusユーザーに付与します:
chown -R prometheus:prometheus /var/lib/prometheusPrometheus構成ファイルを/etc/prometheusに次のように移動します。
mv /var/lib/prometheus/prometheus.yml /etc/prometheus/以下に示すように、prometheus.ymlファイルの構成も確認してください。
[root@unixcop ~]# grep -v '#' /etc/prometheus/prometheus.yml
global:

alerting:
  alertmanagers:
    - static_configs:
        - targets:

rule_files:

scrape_configs:
  - job_name: "prometheus"


    static_configs:
      - targets: ["localhost:9090"]
[root@unixcop ~]#
また、Prometheusのシンボリックリンクを作成して、任意のパスから実行可能にします。
# cp -s /var/lib/prometheus/promtool /usr/bin
# cp -s /var/lib/prometheus/prometheus /usr/bin
PrometheusのSystemdサービスユニットを作成する
Prometheusの自動起動を有効にするには、systemdサービスユニットを作成する必要があります。
次の手順に従ってください:
# vim /usr/lib/systemd/system/prometheus.service次に、以下を追加します。
[Unit]
Description=Prometheus
Wants=network-online.target
After=network-online.target

[Service]
User=prometheus
Group=prometheus
Type=simple
ExecStart=/usr/bin/prometheus \
--config.file /etc/prometheus/prometheus.yml \
--storage.tsdb.path /var/lib/prometheus/ \
--web.console.templates=/var/lib/prometheus/consoles \
--web.console.libraries=/var/lib/prometheus/console_libraries

[Install]
WantedBy=multi-user.target
次に、Prometheusを有効にして起動します:
[root@unixcop ~]# systemctl enable --now prometheus.service
Created symlink /etc/systemd/system/multi-user.target.wants/prometheus.service → /usr/lib/systemd/system/prometheus.service.
[root@unixcop ~]#デフォルトのポート9090/ tcp 。したがって、それを許可する必要があります。
[root@unixcop ~]# firewall-cmd --permanent --add-port=9090/tcp
success
[root@unixcop ~]# firewall-cmd --reload
success
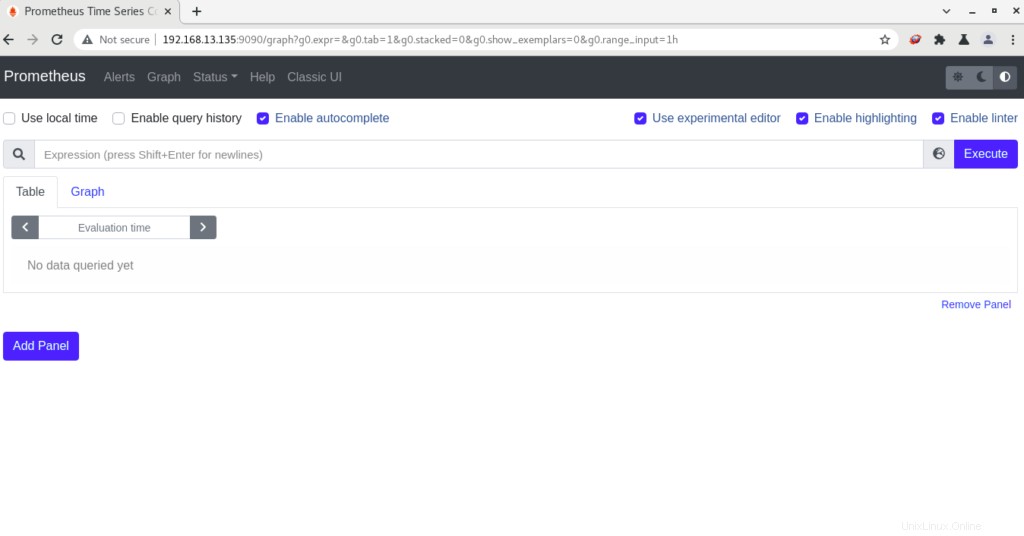
[root@unixcop ~]#URLを開くhttp:// localhost:9090 以下のスクリーンショットに示すように、Webブラウザで

ノードエクスポータのインストール
Node Exporterは、構成可能なメトリックコレクターを備えたサーバーレベルおよびレベルメトリック用のPrometheusエクスポーターです。ディスク容量、RAM、CPU使用率などのサーバーリソースを測定するのに役立ちます。
node_exporterをインストールする必要があります Prometheusサーバー上。
まず、次のようにNodeExporterのディレクトリを作成します。
# mkdir -p /var/lib/prometheus/node_exporterPrometheusWebサイトからNode_Exporterをダウンロードします。
[root@unixcop ~]# wget https://github.com/prometheus/node_exporter/releases/download/v1.2.2/node_exporter-1.2.2.linux-amd64.tar.gz -P /tmp
--2021-09-09 11:42:18--  https://github.com/prometheus/node_exporter/releases/download/v1.2.2/node_exporter-1.2.2.linux-amd64.tar.gz
Resolving github.com (github.com)... 140.82.121.4
Connecting to github.com (github.com)|140.82.121.4|:443... connected.
HTTP request sent, awaiting response... 302 Found
Location: https://github-releases.githubusercontent.com/9524057/28598a7c-d8ad-483d-85ba-8b2c9c08cf57?X-Amz-Algorithm=AWS4-HMAC-SHA256&X-Amz-Credential=AKIAIWNJYAX4CSVEH53A%2F20210909%2Fus-east-1%2Fs3%2Faws4_request&X-Amz-Date=20210909T154012Z&X-Amz-Expires=300&X-Amz-Signature=2581f24124ad04eeb9d7ead72729c4afbcfe08ade2e37a8d3ffa0eb876ab0091&X-Amz-SignedHeaders=host&actor_id=0&key_id=0&repo_id=9524057&response-content-disposition=attachment%3B%20filename%3Dnode_exporter-1.2.2.linux-amd64.tar.gz&response-content-type=application%2Foctet-stream [following]
--2021-09-09 11:42:19--  https://github-releases.githubusercontent.com/9524057/28598a7c-d8ad-483d-85ba-8b2c9c08cf57?X-Amz-Algorithm=AWS4-HMAC-SHA256&X-Amz-Credential=AKIAIWNJYAX4CSVEH53A%2F20210909%2Fus-east-1%2Fs3%2Faws4_request&X-Amz-Date=20210909T154012Z&X-Amz-Expires=300&X-Amz-Signature=2581f24124ad04eeb9d7ead72729c4afbcfe08ade2e37a8d3ffa0eb876ab0091&X-Amz-SignedHeaders=host&actor_id=0&key_id=0&repo_id=9524057&response-content-disposition=attachment%3B%20filename%3Dnode_exporter-1.2.2.linux-amd64.tar.gz&response-content-type=application%2Foctet-stream
Resolving github-releases.githubusercontent.com (github-releases.githubusercontent.com)... 185.199.108.154, 185.199.110.154, 185.199.109.154, ...
Connecting to github-releases.githubusercontent.com (github-releases.githubusercontent.com)|185.199.108.154|:443... connected.
HTTP request sent, awaiting response... 200 OK
Length: 8898481 (8.5M) [application/octet-stream]
Saving to: 'https://1118798822.rsc.cdn77.org/tmp/node_exporter-1.2.2.linux-amd64.tar.gz'

node_exporter-1.2.2.linux-amd64.tar.g 100%[=======================================================================>]   8.49M   204KB/s    in 42s

2021-09-09 11:43:02 (207 KB/s) - 'https://1118798822.rsc.cdn77.org/tmp/node_exporter-1.2.2.linux-amd64.tar.gz' saved [8898481/8898481]

[root@unixcop ~]#
次に、次のコマンドを使用して、ダウンロードしたtarballを/ var / lib / prometheus /node_exporter/に抽出します。
# tar xf /tmp/node_exporter-1.2.2.linux-amd64.tar.gz -C /var/lib/prometheus/unixcop_node_exporter/ --strip-components=1所有権を変更します。
# chown -R prometheus:prometheus /var/lib/prometheus/unixcop_node_exporter/また、node_exporterのシンボリックリンクを次のように作成します。
[root@unixcop ~]# cp -s /var/lib/prometheus/unixcop_node_exporter/node_exporter /usr/bin/node_exporterの自動起動を有効にする プロセス、systemdサービスユニットを作成します。
vim /usr/lib/systemd/system/unixcop_node_exporter.service次に、以下を追加します。
[Unit]
Description=Node Exporter
Wants=network-online.target
After=network-online.target

[Service]
User=prometheus
ExecStart=/usr/bin/node_exporter

[Install]
WantedBy=default.target
以下のコマンドでNodeExporterを有効にして起動します:
[root@unixcop ~]# systemctl enable --now unixcop_node_exporter.service
Created symlink /etc/systemd/system/default.target.wants/node_exporter.service → /usr/lib/systemd/system/node_exporter.service.
[root@unixcop ~]#
また、node_exporterポート 9100 / tcpを許可するようにファイアウォールを構成します 。
[root@unixcop ~]# firewall-cmd --permanent --add-port=9100/tcp
success
[root@unixcop ~]# firewall-cmd --reload
success
[root@unixcop ~]#
次に、Prometheus構成ファイルを編集します。
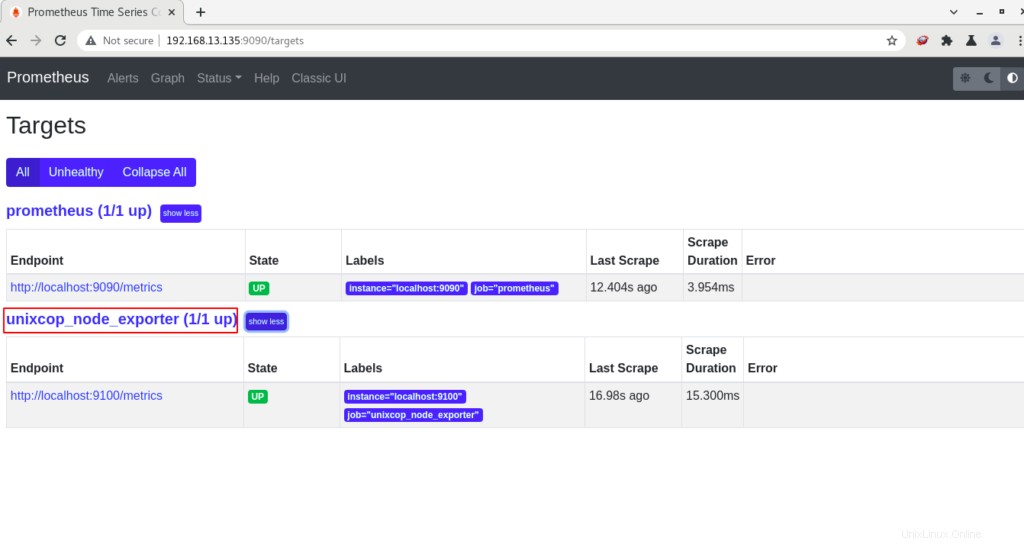
# vi /etc/prometheus/prometheus.ymlそして、 unixcop_node_exporterを追加します このファイルのエンドポイント構成。
 - job_name: 'unixcop_node_exporter'
    static_configs:
    - targets: ['localhost:9100']
次に、Prometheusを再起動します。
# systemctl restart prometheus.serviceブラウザを開いて、prometheusに移動します。
ステータスを開く
次に、ターゲットをクリックします 。

結論
この記事では、CentOS /RHEL8にPrometheusシステム監視ツールをインストールする方法について説明しました。
また、ディスク容量、RAM、CPU使用率などのサーバーリソースを測定するのに役立つサーバーレベルおよびレベルメトリック用のNodeExporterをインストールする方法も示しました。