はじめに
Zimbra Collaboration Suite ( ZCS )は、メールサーバー用のオープンソースのコラボレーションプラットフォームであり、オープンソースエディションの2つのエディションで開発されています。 (無料 )およびネットワークエディション (有料 )、LDAP、SMTP、POP、IMAP、ウェブメールクライアント、予定表、タスク、ウイルス対策、スパム対策などのサービスを提供します。
このチュートリアルでは、 ZimbraCollaborationSuiteオープンソースエディションをインストールする方法について説明します。 CentOS / RHEL 8 サーバー。
要件
- 両方のAを備えた外部DNSサーバー およびMX ZimbraメールサーバーのIPアドレスを指す有効なレコード。
- メール、データベース、LDAP、DNS、またはHttpサーバーを稼働させずに、CentOS 8 /RHEL8またはCentOS7/RHEL7を最小限にインストールします。
- ネットワークインターフェースに割り当てられた静的IPアドレス。
システムパッケージのインストール
1。 まず、root権限でサーバーコンソールにログインし、次のパッケージをインストールします。
# yum -y install unzip net-tools sysstat openssh-clients perl-core libaio nmap-ncat libstdc++.so.6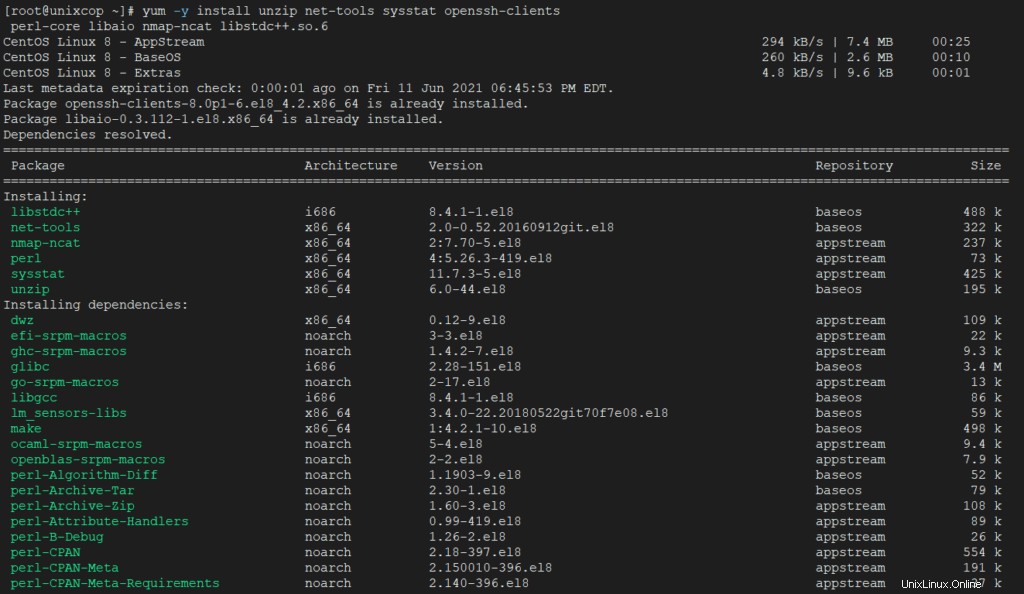
2。 getenforceを発行します マシンでSelinuxが有効になっているかどうかを確認するコマンド。ポリシーが強制に設定されている場合 以下のコマンドを発行して無効にします。
# getenforce
# setenforce 0
# getenforce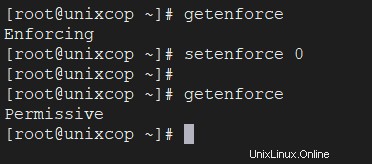
CentOSでSelinuxを完全に無効にするには、/etc/selinux/configを開きます。 テキストエディタでファイルを作成し、 SELINUXの行を設定します 無効にする。
3。 次のコマンドを発行して、wgetシステムユーティリティもシステムにインストールされていることを確認します。
# yum install wget -y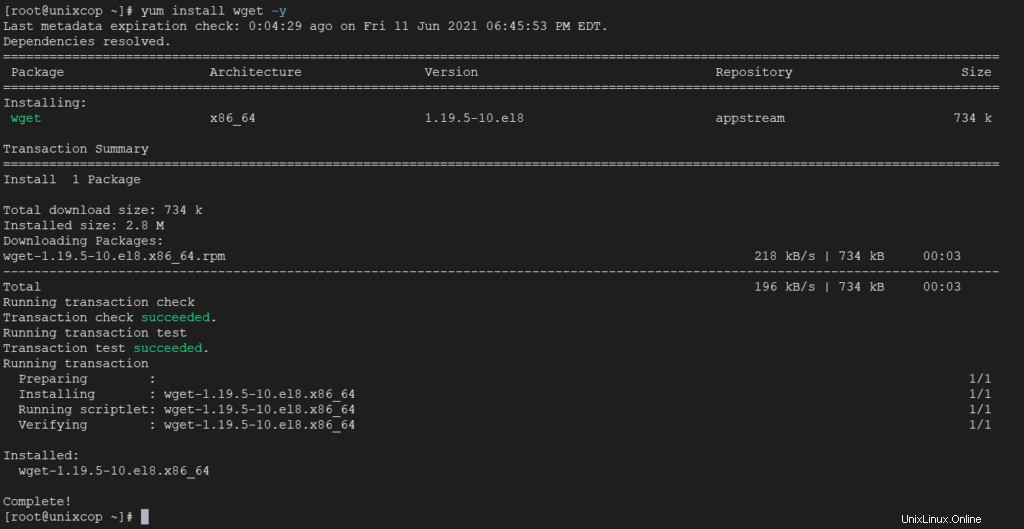
システムホスト名の構成
1。 Zimbraのために 正しく機能するには、ローカルマシンのホスト名と FQDNを設定する必要があります rootアカウントから以下のhostnamectlコマンドを実行して、サーバーのIPアドレスを指定します。
# hostnamectl set-hostname mail
# echo "192.168.159.130  mail.UnixcopCentos8.lan  mail " >> /etc/hosts
# cat /etc/hosts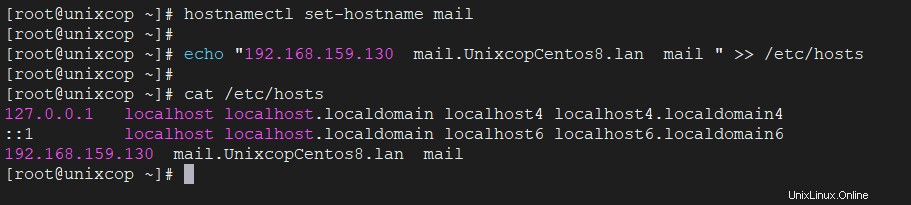
2。 独自のドメイン設定と一致させるために、それに応じてシステムのホスト名とFQDNの値を置き換えます。両方のレコードに対してpingコマンドを発行して、ホスト名とFQDNの値をテストします。
# ping -c2 mail.UnixcopCentos8.lan
# ping -c2 mail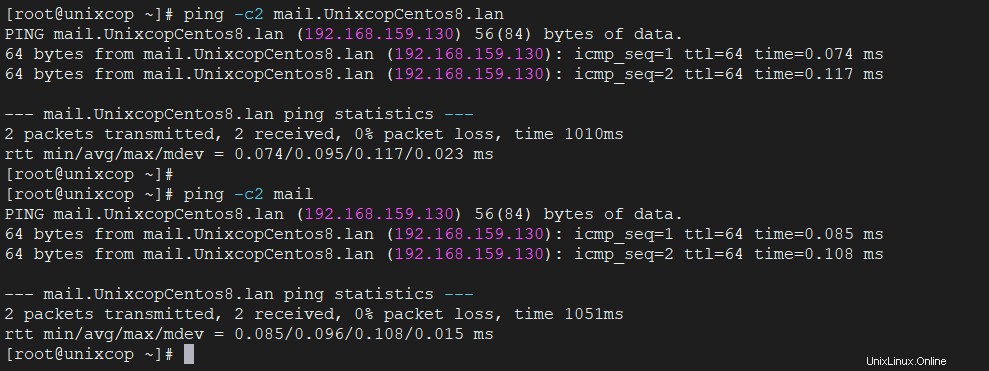
静的IPアドレスを追加する
1。 サーバーがDHCP動的IPアドレスを使用している場合は、ネットワークインターフェイスカードを編集し、静的IPアドレスを使用するように構成する必要があります。 ip a sを使用してネットワークインターフェース情報を取得します コマンドを実行し、サーバーの外部NIC(通常は ens33 など)を識別します またはeth0 。
# ip a s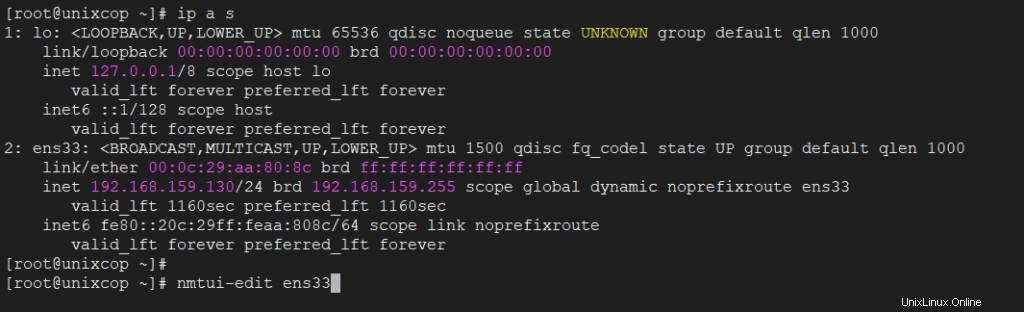
2。 nmtui-editを実行します 設定を変更し、手動のIPアドレスを使用してインターフェイスを割り当てる必要があるインターフェイスに対してコマンドを実行します。以下のスクリーンショットをガイドとして使用してください。
# nmtui-edit ens33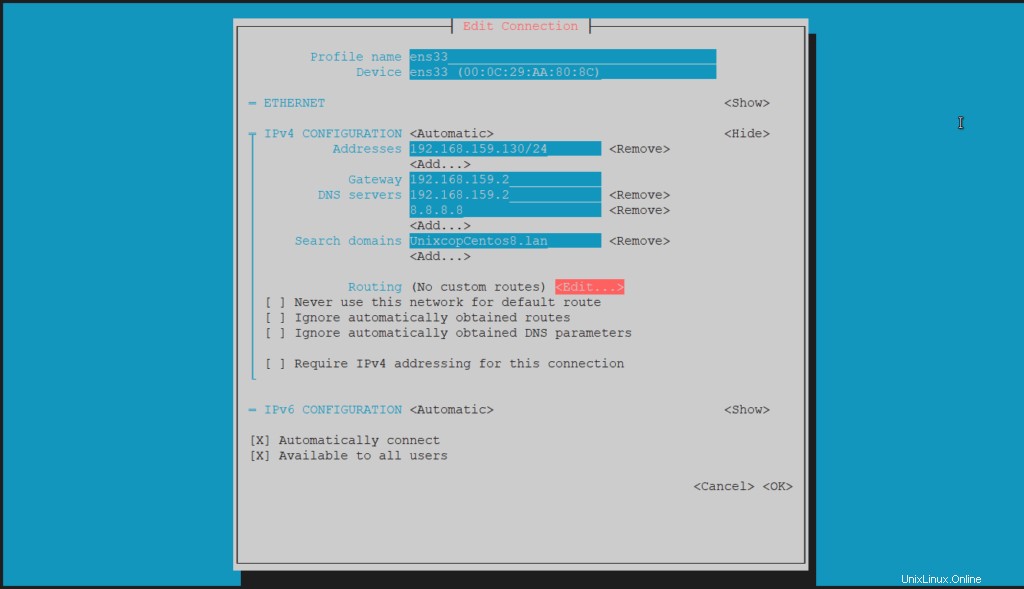
不要なサービスを無効にする
CentOSのデフォルトのインストールには、 postfixが付属しています。 デーモンはすでにインストールされ、実行されています。 postfixサービスを無効にして消去するには、次のコマンドを実行します:
# systemctl stop postfix
# systemctl disable postfix
# yum remove postfix
ZimbraCollaborationSuiteオープンソースエディションをインストールする
1。 次に、 Zimbra Collaboration Suiteをインストールします。 。 Zimbra Collaboration Suiteのダウンロードページに移動し、次のwgetコマンドを発行してシステムの最新バージョンを取得します。
RHEL /CentOS8の場合
# wget https://files.zimbra.com/downloads/8.8.15_GA/zcs-8.8.15_GA_3953.RHEL8_64.20200629025823.tgz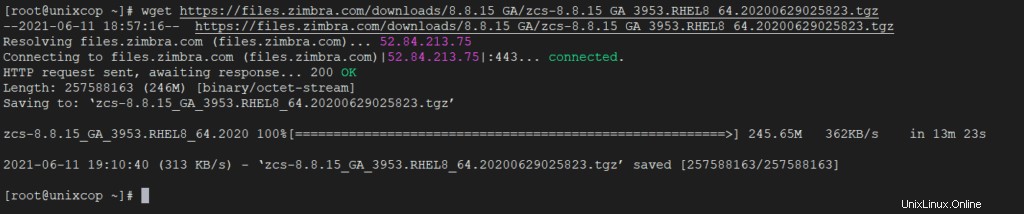
RHEL /CentOS7の場合
# wget https://files.zimbra.com/downloads/8.8.15_GA/zcs-8.8.15_GA_3869.RHEL7_64.20190918004220.tgz2。 ダウンロードが完了したら、解凍を使用します アーカイブを抽出するコマンドを実行し、Zimbraで抽出されたディレクトリを入力し、ディレクトリの内容を一覧表示してインストーラーファイルを見つけます。
# tar xfz zcs-8.8.15_GA_3953.RHEL8_64.20200629025823.tgz
# cd zcs-8.8.15_GA_3953.RHEL8_64.20200629025823/
# ls
3。 次に、 Zimbraを起動します install.shという名前のインストーラスクリプトファイルを実行時に起動することによるインストールプロセス 。
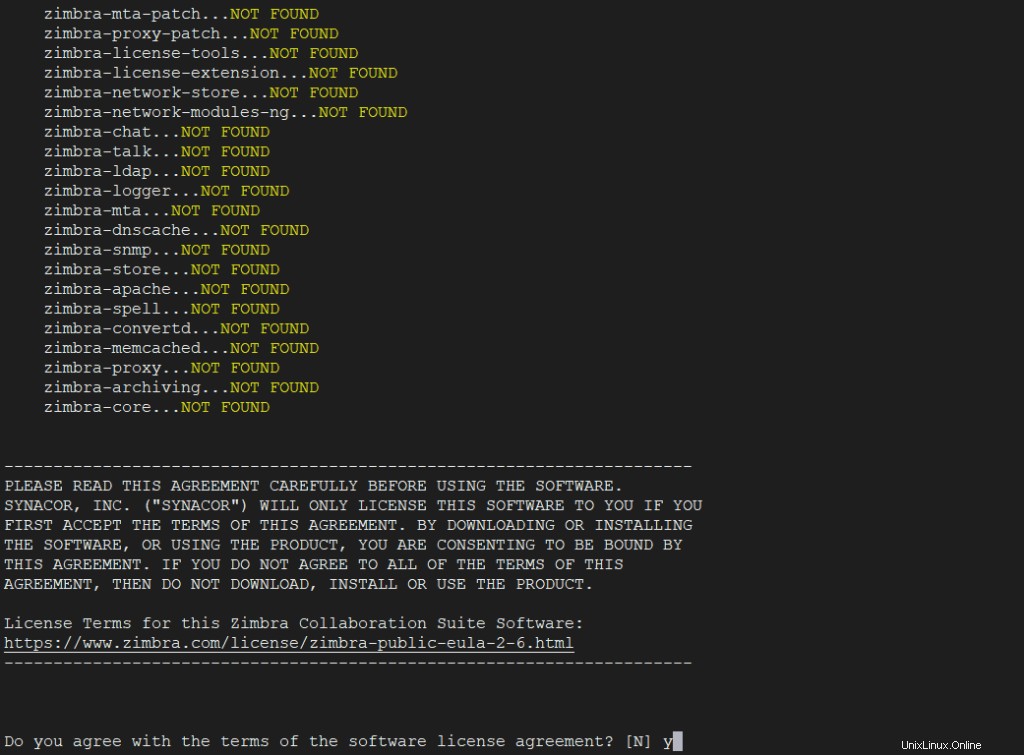
一連のシステムチェックの後、インストーラーはライセンスを受け入れるように促します。ライセンスに同意する(y) インストールプロセスをさらに続行するために。
[root@unixcop zcs-8.8.15_GA_3953.RHEL8_64.20200629025823] # ./install.sh出力
1。 インストールプロセスを開始します。
2。 インストールプロセスでは、Zimbraデーモンを適切に構成するために一連の質問が表示されます。 Zimbraサービスをさらにセットアップするには、以下のインストールの抜粋を使用してください。
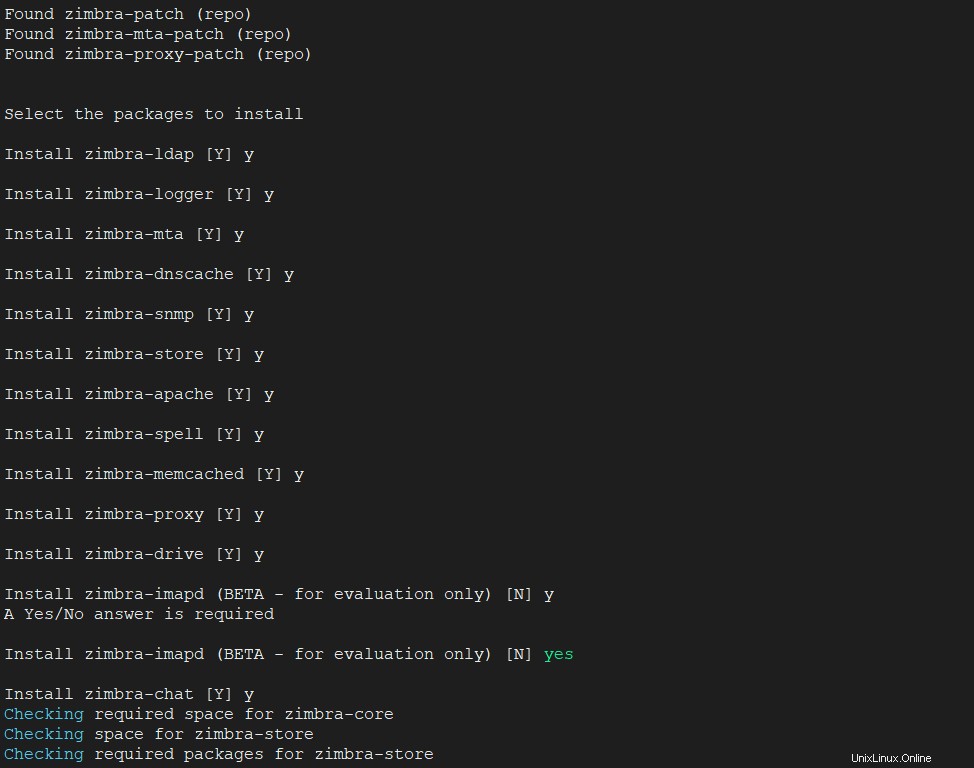
3。 Zimbraパッケージをインストールするように求められたら、 Yを押します。 すべてをインストールします。
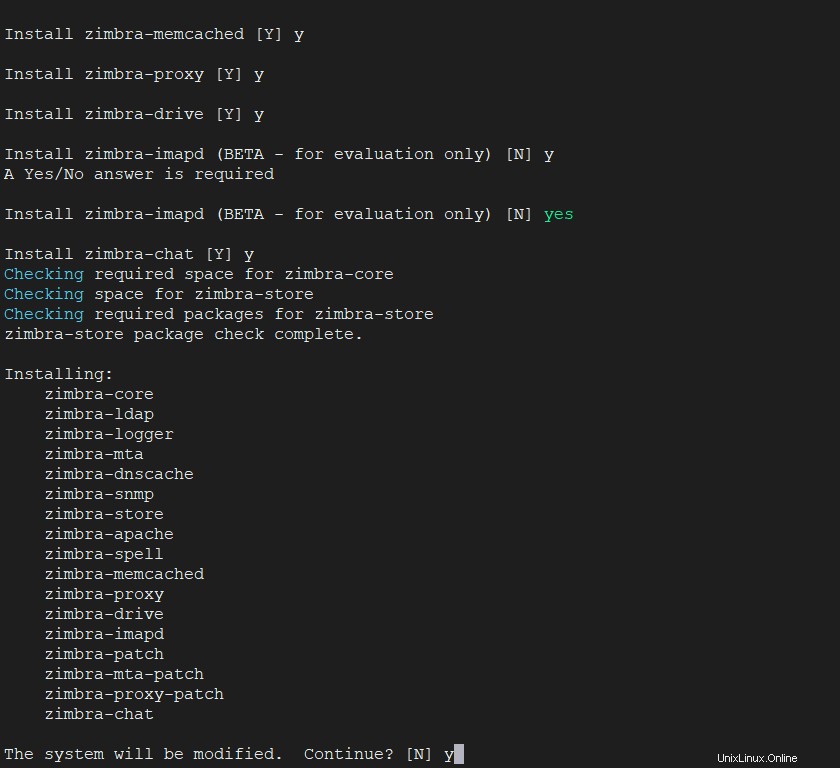
4。 最後に、Zimbraのインストールプロセスを開始します。
Downloading packages (11):
   zimbra-core-components
   zimbra-ldap-components
   zimbra-mta-components
   zimbra-dnscache-components
   zimbra-snmp-components
   zimbra-jetty-distribution
   zimbra-store-components
   zimbra-apache-components
   zimbra-spell-components
   zimbra-memcached
   zimbra-proxy-components
      ...done

Removing /opt/zimbra
Removing zimbra crontab entry...done.
Cleaning up zimbra init scripts...done.
Cleaning up /etc/security/limits.conf...done.

Finished removing Zimbra Collaboration Server.


Installing repo packages (11):
   zimbra-core-components
   zimbra-ldap-components
   zimbra-mta-components
   zimbra-dnscache-components
   zimbra-snmp-components
   zimbra-jetty-distribution
   zimbra-store-components
   zimbra-apache-components
   zimbra-spell-components
   zimbra-memcached
   zimbra-proxy-components
      ...
5。 構成を保存します。
1) Status:                                  Enabled
   2) Create Admin User:                       yes
   3) Admin user to create:                    admin@mail.UnixcopCentos8.lan
** 4) Admin Password                           UNSET
   5) Anti-virus quarantine user:              virus-quarantine.7xi47__k@mail.UnixcopCentos8.lan
   6) Enable automated spam training:          yes
   7) Spam training user:                      spam.gwaslmgiv@mail.UnixcopCentos8.lan
   8) Non-spam(Ham) training user:             ham.wzsndrkq@mail.UnixcopCentos8.lan
   9) SMTP host:                               mail.UnixcopCentos8.lan
  10) Web server HTTP port:                    8080
  11) Web server HTTPS port:                   8443
  12) Web server mode:                         https
  13) IMAP server port:                        7143
  14) IMAP server SSL port:                    7993
  15) POP server port:                         7110
  16) POP server SSL port:                     7995
  17) Use spell check server:                  yes
  18) Spell server URL:                        http://mail.UnixcopCentos8.lan:7780/aspell.php
  19) Enable version update checks:            TRUE
  20) Enable version update notifications:     TRUE
  21) Version update notification email:       admin@mail.UnixcopCentos8.lan
  22) Version update source email:             admin@mail.UnixcopCentos8.lan
  23) Install mailstore (service webapp):      yes
  24) Install UI (zimbra,zimbraAdmin webapps): yes

Select, or 'r' for previous menu [r] 4 # Select 4 to set admin password Password for admin@mail.UnixcopCentos8.lan (min 6 characters): [78wfDuWHk] enter admin password here
Store configuration
1) Status: Enabled
2) Create Admin User: yes
3) Admin user to create: admin@mail.UnixcopCentos8.lan
4) Admin Password UNSET
5) Anti-virus quarantine user: virus-quarantine.7xi47__k@mail.UnixcopCentos8.lan
6) Enable automated spam training: yes
7) Spam training user: spam.gwaslmgiv@mail.UnixcopCentos8.lan
8) Non-spam(Ham) training user: ham.wzsndrkq@mail.UnixcopCentos8.lan
9) SMTP host: mail.UnixcopCentos8.lan
10) Web server HTTP port: 8080
11) Web server HTTPS port: 8443
12) Web server mode: https
13) IMAP server port: 7143
14) IMAP server SSL port: 7993
15) POP server port: 7110
16) POP server SSL port: 7995
17) Use spell check server: yes
18) Spell server URL: http://mail.UnixcopCentos8.lan:7780/aspell.php
19) Enable version update checks: TRUE
20) Enable version update notifications: TRUE
21) Version update notification email: admin@mail.UnixcopCentos8.lan
22) Version update source email: admin@mail.UnixcopCentos8.lan
23) Install mailstore (service webapp): yes
24) Install UI (zimbra,zimbraAdmin webapps): yes
Select, or 'r' for previous menu [r] r
Main menu

   1) Common Configuration:
   2) zimbra-ldap:                             Enabled
   3) zimbra-logger:                           Enabled
   4) zimbra-mta:                              Enabled
   5) zimbra-dnscache:                         Enabled
   6) zimbra-snmp:                             Enabled
   7) zimbra-store:                            Enabled
   8) zimbra-spell:                            Enabled
   9) zimbra-proxy:                            Enabled
  10) Default Class of Service Configuration:
   s) Save config to file
   x) Expand menu
   q) Quit

Configuration complete - press return to exit # Press Enter
Zimbraの初期構成
1。 インストールが完了したら、Webブラウザーを開き、ポート 7071でZimbraサービスを実行しているマシンのドメイン名またはIPアドレスに移動します。 HTTPSプロトコルを介して、証明書のセキュリティエラーを受け入れ、インストールプロセス中に構成された資格情報を使用してログインします。 ZimbraAdminWebパネルのデフォルトのユーザー名はadminです。 。
https://mail.UnixcopCentos8.lan:7071
or
https://192.168.159.130:7071 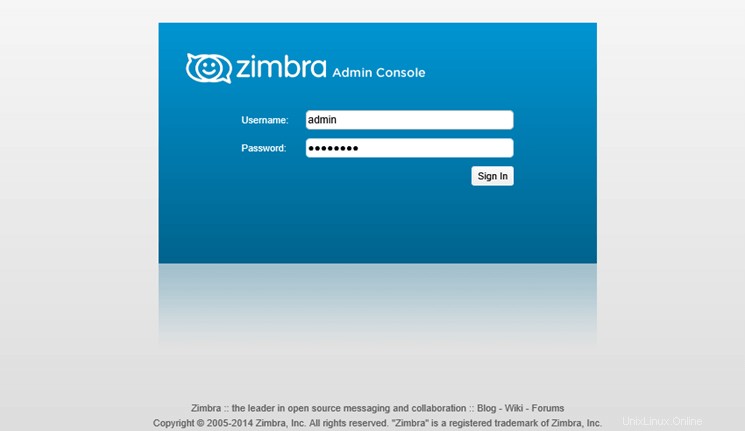
2。 管理Webコンソールにログインすると、独自の SSLの追加を開始できます。 証明書、メールアカウント、メールエイリアスなどを作成します。ポートが7071であることを覚えておいてください 管理タスクにのみ使用されます。
クライアントは、HTTPSプロトコルを介してドメイン名またはサーバーのIPアドレスを使用して、Webメールボックスに安全にログインできます。
https://mail.UnixcopCentos8.lan
or
https://192.168.159.130
Zimbraの削除またはアンインストール
Zimbraサービスをそのコンポーネントと一緒にアンインストールする場合は、-uを使用してインストーラースクリプトを実行します。 オプション。
# ./install.sh -u
Zimbraのインストールアーカイブとディレクトリを削除するには、次のコマンドを実行します。
# cd
# rm -rf zcs-*
最後に、Zimbra Collaboration Suiteを適切に実行するには、4GBのRAMが必要な強力なマシンが必要です。