前回の記事では、Icinga2サーバーのインストールについて説明しました。 およびIcingaWeb2のインストール 。このガイドでは、リモートのLinuxマシンを追加する方法について説明します。 Icinga2サーバーに 。
記事シリーズ
Icinga 2
1 : CentOS 7 /RHEL7にIcinga2をインストールする方法
2 : Ubuntu 18.04 / 16.04 /Debian9にIcinga2をインストールする方法
Icinga Web 2
1 : CentOS 7 /RHEL7でIcingaWeb2をセットアップする方法
2 : Ubuntu 18.04 / 16.04 /Debian9でIcingaWeb2をセットアップする方法
Icingaクライアント
1 :リモートLinuxマシンをIcinga2監視ツールに追加する方法
セキュリティを強化するために、Icinga2はクライアントとサーバーの通信にSSL証明書を使用します。
サーバーとクライアントの通信はTCPポート5665で行われます。したがって、両方の方法でトラフィックを許可するようにファイアウォールを構成していることを確認してください。
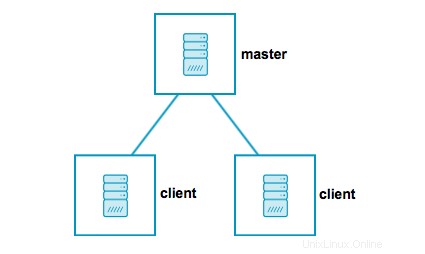
アーキテクチャ
次の図は、分散型Icinga2サーバークライアントアーキテクチャの図を示しています。
マスターノード –これは構造の最上位ノードであり、通常はIcinga2とIcingaWeb 2をインストールします。これは、子ノードから実行されたチェックを通知に結合します。
衛星ノード –このノードは、マスターノードからホストやサービスなどの構成を受け取ることができます。独自にチェックを実行することも、クライアントノードにチェックを委任することもでき、マスターノードが利用できない場合でも実行できます。
クライアントノード –このノードは、親ノード(マスターまたはサテライト)からリモートコマンド実行を受信するか、独自に構成されたチェックを実行します。
ここでは、マスターノードとクライアントノードの通信をセットアップし、サテライトノードを削除します。
セットアップ図は次のようになります。
環境
| ホスト名 | IPアドレス | OS | 目的 |
|---|---|---|---|
| server.itzgeek.local | 192.168.1.10 | CentOS 7 / Ubuntu 18.04 / Debian 9 | マスターノード |
| centos.itzgeek.local | 192.168.1.20 | CentOS 7 | クライアントノード1 |
| ubuntu.itzgeek.local | 192.168.1.30 | Ubuntu 18.04 | クライアントノード2 |
Icinga2マスターのセットアップ
Icinga2ノードウィザードコマンドは、Icinga2マスターのセットアップに役立ちます。ウィザードはrootとして実行する必要があります。
icinga2 node wizard
出力:
Welcome to the Icinga 2 Setup Wizard!

We will guide you through all required configuration details.

Please specify if this is a satellite/client setup ('n' installs a master setup) [Y/n]: n << Setup Master

Starting the Master setup routine...

Please specify the common name (CN) [server.itzgeek.local]: << Press Enter
Reconfiguring Icinga...
Checking for existing certificates for common name 'server.itzgeek.local'...
Certificate '/var/lib/icinga2/certs//server.itzgeek.local.crt' for CN 'server.itzgeek.local' already existing. Skipping certificate generation.
Generating master configuration for Icinga 2.
'api' feature already enabled.

Master zone name [master]: << Press Enter

Default global zones: global-templates director-global
Do you want to specify additional global zones? [y/N]: N << Press N and Enter
Please specify the API bind host/port (optional):
Bind Host []: << Press Enter
Bind Port []: << Press Enter

Do you want to disable the inclusion of the conf.d directory [Y/n]: Y << Press Y and Enter
Disabling the inclusion of the conf.d directory...
Checking if the api-users.conf file exists...

Done.

Now restart your Icinga 2 daemon to finish the installation!
Icinga2ノードウィザードは次のことを行います:
- API機能がまだ有効になっていない場合は、有効になります。
- 署名要求に署名するための新しい認証局を作成します。
- 新しい証明書署名要求(CSR)を生成し、独自のCAで署名します
- 構成アイテム(ゾーンとエンドポイント)を /etc/icinga2/zones.confにダンプします
- /etc/icinga2/constants.confを更新する NodeNameとTicketSaltを含むファイル。
構成ファイルを確認します。
cat /etc/icinga2/constants.conf | egrep -i "ZoneName|TicketSalt"
マスターノードの構成が次のようになっていることを確認してください。
const ZoneName = "server.itzgeek.local"
const TicketSalt = "16ad49e3cf16628ba1be0f021414805f"
/etc/icinga2/zones.confを確認します ファイルにはマスターノードの詳細が含まれています。
cat /etc/icinga2/zones.conf
出力:
/*
 * Generated by Icinga 2 node setup commands
 * on 2018-09-23 10:47:55 +0530
 */

object Endpoint "server.itzgeek.local" {
}

object Zone "master" {
        endpoints = [ "server.itzgeek.local" ]
}
Icinga2サービスを再起動して、マスターセットアップを有効にします。
### For Systemd Systems ###

systemctl restart icinga2

### For SysVinit Systems ###

service icinga2 restart
ページ:1 2 3