この記事では、MuninとMonitを使用してCentOS7サーバーを監視する方法について説明します。 Muninは、多くの構成を行わなくても、サーバーのほぼすべての側面(負荷平均、メモリ使用量、CPU使用率、MySQLスループット、eth0トラフィックなど)について気の利いた小さなグラフィックを生成しますが、Monitは、Apache、MySQL、Postfixなどのサービスの可用性をチェックします。サービスが期待どおりに動作していないことが検出された場合の再起動などの適切なアクション。 2つの組み合わせにより、完全な監視が可能になります。現在または今後の問題を認識できるグラフィック(「すぐに大きなサーバーが必要、負荷平均が急速に増加しています」など)と、監視対象サービスの可用性を確保するウォッチドッグです。 。
Muninでは複数のサーバーを監視できますが、ここでは、サーバーがインストールされているシステムの監視についてのみ説明します。
このチュートリアルはCentOS7.2用に作成されていますが、構成はRHELやScientificLinuxなどの他のディストリビューションにも適用する必要があります。
1予備メモ
システムのホスト名はserver1.example.comであり、ドキュメントルート/var/www/htmlを含むWebサイトwww.example.comがあります。
2EPELリポジトリを有効にする
CentOS 7では、MuninとMonitはデフォルトのCentOSリポジトリでは使用できません。幸い、EPELリポジトリからインストールできます。 EPELリポジトリを有効にするには、次のコマンドを実行します。
yum -y install epel-release
EPEL GPGキーをインポートします:
rpm --import /etc/pki/rpm-gpg/RPM-GPG-KEY-EPEL-7
次に実行します:
yum -y update
muninのインストールを開始する前に、システムが最新であり、EPELのパッケージリストがロードされていることを確認します。
2ApacheWebサーバーをインストールします
Muninは、統計ファイルを提供および表示するためにWebサーバーを必要とします。ここにApachehttpdサーバーをインストールします:
yum install httpd
apacheを起動し、起動時に自動的に起動できるようにします。
systemctl enable httpd
systemctl start httpd
4Muninのインストールと構成
CentOSにMuninをインストールするには、次のようにします。
yum -y install munin munin-node
次に、Muninのシステム起動リンクを作成して開始します:
systemctl enable munin-node
systemctl start munin-node
次に、Munin構成ファイル/etc/munin/munin.confを編集する必要があります。
nano /etc/munin/munin.conf
muninがHTML出力でlocalhostの代わりにserver1.example.comという名前を使用するようにしたいので、localhostをserver1.example.comに置き換えます。コメントがない場合、変更されたファイルは次のようになります。
[...]
# a simple host tree
[server1.example.com]
    address 127.0.0.1
    use_node_name yes
[...]
munin統計は、ユーザー名とパスワード(Apache基本認証)で保護されています。次のステップでは、新しいユーザーとパスワードを/ etc / munin/munin-htpasswdファイルに追加します。
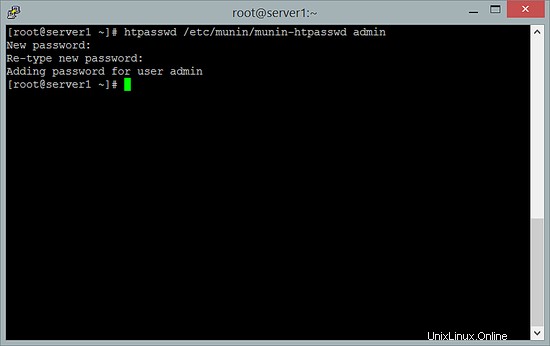
htpasswd /etc/munin/munin-htpasswd admin
このコマンドは、「admin」という名前の新しいユーザーを追加し、新しいパスワードの入力を2回求めます。
ここで、muninが最初の統計出力を生成できるように数分待ってから、ブラウザでhttp://server1.example.com/munin/にアクセスすると、最初の統計が表示されます。
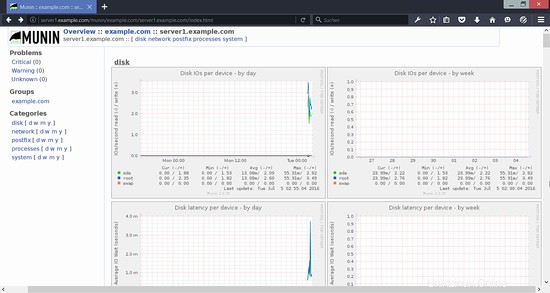
(これは、muninが生成する多くのグラフィックのほんの一部です...)
5Monitのインストールと構成
次に、Monitをインストールします:
yum -y install monit
次に、Monitのシステム起動リンクを作成します:
systemctl enable monit
systemctl start monit
Monitのデフォルトの構成ファイルは/etc/ monitrcで、すべてコメント化されているいくつかの構成例(http://mmonit.com/wiki/Monit/ConfigurationExamplesで他の構成例を見つけることができます)を見つけることができますが、Monitにもディレクトリ/etc/monit.dで構成ファイルを探します。
この場合、私は監視します:
- proftpd
- sshd
- MariaDB
- apache
- 後置
さらに、Monitの次の設定を構成します:
- ポート2812でMonitWebインターフェイスを有効にします。
- HTTPの代わりにHTTPSをウェブインターフェースに使用します。
- Webインターフェイスのパスワードで保護されたログインを構成します。
- Monitは[メール保護]にメールアラートを送信します。
まず、認証設定を構成します。ファイル/etc / monitrcを開きます
nano /etc/monitrc
そして、このセクションが見つかるまで下にスクロールします:
set httpd port 2812 and
   use address localhost # only accept connection from localhost
   allow localhost # allow localhost to connect to the server and
   allow admin:monit # require user 'admin' with password 'monit'
   allow @monit # allow users of group 'monit' to connect (rw)
   allow @users readonly # allow users of group 'users' to connect readonly
次の設定に置き換えます:
set httpd port 2812 and
   use address 0.0.0.0
   SSL ENABLE
   PEMFILE /var/certs/monit.pem
   allow admin:test
「test」という単語はパスワードです。これを安全なパスワードに置き換えてください。また、ユーザー名「admin」を簡単に推測できない名前に変更することもできます。
次に、監視対象サービスの構成を追加します。 / etc / monitrcを変更する代わりに、新しい構成ファイル/etc/monit.d/monitrcを作成します。
私のファイルは次のようになります:
nano /etc/monit.d/monitrc
set logfile syslog facility log_daemon

# Send emails trough this mailserver
set mailserver localhost

# Set the From address of the alert emails
set mail-format { from: [email protected] }

# Send alerts to this address
set alert [email protected]

# Monitor the Proftpd service
check process proftpd with pidfile /var/run/proftpd/proftpd.pid
   start program = "/usr/bin/systemctl start proftpd"
   stop program  = "/usr/bin/systemctl stop proftpd"
   if failed port 21 protocol ftp then restart
   if 5 restarts within 5 cycles then timeout

# Monitor the SSH service
check process sshd with pidfile /var/run/sshd.pid
   start program  "/usr/bin/systemctl start sshd"
   stop program  "/usr/bin/systemctl stop sshd"
   if failed port 22 protocol ssh then restart
   if 5 restarts within 5 cycles then timeout

# Monitor MariaDB
check process mysql with pidfile /var/run/mariadb/mariadb.pid
   group database
   start program = "/usr/bin/systemctl start mariadb"
   stop program = "/usr/bin/systemctl stop mariadb"
   if failed host 127.0.0.1 port 3306 then restart
   if 5 restarts within 5 cycles then timeout

# Monitor the apache webserver
check process apache with pidfile /var/run/httpd/httpd.pid
   group www
   start program = "/usr/bin/systemctl start httpd"
   stop program  = "/usr/bin/systemctl stop httpd"
   if failed host localhost port 80 protocol http
      and request "/monit_token" then restart
   if cpu is greater than 60% for 2 cycles then alert
   if cpu > 80% for 5 cycles then restart
   if totalmem > 500 MB for 5 cycles then restart
   if children > 250 then restart
   if loadavg(5min) greater than 10 for 8 cycles then stop
   if 3 restarts within 5 cycles then timeout

# Monitor postfix mailserver
check process postfix with pidfile /var/spool/postfix/pid/master.pid
   group mail
   start program = "/usr/bin/systemctl start postfix"
   stop  program = "/usr/bin/systemctl stop postfix"
   if failed port 25 protocol smtp then restart
   if 5 restarts within 5 cycles then timeout
(サーバーに実際に存在するプロセスのみをチェックするようにしてください。そうしないと、monitが起動しません。つまり、monitにPostfixをチェックするように指示しても、Postfixがシステムにインストールされていない場合、monitは起動しません。)
構成ファイルはかなり自明です。オプションについて不明な点がある場合は、Monitのドキュメントを参照してください:http://mmonit.com/monit/documentation/monit.html
Monit構成のapache部分には、次のものがあります。
   if failed host localhost port 80 protocol http
      and request "/monit_token" then restart
つまり、Monitはポート80でローカルホストに接続しようとし、ウェブサイトのドキュメントルートが/ var / www / htmlであるため、/ var / www / html/monit_tokenであるファイル/monit_tokenにアクセスしようとします。 Monitが成功しない場合は、Apacheが実行されていないことを意味し、Monitはそれを再起動します。次に、ファイル/ var / www / html / monit_tokenを作成し、それにランダムな文字列を書き込む必要があります。
touch /var/www/html/monit_token
次に、SSLで暗号化されたMonit Webインターフェイスに必要なSSL(pem)証明書(/var/certs/monit.pem)を作成します。
mkdir /var/certs
cd /var/certs
証明書を作成するには、OpenSSL構成ファイルが必要です。次のようになります:
nano /var/certs/monit.cnf
# create RSA certs - Server

RANDFILE = ./openssl.rnd

[ req ]
default_bits = 1024
encrypt_key = yes
distinguished_name = req_dn
x509_extensions = cert_type

[ req_dn ]
countryName = Country Name (2 letter code)
countryName_default = MO

stateOrProvinceName             = State or Province Name (full name)
stateOrProvinceName_default     = Monitoria

localityName                    = Locality Name (eg, city)
localityName_default            = Monittown

organizationName                = Organization Name (eg, company)
organizationName_default        = Monit Inc.

organizationalUnitName          = Organizational Unit Name (eg, section)
organizationalUnitName_default  = Dept. of Monitoring Technologies

commonName                      = Common Name (FQDN of your server)
commonName_default              = server.monit.mo

emailAddress                    = Email Address
emailAddress_default            = [email protected]

[ cert_type ]
nsCertType = server
次に、次のような証明書を作成します。
openssl req -new -x509 -days 365 -nodes -config ./monit.cnf -out /var/certs/monit.pem -keyout /var/certs/monit.pem
openssl gendh 512 >> /var/certs/monit.pem
openssl x509 -subject -dates -fingerprint -noout -in /var/certs/monit.pem
chmod 700 /var/certs/monit.pem
最後に、Monitを開始できます:
systemctl restart monit
次に、ブラウザでhttps://www.example.com:2812/にアクセスし(ポート2812がファイアウォールによってブロックされていないことを確認してください)、adminでログインしてテストすると、MonitWebインターフェイスが表示されます。次のようになります:
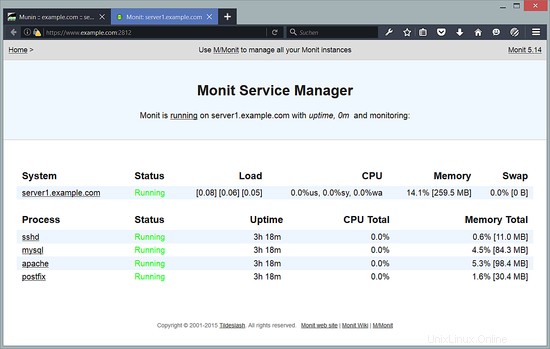
(メイン画面)
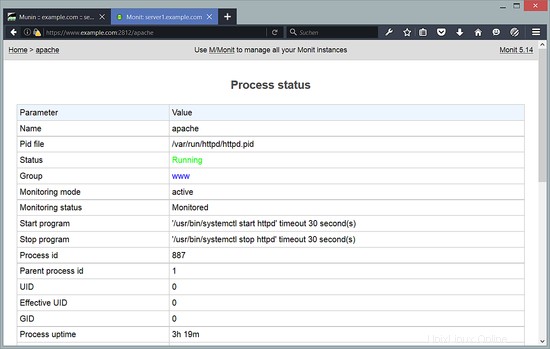
(Apacheステータスページ)
/etc/monit.d/monitrcの構成に応じて、Monitはサービスが失敗した場合にサービスを再起動し、サービスのプロセスIDが変更された場合などに通知メールを送信します。
6つのリンク
- munin:http://munin.projects.linpro.no
- monit:http://mmonit.com/monit
- CentOS:http://www.centos.org