Passboltは、パスワードを安全に保存および共有できるオープンソースのパスワードマネージャーです。これは、中小規模の組織がログイン資格情報を保存してチームメンバー間で共有するために設計されています。自己ホスト型であり、コミュニティエディションとサブスクリプションベースのエディションの両方で利用できます。
このチュートリアルでは、Nginxを使用してPassboltパスワードマネージャーをインストールし、CentOS8にSSLを暗号化する方法を示します。
- CentOS8を実行しているサーバー。
- サーバーIPで指定された有効なドメイン名。
- ルートパスワードはサーバーで構成されています。
LEMPサーバーをインストールする
まず、次のコマンドを使用してNginxとMariaDBデータベースサーバーをインストールします。
dnf install nginx mariadb-server -y
次に、最新バージョンのPHPとその他の必要なPHP拡張機能をサーバーにインストールする必要があります。デフォルトでは、最新バージョンのPHPはCentOSのデフォルトリポジトリでは利用できません。したがって、EPELおよびREMIリポジトリをシステムに追加する必要があります。
次のコマンドで両方のリポジトリを追加できます:
dnf install epel-release -y
dnf install https://rpms.remirepo.net/enterprise/remi-release-8.rpm -y
次に、次のコマンドを使用して、デフォルトのPHPリポジトリを無効にし、REMIリポジトリを有効にします。
dnf module reset php
dnf module enable php:remi-7.4
次に、次のコマンドを実行して、他の必要な依存関係を使用してPHPをインストールします。
dnf install php php-fpm php-intl php-gd php-mysqli php-json php-pear php-devel php-mbstring php-fpm git make unzip -y
すべてのパッケージをインストールしたら、PHP-FPM構成ファイルを編集し、ユーザーとグループをNginxに変更する必要があります。
nano /etc/php-fpm.d/www.conf
次の行を変更します:
user = nginx
group = nginx
ファイルを保存して閉じてから、セッションディレクトリの所有権を変更します。
chgrp nginx /var/lib/php/session
次に、Nginx、MariaDB、PHP-FPMサービスを開始し、次のコマンドを使用してシステムの再起動時に開始できるようにします。
systemctl start mariadb nginx php-fpm
systemctl enable mariadb nginx php-fpm
次に、システムにGNUPG拡張機能をインストールする必要があります。次のコマンドを実行してインストールできます:
dnf config-manager --set-enabled powertools
dnf install gpgme-devel
pecl install gnupg
echo "extension=gnupg.so" > /etc/php.d/gnupg.ini
次に、PHP-FPMサービスを再起動して、変更を適用します。
systemctl restart php-fpm
Composerは、PHPの依存関係マネージャーです。システムにインストールする必要があります。
まず、次のコマンドを使用してComposerセットアップファイルをダウンロードします。
php -r "copy('https://getcomposer.org/installer', 'composer-setup.php');" 次に、次のコマンドを使用してComposerをインストールします。
php composer-setup.php --install-dir=/usr/local/bin --filename=composer
次の出力が得られるはずです:
All settings correct for using Composer
Downloading...

Composer (version 2.0.11) successfully installed to: /usr/local/bin/composer
Use it: php /usr/local/bin/composer
次に、次のコマンドを使用してComposerのバージョンを確認します。
composer -V
次の出力が得られるはずです:
Composer version 2.0.11 2021-02-24 14:57:23
次に、Passboltのデータベースとユーザーを作成する必要があります。
まず、次のコマンドを使用してMariaDBに接続します。
mysql
接続したら、次のコマンドを使用してデータベースとユーザーを作成します。
MariaDB [(none)]> CREATE DATABASE passbolt DEFAULT CHARACTER SET utf8mb4 COLLATE utf8mb4_unicode_ci;
MariaDB [(none)]> GRANT ALL ON passbolt.* TO 'passbolt'@'localhost' IDENTIFIED BY 'password';
次に、特権をフラッシュし、次のコマンドでMariaDBを終了します。
MariaDB [(none)]> FLUSH PRIVILEGES;
MariaDB [(none)]> EXIT;
終了したら、次のステップに進むことができます。
Passboltのインストールと構成
まず、ディレクトリをNginx Webルートディレクトリに変更し、次のコマンドを使用して最新バージョンのPassboltをダウンロードします。
cd /var/www
git clone https://github.com/passbolt/passbolt_api.git passbolt
ダウンロードが完了したら、次のコマンドを使用して、ディレクトリをpassboltに変更し、必要なすべての依存関係をインストールします。
cd passbolt
composer install --no-dev
次に、GPGキーを生成するためにhavegedをインストールする必要があります。まず、次のコマンドを使用してhavegedをインストールします。
dnf install haveged
次に、次のコマンドを使用してhavegedサービスを開始します。
systemctl start haveged
次に、次のコマンドを使用してGPGキーを生成します。
gpg --full-generate-key
すべての質問に注意深く答えてください。パスワードの設定を求められる場合は、パスワードフィールドを空白のままにします:
gpg (GnuPG) 2.2.9; Copyright (C) 2018 Free Software Foundation, Inc.
This is free software: you are free to change and redistribute it.
There is NO WARRANTY, to the extent permitted by law.

gpg: directory '/root/.gnupg' created
gpg: keybox '/root/.gnupg/pubring.kbx' created
Please select what kind of key you want:
   (1) RSA and RSA (default)
   (2) DSA and Elgamal
   (3) DSA (sign only)
   (4) RSA (sign only)
Your selection?
RSA keys may be between 1024 and 4096 bits long.
What keysize do you want? (2048)
Requested keysize is 2048 bits
Please specify how long the key should be valid.
         0 = key does not expire
        = key expires in n days
      w = key expires in n weeks
      m = key expires in n months
      y = key expires in n years
Key is valid for? (0)
Key does not expire at all
Is this correct? (y/N) y

GnuPG needs to construct a user ID to identify your key.

Real name: Hitesh
Email address: [email protected]
Comment: Welcome
You selected this USER-ID:
    "Hitesh (Welcome) <[email protected]>"

Change (N)ame, (C)omment, (E)mail or (O)kay/(Q)uit? O
We need to generate a lot of random bytes. It is a good idea to perform
some other action (type on the keyboard, move the mouse, utilize the
disks) during the prime generation; this gives the random number
generator a better chance to gain enough entropy.
We need to generate a lot of random bytes. It is a good idea to perform
some other action (type on the keyboard, move the mouse, utilize the
disks) during the prime generation; this gives the random number
generator a better chance to gain enough entropy.
gpg: /root/.gnupg/trustdb.gpg: trustdb created
gpg: key 1A0448FECA43E1F9 marked as ultimately trusted
gpg: directory '/root/.gnupg/openpgp-revocs.d' created
gpg: revocation certificate stored as '/root/.gnupg/openpgp-revocs.d/40733A5076D11E86EF2FE5B51A0448FECA43E1F9.rev'
public and secret key created and signed.

pub   rsa2048 2021-03-12 [SC]
      40733A5076D11E86EF2FE5B51A0448FECA43E1F9
uid                      Hitesh (Welcome) <[email protected]>
sub   rsa2048 2021-03-12 [E]
注 :上記で生成された秘密鍵を覚えておいてください。
次に、次のコマンドを使用して、秘密鍵をserverkey_private.ascファイルとserverkey.ascファイルにエクスポートします。
gpg --armor --export-secret-keys [email protected] > /var/www/passbolt/config/gpg/serverkey_private.asc
gpg --armor --export [email protected] > /var/www/passbolt/config/gpg/serverkey.asc
次に、passboltディレクトリに適切な所有権を設定します:
chown -R nginx:nginx /var/www/passbolt
次に、次のコマンドを使用してNginxキーリングを初期化します。
sudo su -s /bin/bash -c "gpg --list-keys" nginx
出力:
gpg: directory '/var/lib/nginx/.gnupg' created
gpg: keybox '/var/lib/nginx/.gnupg/pubring.kbx' created
gpg: /var/lib/nginx/.gnupg/trustdb.gpg: trustdb created
次に、Passboltのデフォルト構成ファイルの名前を変更します。
cp config/passbolt.default.php config/passbolt.php
次に、passbolt.phpファイルを編集し、データベース設定とベースURLを定義します。
nano config/passbolt.php
次の行を変更します:
        'fullBaseUrl' => 'https://passbolt.linuxbuz.com',
    // Database configuration.
    'Datasources' => [
        'default' => [
            'host' => 'localhost',
            //'port' => 'non_standard_port_number',
            'username' => 'passbolt',
            'password' => 'password',
            'database' => 'passbolt',
            'serverKey' => [
                // Server private key fingerprint.
                'fingerprint' => '40733A5076D11E86EF2FE5B51A0448FECA43E1F9',
                'public' => CONFIG . 'gpg' . DS . 'serverkey.asc',
                'private' => CONFIG . 'gpg' . DS . 'serverkey_private.asc',
ファイルを保存して閉じてから、次のコマンドでPassboltをインストールします。
cd /var/www/passbolt
sudo su -s /bin/bash -c "./bin/cake passbolt install --no-admin" nginx
次の出力が得られるはずです:
All Done. Took 0.9595s

Import the server private key in the keyring
---------------------------------------------------------------
Importing /var/www/passbolt/config/gpg/serverkey_private.asc
Keyring init OK

Passbolt installation success! Enjoy! ?
Passbolt用にNginxを構成する
次に、PassboltのNginx構成ファイルを作成する必要があります。次のコマンドで作成できます:
nano /etc/nginx/conf.d/passbolt.conf
次の行を追加します:
server {
  listen 80;
  server_name passbolt.linuxbuz.com;
  root /var/www/passbolt;

  location / {
    try_files $uri $uri/ /index.php?$args;
    index index.php;
  }

  location ~ \.php$ {
    fastcgi_index           index.php;
    fastcgi_pass            unix:/var/run/php-fpm/www.sock;
    fastcgi_split_path_info ^(.+\.php)(.+)$;
    include                 fastcgi_params;
    fastcgi_param           SCRIPT_FILENAME $document_root$fastcgi_script_name;
    fastcgi_param           SERVER_NAME $http_host;
  }

  location ~* \.(jpe?g|woff|woff2|ttf|gif|png|bmp|ico|css|js|json|pdf|zip|htm|html|docx?|xlsx?|pptx?|txt|wav|swf|svg|avi|mp\d)$ {
    access_log off;
    log_not_found off;
    try_files $uri /webroot/$uri /index.php?$args;
  }
}
ファイルを保存して閉じ、構文エラーがないかNginxを確認します:
nginx -t
出力:
nginx: the configuration file /etc/nginx/nginx.conf syntax is ok
nginx: configuration file /etc/nginx/nginx.conf test is successful
次に、Nginxを再起動して変更を適用します:
systemctl restart nginx
次に、Certbotクライアントをインストールして、Let's Encrypt SSLforPassboltをインストールする必要があります。次のコマンドでインストールできます:
dnf install letsencrypt python3-certbot-nginx
次に、次のコマンドを使用して、letsドメインのSSL証明書を取得してインストールします。
certbot --nginx -d passbolt.linuxbuz.com
メールアドレスを入力し、利用規約に同意するよう求められます:
Saving debug log to /var/log/letsencrypt/letsencrypt.log
Plugins selected: Authenticator nginx, Installer nginx
Enter email address (used for urgent renewal and security notices)
 (Enter 'c' to cancel): [email protected]

- - - - - - - - - - - - - - - - - - - - - - - - - - - - - - - - - - - - - - - -
Please read the Terms of Service at
https://letsencrypt.org/documents/LE-SA-v1.2-November-15-2017.pdf. You must
agree in order to register with the ACME server. Do you agree?
- - - - - - - - - - - - - - - - - - - - - - - - - - - - - - - - - - - - - - - -
(Y)es/(N)o: Y

- - - - - - - - - - - - - - - - - - - - - - - - - - - - - - - - - - - - - - - -
Would you be willing, once your first certificate is successfully issued, to
share your email address with the Electronic Frontier Foundation, a founding
partner of the Let's Encrypt project and the non-profit organization that
develops Certbot? We'd like to send you email about our work encrypting the web,
EFF news, campaigns, and ways to support digital freedom.
- - - - - - - - - - - - - - - - - - - - - - - - - - - - - - - - - - - - - - - -
(Y)es/(N)o: Y
Account registered.
Requesting a certificate for passbolt.linuxbuz.com
Performing the following challenges:
http-01 challenge for passbolt.linuxbuz.com
Waiting for verification...
Cleaning up challenges
Deploying Certificate to VirtualHost /etc/nginx/conf.d/passbolt.conf
Redirecting all traffic on port 80 to ssl in /etc/nginx/conf.d/passbolt.conf

- - - - - - - - - - - - - - - - - - - - - - - - - - - - - - - - - - - - - - - -
Congratulations! You have successfully enabled https://passbolt.linuxbuz.com
- - - - - - - - - - - - - - - - - - - - - - - - - - - - - - - - - - - - - - - -
Subscribe to the EFF mailing list (email: [email protected]).


IMPORTANT NOTES:
 - Congratulations! Your certificate and chain have been saved at:
   /etc/letsencrypt/live/passbolt.linuxbuz.com/fullchain.pem
   Your key file has been saved at:
   /etc/letsencrypt/live/passbolt.linuxbuz.com/privkey.pem
   Your certificate will expire on 2021-06-09. To obtain a new or
   tweaked version of this certificate in the future, simply run
   certbot again with the "certonly" option. To non-interactively
   renew *all* of your certificates, run "certbot renew"
 - If you like Certbot, please consider supporting our work by:

   Donating to ISRG / Let's Encrypt:   https://letsencrypt.org/donate
   Donating to EFF:                    https://eff.org/donate-le
Passboltのユーザーを登録する
次に、Passboltのユーザーを登録する必要があります。次のコマンドで実行できます:
cd /var/www/passbolt
sudo su -s /bin/bash -c "./bin/cake passbolt register_user -u [email protected] -f howtoforge -l Demo -r admin" nginx
次の出力が得られるはずです:
     ____                  __          ____
    / __ \____  _____ ____/ /_  ____  / / /_
   / /_/ / __ `/ ___/ ___/ __ \/ __ \/ / __/
  / ____/ /_/ (__  |__  ) /_/ / /_/ / / /
 /_/    \__,_/____/____/_.___/\____/_/\__/

 Open source password manager for teams
---------------------------------------------------------------
User saved successfully.
To start registration follow the link provided in your mailbox or here:
https://passbolt.linuxbuz.com/setup/install/f81227bc-b0b6-44b5-99a7-6b490a4ba262/5a112de0-6ca4-4e1b-97c8-26453ef3828b
上記のリンクを使用して、Paaboltにアクセスできます。
次に、ポート80と443がファイアウォールを通過できるようにする必要があります。次のコマンドで実行できます:
firewall-cmd --permanent --add-port=80/tcp
firewall-cmd --permanent --add-port=443/tcp
次に、firewalldをリロードして、変更を適用します。
firewall-cmd --reload
PassboltWebUIにアクセス
次に、Webブラウザーを開き、URL https://passbolt.linuxbuz.com/setup/install/f81227bc-b0b6-44b5-99a7-6b490a4ba262/5a112de0-6ca4-4e1b-97c8-26453ef3828bを入力します。 。次のページにリダイレクトされます:
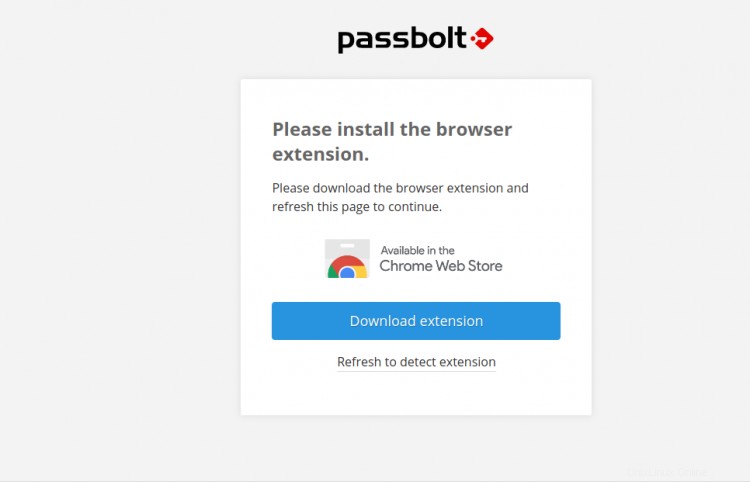
ここでは、Passboltブラウザ拡張機能をダウンロードし、インストールしたらページを更新する必要があります。次のページが表示されます:
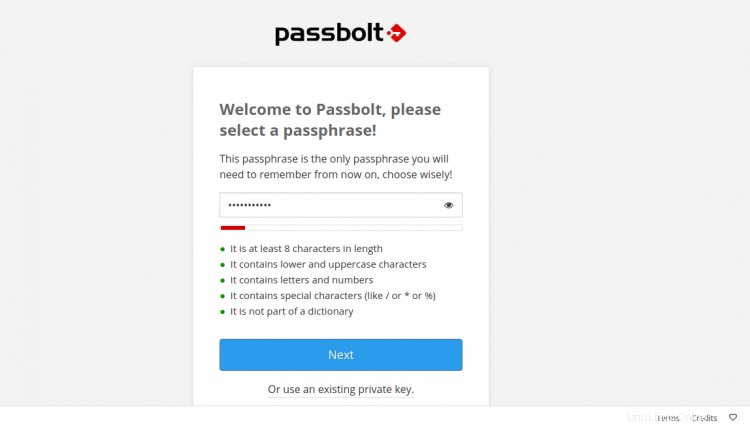
安全なパスワードを指定し、次へをクリックします ボタン。次のページが表示されます:
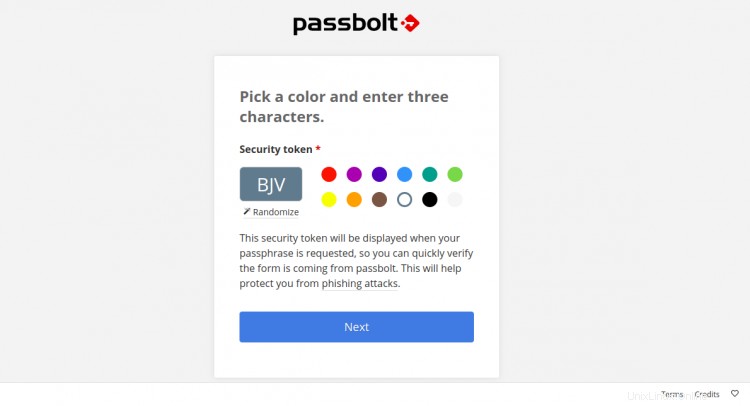
色を選択し、セキュリティトークンを入力して、次へをクリックします ボタン。次のページのPassboltダッシュボードにリダイレクトされます:
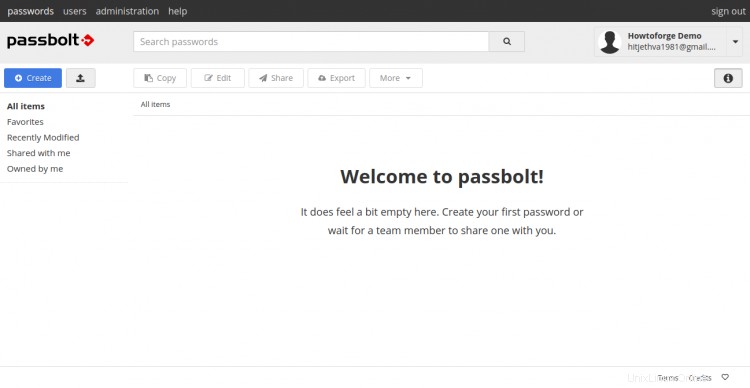
おめでとう!これで、CentOS8にNginxとLet'sEncrypt SSLを使用してPassboltパスワードマネージャーが正常にインストールされました。これで、組織にPassboltを実装し、チームメンバー間でログインクレデンシャルの保存と共有を安全に開始できます。