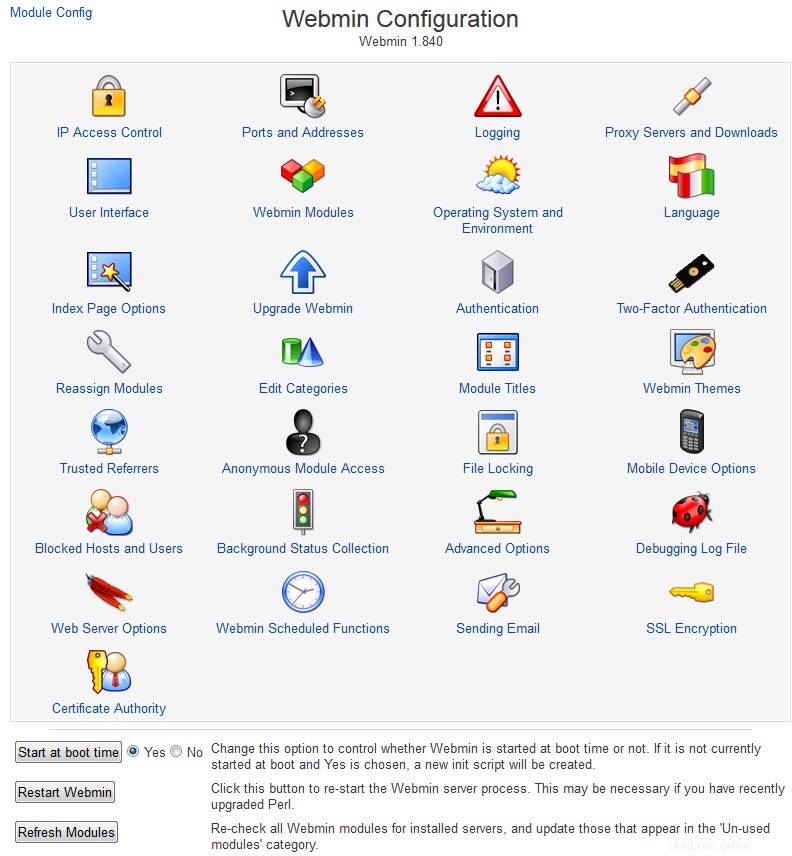
Webmin構成 モジュールは、他のサーバーまたはサービスを構成するように設計されている他のほとんどのモジュールとは異なり、Webmin自体を構成できるようにするために存在します。これにより、ポートとWebminの使用を変更したり、接続できるクライアントアドレスを制限したり、ユーザーインターフェイスが使用するテーマと言語を変更したり、新しいモジュールをインストールしたりできます。この章では、モジュールを使用してこれらのタスクを実行する方法について説明します。
Webminカテゴリのモジュールのアイコンをクリックすると、下の画像に示すアイコンのメニューが表示されます。各アイコンをクリックすると、Webmin設定の一部を変更できる構成ページまたはフォームを表示できます。

コンテンツ
 IPアクセス制御
 IPアクセス制御
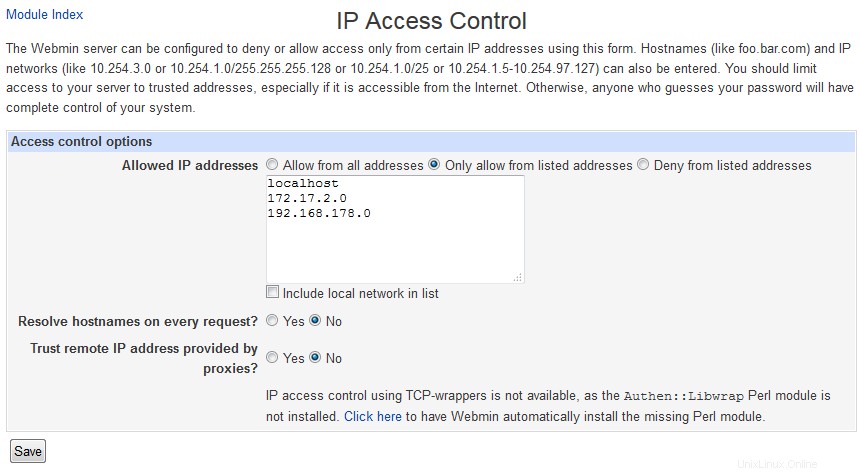
 デフォルトでは、Webminは任意のIPアドレスからの接続を受け入れます。パスワードで保護されていますが、ネットワークの外部からの攻撃者がログインを試みることさえできないように、可能であれば、正当なクライアントシステムのみにアクセスを制限する必要があります。これを行うために従う手順は次のとおりです。
- IPアクセス制御をクリックします モジュールのメインページで、アクセス制御フォームを表示します。
- [リストされたアドレスからのみ許可する]を選択します 隣接するテキストボックスに、ホスト名、IPアドレス、およびネットワークのリストを入力します。ネットワークには、 192.168.1.0 / 255.255.255.0のようなネットマスクを使用して入力する必要があります 。 *。example.comのように入力すると、DNSドメイン全体からのアクセスを許可できます。 ただし、攻撃者が逆引きDNSの結果を偽造する可能性があるため、これは完全に安全ではないことに注意してください。
- 通常、Webminは、最初に起動したときに1回だけ入力したホスト名を解決します。これを変更するには、[すべての要求でホスト名を解決する]チェックボックスをオンにします。これにより、すべての要求の比較のためにホスト名がIPアドレスに変換されます。これは、ブラウザを実行しているシステムが頻繁にIPアドレスを変更しているが、一致するようにDNSレコードを更新できる場合に役立ちます。これは、DHCPを使用しているネットワークで、またはアドレスを動的に割り当てるISPに接続している場合に発生する可能性があります。
- クライアントを許可するかどうかを決定するときにWebminにTCPラッパー構成ファイル/etc/hosts.allowと/etc/hosts.denyもチェックさせるには、*TCPラッパーhosts.allowとhostsもチェックします。 .denyfiles*オプション。これらのファイルを編集するときに使用するサービス名はwebminです。
- 保存を押します ボタンをクリックして、新しいクライアントアドレス制限をアクティブにします。
 ポートとアドレス
 ポートとアドレス
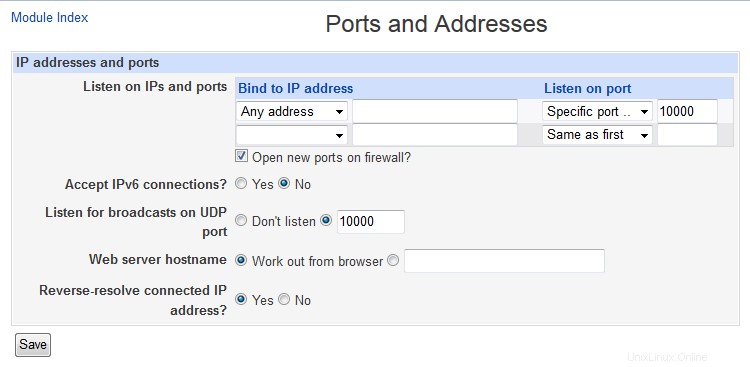
 Webminは通常、システムのすべてのIPアドレスのポート10000で接続をリッスンします。ただし、ポートを変更する必要がある場合があります。これは、ネットワーク上のファイアウォールが標準ポート80および443のWebサーバーへの接続のみを許可しているためです。ポート10000はすべてのユーザーが実行するサーバーで使用できるため、システム上の悪意のあるユーザーがWebminがシャットダウンされるのを待ってから、その部分で自分の偽のWebminサーバーを起動します。これにより、管理者パスワードまたはルートパスワードが取得される可能性があります。このため、代わりに1024未満のポート(rootとして実行されるプログラムのみがリッスンできる)を使用することをお勧めします。リスニングIPアドレスの変更は、システムに複数のネットワークインターフェイスがあり、内部LANに接続されているインターフェイスでの接続のみを許可する場合にも役立ちます。
ポートまたはアドレスを変更するには、次の手順を実行します。
- ポートとアドレスをクリックします モジュールのメインページのアイコン。
- 特定のインターフェースアドレスのみをリッスンするには、IPアドレスをリッスンするの2番目のオプションを選択します フィールドに入力し、その横のテキストボックスにIPを入力します。これは、ホストの実インターフェイスまたは仮想インターフェイスのいずれかのアドレスである必要があります。
- ポートを変更するには、ポートで聞くに番号を入力します 分野。
- 保存を押します ボタンをクリックして、新しい設定を使用します。ブラウザは新しいポートとアドレスにリダイレクトされるため、再度ログインする必要がある場合があります。
 ロギング
ロギング
 ロギング
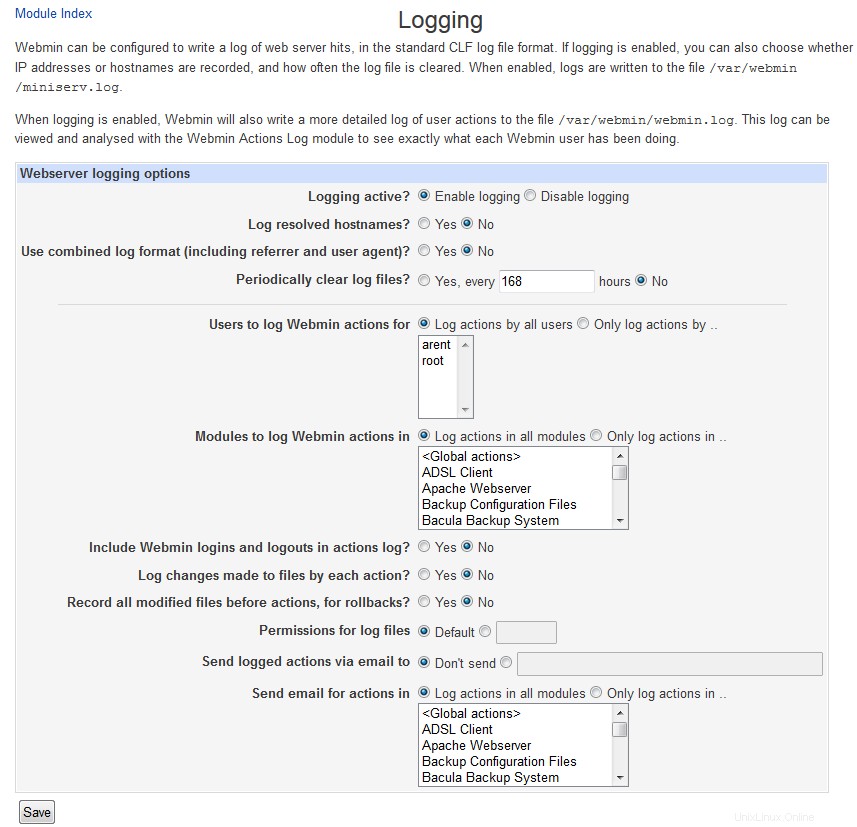
ロギング ほとんどのWebサーバーと同様に、Webminは、受信するすべての要求を記録する標準のCLF形式のログファイルを作成するように構成できます。また、DNSゾーンの作成やUnixグループの削除など、ユーザーが実行したアクションのログも作成します。このアクションログには、変更されたすべてのファイルの詳細と各アクションによって実行されたコマンドを含めることもできるため、Webminが内部で何をしているかを確認できます。
基本ログはデフォルトで有効になっていますが、次の手順に従ってさらに構成できます。
- ロギングをクリックします メインページのアイコン。
- ログを無効にするの場合 を選択すると、Webminはログをまったく書き込みません。ただし、ログを有効にするを選択する必要があります それをアクティブにします。
- ログ解決されたホスト名の場合 チェックボックスをオンにすると、ログファイルにIPアドレスではなく実際のクライアントホスト名が含まれます。これにより、ネットワークでDNS逆引き参照に時間がかかる場合、要求ごとに1つ実行する必要があるため、問題が発生する可能性があります。
- ログファイルが大きくなりすぎるのを防ぐために、Webminはそれらを定期的に切り捨てるように構成できます。この機能を有効にするには、ログファイルを毎回クリアを選択します ボックスに入力し、隣接するテキストフィールドに時間数を入力します。
- アクションのログを特定のユーザーのみに制限するには、アクションのログのみを選択します オプションを選択し、その横のリストから一部のユーザーを選択します。これは、ほとんどのユーザーがあまり気にしないタスクしか実行できず、代わりに、より強力な管理者によって実行されたアクションのみをログに記録する場合に便利です。
- アクションのログを特定のモジュールのみに制限するには、アクションのログのみを選択します オプションを選択し、リストから1つ以上のモジュールを選択します。
- アクションごとに実行されるファイル変更とコマンドのログを有効にするには、*各アクションによってファイルに加えられた変更をログに記録する*ボックスをオンにします。これはより多くのディスクスペースを占有しますが、いくつかの非常に有用で興味深い情報を提供します。
- 保存を押します ボタンをクリックして変更を有効にします。
Webminアクションログモジュールでは、ここで記録を有効にした後、アクションを検索して表示する方法について説明しています。これは、サーバーにアクセスできる複数の管理者がいる場合に、システムで誰が何をしたかを調べるのに役立ちます。
 プロキシサーバーとダウンロード
 プロキシサーバー
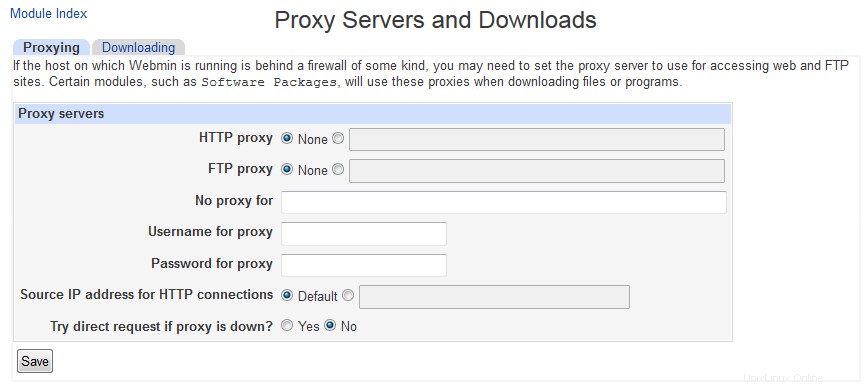
 多くのWebminモジュールは、他のFTP、HTTP、およびHTTPSサーバーからファイルをダウンロードできます。たとえば、ソフトウェアパッケージモジュールでは、新しいパッケージをフェッチしてインストールするためのURLを入力できます。通常、WebminはURLで指定されたホストに直接接続しますが、代わりにプロキシサーバーを使用するように構成できます。これは、ネットワークがWebサイトやFTPサイトへの直接アクセスを許可せず、代わりにクライアントにプロキシ経由での接続を強制する場合に必要になることがあります。
WebminのRPCメカニズム(Webminサーバーインデックスでカバーされています)は、他のWebminサーバーへのHTTPリクエストも利用します。高速モードまたは大きなファイルを転送するときにRPCプロトコルによって使用される直接TCP接続には適用されませんが、プロキシ構成はRPC呼び出しにも適用されます。他のWebminサーバーは同じネットワーク上にある可能性が高いため、これらのホストのプロキシのユーザーを無効にすることをお勧めします。
HTTPおよびFTPプロキシサーバーとそれらが使用されるホストを指定するには、次の手順に従います。
- Webmin構成モジュールのメインページで、プロキシサーバーをクリックします。 アイコン。
- HTTPリクエストにプロキシを使用する場合は、HTTPプロキシの2番目のラジオボタンを選択します フィールドに入力し、 http://proxy.example.com:8080/のような完全なURLを入力します その隣のテキストボックスに。 なしの場合 が選択されている場合、プロキシは使用されません。この指定されたサーバーは、CONNECTプロキシ要求を行うことによってHTTPS接続にも使用されるため、それらをサポートおよび許可していることを確認してください。
- 同様に、FTPプロキシでFTPダウンロードに使用するプロキシを入力できます。 分野。通常、これはHTTPプロキシと同じです。
- 特定のホストのプロキシの使用を無効にするには、プロキシなしに入力します ホスト名、ドメイン名、および完全または部分的なIPアドレスのスペース区切りのリストを含むフィールド。たとえば、.example.com192.168.1。と入力します。 Webminをそのドメインおよびネットワーク内のホストに直接接続させるため。
- プロキシでクライアントが自分自身を認証する必要がある場合は、プロキシのユーザー名を入力します およびプロキシのパスワード 田畑。
- 保存を押します ボタンをクリックして、Webminに新しい設定の使用を開始させます。
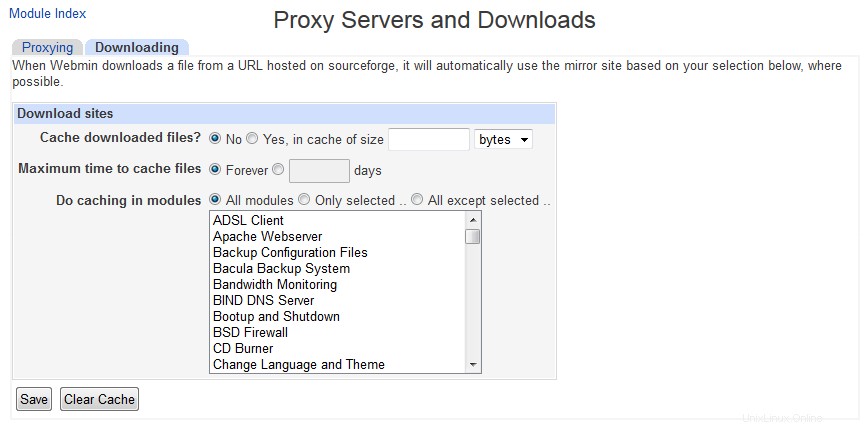 ダウンロード
  ユーザーインターフェース
Webminには、ユーザーインターフェイスの配色を制御するいくつかの設定があります(古いWebminテーマを使用する場合)。 )、各ページに表示されるサーバーホスト情報、およびフィードバックの送信が許可されているかどうか。次の手順に従って変更できます:
- モジュールのメインページで、ユーザーインターフェイスをクリックします。 アイコンをクリックして、インターフェースオプションフォームを表示します。
- 最初の5つのフィールドでは、古いスタイルのテーマを使用するときにインターフェイスのさまざまな部分に使用する色を選択できます。それぞれについて、デフォルトを選択できます 、または色の赤、緑、青のコンポーネントに3つの16進数を入力します。たとえば、 FF 88 00 オレンジの色合いになります。ただし、これらのオプションは新しいデフォルトテーマには影響しません。
- 一部のテーマでは、すべてのページの上部にあるタイトルが画像としてレンダリングされます。これによりページのダウンロードが遅くなる可能性があるため、タイトルをテキストとして表示しますか?を変更することで、代わりにプレーンHTMLテキストタイトルの使用を強制できます。 はいへのフィールド 。
- デフォルトでは、Webminのすべてのページで、システムのホスト名とオペレーティングシステムがブラウザのステータスバーに表示されます。他の場所に表示したり、完全にオフにしたりするには、ログインとホスト名の表示から次のオプションのいずれかを選択します メニュー:*ブラウザの下部にあります*情報はブラウザのステータス領域に表示されます。通常はウィンドウの下部にあります。 *ブラウザタイトル内*情報は各ページのタイトルに追加されます。これは通常、ブラウザウィンドウのタイトルに表示されます。 *ページ見出しの上*情報は各ページのタイトルの上に表示されます。 *どこにもありません*ホスト名とオペレーティングシステムの情報はどこにも表示されません。信頼できないユーザーがシステムについて学びすぎるのではないかと心配している場合は、これを選択するオプションです。
- デフォルトのテーマを使用する場合、Webminのすべてのページの右上隅に、開発者にフィードバックを送信するためのリンクがあります。ただし、フィードバックが代わりにマスターシステム管理者に送信されるように構成して、他のユーザーがあなたに連絡できるようにすることもできます。これを行うには、フィードバックの送信にメールアドレスを入力します [*フィードバックの送信を許可しますか?*]フィールドを上記のアドレスにのみに変更します。 。 いいえを選択すると、フィードバックの送信を完全に防ぐことができます。 代わりに後者のフィールドで。
- 保存をクリックします ボタンをクリックして、新しいユーザーインターフェイス設定をアクティブにします。
 Webminモジュール
 Webminモジュールのインストール/クローン/削除/エクスポート
 この本の最初の章で説明しているように、Webminは基本的にモジュールのコレクションであり、各モジュールはApacheの構成やUnixユーザーの管理などのタスクを実行します。モジュールは、他のモジュールに依存しないことを前提として、他のモジュールの動作に影響を与えることなく追加または削除できます。執筆時点では、メインのWebminディストリビューションには76のモジュールが含まれていますが、他の人が作成した100を超えるモジュールがWebサイトwebmin.thirdpartymodules.comからダウンロードできます。これは、FreeBSDファイアウォールの管理、システム情報の表示、VNCサーバーへの接続など、コアモジュールが実行しないタスクを実行するモジュールとテーマの検索可能なデータベースです。
- インストール
気に入ったモジュールが見つかったら、次の手順でインストールできます。
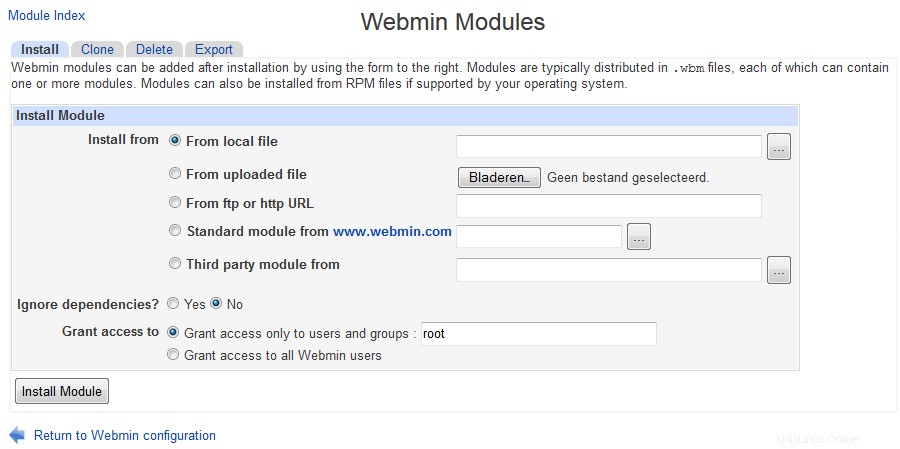
- メインページで、Webminモジュールをクリックします アイコン。これにより、モジュールのインストール、クローン作成、および削除のためのフォームを含むページが表示されます。
- モジュールの.wbmファイルをWebminが実行されているシステムにすでにダウンロードしている場合は、ローカルファイルからを選択します。 ファイルへのフルパスをファイルの横のテキストフィールドに入力します。
- または、モジュールファイルがWebブラウザを実行しているPCにある場合は、アップロードファイルからを選択します。 [参照]ボタンを使用して、コンピューター上のファイルを検索します。
- 代わりに、モジュールがWebサイトのどこかにある場合は、[*ftpまたはhttpURLから*]を選択し、このオプションの横にあるテキストボックスに完全なURLを入力します。
- Webminは通常、依存している他のモジュールが利用できない場合、またはWebminの今後のリリース用に作成されている場合、モジュールのインストールを停止します。これを防ぐには、インストール時にモジュールの依存関係を無視するを確認してください。 箱。ただし、これにより、機能しないモジュールをインストールできる場合があります。ただし、サーバーのオペレーティングシステムをサポートしないモジュールを追加することはできません。
- この新しいモジュールが誰に付与されるかを制御するには、ユーザーとグループにのみアクセスを許可するを選択します オプションを選択し、Webminユーザー名とグループ名のリストを隣接するテキストボックスに入力します。デフォルトでは、現在ログインしているユーザーのみが一覧表示されます。または、すべてのWebminユーザーにアクセスを許可するを選択して、すべてのユーザーとグループにそれを与えることができます。 。
- ファイルからモジュールをインストールする ボタンをクリックして(必要に応じて)新しいモジュールをダウンロードしてインストールします。すべて問題がなければ、インストールされているモジュールとそのディレクトリのサイズを一覧表示するページが表示されます。
Webminには、インストールルートディレクトリにあるinstall-module.plというスクリプトが付属しています。 RPMバージョンをインストールした場合、これは/ usr / libexec / webminになります。それ以外の場合は、tar.gzファイルが抽出された場所になります。このスクリプトを使用して、.wbtファイルをパラメーターとして渡すことにより、コマンドラインからモジュールをインストールできます。 rootまたはadminユーザーが存在する場合はそれだけに付与され、存在しない場合はWebminUsersモジュールにリストされている最初のアカウントにのみ付与されます。
デフォルトでWebminに付属しているモジュールを含め、現在インストールされているモジュールはすべて、同じページで削除することもできます。ただし、デフォルトのモジュールを削除することはお勧めできません。次回のアップグレード時に自動的に再インストールされるためです。代わりに、Webminユーザーモジュールで使用したくないアクセスを削除することをお勧めします。一部のモジュールは他のモジュール(実行中のプロセスなど)に依存しているため、すべてのモジュールを削除できるわけではありません。このモジュールを削除することもできません。
- 削除
1つ以上のモジュールを削除するには、次の手順に従います。
- Webminモジュールをクリックします メインページのアイコン。
- ページの最後のフォームまで下にスクロールして、モジュールの削除から削除するすべてのモジュールを選択します リスト。クローン(後で説明)は、不要になった場合は削除することもできます。クローンを持つモジュールを削除すると、それらも自動的に削除されます。
- 選択したモジュールの削除を押したとき ボタンをクリックすると、削除される内容を正確に示す確認ページが表示されます。または、1つ以上の削除を妨げる依存関係の問題がある場合は、代わりに問題を説明するエラーメッセージが表示されます。
- モジュールへのアクセスをすべてのユーザーから削除し、すべてのアクセス制御設定をデフォルトに戻すには、ユーザーから削除してアクセス制御設定をリセットしますか?をオンにします。 箱。これは、将来モジュールを再インストールする予定があり、以前に使用していたのと同じ人がモジュールを利用できるようにしたくない場合に役立ちます。
- 削除をクリックします モジュールの削除を続行します。どのモジュールが削除されたかを正確に示すページが、それぞれの削除されたバイト数とともに表示されます。
- Webminモジュールのクローン作成
状況によっては、同じWebminモジュールを2回インストールして、それぞれを個別に構成できるようにしたい場合があります。これは、たとえば、Apacheの2つのバージョンがインストールされている場合に役立ちます。1つはテスト用で、もう1つは本番用です。標準のApacheモジュールは、一度に1つしか管理できないように設定できるため、両方のサーバーを構成する必要があるのは、Webminを2回インストールすることだけであるように見える場合があります。
ただし、解決策があります-モジュールのクローン作成。クローンは、同じコードをすべて共有する既存のモジュールのコピーですが、個別に構成したり、異なるユーザーに割り当てたり、ユーザーアクセス制御を個別に設定したりすることができます。クローンを作成するには、次の手順に従います。
- Webminモジュールをクリックします メインページのアイコン。
- Clone Moduleというタイトルの2番目のフォームに移動します 、クローンするモジュールから元のモジュールを選択します メニュー。
- クローンモジュール名 フィールドに、クローンのアイコンの下に表示される新しい名前を入力します( ApacheServerのテストなど)。 。
- このモジュールを元のモジュールとは異なるカテゴリで表示する場合は、カテゴリに割り当てるから選択します。 メニュー。
- クローンモジュールを押す ボタン。コピーが作成され、現在ログインしているユーザーに付与され、ブラウザーはWebmin構成のメインページに戻ります。
- これで、新しいモジュールに移動できます。このモジュールは、デフォルトで元のモジュールと同じように構成されます。 モジュール構成 次に、リンクを使用して、必要に応じて異なる構成ファイルとプログラムパスを使用するように設定できます。カスタムコマンドやシステムとサーバーのステータスなどのモジュールのクローンを作成すると、既存のコマンドやモニターもクローンにコピーされます。元のモジュールの設定に影響を与えることなく、必要に応じてそれらを削除できます。
別のスケジュールで実行されるシステムおよびサーバーステータスモジュールの新しいコピーを作成する、NISユーザーを管理するためのユーザーおよびグループモジュールのコピーを作成する、複数のユーザーを作成するなど、クローン作成で実行できる巧妙なトリックがかなりあります。さまざまな構成ファイル用のFetchmailモジュールの
- アップグレード後にモジュールを追加
(自動)アップグレード中に新しいモジュールが追加された場合は常に、新しいモジュールにアクセスできるユーザーにそのモジュールを追加する必要があります。
 オペレーティングシステムと環境
Webminの動作は、インストールしたオペレーティングシステムまたはLinuxディストリビューション、および実行している特定のバージョンによって異なります。正しいOSは、インストール時に常に自動的に検出されるか、インストーラーによって提供されますが、システムの存続期間中にシステムがアップグレードされる可能性は十分にあります。これが発生した場合、Webminはアップグレードを自動的に検出しません。次の手順に従ってアップグレードを通知する必要があります。
- オペレーティングシステムと環境をクリックします モジュールのメインページのアイコン。
- *新しいオペレーティングシステム*リストからUnixベンダーとバージョンを選択します。
- 保存を押します ボタンをクリックして、Webminに使用を開始させます。
Unixの各フレーバーは、Webminが管理するさまざまな構成ファイルに異なる場所と形式を使用するため、インストール時に検出されたオペレーティングシステムとバージョンによってモジュール構成のデフォルト値が決まります。ただし、上記の手順に従ってOSを変更しても、これらの構成設定は調整されません。代わりに、将来インストールされるモジュールに使用されるモジュールを決定するだけです。ほとんどのOSアップグレードではファイルやプログラムの場所が変更されないため、通常、これは問題にはなりません。ただし、一部のモジュールは、アップグレード後に手動で構成する必要がある場合があります。たとえば、古いOSバージョンでLPRngが使用され、新しいバージョンでCUPSが使用されている場合は、プリンター管理モジュールで使用される印刷システムを変更する必要があります。
- プログラムパスと環境変数の編集
Unixシェルからlsのようなコマンドを実行すると、PATH環境変数は、シェルが/ bin/lsなどの実際の実行可能ファイルを見つけるために検索するディレクトリを決定します。 Webminはまた、PATH変数を使用して、フルパスが指定されていないときに実行されるコマンド(webalizerやmysqlなど)を見つけます。デフォルトでは、このディレクトリのリストには、オペレーティングシステム上のプログラムの一般的な場所がすべて含まれるように設定されていますが、/ usr / local / samba/binなどの非標準ディレクトリに実行可能ファイルをインストールした場合は正しくない可能性があります。
同様に、LD_LIBRARY_PATH環境変数は、プログラムが実行時にロードする必要のある共有ライブラリを探す場所を決定します。繰り返しになりますが、Webminはデフォルトでこの変数をオペレーティングシステム上のすべての共通ライブラリディレクトリを含むように設定しますが、プログラムを手動でコンパイルしてインストールした場合、一部を見逃す可能性があります。この症状は、Webminによって実行されるプログラムが失敗し、libmysqlclient.so.6:openfailedのようなエラーメッセージが表示されることです。このようなライブラリは、デフォルトの検索パスにない/ usr / local / mysql/libにある可能性があります。
次の手順に従って、これらのパスを編集し、Webminによって実行されるすべてのプログラムに渡される独自の環境変数を定義できます。
- オペレーティングシステムと環境をクリックします アイコン。
- プログラムディレクトリを*プログラム検索パス*フィールドに追加します。各ディレクトリは、PATH環境変数の場合と同様に、:(コロン)で区切る必要があります。ただし、既存のディレクトリは、Webminの一部が機能しなくなる可能性があるため、削除または変更しないでください。
- 追加の共有ライブラリディレクトリを*ライブラリ検索パス*フィールドにコロンで区切って追加します。
- Webminが実行するプログラムに他の環境変数を渡すと便利な場合があります。たとえば、Oracleに接続するカスタムコマンドが複数ある場合は、実行する前にORACLE_HOMEを適切に設定する必要があります。 追加の環境変数 表を使用すると、いくつかを定義できます。 変数名の下の最初の空のフィールドに名前を入力するだけです 、および値の下の隣のフィールドに値を入力します 。 Webminのほとんどのテーブルと同様に、このテーブルには一度に1つの空の行しか表示されないため、複数の変数を追加する場合は、このページを保存して再度開く必要があります。
- パスと変数の設定が完了したら、保存を押します。 それらをアクティブにするボタン。
Webminによって実行されるプログラムはすべて、Webサーバー自体によって設定され、Webminを構成するCGIプログラムに渡されるいくつかの変数にもアクセスできます。たとえば、REMOTE_USERにはログインしたユーザーの名前が含まれ、REMOTE_HOSTにはクライアントのIPアドレスが含まれます。すべてのHTTPヘッダーは、HTTP_で始まる大文字の変数に格納されるため、プログラムは、たとえばHTTP_USER_AGENT変数でユーザーのブラウザに関する情報を見つけることができます。
 言語
言語
多くのWebminモジュールは、ドイツ語や日本語など、さまざまな言語に翻訳されています。以下の手順に従って、すべてのユーザーのデフォルト言語を変更できます。Webminユーザーモジュールの1人のユーザーのみです。すべての翻訳が完了しているわけではないため、一部のメッセージとラベルは引き続き英語で表示されます。
- 言語をクリックします モジュールのメインページのアイコン。
- 表示されるフォームで、言語で表示からユーザーの希望する言語を選択します メニュー。
- 一部のブラウザ(Operaなど)は、ユーザーが選択した言語でサーバーにページを表示するように要求できます。可能であれば、Webminがそのようなリクエストを受け入れるようにするには、[*ブラウザで指定された言語を使用しますか?*]フィールドをはいに変更します。 。言語が送信されると、グローバルユーザーと個々のユーザーの両方の設定が上書きされます。
- 保存を押します ボタンをクリックすると、Webminがすぐに新しい言語に切り替わります。
多くの言語(中国語、日本語、ロシア語など)は、標準のヨーロッパのアルファベットにはない記号を使用しています。それらを表示するには、多くの場合、Webminへのアクセスに使用するブラウザーを実行しているシステムに特別なフォントをインストールする必要があります。一部のLinuxディストリビューションにはデフォルトでこれらのフォントが含まれていますが、含まれていないものもあり、インストールはかなり複雑になる可能性があります。
 インデックスページのオプション
すべてのページに適用される一般的なユーザーインターフェイス設定に加えて、モジュールアイコンが表示されるメインメニューのみのレイアウトを制御するものもあります。これらを使用して、分類をオフにしたり、システムのホスト名とOSの表示を制御したり、デフォルトでユーザーをモジュールに直接送信したりすることができます。次の手順では、メインメニューの設定を変更する方法について説明します。
- インデックスページのオプションをクリックします Webmin構成モジュールのメインページのアイコン。
- デフォルトでは、モジュールアイコンは4行に表示されます。広いブラウザウィンドウを使用したい場合は、使用可能なスペースを適切に使用するには少なすぎる可能性があります。 列数を編集します 各行のアイコンの数を変更するフィールド。
- モジュールを分類しますか? オプションがはいに設定されている 、アイコンはカテゴリの下に表示され、メインメニューの任意の1ページに表示される数を減らします。 いいえを選択する 代わりに、それらすべてを1つの大きなページに配置し、デフォルトのテーマを使用する場合は、すべてのページの上部からカテゴリのリストを削除します。
- ユーザーがWebminにログインすると、 Webminにモジュールが表示されます。 デフォルトではカテゴリ。通常、他のカテゴリのモジュールを使用する場合は、デフォルトのカテゴリからモジュールを選択します メニュー。
- バージョン、ホスト名、OSを表示しますか? フィールドがはいに設定されている デフォルトでは、メインメニューにシステムのWebminバージョン、ホスト名、およびオペレーティングシステムが表示されます。セキュリティ上の理由からこの情報をユーザーが利用できるようにしたくない場合は、[いいえ]を選択します 代わりは。
- Webminユーザーが1つのモジュールにしかアクセスできない場合、メインメニューにはアイコンが1つしかないため、メインメニューを表示しても意味がありません。そのようなユーザーがログイン後すぐに自分の唯一のモジュールに誘導されるようにするには、[ユーザーが1つしかない場合は*直接モジュールに移動しますか?*]フィールドをはいに変更します。 。
- 保存をクリックします ボタンをクリックして、これらの新しいメインメニュー設定をアクティブにします。
一部の非標準テーマ、特に独自のメインメニューがあるテーマでは、これらの機能のすべてが実装されていない場合があります。
 Webminのアップグレード
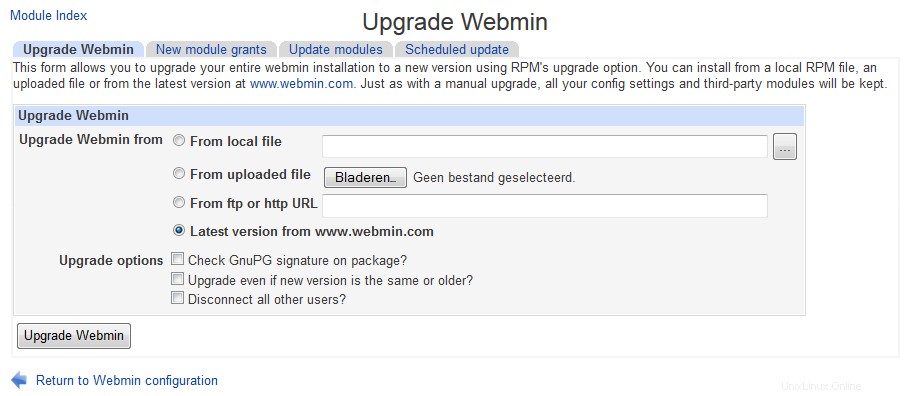
Webminのメイン画面をアップグレードする Webminには、既にダウンロードしたファイルから、またはwww.webmin.comから取得したパッケージから、新しいバージョンがリリースされたときに自身をアップグレードする機能があります。最新のRPMまたはtar.gzパッケージをインストールすることでコマンドラインからアップグレードすることはかなり可能ですが、このモジュール内からアップグレードする方がさらに簡単で、エラーが発生しにくくなります。
Webminは、最初にインストールされたのと同じタイプのパッケージを使用してのみアップグレードできます。つまり、元々tar.gz形式を使用していた場合、アップグレードは別のtar.gzファイルからのみ実行できます。同様に、RPMインストールは、新しいRPMパッケージからのみアップグレードできます。もちろん、Webminが最新バージョンをダウンロードすると、常に適切なパッケージ形式が選択されます。
最近のリリースには、RPMおよびtar.gzパッケージのGnuPGデジタル署名をチェックして、それらが本物であることを確認する機能があります。これは、システムにgpgコマンドがインストールされている場合、およびWebminサイトから直接アップグレードする場合にのみtar.gzパッケージを使用する場合にのみ実行できます。署名チェックは、実際にはトロイの木馬または他の種類の悪意のあるプログラムであるWebminの偽のバージョンをインストールすることからユーザーを保護します。
Webminをアップグレードするには、次の手順に従います。
- Webminのアップグレードをクリックします モジュールのメインページのアイコン。これにより、アップグレード、更新されたモジュールのインストール、および更新の自動インストールを設定するためのフォームが記載されたページに移動します。
- Webminのアップグレード フォームは、*Webminモジュールのインストールと削除*セクションで説明されているモジュールのインストールフォームと非常によく似ています。 ローカルファイルからのいずれかを選択します 新しいパッケージがすでにサーバーシステムにある場合は、*アップロードされたファイルから*、Webブラウザが実行されているPCにある場合、または*ftpまたはhttpURLから*パッケージを何らかのURLからダウンロードします。最も簡単なオプションは、www.webmin.comから最新バージョンを選択することです。 適切なパッケージを自動的にダウンロードします。
- システム上のWebminがtar.gzファイルからインストールされた場合、アップグレード後に古いバージョンのディレクトリを削除しますか? チェックボックスをオンにすると、新しいバージョンのインストール後に古いバージョンを削除できます。古いリリースに戻すことができるようにしたい場合を除いて、ディスク容量を節約するためにこのオプションを有効にする必要があります。 RPMパッケージは常に同じディレクトリにインストールされるため、RPMインストールではまったく表示されません。
- 可能であれば、パッケージのGnuPG署名を確認するには、パッケージのGnuPG署名を確認しますか?をオンにします。 オプション。 gpgプログラムがシステムにインストールされている場合、デフォルトで有効になっています。
- Webminのアップグレードを押す ボタンをクリックしてアップグレードを開始します。ダウンロードの進行状況(必要な場合)と新しいバージョンのsetup.shスクリプトからの出力を示すページが表示されます。インストールするために選択したバージョンより後のバージョンまたはwww.webmin.comで既に実行している場合は、代わりにエラーメッセージが表示されます。
アップグレードプロセスでは、すべてのユーザーとモジュール構成設定が保持され、現在Webminサーバーにアクセスしているユーザーにも気付かれることはありません。 tar.gzパッケージからプログラムを最初にインストールし、/ usr / local / webminのようなターゲットディレクトリを指定しなかった場合、新しいバージョンは古いディレクトリの隣のディレクトリにインストールされます。 For example, if Webmin 1.060 was in /usr/local/webmin-1.060 and you upgraded to version 1.070, it would be installed in /usr/local/webmin-1.070, and the old directory deleted if the *Delete old version's directory after upgrade?* option was checked.
Any modules that the new version includes but the old one does not will be granted to the first user listed in the Webmin Users module, which will typically be root or admin. You should check after the upgrade is complete to ensure that they have not been given to an un-trusted user instead though, as most modules by default can be used to subvert security on your system.
- Installing updates to Webmin
Updated versions of Webmin modules in the latest release are often made available to fix bugs or security problems. Installing these updated modules is always a good idea, as they may fix problems that you have been having or patch security holes that could allow un-trusted users to gain root access on your system. Updates are always designed to solve problems rather than adding new features which may potentially have problems of their own.
Of course, if you are not having any trouble then you can just wait until the next full release and install it instead. Each version will always include any updates that were made available for previous versions of Webmin. Updates are only created to solve problems in the latest version, so if you are running an older version do not expect any more to be released for it.
The page http://www.webmin.com/updates.html lists the downloadable updates for each version of Webmin. You can retrieve any that you need from there to be installed using this module, as explained in the Installing and deleting Webmin modules セクション。 However, there is an easier method - Webmin can be told to check for, download and install any updates that it does not already have. This can either be done explicitly using this module, or set up to happen on schedule.
To check for and install updates, follow these steps :
- Click on the Update Webmin icon on the Webmin Configuration module's main page.
- Scroll down to the second form, headed Upgrade modules now 。
- Select the Update from www.webmin.com オプション。 The alternate Update from another source mode is only useful if running your own repository of new modules, which is not covered in this book.
- If you just want to see what updates are needed without actually installing them, check the *Only show which modules would be updated *box. Otherwise, un-check it so that updates are actually done.
- If you have deleted some of the standard Webmin modules and don't want them to be re-installed by the update process, de-select the Install modules that are not currently installed オプション。
- Hit the Update Modules ボタン。 A page listing all updates for your operating system will be displayed, along with the problems that they fix. As long as the box in step 4 was not checked, the progress of each needed module's download and the results of its installation will be shown as well. As well, if a new version of Webmin is available a message will appear at the end of the page informing you. Because module updates are only released for the latest version, it is advisable to upgrade the entire program as soon as possible.
Every Webmin module has a version number, which the update process uses to keep track of which ones it has already downloaded and installed. A message like Module cron is already up to date shown next to a potential update indicates that it has already been installed. A message like *Update to module cron is not related to this OS* means that the module does not support your operating system, or that the problem that the update fixes does not occur on your OS.
- Scheduled updates
Instead of manually following the steps above every now and then, you can configure Webmin to check for, report on and install new modules on schedule. When needed updates are found, an email can be sent to you listing the modules that should be or have been installed and the problems that they fix. As well the email will include notification of the availability of a new Webmin release, if there is one.
To enable automatic updates, follow these steps :
- Click on the Update Webmin icon and scroll down to the final form on the page, titled Update modules on schedule 。 \# Check the Scheduled updating currently enabled 箱。 # Unless you run your own repository, select Update from www.webmin.com 。
- The Update modules at field specifies the time of day that the scheduled update check is run. Typically you should enter something like _3_ to have updates done at 3 am, assuming that your system is turned on at that time. The every field next to it sets the number of days between checks. For example, if you enter _1_ then updating will be done only every third day. 1 or 2 days is usually a reasonable period.
- If the Only show which modules would be updated option is enabled, a reporting only showing which modules need updating will be sent out on schedule. This can be useful if you want to be reminded of new modules, but install them yourself to control which updates are used.
- The Install modules that are not currently installed option has exactly the same meaning as in the Update modules now form, and generally does not need to be enabled.
- If Only report updates is checked, an email report will not be sent if no needed updates are available and no new version of Webmin has been released. This is usually what you want, as it cuts down on the number of unnecessary email messages.
- In the Email update report to field enter the address to which the update report should be sent. If it is left empty automatic checking will still be done, just not reported. Email is always sent by calling the sendmail program, the path to which is taken from the Sendmail Configuration module's configuration.
- Hit the Save and Apply button to enable scheduled updating. A Cron job (covered in chapter 10) will be created, which you can see in the Schedule Cron Jobs module, but should not touch.
Automatic updating can be turned off at any time by de-selecting the Scheduled updating currently enabled box on this form and clicking on Save and Apply 。
If webmin was installed using yum or apt-get and updating is enabled, yum/apt-get will update webmin on similar schedule as other components.
- Added modules after upgrade
Whenever a new module was added during (automated) upgrade, you will need to add that module to users who who may access the new module.
 Authentication
 Authentication
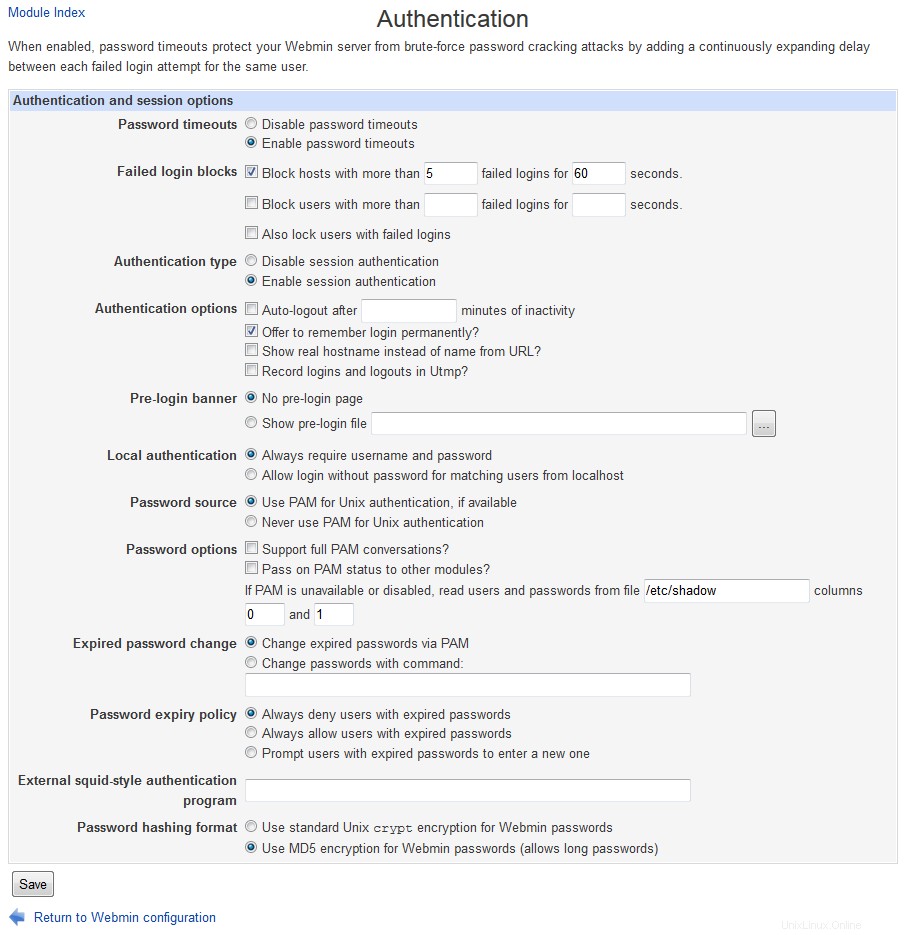
 Webmin has several options that control how multiple failed login attempts are handled, how users login and how Unix passwords are checked. The default authentication method uses cookies, but if your browser cannot handle them you may want to switch to basic HTTP authentication instead. The only problem with this method is that there is no way to properly log out, as there is no support for logging out in the HTTP protocol. However, it sometimes must be used - for example, browsers on MacOS X cannot load applets (such as the ones in the File Manager and SSH/Telnet Login modules) from web servers using cookie authentication.
To configure authentication for Webmin, follow these steps:
- Click on the Authentication icon on the module's main page to bring up the authentication form.
- When Enable password timeouts is selected, Webmin will detect multiple failed login attempts from the same IP address and lock that host out for a configurable amount of time. This feature should always be turned on, as it stops attackers using millions of login attempts to guess passwords on your system. The Block hosts with more than field specifies the number of login attempts allowed from a single host before blocking is triggered, while the failed logins for field sets the number of seconds that a host is blocked for. The defaults are reasonable, but you can increase the timeout if you are feeling paranoid.
- When *Log blocked hosts, logins and authentication failures to syslog* is selected Webmin will send messages to the system logs (covered in chapter 13) when a user logs in, logs out or enters an incorrect password. All messages are sent with the authpriv facility. You should leave this option turned on, so that suspiciously large numbers of login failures can be detected.
- When Enable session authentication is selected, Webmin will use its own login form to ask users for a username and password, and set a cookie after the login is complete to identify authenticated clients. To switch to normal HTTP authentication, select Disable session authentication instead.
- When using session authentication, Webmin can be configured to automatically log users out if they have been inactive for more than a certain amount of time. To enable this, check the Auto-logout after box and enter a number of minutes into the text field next to it. This feature and the next three are not available when using HTTP authentication.
- When Offer to remember login permanently? is checked (as it is by default), the login form will include a check box for permanently remembering the login. When selected, the cookie sent to the user's browser will be marked to indicate that it should be saved even if the browser is shut down and re-run later. This is convenient because is means that the user will not have to login to Webmin again, but you may consider it a security risk. If so, un-checking this box will remove the remember option from the login form.
- By default the login page includes the hostname from the URL in the message above the username and password fields. To hide it, de-select the Show hostname on login screen? 箱。
- Some people like to have a welcome message shown on the login page the first time a user accesses it, perhaps giving information about the server or telling unauthorized people to go away. To enable this on your system, first create an HTML page containing the message that you want to appear. Then select *Show pre-login file* and enter the full path to the HTML file in the text field. After a user reads it he must re-load or re-visit the page (perhaps by following a link in the page itself) to force the real login form to appear.
- Webmin can automatically authenticate connections from localhost by determining which Unix user is making the connection, and checking to see if a Webmin user of the same name exists. To enable this, select *Allow login without password for matching users from localhost*. If you run a browser as root on the same system as Webmin runs on and have a Webmin user called root, this feature allows you to access the URL http://localhost:10000/ and be logged in without needing to enter a username and password. It is convenient, but potentially insecure if an attacker can trick a program (such as Squid) into connecting to that URL, which would grant access to Webmin as the user that the program runs as. For this reason, *Always require username and password* is selected by default.
- When the Unix authentication option is selected for a user in the Webmin users module, his password can be checked by using PAM or by reading the Unix password file directly. If the Use PAM for Unix authentication, if available option is selected and the Authen::PAM Perl module installed, Webmin will attempt to use PAM to validate the user. However, on Linux this will only work if the /etc/pam.d/webmin service file is set up correctly. This file is included in the RPM package of Webmin though. If your operating system does not support PAM, if the Perl module is not installed or if the *Never use PAM for Unix authentication* option is selected, Webmin will fall back to directly reading the password file. This is more reliable, but will not prevent the use of passwords that are marked as expired. The *read users and passwords from file* fields specify the file to get passwords from and the columns to use for the username and password, but should rarely need to be changed as they are set by default to match your operating system. Because Webmin will use PAM where it can or read the appropriate password file if PAM is not available, the fields covered in this step should not need to be changed.
- The External squid-style authentication program field can be used to enter the full path and parameters to a program that validates passwords. If it is filled in, the option *External authentication program* will appear in the Password menu for a user in the Webmin Users module, indicating that the user's password should be checked using this command. The program must behave exactly like a Squid's external authenticator, covered in the Setting up proxy authentication section of of Squid Proxy Server.
- Finally, hit Save at the bottom of the form to activate the new authentication settings for subsequent logins.
 Two factor Authentication
Two-factor authentication can be used to add an extra layer of security to a Webmin account, as well as the regular username and password. When enabled, a user will need to provide an extra authentication token which typically comes from a smartphone app, hardware OTP generator or SMS.
This page allows you to select an authentication provider for Webmin users on your system. Once enabled, each user can then enroll for two-factor in the Webmin Users module. The available two-factor providers are:
- Authy
- This is a commercial service that provides a smartphone app and website for managing two-factor users. Each user must create an account on Authy's website and link it to their smartphone.
- Google Authenticator
- This is a smartphone app that implements the standard TOPT protocol. Each user must scan a QR code using the app to link their tokens with the Webmin server.
 Edit Categories
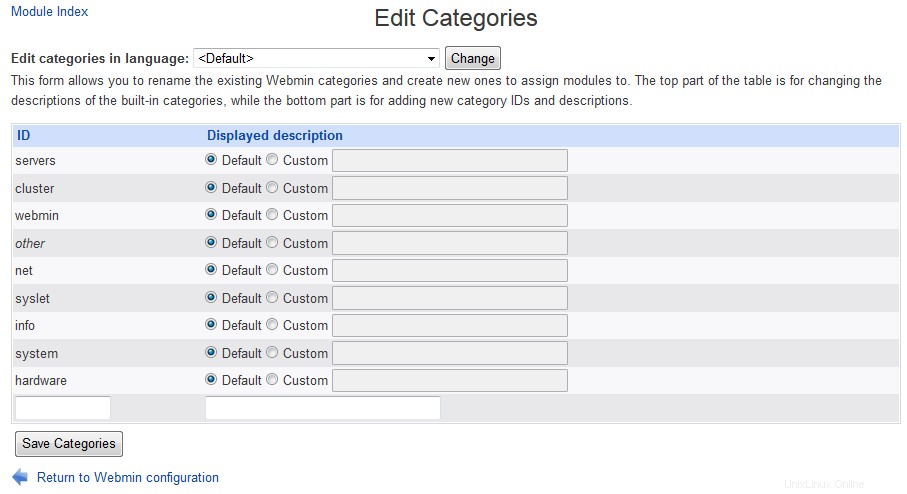
Every Webmin module has a category that controls where it appears on the module's main menu. You can create your own categories and move modules from their default locations into your own or existing categories, which can be useful if you don't like the default arrangement, or want to put everything into one huge category.
To create new categories or re-name existing ones, follow these steps:
- Click on Edit Categories on the module's main page to display the category editing page.
- To add a category, scroll down to the bottom of form. In the first empty field under ID enter a unique internal name for your new category, such as stuff 。 Then in the field next to it under Displayed description enter the name that will appear in Webmin, such as Thirdparty 。 Existing categories that you have added can be edited by changing the fields in this section as well. However, you should not change the entries in the ID column, as they are used internally to associate modules with categories. The ID is never visible to users anyway - only the displayed description is.
- To change the name of one of the default categories displayed at the top of the form, select the second radio button next to it and entering a new description into the text box to the right. If Default is chosen, the standard name determined by the current language will be used.
- Hit the Save Categories button at the bottom of the form to activate the new categories. You can now move modules into any that you have created.
 Edit Categories
  Reassign Modules
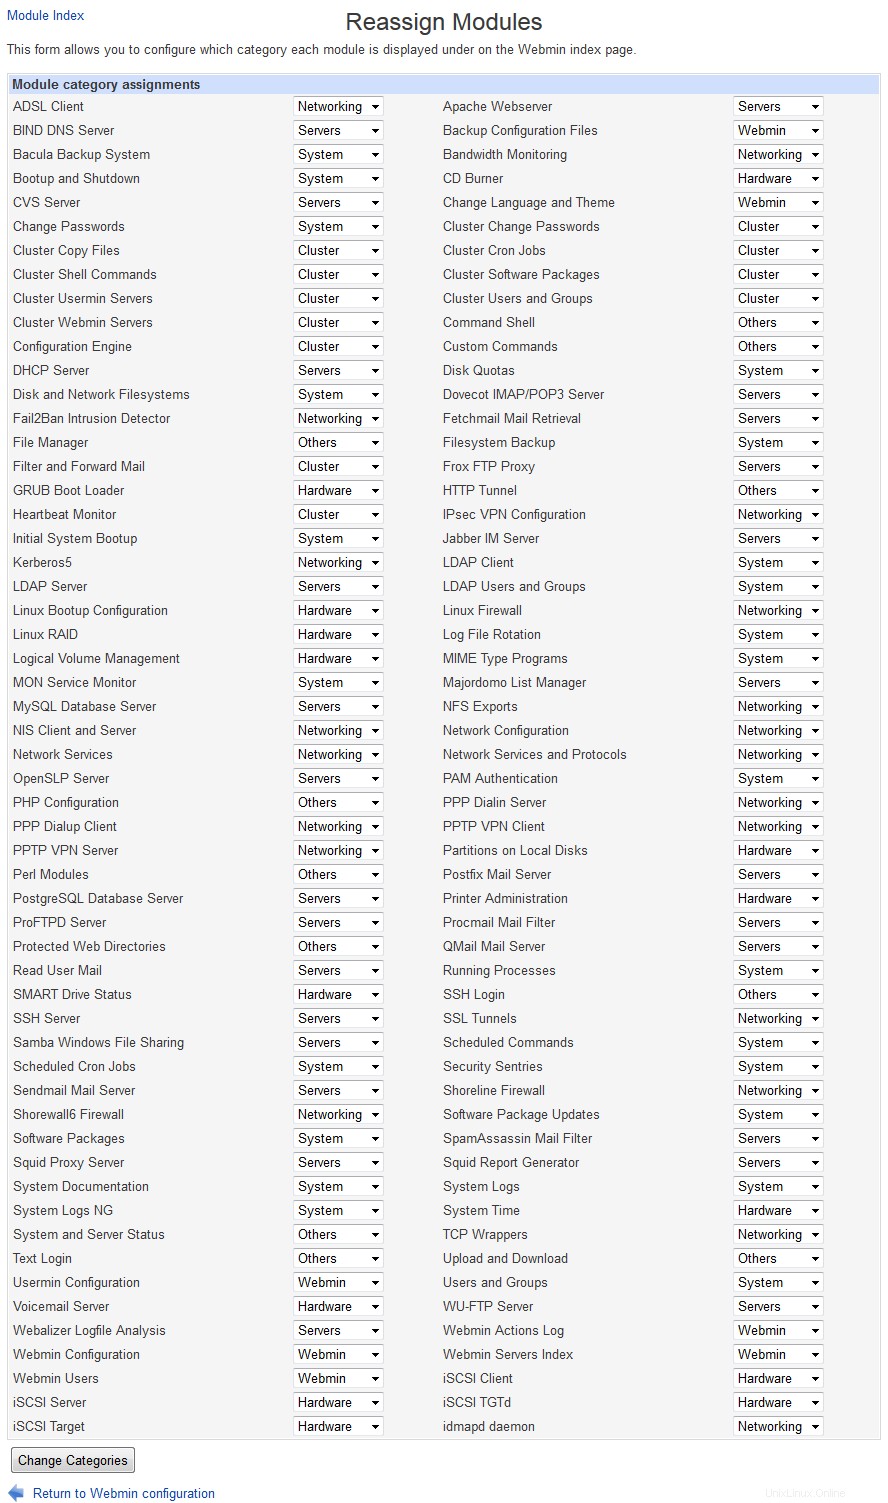
To change the categories that modules appear in, do the following:
- Click on the Reassign Modules icon on the main page.
- The page that appears lists every installed Webmin module and the category it is currently in. For each module that you want to move, select a new category from the menu next to its name.
- Click on the Change Categories button at the bottom of the page to move the modules.
 Reassign Modules
  Module Titles
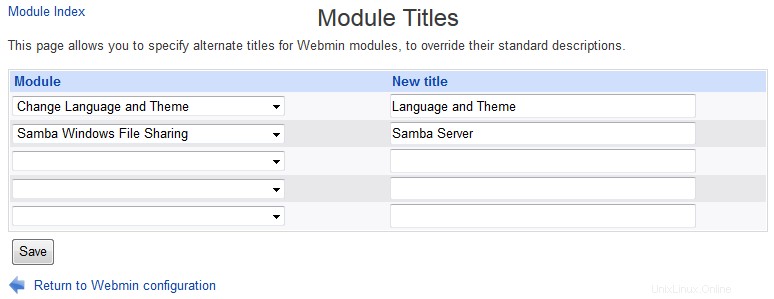
If you dont't like the the titles available (bacause they are too long or find them misleading) you may alter them at wish:
 Module Titles
  Webmin Themes
A theme is an extension to Webmin (much like a module) that controls how its interface appears. The currently active theme determines if and how the categories at the top of each page are displayed, what page background is used, what icons each module has, how titles appear and how each page ends. By changing themes you can significantly change the look of Webmin without effecting its functionality. Several themes are included by default, and you can install more that have been written by other developers.
Like the language, you can set the theme for all logins in this module, or override it for a specific user in the Webmin Users module. The steps to change the theme for everyone are :
- Click on the Webmin Themes icon on the module's main page. This will take you to a page for changing themes, installing a new theme and deleting existing ones.
- Select the theme to use from the Current theme メニュー。 Those included as standard with Webmin are :*Old Webmin Theme *The very simple theme that the first versions of Webmin used before theming was added. If you find the default too slow, this may be a better alternative as it uses less images. *Caldera Theme *An improved layout that uses frames to place categories and module icons at the top, and actual forms and pages down the bottom. *MSC.Linux Theme *The current default Webmin theme. *MSC.Linux Mini Theme *A modified version of the default theme, designed for use on small-screen devices such as PDAs.
- Hit the Change button to activate the chosen theme.
New themes developed by other people can also be added to Webmin, and several are available for download from www.webmin.com/third.html.
To install a theme, follow these steps :
- Click on the Webmin Themes icon on the module's main page.
- Select the theme's file using the second form. Just as when installing a module, you can choose to install a theme from a file on the system running Webmin, the PC your browser is on, or an HTTP or FTP URL.
- Hit the Install Theme button to have it downloaded (if necessary) and installed.
The final thing that you can do on this page in delete one of the installed themes. The Old Webmin Theme cannot be deleted as it is built into the program, and the other standard themes should not be as they will be added again if you upgrade to the next version. To delete a theme that you have installed, follow these instructions:
- Click on the Webmin Themes icon on the module's main page.
- Select the one to remove from the Theme to delete menu at the bottom of the page. If that menu does not appear it means that all installed themes are in use either by an individual user or for everyone.
- Hit the Delete button to bring up a confirmation page asking if really want to go ahead.
- Click on Delete again to remove the theme.
 Trusted Referrers
One danger when using a web-based administration interface like Webmin is that a link from another website may point to a program on your Webmin server. For example, a malicious site could include HTML code like :
<a href="http://localhost:10000/proc/run.cgi?cmd=rm+*">click me</a>
Clicking on this harmless-looking link would cause Webmin's Running Processes module to run a command that deletes files on your system! Assuming that you have already logged into Webmin, no password would be required. Worse still, a similar URL could be used in an tag for an image, which is fetched automatically by your browser as soon as you open a page that seems innocuous.
Fortunately, there is a solution - most browsers send the full URL of the page that a link came from in their HTTP requests. By default, Webmin compares the hostname in this URL with the one used to access the current page, and displays a warning if they do not match. This blocks links from other web sites to your Webmin server, except for those that do not specify a program, such as http://localhost:10000/cron/ , and are thus harmless.
Sometimes though you will want to allow such links, such as from an internal Intranet webserver that you maintain and trust. For this reason Webmin can be configured to allow links where the referrer is from a list of trusted hosts. These steps explain how :
- Click on the Trusted Referers icon on the module's main page.
- To turn off referrer checking entirely (which is not a good idea), change the Referer checking enabled? field to No .
- To allow links from certain hosts, fill in the Trusted websites field with a list of hostnames, such intranet.example.com 。
- In some cases the browser will not provide any referrer information at all, possibly because it does not support that HTTP feature. When the Trust links from unknown referers box is checked, Webmin will allow requests in this case. If you are paranoid and know that your browser always does supply referrer information, turn this option off.
- Hit the Save button to activate the settings.
Webmin does not simply deny links from un-trusted sites. Instead, it displays a warning and gives the user a chance to continue with the link. This warning form contains a checkbox labeled *Don't show this warning in future*, which if selected effectively changes the Referer checking enabled? field to No 。
 Anonymous Module Access
It is possible to set up certain Webmin modules so that they can only be used to view information, or to execute harmless commands. For example, the System and Server Status module's access control features can be set to give a user read-only access, letting them see which monitors are up and which are down. Or the Custom Commands module can be configured for some user to let him only run commands that display information.
The anonymous access feature of this module lets you grant access to certain modules to clients without them needing to login at all. Such clients will be treated as a specified Webmin user, and thus have only the rights that you grant to that user. However, they will never need to supply its username and password when accessing allowed modules on your system. This can be useful for making certain information (such as the server status display) available to everyone on your network, without needing to tell them a username and password. However, it should be used with extreme care, as granting anonymous access as a powerful user could compromise your entire system.
To set up unauthenticated access to some modules, follow these steps :
- First, use the Webmin Users module to create a user, called anonymous for example, who has the modules and access control settings that you want to give to unauthenticated clients. Its password can be set to No login allowed , as this user will never login conventionally. The user should be given the Old Webmin Theme , to minimize the number of image directories that you will need to allow access to later.
- Then in the Webmin Configuration module, click on the *Anonymous Module Access* icon.
- The form that appears contains a table with two columns, and initially two empty rows. Each row specifies a URL path on your server to allow unauthenticated access to, and a Webmin user* that requests to that path should be treated as. In the first row enter /images for the path and anonymous for the user, so that the directory containing Webmin's title images can be accessed by unauthenticated clients. In the second row enter the path for the module that you want to allow (such as /status ), and anonymous as the user again. Never enter a path of /, as it will allow unauthorized access to your entire Webmin server! The path to a specific CGI program (such as /custom/run.cgi ) may make sense in some cases.
- Hit the Save button to turn on anonymous access. If you want to allow more that two URL paths, click on the icon again so that the table is re-displayed with two more empty rows.
If a user who has already logged visits a module that has been allowed anonymous access with the steps above, Webmin will still identify him correctly as the logged-in user.
 File Locking
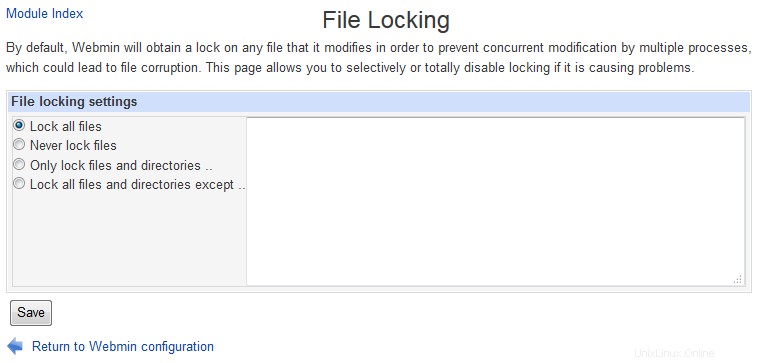 File Locking
  Mobile Device Options
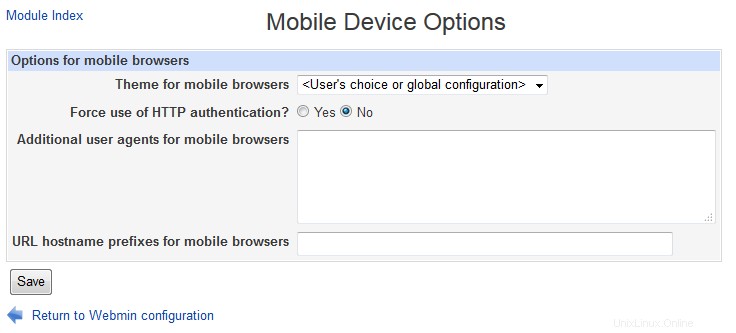 Mobile Device Options
  Blocked Hosts and Users
 Blocked Hosts and Users
  Background Status Collection
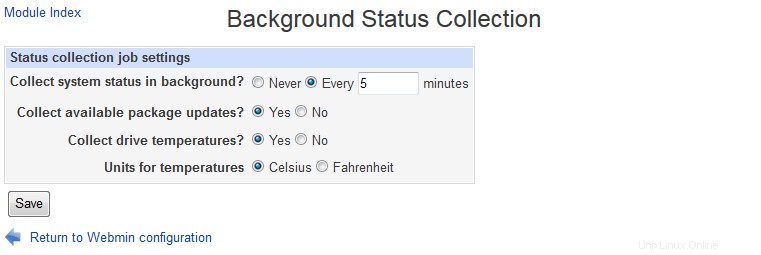 Background Status Collection
  Advanced Options
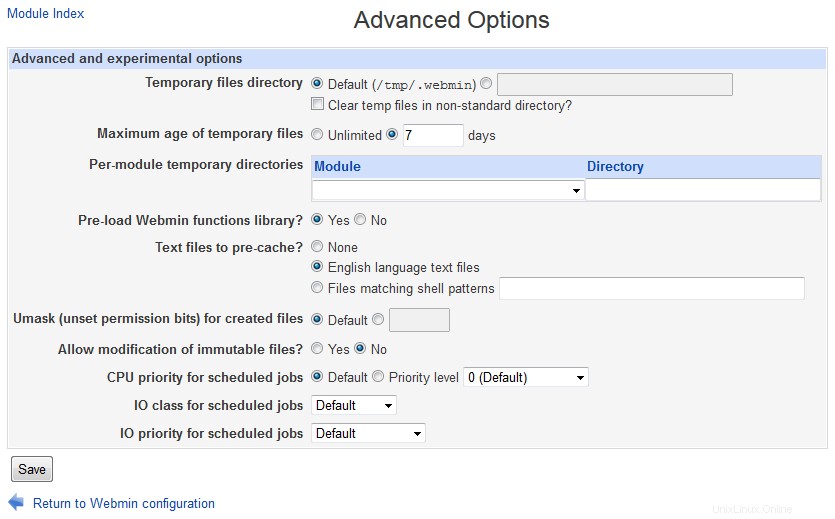 Advanced Options
  Debugging Log File
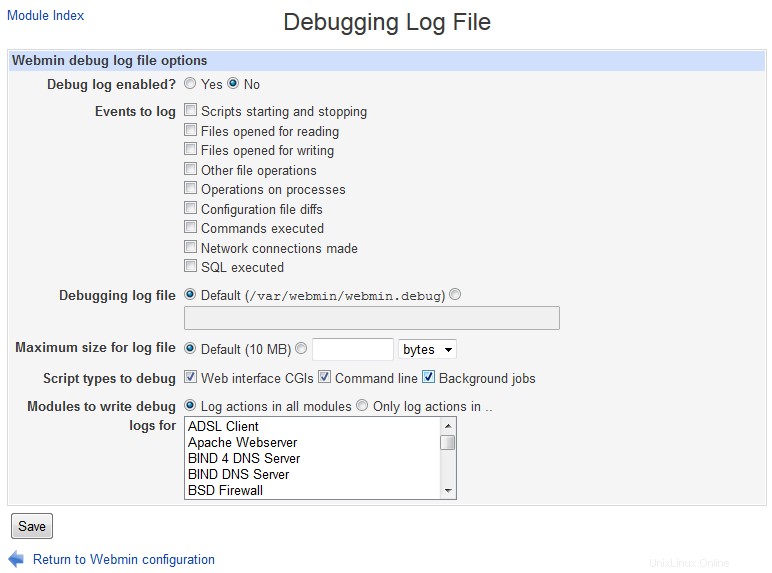 Debugging Log File
  Web Server Options
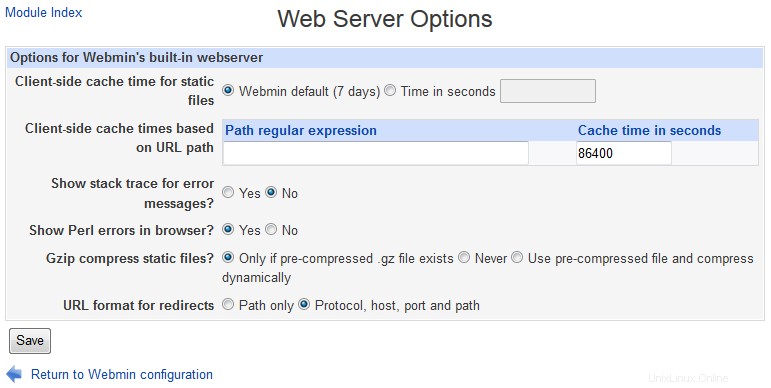 Web Server Options
  Webmin Scheduled Functions
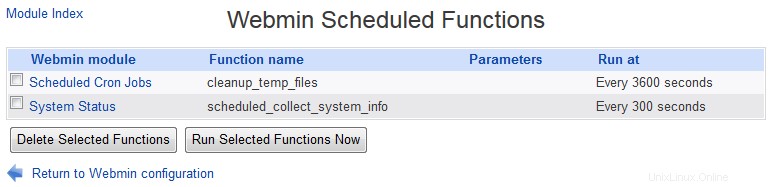 Webmin Scheduled Functions
  Sending Email
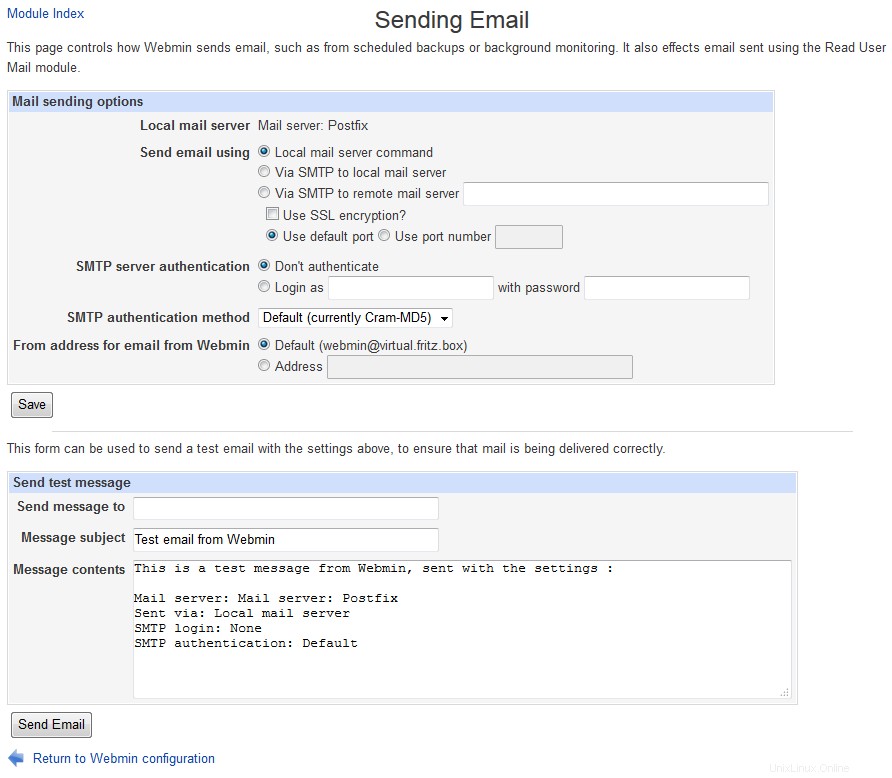 Sending Email
  SSL Encryption
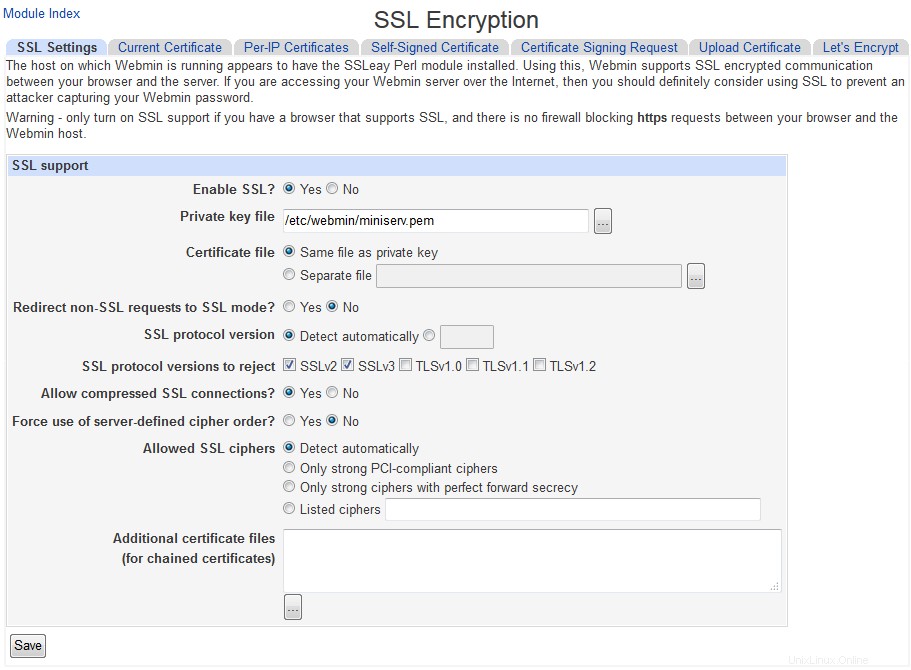
The SSL Encryption page in this module can be used to turn on or off SSL mode or to generate another new key, all of which is explained in Securing Webmin. Free certificates can be obtained using Let's Encrypt.
 SSL Encryption main page
  Certificate Authority
 Webmin Certificate Authority
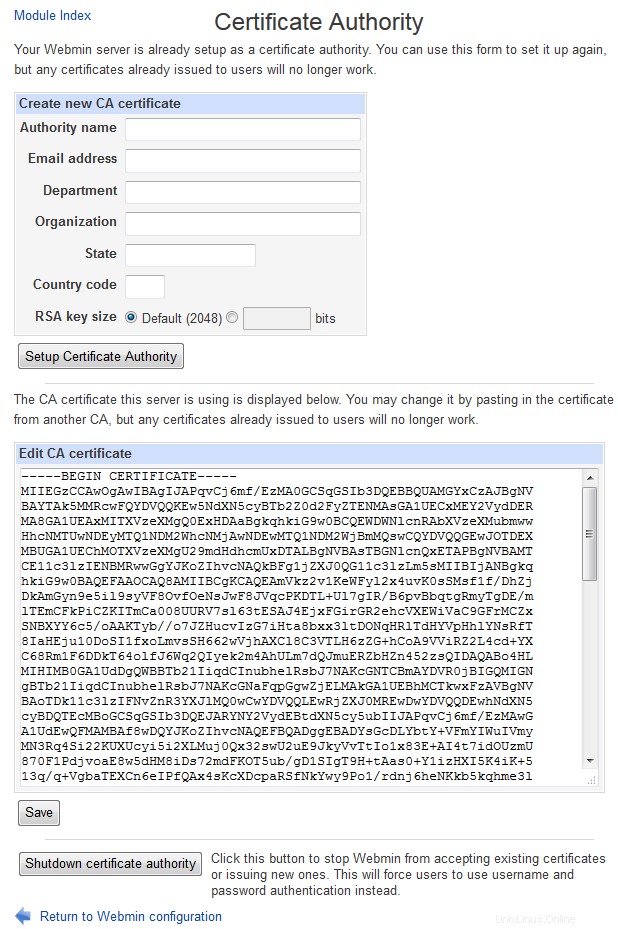
 As the Webmin Users page explains, the Webmin Users module can be used to request a client-side SSL certificate for a user. However, before this is possible you must set up your system as a certificate authority, or CA. An authority is basically just an SSL certificate that can be used to sign other newly issued client certificates, and to verify that those supplied by clients come from this CA.
Because client SSL authentication can only be used in SSL mode, Webmin must be running in that mode and thus have the openssl command installed before you can precede. Once these requirements have been satisfied, follow these steps to set up a CA:
- Click on the Certificate Authority icon on the module's main page to bring up a form for entering the new CAs details.
- In the Authority name field enter the name of the person issuing certificates, such as Network administrator .
- In the Email address field enter the address of the administrator for this server, such as bob@foo.com .
- In the Department field enter the subdivision of your organization that the server is in, such as Accounting 。 This can be left blank if it makes no sense, such as for a home server.
- In the Organization field enter the name of your company or organization, such as Foo Corporation 。 Again, this may not make sense in all cases and so can be left blank.
- Fill in the State field with the name of the state your server is in, such as California .
- Fill in the Country code field with the two-letter upper-case code for your country, such as AU 。
- Click on the Setup certificate authority button to generate the CA certificate and configure Webmin to use it. If you have done this before, any existing certificate will be overwritten.
- Webmin users can now generate personal certificates using the Webmin Users module. Unfortunately, the web server will request that all clients supply a certificate as soon as one user has one, which can cause annoying dialog boxes to appear to people who are still username and password authentication in some older browsers.
To stop using a CA for validating clients altogether, hit the Shutdown certificate authority button on the same page. All users will be forced to revert to username and password authentication instead.