Ubuntu14.04でGitlabHQを使用して独自のGitサーバーを実行する方法
このドキュメントでは、GitとGitHubをインストールして構成する方法について説明します。これらは、Gitリポジトリのホスト全体と関連する権限を管理および管理するための優れたツールです。したがって、これらはオープンソースソフトウェアを作成するユーザーにとって真の祝福であり続けますが、クローズドソースソフトウェアを作成する場合、サードパーティのサーバーにコードを信頼することに不安を感じる可能性があります。ユーザーの制御の外部にあるサーバーでgitリポジトリをホストせずに、Github / BitBucketのようなもので待望の柔軟性と制御を獲得するために、GitLabは天の恵みであり続けます!
GitLabは素晴らしいツールです。サーバー上のGitリポジトリ、つまりGitHubへのシンプルでユーザーフレンドリーでありながら強力なWebベースのインターフェイスを提供します。ユーザーは自分のクラウドサーバーで自由にホストし、カスタムビルドの方法でアクセスを制御できます。リポジトリのサイズを制限する唯一の要因は、サーバーの組み込みのストレージスペースです。
1予備メモ
このチュートリアルはUbuntu14.04サーバーに基づいているため、このチュートリアルを続行する前に、基本的なUbuntu14.04サーバーのインストールをセットアップする必要があります。システムには静的IPアドレスが必要です。このチュートリアルでは、IPアドレスとして192.168.0.100を使用し、ホスト名としてserver1.example.comを使用しています。 GitLabを機能させるには、必要なすべてのソフトウェアをインストールする必要があります。したがって、既存のVPS(ドロップレット)/まったく異なるLinuxディストリビューションを使用している場合は、互換性のないPythonバージョンとRubyバージョンで混乱が生じる可能性があります。したがって、 Ruby 2.0が不可欠です。 およびPython2.7 最初にインストールされます。
2 Ruby 2.0以降、Python2.7およびBundlerGemのインストール
Git Hubを構成する前に、まず事前構成をインストールします。必要なパッケージをインストールするプロセスを以下に説明します。
apt-get update
apt-get install -y build-essential zlib1g-dev libyaml-dev libssl-dev libgdbm-dev libreadline-dev libncurses5-dev libffi-dev curl git-core openssh-server redis-server checkinstall libxml2 -dev libxslt-dev libcurl4-openssl-dev libicu-dev
注:ユーザーは、Ruby 1.8がシステムにインストールされていないことを確認する必要がありますが、デフォルトのUbuntu14.04ではインストールされる可能性はほとんどありません。
Pythonのバージョンは次のように確認できます(私の場合はPython 2.7.6です):
python --version
example@unixlinux.online:〜#python --version
Python 2.7.6
example@unixlinux.online:~#
これは、以下に示すように実行できます。Ruby2.1.2をインストールすると、Rubyは次のようにインストールできます。
mkdir / tmp / ruby &&cd / tmp / ruby
wget http://ftp.ruby-lang.org/pub/ruby/2.1/ruby-2.1.2.tar.gz
tar zxvf ruby -2.1.2.tar.gz
cd ruby-2.1.2
./configure
make
make install
さらに、ルビーのバージョンを次のように確認します:
ルビー-v
example@unixlinux.online:/tmp/ruby/ruby-2.1.2# ruby -vruby 2.1.2p95(2014-05-08リビジョン45877)[x86_64-linux]
example@unixlinux。オンライン:/tmp/ruby/ruby-2.1.2#
次に、次のようにBundlerGemをインストールします。
gem install bundler --no-ri --no-rdoc
example@unixlinux.online:/tmp/ruby/ruby-2.1.2# gem install bundler --no-ri --no-rdocフェッチ:bundler-1.6.5.gem(100%)
bundler-1.6.5が正常にインストールされました
1つのgemがインストールされました
example@unixlinux.online:/tmp/ruby/ruby-2.1.2#
次に、次のように、Gitlabのuser=gitユーザーを作成してさらに構成で使用します。
adduser --disabled-login --gecos'GitLab' git
3GitLabシェルのインストール
次のコマンドを使用してGitLabシェルをダウンロードします:
cd / home / git
sudo -u git -H git clone https://github.com/gitlabhq/gitlab-shell.git
cd gitlab-shell
sudo -u git -H git checkout v1.7.0
sudo -u git -H cp config.yml.example config.yml
さらに、元のファイルconfig.yml.exampleのバックアップを作成し、それをconfig.ymlにコピーします。次のようにファイルを編集します:
vi config.yml
次に、値をgitlab_url: "http:// localhost/"から次のようにgitvalueに変更する必要があります:
# GitLab user. git by default
user: git

# Url to gitlab instance. Used for api calls. Should end with a slash.
#gitlab_url: "http://localhost/"
gitlab_url:     "http://server1.example.com"

[....]
次に、次のようにインストールされたGitLabシェルを実行します。
sudo -u git -H ./bin/install
次のような出力になります:
example@unixlinux.online:/home/git/gitlab-shell# sudo -u git -H ./bin/install
mkdir -p / home / git / repository:true
mkdir -p / home /git/.ssh:true
chmod 700 /home/git/.ssh:true
touch /home/git/.ssh/authorized_keys:true
chmod 600 / home /git/。 ssh / authorized_keys:true
chmod -R ug + rwX、o-rwx / home / git / repository:true
find / home / git / repository -type d -print0 | xargs -0 chmod g + s:true
example@unixlinux.online:/home/git/gitlab-shell#
4GitLab用のMariadbのインストール
次に、バックエンドで使用するMariadbを使用するようにGitLabをセットアップします。最初のステップは、以下のコマンドを使用してMariadbをインストールすることです。インストールプロセス中に、MySQLルートパスワードの設定を求めるプロンプトが表示されます。これは個人の好みに応じて設定できますが、後続の手順で使用するために同じものをメモしておく必要があります。
apt-get install mariadb-server mariadb-client libmariadbclient-dev
MariaDBの「root」ユーザーの新しいパスワード:<強い色:赤; TEXT-DECORATION:underline "> <-mariadbpassword
MariaDBの「root」ユーザーのパスワードを繰り返します。<強い色:赤; TEXT-DECORATION:underline "> <-mariadbpassword
Gitlabデータベースの作成:
mysql -u root -p
Mariadbプロンプトで、database =gitlabdb user=gitlabuserおよびpassword=gitlabuserpasswordを使用します:
CREATE DATABASE gitlabdb DEFAULT CHARACTER SET utf8 COLLATE utf8_unicode_ci;
GRANT SELECT、LOCK TABLES、INSERT、UPDATE、DELETE、CREATE、DROP、INDEX、ALTERONgitlabdb。*TO'gitlabuser'@'localhost' IDENTIFIED BY'gitlabuserpassword';
フラッシュ権限;
終了
次に、次のようにインストールを進めます。
cd / home / git
sudo -u git -H git clone https://github.com/gitlabhq/gitlabhq.git gitlab
cd / home / git / gitlab
sudo -u git -Hgitチェックアウト6-0-安定
sudo-u git -H cp config / gitlab.yml.example config / gitlab.yml
GitLabシェルのセットアップと同様に、VPS用にドメインを構成している場合は、そのドメインを使用するようにconfig.ymlを編集する必要があります(以下のコマンドを参照)。
sudo -u git -H vi config / gitlab.yml
[...]
 ## GitLab settings
#  gitlab:
#    ## Web server settings
#    host: localhost
#    port: 80
#    https: false

  gitlab:
    ## Web server settings
    host: server1.example.com
    port: 80
    https: false
[...]
ここでは、いくつかのLinuxファイルのアクセス許可を設定し、gitユーザーのGitconfigを構成し、gitユーザー用にいくつかのGitLabconfigとディレクトリを設定する必要があります(以下を参照)。
cd / home / git / gitlab
chown -R git log /
chown -R git tmp /
chmod -R u + rwX log /
chmod -R u + rwX tmp /
sudo -u git -H mkdir / home / git / gitlab-satellites
sudo -u git -H mkdir tmp / pids /
sudo -u git -H mkdir tmp / sockets /
chmod -R u + rwX tmp / pids /
chmod -R u + rwX tmp / sockets /
sudo -u git -H mkdir public / uploads
chmod -R u + rwX public / uploads
sudo -u git -H cp config / unicorn.rb.example config / unicorn.rb
sudo -u git -H git config --global user.name "GitLab"
sudo -u git -H git config --global user.email "example@unixlinux.online"
sudo -u git -H git config --global core.autocrlf input
sudo -u git cp config / database.yml.mysql config / database.yml
次に、以前に設定したgitlabMariadbユーザーを使用するようにGitLabに指示する必要があります。このために、ファイルconfig / database.ymlfileを編集します(以下に示すように):
sudo -u git -H vi config / database.yml
[...]
#production:
#  adapter: mysql2
#  encoding: utf8
#  reconnect: false
#  database: gitlabhq_production
#  pool: 10
#  username: root
#  password: "secure password"


production:
  adapter: mysql2
  encoding: utf8
  reconnect: false
  database: gitlabdb
  pool: 10
  username: gitlabuser
  password: "gitlabuserpassword"
[...]
データベース作成時に指定した値を入力してください。データベース作成時に他の値を使用した場合は、上記の値が異なる場合があります。ファイルのアクセス許可を次のように変更します:
sudo -u git -H chmod o-rwx config / database.yml
これで、さらにいくつかの必要なgemをインストールできます。これは、かなり長いステップになる可能性があります(以下を参照)。
cd / home / git / gitlab
gem install charlock_holmes --version '0.6.9.4'
wget https://downloads-packages.s3.amazonaws.com/ubuntu-14.04/gitlab_7.1.1-omnibus-1_amd64.deb
apt-get install openssh-server
apt-get install postfix#選択代わりにsendmailを使用する「インターネットサイト」も機能しますが、eximに問題があります
ここでは、ユーザー入力を求められます。インターネットサイトを選択し、server1.example.comとしてシステムメールを使用してください。postfixをインストールする代わりにsendmailを使用することもできます。この場合、eximは機能しません。次に、git labをインストールします:
dpkg -i gitlab_7.1.1-omnibus-1_amd64.deb
構成ファイルを編集して、ホスト名を追加します。つまり、hostname =server1.example.com:vi /etc/gitlab/gitlab.rb
[....]
#external_url 'http://gitlab.example.com'
external_url 'http://server1.example.com'
次に、GitLabの開始を次のように再構成します。
gitlab-ctl reconfigure
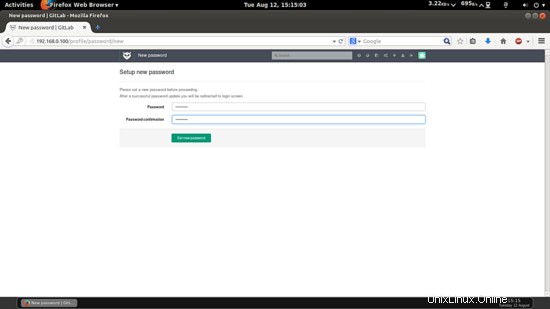
http://192.168.0.100/users/sign_onでログインページを閲覧できます。資格情報はusername=rootおよびpassword=5iveL!fe
として使用します。
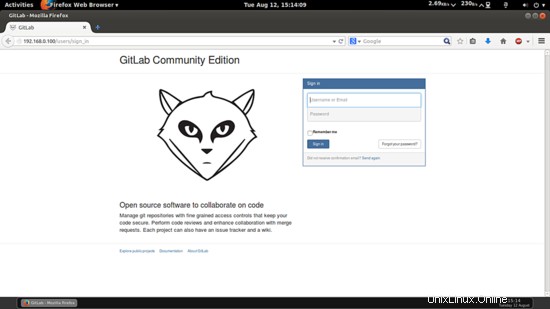
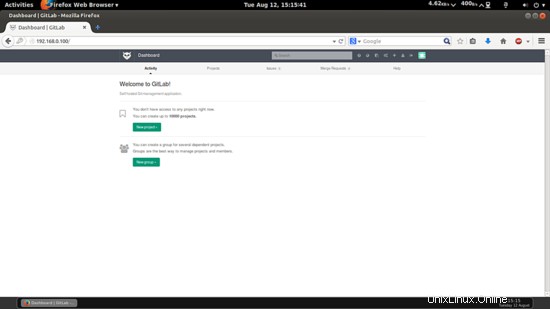
これがデフォルトのウェルカムページになります。
>
5つのリンク
- gitlab:https://about.gitlab.com/
- ubuntu:http://www.ubuntu.com/