専用のWebとMySQLを備えた仮想マルチサーバー環境、 ISPConfig3を使用したDebianSqueeze上の電子メールおよびDNSサーバー
バージョン1.0
作成者:MichelKäser
このチュートリアルでは、Debian Squeezeで専用のWebおよびMySQL、電子メール、DNSサーバーを備えたOpenVZを使用して、単一の専用サーバーを仮想マルチサーバー環境としてセットアップする方法について説明します。また、これらすべてのサーバーを保守する方法についても学習します。さらに、それらすべてにいくつかの非常に便利なパッケージをインストールする方法、それらを保護する方法、およびそれらを監視する方法を学習します。
最終的には、完全に機能する仮想マルチサーバー環境ができ、共有ホスティングの準備が整います。
これがあなたのために働くという保証はありません!
1要件
このチュートリアルに従うには、次のものが必要です。
- 専用サーバー
- 少なくとも5つのIP
- 多くの時間
2予備メモ
このチュートリアルでは、次の専用サーバーを使用します:http://www.hetzner.de/hosting/produkte_rootserver/ex4 withFlexi-Packおよび追加の/28サブネット(14 IP)。
目標は、これらのサーバーを用意することです。
- タイプ:ノード
- ハードウェア:専用
- ホスト名:root.example.tld
- 192.168.1.1
- タイプ:コンテナ
- ハードウェア:仮想
- ホスト名:web.example.tld
- 192.168.1.2
- タイプ:コンテナ
- ハードウェア:仮想
- ホスト名:mail.example.tld
- 192.168.1.3
- タイプ:コンテナ
- ハードウェア:仮想
- ホスト名:ns1.example.tld
- 192.168.1.4
- タイプ:コンテナ
- ハードウェア:仮想
- ホスト名:ns2.example.tld
- 192.168.1.5
3ベースシステム
私と同じ専用サーバーを使用したと思います。 Hetzner Web-Interfaceを使用すると、さまざまなディストリビューションをインストールできます。最小限のDebian6.064ビットを使用してください。
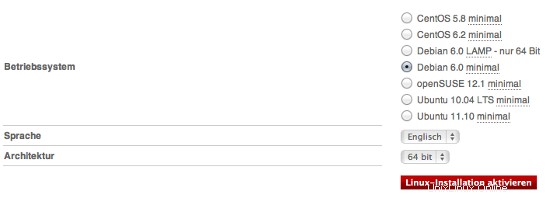
これにより、基本システムがインストールされ、自分で構成する必要はありません。ルートパスワードも取得します。
4 OpenVZ +OVZWebパネルのインストール
サーバーの準備ができたら、受け取った資格情報を使用してログインします。最初に更新/アップグレードを行います:
apt-get update &&apt-get -y upgrade &&apt-get -y dist-upgrade
サーバーを最新バージョンにアップグレードします。
以下にいくつかの追加パッケージをインストールします:
apt-get -y install nano wget ntp ntpdate
4.1OpenVZのインストール
ここで、仮想マルチサーバー環境のベースであるOpenVZをインストールします。
OpenVZカーネルとvzctl、vzquota、およびvzdumpパッケージはDebian Squeezeリポジトリで利用できるため、次のようにインストールできます。
apt-get install linux-image-openvz-amd64 vzctl vzquota vzdump
/ var / lib /vzから/vzへのシンボリックリンクを作成して、下位互換性を提供します。
ln -s / var / lib / vz / vz
/etc/sysctl.confを開き、次の設定が含まれていることを確認します。
nano /etc/sysctl.conf
[...]
net.ipv4.conf.all.rp_filter=1
net.ipv4.icmp_echo_ignore_broadcasts=1
net.ipv4.conf.default.forwarding=1
net.ipv4.conf.default.proxy_arp = 0
net.ipv4.ip_forward=1
kernel.sysrq = 1
net.ipv4.conf.default.send_redirects = 1
net.ipv4.conf.all.send_redirects = 0
net.ipv4.conf.eth0.proxy_arp=1
[...]
/etc/sysctl.confを変更する必要がある場合は、
を実行します。sysctl -p
その後。
仮想マシンのIPアドレスがホストシステムのIPアドレスとは異なるサブネットからのものである場合、次の手順は重要です。これを行わないと、仮想マシンでネットワーキングが機能しなくなります!
/etc/vz/vz.confを開き、NEIGHBOUR_DEVSをallに設定します:
nano /etc/vz/vz.conf
[...]
# Controls which interfaces to send ARP requests and modify APR tables on.
NEIGHBOUR_DEVS=all
[...]
最後に、システムを再起動します。
再起動
システムが問題なく再起動すれば、すべて問題ありません!
実行
uname -r
新しいOpenVZカーネルが表示されます:
example@unixlinux.online:〜#uname -r
2.6.32-5-openvz-amd64
Hetznerは/homeを別のハードディスクにマウントするため、OpenVZのバックアップ場所として使用できます。これを行うには、次を実行します:
rm -rf / var / lib / vz / dump
ln -s / home / backup / vz / var / lib / vz / dump
仮想コンテナ内でfail2banを使用するため、それらのIPTablesサポートを有効にする必要があります。これを行うには、/ etc / vz/vz.confファイルを編集します。
nano /etc/vz/vz.conf
IPTABLESで始まる行を検索し、コメント(#)します。その後、以下を貼り付けます:
[...]
IPTABLES="ipt_REJECT ipt_tos ipt_limit ipt_multiport iptable_filter iptable_mangle ipt_TCPMSS ipt_tcpmss ipt_ttl ipt_length ipt_state"
次に、カーネルで状態モジュールをアクティブにします。
modprobe xt_state
4.2OVZWebパネルのインストール
OpenVZ Webパネルは、OpenVZ仮想化テクノロジーを使用してハードウェアおよび仮想サーバーを制御するためのGUIWebベースのフロントエンドです。
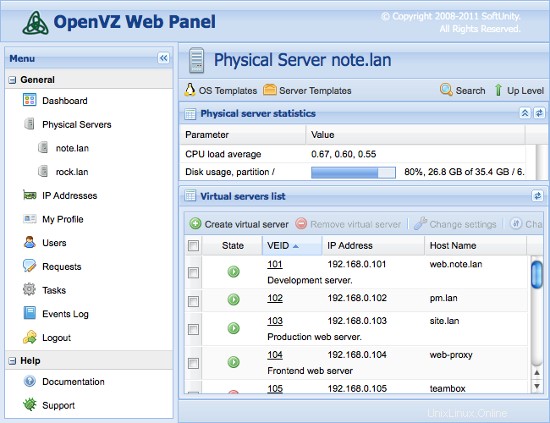
OpenVZ Web Panelをインストールする最も簡単な方法は、次のコマンドを実行することです。
wget -O-http://ovz-web-panel.googlecode.com/svn/installer/ai.sh | sh
インストール後、Panelは次のURLで利用できるようになります:
http:// <192.168.1.1>:3000
デフォルトの管理者の資格情報は、admin/adminです。デフォルトのパスワードを変更することを忘れないでください。
ISPConfig3を使用したDebianSqueeze上の専用WebおよびMySQL、EメールおよびDNSサーバーを備えた仮想マルチサーバー環境-2ページ
5仮想サーバーの作成
次に、OVZWebパネルを使用して仮想サーバーを作成します。パネルにログインし、[IPアドレス]の下にIPを追加します。次に、ローカルホストとOSテンプレートをクリックします。
次に、仮想サーバーのテンプレートをダウンロードする必要があります。これを行うには、[新しいOSテンプレートのインストール]-> [寄稿]をクリックし、debian-6.0-amd64-minimalを選択します。
ここでローカルホストに戻り、[仮想サーバーの作成]をクリックします。以下のようにフィールドに入力します:
- サーバーID(VEID):数字(IPの最後の部分を選択するので、最初の部分は2)
- OSテンプレート:すでに適切に選択されています
- サーバーテンプレート:無制限
- IPアドレス:192.168.1.2
- ホスト名:web.example.tld
- DNSサーバー:8.8.4.4 8.8.8.8(GoogleのDNS)
- 残りはそのままにして、必要に応じてディスクスペース、RAM、CPUを割り当てます...
すべての仮想サーバーに対してこの手順を繰り返します(最後に4回:Web、メール、2x DNS)。
5.1仮想サーバーの準備
ここで、すべての仮想サーバーにログインして、次のコマンドを実行する必要があります。
apt-get update &&apt-get -y upgrade &&apt-get -y dist-upgrade
apt-get -y install nano wget ntp ntpdate
これにより、最新バージョンにアップグレードされ、不足しているパッケージがいくつかインストールされます。
6専用サーバーのインストール
6.1 Web/DBサーバーのインストール
hostsファイルを編集し、すべてのサーバーのIPアドレスとホスト名を追加します。ホスト名とIPアドレスは、セットアップに一致するように調整する必要があります。
nano / etc / hosts
127.0.0.1 localhost
192.168.1.2 web.example.tld
192.168.1.3 mail.example.tld
192.168.1.4 ns1.example.tld
192.168.1.5 ns2.example.tld

# The following lines are desirable for IPv6 capable hosts
::1     localhost ip6-localhost ip6-loopback
fe00::0 ip6-localnet
ff00::0 ip6-mcastprefix
ff02::1 ip6-allnodes
ff02::2 ip6-allrouters
ff02::3 ip6-allhosts
サーバーのホスト名を設定します:
echo web.example.tld> /etc/hostname
/etc/init.d/hostname.sh start
MySQLサーバーをインストールします。 MySQLサーバーインスタンスは、ISPConfigがサーバー間で構成を同期するために使用するため、すべてのサーバーで必要です。
apt-get -y install mysql-client mysql-server
インストーラーから要求されたら、MySQLの新しいパスワードを入力します。
MySQLがローカルホストだけでなく、マスターサーバー上のすべてのインターフェイスでリッスンするようにしたいので、/ etc / mysql / my.cnfを編集して、bind-address =127.0.0.1:
の行をコメントアウトします。nano /etc/mysql/my.cnf
[...]

# Instead of skip-networking the default is now to listen only on
# localhost which is more compatible and is not less secure.
#bind-address           = 127.0.0.1

[...]
>
次に、MySQLを再起動します:
/etc/init.d/mysql restart
次に、Apache2、PHP5、phpMyAdmin、FCGI、suExec、Pear、およびmcryptを次のようにインストールします。
apt-get -y install apache2 apache2.2-common apache2-doc apache2-mpm-prefork apache2-utils libexpat1 ssl-cert libapache2-mod-php5 php5 php5-common php5-gd php5-mysql php5-imap phpmyadmin php5-cli php5 -cgi libapache2-mod-fcgid apache2-suexec php-pear php-auth php5-mcrypt mcrypt php5-imagick imagemagick libapache2-mod-suphp libopenssl-ruby libapache2-mod-ruby sudo zip wget
次の質問が表示されます:
自動的に再構成するWebサーバー:<-apache2
次に、次のコマンドを実行して、Apacheモジュールのsuexec、rewrite、ssl、actions、headers、expires、includeを有効にします。
a2enmod suexecrewritesslアクションにはrubydav_fsdavauth_digestヘッダーの有効期限が含まれます
PureFTPdは、次のコマンドでインストールできます。
apt-get -y install pure-ftpd-common pure-ftpd-mysql
ファイル/etc/ default / pure-ftpd-common ...
を編集しますvi / etc / default / pure-ftpd-common
...そしてvirtualchrootがVIRTUALCHROOT=trueに設定されていることを確認してください:
[...]
VIRTUALCHROOT=true
[...]
次に、FTPおよびTLSセッションを許可するようにPureFTPdを構成します。 FTPは、すべてのパスワードとすべてのデータがクリアテキストで転送されるため、非常に安全でないプロトコルです。 TLSを使用することで、通信全体を暗号化できるため、FTPの安全性が大幅に向上します。
FTPおよびTLSセッションを許可する場合は、
を実行します。エコー1>/etc / pure-ftpd / conf / TLS
TLSを使用するには、SSL証明書を作成する必要があります。 / etc / ssl / private /に作成するので、最初にそのディレクトリを作成します:
mkdir -p / etc / ssl / private /
その後、次のようにSSL証明書を生成できます。
openssl req -x509 -nodes -days 7300 -newkey rsa:2048 -keyout /etc/ssl/private/pure-ftpd.pem -out /etc/ssl/private/pure-ftpd.pem
国名(2文字のコード)[AU]:<-国名を入力します(例:「DE」)。
州名または州名(フルネーム)[一部の州]:<-州を入力しますまたは州名。
地域名(例:市)[]:<-市区町村を入力してください。
組織名(例:会社)[Internet Widgits Pty Ltd]:<-組織名を入力してください(例:会社名)
組織単位名(例:セクション)[]:<-組織単位名(例:「IT部門」)を入力します。
一般名(例:あなたの名前)[]:<-システムの完全修飾ドメイン名を入力します(例: "web.example.tld")。
メールアドレス[]:<-メールアドレスを入力します。
SSL証明書の権限を変更します:
chmod 600 /etc/ssl/private/pure-ftpd.pem
vlogger、webalizer、awstatsをインストールします:
apt-get -y install vlogger webalizer awstats
その後、/ etc / cron.d/awstatsを開きます...
vi /etc/cron.d/awstats
...そしてそのファイル内の両方のcronジョブをコメントアウトします:
#*/10 * * * * www-data [ -x /usr/share/awstats/tools/update.sh ] && /usr/share/awstats/tools/update.sh

# Generate static reports:
#10 03 * * * www-data [ -x /usr/share/awstats/tools/buildstatic.sh ] && /usr/share/awstats/tools/buildstatic.sh
Jailkitのインストール:Jailkitは、SSHユーザーをchrootする場合にのみ必要です。次のようにインストールできます(重要:JailkitはISPConfigの前にインストールする必要があります-後でインストールすることはできません!):
apt-get -y install build-essential autoconf automake1.9 libtool flex bison debhelper
cd / tmp
wget http://olivier.sessink.nl/jailkit/jailkit-2.14.tar.gz
tar xvfz jailkit-2.14.tar.gz
cd jailkit-2.14
./debian/rules binary
cd ..
dpkg -i jailkit_2.14-1_*。deb
rm -rf jailkit-2.14 *
fail2banのインストール:これはオプションですが、ISPConfigモニターがログを表示しようとするため、推奨されます:
apt-get install fail2ban
fail2banモニターをPureFTPdにするには、ファイル/etc/fail2ban/jail.local:
を作成します。vi /etc/fail2ban/jail.local
[pureftpd]

enabled  = true
port     = ftp
filter   = pureftpd
logpath  = /var/log/syslog
maxretry = 3
次に、次のフィルターファイルを作成します。
vi /etc/fail2ban/filter.d/pureftpd.conf
[Definition]
failregex = .*pure-ftpd: \(.*@<HOST>\) \[WARNING\] Authentication failed for user.*
ignoreregex =
その後、fail2banを再起動します:
/etc/init.d/fail2ban restart
次に、ISPConfig3をインストールします。最新のISPConfig3安定版リリースのダウンロードURLを取得するには、ISPConfig Webサイトにアクセスしてください:http://www.ispconfig.org/ispconfig-3/download/
このサーバーは、ISPConfigコントロールパネルインターフェイスを実行するセットアップのマスターサーバーです。インストール中に他のMySQLインスタンスがこのノードのMySQLデータベースに接続できるようにするには、すべてのスレーブサーバーのホスト名とIPアドレスのMySQLルートユーザーレコードをマスターデータベースに追加する必要があります。これを行う最も簡単な方法は、すでにインストールしたWebベースのphpmyadmin管理ツールを使用することです。 WebブラウザでURLhttp://192.168.1.2/phpmyadminを開き、MySQL rootユーザーとしてログインして、次のMySQLクエリを実行します。
CREATE USER'root' @ '192.168.1.3' IDENTIFIED BY'myrootpassword';
GRANT ALL PRIVILEGESON*。 * TO'root' @ '192.168.1.3' IDENTIFIED BY'myrootpassword' WITH GRANT OPTION MAX_QUERIES_PER_HOUR 0 MAX_CONNECTIONS_PER_HOUR 0 MAX_UPDATES_PER_HOUR 0 MAX_USER_CONNECTIONS 0;
CREATE USER'root' @ '192.168.1.4' IDENTIFIED BY'myrootpassword';
GRANT ALL PRIVILEGESON*。 * TO'root' @ '192.168.1.4' IDENTIFIED BY'myrootpassword' WITH GRANT OPTION MAX_QUERIES_PER_HOUR 0 MAX_CONNECTIONS_PER_HOUR 0 MAX_UPDATES_PER_HOUR 0 MAX_USER_CONNECTIONS 0;
CREATE USER'root' @ '192.168.1.5' IDENTIFIED BY'myrootpassword';
GRANT ALL PRIVILEGESON*。 * TO'root' @ '192.168.1.5' IDENTIFIED BY'myrootpassword' WITH GRANT OPTION MAX_QUERIES_PER_HOUR 0 MAX_CONNECTIONS_PER_HOUR 0 MAX_UPDATES_PER_HOUR 0 MAX_USER_CONNECTIONS 0;
CREATE USER'root' @'mail.example.tld' IDENTIFIED BY'myrootpassword';
GRANT ALL PRIVILEGESON*。 * TO'root' @'mail.example.tld' IDENTIFIED BY'myrootpassword' WITH GRANT OPTION MAX_QUERIES_PER_HOUR 0 MAX_CONNECTIONS_PER_HOUR 0 MAX_UPDATES_PER_HOUR 0 MAX_USER_CONNECTIONS 0;
CREATE USER'root' @'ns1.example.tld' IDENTIFIED BY'myrootpassword';
GRANT ALL PRIVILEGESON*。 * TO'root' @'ns1.example.tld' IDENTIFIED BY'myrootpassword' WITH GRANT OPTION MAX_QUERIES_PER_HOUR 0 MAX_CONNECTIONS_PER_HOUR 0 MAX_UPDATES_PER_HOUR 0 MAX_USER_CONNECTIONS 0;
CREATE USER'root' @'ns2.example.tld' IDENTIFIED BY'myrootpassword';
GRANT ALL PRIVILEGESON*。 * TO'root' @'ns2.example.tld' IDENTIFIED BY'myrootpassword' WITH GRANT OPTION MAX_QUERIES_PER_HOUR 0 MAX_CONNECTIONS_PER_HOUR 0 MAX_UPDATES_PER_HOUR 0 MAX_USER_CONNECTIONS 0;
上記のSQLコマンドで、IPアドレス(192.168.1.3〜192.168.1.5)をサーバーのIPアドレスに置き換え、mail.example.tld、ns1.example.tld、およびns2.example.tldをサーバーとmyrootpasswordと目的のルートパスワード。
[権限の再読み込み]ボタンをクリックするか、MySQLを再起動します。次に、phpmyadminを閉じます。
web.example.tldのシェルに戻り、最新のISPConfig3安定版リリースをダウンロードします。
cd / tmp
wgethttp://www.ispconfig.org/downloads/ISPConfig-3-stable.tar.gz
tar xfz ISPConfig-3-stable.tar.gz
cd ispconfig3_install /インストール/
次に、インストールスクリプトを開始します:
php -q install.php
言語の選択(en、de)[en]:<-en
インストールモード(標準、エキスパート)[標準]:<-エキスパート
サーバーの完全修飾ホストホスト(FQDN)(例:server2) .domain.tld [web.example.tld]:<-web.example.tld
MySQLサーバーのホスト名[localhost]:<-localhost
MySQL rootユーザー名[root]:<-root
MySQLルートパスワード[]:<-ここにMySQLルートパスワードを入力します
作成するMySQLデータベース[dbispconfig]:<-dbispconfig
MySQL文字セット[utf8]:<-utf8
このサーバーは既存のISPConfigマルチサーバーセットアップ(y、n)に参加しますか[n]:<-n
メールの構成(y、n)[y]:<-n
Jailkitの構成(y、n)[y]:<-y
FTPサーバーの構成(y、n)[y]:<-y
DNSサーバーの構成(y、n)[y]:<--n
Apacheサーバーの構成(y、n)[y]:<-y
ファイアウォールサーバーの構成(y、n)[y]:<-n
ISPConfigWebのインストール-インターフェイス(y、n)[y]:<-y
ISPConfigポート[8080]:<-8080
ISPConfig WebインターフェイスのSSLを有効にする(y、n)[y]:<--y
国名(2文字のコード)[AU]:<-ENT ER
州名または州名(フルネーム)[一部の州]:<-ENTER
地域名(例:市)[]:<-ENTER
組織名(例:会社)[Internet Widgits Pty Ltd]:<-ENTER
組織単位名(例:セクション)[]:<-ENTER
一般名(例:あなたの名前)[]:<- ENTER
メールアドレス[]:<-ENTER
チャレンジパスワード[]:<-ENTER
オプションの会社名[]:<-ENTER
インストールディレクトリをクリーンアップします:
cd / tmp
rm -rf /tmp/ispconfig3_install/install
rm -f /tmp/ISPConfig-3-stable.tar.gz
6.2メールサーバーのインストール
hostsファイルを編集し、すべてのサーバーのIPアドレスとホスト名を追加します。ホスト名とIPアドレスは、セットアップに一致するように調整する必要があります。
nano / etc / hosts
127.0.0.1 localhost
192.168.1.2 web.example.tld
192.168.1.3 mail.example.tld
192.168.1.4 ns1.example.tld
192.168.1.5 ns2.example.tld

# The following lines are desirable for IPv6 capable hosts
::1     localhost ip6-localhost ip6-loopback
fe00::0 ip6-localnet
ff00::0 ip6-mcastprefix
ff02::1 ip6-allnodes
ff02::2 ip6-allrouters
ff02::3 ip6-allhosts
サーバーのホスト名を設定します:
echo mail.example.tld> / etc / hostname
echo mail.example.tld> /etc/mailname
/etc/init.d/hostname.sh start
1つのコマンドでpostfix、dovecot、MySQLをインストールします:
apt-get -y install postfix postfix-mysql postfix-doc mysql-client mysql-server openssl getmail4 rkhunter binutils dovecot-imapd dovecot-pop3d
インストーラーから要求されたときにmysqlの新しいパスワードを入力し、以下に説明するように次の質問に答えます。
一般的なタイプの構成? <-インターネットサイト
メール名? <-mail.example.tld
amavisd-new、SpamAssassin、およびClamAVをインストールするには、次のコマンドを実行します。
apt-get -y install amavisd-new spamassassin clamav clamav-daemon zoo unzip bzip2 arj nomarch lzop cabextract apt-listchanges libnet-ldap-perllibauthen-sasl-perlclamav-docsデーモンlibio-string-perllibio-socket-ssl-perl libnet-ident-perl zip libnet-dns-perl
サーバーでメーリングリストを使用する場合は、mailmanをインストールします。このステップはオプションです。 mailmanにはapacheWebサーバーが必要なので、メールサーバーでapacheインスタンスを実行したくない場合は、mailmanをインストールしないでください。
apt-get -y install mailman
mailmanのaptインストーラーは、メーリングリストの言語を選択するように要求します。 mailmanに使用するすべての言語を有効にします。次に、「mailman」メーリングリストを作成します。
ニューリストメールマン
メーリングリスト管理者のメールアドレスと新しいパスワードを入力します。これが、mailmanインストールの最後のステップです。 phpをインストールする次のコマンドは、mailmanをインストールしたかどうかに関係なく、すべてのサーバーで実行する必要があります。
次に、PHPのコマンドラインバージョンをインストールインストールして、ISPConfig用のPHPベースのシェルスクリプトを実行できるようにします。
apt-get -y install php5-cli php5-mysql php5-mcrypt mcrypt
fail2banのインストール:これはオプションですが、ISPConfigモニターがログを表示しようとするため、推奨されます:
apt-get install fail2ban
fail2banでPureFTPdとDovecotを監視するには、ファイル/etc/fail2ban/jail.local:
を作成します。vi /etc/fail2ban/jail.local
[dovecot-pop3imap]

enabled = true
filter = dovecot-pop3imap
action = iptables-multiport[name=dovecot-pop3imap, port="pop3,pop3s,imap,imaps", protocol=tcp]
logpath = /var/log/mail.log
maxretry = 5
次に、次のフィルターファイルを作成します。
vi /etc/fail2ban/filter.d/dovecot-pop3imap.conf
[Definition]
failregex = (?: pop3-login|imap-login): .*(?:Authentication failure|Aborted login \(auth failed|Aborted login \(tried to use disabled|Disconnected \(auth failed|Aborted login \(\d+ authentication attempts).*rip=(?P<host>\S*),.*
ignoreregex =
その後、fail2banを再起動します:
/etc/init.d/fail2ban restart
次に、このサーバーにISPConfig3をインストールします。最新のISPConfig3安定版リリースのダウンロードURLを取得するには、ISPConfig Webサイトにアクセスしてください:http://www.ispconfig.org/ispconfig-3/download/
最新のISPConfig3安定版リリースをダウンロードします:
cd / tmp
wgethttp://www.ispconfig.org/downloads/ISPConfig-3-stable.tar.gz
tar xfz ISPConfig-3-stable.tar.gz
cd ispconfig3_install /インストール/
次に、インストールスクリプトを開始します:
php -q install.php
言語の選択(en、de)[en]:<-en
インストールモード(標準、エキスパート)[標準]:<-エキスパート
サーバーの完全修飾ホストホスト(FQDN)(例:server1) .domain.tld [mail.example.tld]:<-mail.example.tld
MySQLサーバーのホスト名[localhost]:<-localhost
MySQL rootユーザー名[root]:<-root
MySQLルートパスワード[]:<-ここにMySQLルートパスワードを入力します
作成するMySQLデータベース[dbispconfig]:<-dbispconfig
MySQL文字セット[utf8]:<-utf8
このサーバーは既存のISPConfigマルチサーバーセットアップに参加しますか(y、n)[n]:<-y
MySQLマスターサーバーのホストホスト[]:<-web.example.tld
MySQLマスターserver root username [root]:<-root
MySQL master server root password []:<-ここにマスターサーバーのrootパスワードを入力します
MySQL master server database name [dbispconfig]:<- --dbispconfig
メールの構成(y、n)[y]:<-y
国名(2文字コード)[AU]:<-DE(ここに住んでいるISO国コードを入力してください)
州または県名(フルネーム)[一部の州]:<-Niedersachsen(入力してくださいここに住んでいる州)
地域名(例:市)[]:<-リューネブルク(ここに市を入力)
組織名(例:会社)[Internet Widgits Pty Ltd]:<--ENTER
組織単位名(例:セクション)[]:<-ENTER
一般名(例:あなたの名前)[]:<-ENTER
メールアドレス[]: <-ENTER
Jailkitの構成(y、n)[y]:<-n
FTPサーバーの構成(y、n)[y]:<-n
DNSサーバーの構成(y、n)[y] :<-n
Apacheサーバーの構成(y、n)[y]:<-n
ファイアウォールサーバーの構成(y、n)[y]:<-n
インストールISPConfig Webインターフェイス(y、n)[y]:<-n
実行...
rm -f / var / www / ispconfig
... / var/wwwディレクトリのISPConfigインターフェイスリンクを削除します。
インストールディレクトリをクリーンアップします:
rm -rf /tmp/ispconfig3_install/install
rm -f /tmp/ISPConfig-3-stable.tar.gz
専用のWebおよびMySQL、ISPConfig3を使用したDebianSqueeze上のEメールおよびDNSサーバーを備えた仮想マルチサーバー環境-3ページ
6.3プライマリDNSサーバーのインストール
hostsファイルを編集し、すべてのサーバーのIPアドレスとホスト名を追加します。ホスト名とIPアドレスは、セットアップに一致するように調整する必要があります。
nano / etc / hosts
127.0.0.1 localhost
192.168.1.2 web.example.tld
192.168.1.3 mail.example.tld
192.168.1.4 ns1.example.tld
192.168.1.5 ns2.example.tld

# The following lines are desirable for IPv6 capable hosts
::1     localhost ip6-localhost ip6-loopback
fe00::0 ip6-localnet
ff00::0 ip6-mcastprefix
ff02::1 ip6-allnodes
ff02::2 ip6-allrouters
ff02::3 ip6-allhosts
サーバーのホスト名を設定します:
echo ns1.example.tld> /etc/hostname
/etc/init.d/hostname.sh start
MySQLクライアントとサーバーをインストールします:
apt-get -y install mysql-client mysql-server
インストーラーから要求されたら、MySQLの新しいパスワードを入力します。
次に、PHPのコマンドラインバージョンをインストールインストールして、ISPConfig用のPHPベースのシェルスクリプトを実行できるようにします。
apt-get -y install php5-cli php5-mysql php5-mcrypt mcrypt
fail2banのインストール:これはオプションですが、ISPConfigモニターがログを表示しようとするため、推奨されます:
apt-get install fail2ban
BIND DNSサーバーをインストールします:
apt-get -y install bind9 dnsutils
次に、ISPConfig3をdnsサーバーにインストールします。最新のISPConfig3安定版リリースのダウンロードURLを取得するには、ISPConfig Webサイトにアクセスしてください:http://www.ispconfig.org/ispconfig-3/download/
最新のISPConfig3安定版リリースをダウンロードします:
cd / tmp
wgethttp://www.ispconfig.org/downloads/ISPConfig-3-stable.tar.gz
tar xfz ISPConfig-3-stable.tar.gz
cd ispconfig3_install /インストール/
次に、インストールスクリプトを開始します:
php -q install.php
言語の選択(en、de)[en]:<-en
インストールモード(標準、エキスパート)[標準]:<-エキスパート
サーバーの完全修飾ホスト名(FQDN)(例:server2) .domain.tld [ns1.example.tld]:<-ns1.example.tld
MySQLサーバーのホスト名[localhost]:<-localhost
MySQL rootユーザー名[root]:<-root
MySQLルートパスワード[]:<-ここにMySQLルートパスワードを入力します
作成するMySQLデータベース[dbispconfig]:<-dbispconfig
MySQL文字セット[utf8]:<-utf8
このサーバーは既存のISPConfigマルチサーバーセットアップに参加しますか(y、n)[n]:<-y
MySQLマスターサーバーのホスト名[]:<-web.example.tld
MySQLマスターserver root username [root]:<-root
MySQL master server root password []:<-ここにマスターサーバーのrootパスワードを入力します
MySQL master server database name [dbispconfig]:<- --dbispconfig
メールの構成(y、n)[y]:<-n
Jailkitの構成(y、n)[y]:<-n
FTPサーバーの構成(y、 n)[y]:<-n
DNSサーバーの構成(y、n)[y]:<-y
Configur e Apacheサーバー(y、n)[y]:<-n
ファイアウォールサーバーの構成(y、n)[y]:<-n
ISPConfig Webインターフェイスのインストール(y、n) [y]:<-n
実行...
rm -f / var / www / ispconfig
... / var/wwwディレクトリのISPConfigインターフェイスリンクを削除します。
インストールディレクトリをクリーンアップします:
rm -rf /tmp/ispconfig3_install/install
rm -f /tmp/ISPConfig-3-stable.tar.gz
6.4セカンダリDNSサーバーのインストール
hostsファイルを編集し、すべてのサーバーのIPアドレスとホスト名を追加します。ホスト名とIPアドレスは、セットアップに一致するように調整する必要があります。
nano / etc / hosts
127.0.0.1 localhost
192.168.1.2 web.example.tld
192.168.1.3 mail.example.tld
192.168.1.4 ns1.example.tld
192.168.1.5 ns2.example.tld

# The following lines are desirable for IPv6 capable hosts
::1     localhost ip6-localhost ip6-loopback
fe00::0 ip6-localnet
ff00::0 ip6-mcastprefix
ff02::1 ip6-allnodes
ff02::2 ip6-allrouters
ff02::3 ip6-allhosts
サーバーのホスト名を設定します:
echo ns2.example.tld> /etc/hostname
/etc/init.d/hostname.sh start
MySQLクライアントとサーバーをインストールします:
apt-get -y install mysql-client mysql-server
インストーラーから要求されたら、MySQLの新しいパスワードを入力します。
次に、PHPのコマンドラインバージョンをインストールインストールして、ISPConfig用のPHPベースのシェルスクリプトを実行できるようにします。
apt-get -y install php5-cli php5-mysql php5-mcrypt mcrypt
fail2banのインストール:これはオプションですが、ISPConfigモニターがログを表示しようとするため、推奨されます:
apt-get install fail2ban
BIND DNSサーバーをインストールします:
apt-get -y install bind9 dnsutils
次に、ISPConfig3をdnsサーバーにインストールします。最新のISPConfig3安定版リリースのダウンロードURLを取得するには、ISPConfig Webサイトにアクセスしてください:http://www.ispconfig.org/ispconfig-3/download/
最新のISPConfig3安定版リリースをダウンロードします:
cd / tmp
wgethttp://www.ispconfig.org/downloads/ISPConfig-3-stable.tar.gz
tar xfz ISPConfig-3-stable.tar.gz
cd ispconfig3_install /インストール/
次に、インストールスクリプトを開始します:
php -q install.php
言語の選択(en、de)[en]:<-en
インストールモード(標準、エキスパート)[標準]:<-エキスパート
サーバーの完全修飾ホスト名(FQDN)(例:server2) .domain.tld [ns2.example.tld]:<-ns2.example.tld
MySQLサーバーのホスト名[localhost]:<-localhost
MySQL rootユーザー名[root]:<-root
MySQLルートパスワード[]:<-ここにMySQLルートパスワードを入力します
作成するMySQLデータベース[dbispconfig]:<-dbispconfig
MySQL文字セット[utf8]:<-utf8
このサーバーは既存のISPConfigマルチサーバーセットアップに参加しますか(y、n)[n]:<-y
MySQLマスターサーバーのホスト名[]:<-web.example.tld
MySQLマスターserver root username [root]:<-root
MySQL master server root password []:<-ここにマスターサーバーのrootパスワードを入力します
MySQL master server database name [dbispconfig]:<- --dbispconfig
メールの構成(y、n)[y]:<-n
Jailkitの構成(y、n)[y]:<-n
FTPサーバーの構成(y、 n)[y]:<-n
DNSサーバーの構成(y、n)[y]:<-y
Configur e Apacheサーバー(y、n)[y]:<-n
ファイアウォールサーバーの構成(y、n)[y]:<-n
ISPConfig Webインターフェイスのインストール(y、n) [y]:<-n
実行...
rm -f / var / www / ispconfig
... / var/wwwディレクトリのISPConfigインターフェイスリンクを削除します。
インストールディレクトリをクリーンアップします:
rm -rf /tmp/ispconfig3_install/install
rm -f /tmp/ISPConfig-3-stable.tar.gz
6.5ISPConfigでサーバー設定を調整する
Webブラウザを使用してマスターサーバーのISPConfigにログインします。
http://192.168.1.2:8080
[システム]>[サーバーサービス]>[web.example.tld]をクリックし、[Webサーバー、ファイルサーバー、DBサーバー]チェックボックスを除くすべてのチェックボックスを無効にして、[保存]をクリックします。

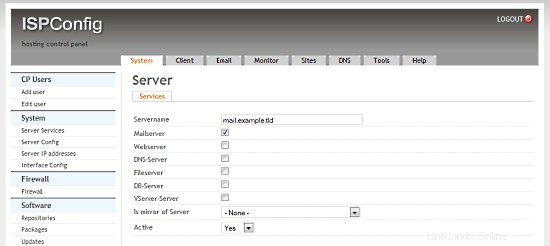
[システム]>[サーバーサービス]>[mail.example.tld]をクリックし、[メールサーバー]チェックボックスを除くすべてのチェックボックスを無効にして、[保存]をクリックします。
[システム]>[サーバーサービス]>[ns1.example.tld]をクリックし、[DNSサーバー]チェックボックスを除くすべてのチェックボックスを無効にして、[保存]をクリックします。
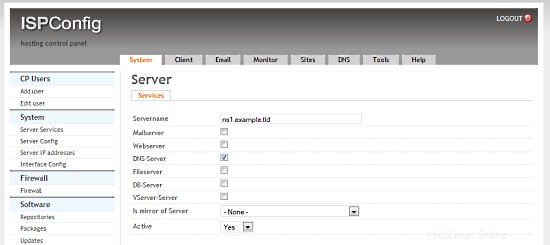
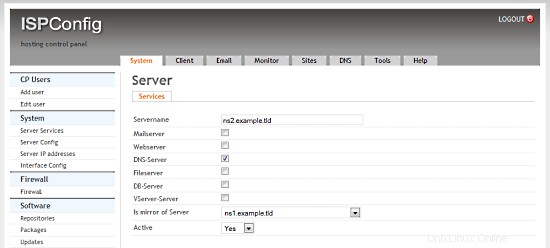
[システム]>[サーバーサービス]>[ns2.example.tld]をクリックし、[DNSサーバー]チェックボックスを除くすべてのチェックボックスを無効にして、[サーバーのミラー]選択ボックスでns1.example.tldを選択し、[保存]をクリックします。
6.6逆引きDNSの設定
ほとんどのメールサーバーは有効な逆引きDNSエントリをチェックするため、メールサーバー用に設定する必要があります。 Hetznerでは、Webインターフェイスでこれを行うことができます:
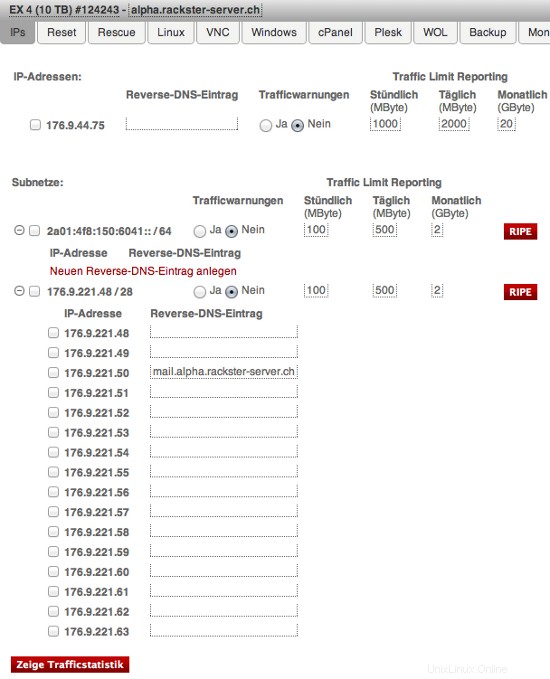
IP176.9.221.50のエントリに注意してください。あなたの場合、IP 192.168.1.3の下で、次のように入力する必要があります:mail.example.tld
専用のWebおよびMySQL、ISPConfig3を使用したDebianSqueeze上のEメールおよびDNSサーバーを備えた仮想マルチサーバー環境-ページ4
7サーバーの拡張
これで、仮想サーバーを実行する1台の専用サーバーの完全に機能する環境ができました。ただし、適用できる微調整はたくさんあり、適用する必要があります。これを今から行います。これらすべてが最適であるというわけではありませんが、強くお勧めします。
最初の手順は、すべてのサーバーで繰り返すことができます。
7.0.1パスワードの代わりに認証キーを使用したSSH
サーバーにアクセスするには秘密鍵を所有している必要があるため、SSH鍵認証の使用はパスワードよりもはるかに安全です。まだ持っていない場合は、(ローカルマシンで)RSAキーペアを作成します。
ssh-keygen
公開/秘密rsaキーペアを生成しています。
キーを保存するファイルを入力してください(/home/username/.ssh/id_rsa):パスフレーズを入力してください(パスフレーズがない場合は空):
同じパスフレーズをもう一度入力してください:
IDは/home/username/.ssh/id_rsaに保存されています。
公開鍵は/home/username/.ssh/id_rsa.pubに保存されています。
公開鍵がサーバーにインストールされると、パスワードの質問なしでアクセスが許可されます。 SSHには通常、ssh-copy-idというユーティリティが付属しており、クライアントの〜/ .ssh / id_rsa.pubのコンテンツをサーバーの〜/ .ssh/authorized_keysに追加するだけです。
ssh-copy-id -i .ssh/id_rsa.pub example@unixlinux.online
この時点で、サーバー上のrootアカウントをパスワード認証のためにロックできます:
このコマンドを実行する前に、まずキーを使用してサーバーにアクセスしてみてください!
passwd -l root
7.0.2Logwatchのインストール
Logwatchは、サーバーで何が起こったか/実行されているかに関する詳細なレポートを送信する小さなパッケージです。監視には絶対に役立ちます。
apt-get -y install logwatch
次に、その構成を調整します:
nano /usr/share/logwatch/default.conf/logwatch.conf
次の値を設定します:
Output = mail
Format = text
MailTo = example@unixlinux.online
Detail = High
Service = All
これで、Logwatchから毎日メールが届きます。ご覧のとおり、これは素晴らしいです!
7.0.3追加のfail2banルールの有効化
Fail2banは、不要なユーザーがサーバーにアクセスするのをブロックするための優れた方法です。 WebサーバーとMySQLサーバーにもメールサーバーにすでにインストールされているので、最初のステップをスキップできます。これをノードと両方のDNSサーバーで実行します:
apt-get -y install fail2ban
ここで、fail2banに監視する必要のあるサービスと、不正なリクエストの処理方法を説明します。
これらはすべてのサーバー(WebおよびMySQLサーバーとメールサーバーを含む)で実行する必要があります:
nano /etc/fail2ban/jail.local
そして、ファイルに以下を追加します(既存のコンテンツを置き換えないでください!):
[ssh]
enables = true
port    = ssh
filter  = sshd
logpath  = /var/log/auth.log
maxretry = 3

[ssh-ddos]

enabled = true
port    = ssh
filter  = sshd-ddos
logpath  = /var/log/auth.log
maxretry = 5
Fail2banは、SSH侵入の試みを検出し、それらをブロックするようになりました。最後に、fail2banを再起動します:
/etc/init.d/fail2ban restart
7.1ノードサーバーの拡張
7.1.1Ajentiのインストール
Ajentiは優れたサーバーコントロールパネルです。私は主にファイアウォールの管理に使用し、ファイルマネージャー、コンソール、ターミナルが組み込まれているためです。
First we have to add it's repository to our sources.list:
nano /etc/apt/sources.list
and add:
deb http://repo.ajenti.org/debian main main
Afterwards you have to import it's Key:
wget http://repo.ajenti.org/debian/key -O- | sudo apt-key add -
You should now be able to access the CP via:http://192.168.1.1:8000. The default username/password is:admin
If you plan to use the built in terminal you have to install the Python PIL module:
apt-get -y install python-imaging
7.1.2 Installing Archey
This is very optional, however I like it. Archey will show you some nice information on login.

To install it, simply run:
apt-get install lsb-release scrot
cd /tmp
wget https://github.com/downloads/djmelik/archey/archey-0.2.8.deb
dpkg -i archey-0.2.8.deb
rm archey-0.2.8.deb
nano /etc/bash.bashrc
At the very end, add:archey.
7.2 Extending The Web/DB Server
These steps are only run on our Web/DB server.
7.2.1 Installing cURL
apt-get -y install curl php5-curl libcurl3-dev
7.2.2 Installing ionCube Loader
You should now be able to do this by yourself. Just download the correct version over at http://www.ioncube.com/loaders.php and follow its introductions.
7.2.3 Installing APC and other useful apps
In this section we will install apc (php accelarator), which is developed by the guys who develop php and some apps (htop, iptraf, logwatch, tiger).
apt-get -y install php-apc htop iptraf tiger
Edit /etc/php5/conf.d/apc.ini, so as to increase the memory cache:
nano /etc/php5/conf.d/apc.ini
And append the following line:
apc.shm_size=128
Finally restart Apache:
/etc/init.d/apache2 restart
With htop you can see system info in a better way than top, with iptraf you can see real time statistics for your connection and with tiger you can have yourself mailed with a periodically report of your system's security vulnerabilities (if any exists).
As a lot of scripts/apps send a lot of mails to user root, you can alias root's mail, to a more 'real' email address. So, after you set up a 'real' mail for your example.tld domain, you can edit the aliases and add an alias to root user:
nano /etc/aliases
and change the line
root:root
to something like
root:example@unixlinux.online
After this execute:
newaliases
If you want to install Drupal (or other cms) you will propably need uploadprogress and json. To accomplish their installation, do:
apt-get -y install php5-dev php-services-json
pecl install uploadprogress
touch /etc/php5/apache2/conf.d/uploadprogress.ini
nano /etc/php5/apache2/conf.d/uploadprogress.ini
And append the following line:
extension=uploadprogress.so
Finally restart Apache:
/etc/init.d/apache2 restart
7.2.4 Installing mod_security
Install the apache mod-security 2 module with apt from the Debian repositories:
apt-get -y install libapache-mod-security
Create the folder for the mod-security configuration files:
mkdir /etc/apache2/mod-security
chmod 600 /etc/apache2/mod-security
Download and unpack the mod-security rules:
cd /tmp
wget http://www.modsecurity.org/download/modsecurity-core-rules_2.5-1.6.1.tar.gz
tar fvx modsecurity-core-rules_2.5-1.6.1.tar.gz
mv *.conf /etc/apache2/mod-security/
ln -s /var/log/apache2 /etc/apache2/logs
Configure apache to load the activated mod-security rules:
nano /etc/apache2/conf.d/mod-security.conf
Include /etc/apache2/mod-security/*.conf
To enable mod-security, edit the file
nano /etc/apache2/mod-security/modsecurity_crs_10_config.conf
and remove the # in front of the line:
SecDefaultAction
"phase:2,log,deny,status:403,t:lowercase,t:replaceNulls,t:compressWhitespace"
Then reload Apache.
/etc/init.d/apache2 force-reload
Mod security will now start to block hack attempts to your websites and log the actions in the file /var/log/apache2/modsec_audit.log.
tail /var/log/apache2/modsec_audit.log
You will see very likely some falsely blocked URL's. To whitelist them, you can add the ID's of the rules that should not be used in the whitelist file.
Example:
nano /etc/apache2/mod-security/modsecurity_crs_99_whitelist.conf
SecRuleRemoveById 960015
SecRuleRemoveById 960016
7.2.5 MySQL Tuning
Download tuning-primer.sh and mysqltuner.pl. These will help you to improve mysql's configuration file.
cd /root/scripts
wget http://www.day32.com/MySQL/tuning-primer.sh
wget http://mysqltuner.com/mysqltuner.pl
chmod 700 tuning-primer.sh mysqltuner.pl
To execute them:
perl /root/scripts/mysqltuner.pl
/root/scripts/tuning-primer.sh
The scripts will ask some simple questions (user/pass) and will display in red colour, their suggestions for critical settings. You can use their suggestions to boost the performance of mysql-server.
7.2.6 Installing RoundCube
Following the above instructions you can install roundcube via apt-get. However following another logic (if you have the time and the courage) you can install roundcube in it's own subdomain, manually.
In "Perfect Server ...." you usually install Squirrelmai. However if you don't want it you can remove it:
apt-get remove squirrelmail
rm /etc/apache2/conf.d/squirrelmail.conf
Install roundcube. (You MUST have the mysql administrator's password before you proceed -- Let dbconfig-common configure the database. You will be asked some questions about the password of the db administrator and the password of the new user that will be created for roundcube. Answer those questions and continue:
apt-get -y install roundcube roundcube-mysql
Examle answers:
"Configure database for roundcube with dbconfig-common?" .... Answer Yes
"Database type to be used by roundcube:...Answer mysql
"Password of the database's administrativeuser:" ... Answer your-admin-DB-password
"MySQL application password for roundcube:" ... Answer the-password-you-want-to-give-to-the-roundcube-user
"Password confirmation:"... Answer the-password-you-want-to-give-to-the-roundcube-user
If something goes wrong you can always run:
dpkg-reconfigure roundcube-core
For more information, please see this post.
For everyone to be able to access his webmail (under his domain name) you have to create or edit the file /etc/apache2/conf.d/roundcube so as to set the alias to 'webmail'. If you want SSL you should include the last two directives (IfModule mod_rewrite.c) to have apache ALWAYS redirect to your SSL installation of ISPConfig.
nano /etc/apache2/conf.d/roundcube
# Those aliases do not work properly with several hosts on your apache server
# Uncomment them to use it or adapt them to your configuration
#    Alias /roundcube/program/js/tiny_mce/ /usr/share/tinymce/www/
    Alias /roundcube /var/lib/roundcube
    Alias /webmail /var/lib/roundcube

# Access to tinymce files
<Directory "/usr/share/tinymce/www/">
      Options Indexes MultiViews FollowSymLinks
      AllowOverride None
      Order allow,deny
      allow from all
</Directory>

<Directory /var/lib/roundcube/>
  Options +FollowSymLinks
  # This is needed to parse /var/lib/roundcube/.htaccess. See its
  # content before setting AllowOverride to None.
  AllowOverride All
  order allow,deny
  allow from all
</Directory>

# Protecting basic directories:
<Directory /var/lib/roundcube/config>
        Options -FollowSymLinks
        AllowOverride None
</Directory>

<Directory /var/lib/roundcube/temp>
        Options -FollowSymLinks
        AllowOverride None
        Order allow,deny
        Deny from all
</Directory>

<Directory /var/lib/roundcube/logs>
        Options -FollowSymLinks
        AllowOverride None
        Order allow,deny
        Deny from all
</Directory>

<IfModule mod_rewrite.c>
  <IfModule mod_ssl.c>
    <Location /webmail>
      RewriteEngine on
      RewriteCond %{HTTPS} !^on$ [NC]
      RewriteRule . https://%{HTTP_HOST}:50443%{REQUEST_URI}  [L]
    </Location>
  </IfModule>
</IfModule>

<IfModule mod_rewrite.c>
  <IfModule mod_ssl.c>
    <Location /roundcube>
      RewriteEngine on
      RewriteCond %{HTTPS} !^on$ [NC]
      RewriteRule . https://%{HTTP_HOST}:50443%{REQUEST_URI}  [L]
    </Location>
  </IfModule>
</IfModule>
Edit /var/lib/roundcube/config/main.inc.php:
nano /var/lib/roundcube/config/main.inc.php
and SET some variables in the file (if this is the first time you edit the file the lines are 60 and 66):
auto_create_user = TRUE;
$rcmail_config['default_host'] = 'mail.example.tld';
If you will install the following plugin (the logger that helps fail2ban) you have to extend the list of plugins in the same file. Ifthe only plugin is the one that will be istalled right afterward you have to edit the line (42) as below:
$rcmail_config['plugins'] = array('fail2ban'); Install the roundcube logger plugin from http://mattrude.com/projects/roundcube-fail2ban-plugin/.
Basically you have to download the file (fail2ban.php) and paste it in the fail2ban folder in the plugins folder of roundcube. Finally you must have this file: /usr/share/roundcube/plugins/fail2ban/fail2ban.php. Execute:
cd /usr/share/roundcube/plugins/
wget --no-check-certificate http://cloud.github.com/downloads/mattrude/rc-plugin-fail2ban/roundcube-fail2ban-plugin.1.1.tgz
tar -xvzf roundcube-fail2ban-plugin.1.1.tgz
touch /var/log/roundcube/userlogins
rm roundcube-fail2ban-plugin.1.1.tgz
chown www-data:www-data /var/log/roundcube/userlogins
This plugin will update the log file with each failed login attempt:/var/log/roundcube/userlogins
Don't forget to edit the link for the webmail in ISPConfig (System -> Interface Config -> (tab) Mail) and set it to /webmail. Lastly, restart apache.
/etc/init.d/apache2 restart
You can now access webmail at http://web.example.tld/webmail
Virtual Multiserver Environment With Dedicated Web &MySQL, Email &DNS Servers On Debian Squeeze With ISPConfig 3 - Page 5
On this page
- 7.2.7 Installing fail2ban
- 7.2.8 Installing mod_evasive With fail2ban Support
- 7.3 Extending the Mail Server
- 7.3.1 Enhanced e-mail SPAM protection
- 7.3.2 Installing Postgrey
- 7.4 Securing The Servers Using SSL
7.2.7 Installing fail2ban
Extend the jail.local file that falko suggests in ThePerfect Server - Debian Squeeze (Debian 6.0) With BIND &Courier [ISPConfig 3]:/etc/fail2ban/jail.local
nano /etc/fail2ban/jail.local
You have to append or edit the following:
[roundcube]
enabled  = true
port     = http
filter   = roundcube
logpath  = /var/log/roundcube/userlogins
maxretry = 5
Last (and very important) don't forget to create the roundcube.conf file /etc/fail2ban/filter.d/roundcube.conf.
nano /etc/fail2ban/filter.d/roundcube.conf
with the following contents:
[Definition]
failregex = FAILED login for .*. from <HOST>
ignoreregex =
Restart fail2ban:
/etc/init.d/fail2ban restart
You can check that all jails are active with the command:
iptables -L -n
7.2.8 Installing mod_evasive With fail2ban Support
mod_evasive is an Apache module for handling DDoS attacks. We will install it and configure fail2ban to auto ban/unban reported attacks.
apt-get install libapache2-mod-evasive
mkdir /var/lock/mod-evasive
chown www-data /var/lock/mod-evasive
ln -s /etc/alternatives/mail /bin/mail
nano /etc/apache2/mods-available/mod-evasive.conf
and paste:
<IfModule  mod_evasive20.c>
   DOSHashTableSize 3097
   DOSPageCount 3
   DOSSiteCount 60
   DOSPageInterval 1
   DOSSiteInterval 2
   DOSBlockingPeriod 15
   DOSEmailNotify example@unixlinux.online
   DOSLogDir "/var/lock/mod_evasive"
</IfModule>
Afterwards we activate the module and restart apache
a2enmod mod-evasive
/etc/init.d/apache2 restart
mod_evasive will not detect DDoS attacks. To ban them by IPTables, we have to create the file:/etc/fail2ban/filter.d/apache-dosevasive.conf:
# Fail2Ban configuration file
#
# Author: Xela
#
# $Revision: 728 $
#

[Definition]

# Option:  failregex
# Notes.:  regex to match the Forbidden log entrys in apache error.log
#          maybe (but not only) provided by mod_evasive
#
# Values:  TEXT
#
failregex = ^\[[^\]]*\]\s+\[error\]\s+\[client <HOST>\] client denied by server configuration:\s

# Option:  ignoreregex
# Notes.:  regex to ignore. If this regex matches, the line is ignored.
# Values:  TEXT
#
ignoreregex =
and to /etc/fail2ban/jail.local we add:
[apache-dosevasive]

enabled = true
filter  = apache-dosevasive
action = iptables-allports[name=dos]
logpath = /var/log/apache*/*error.log
bantime = 600
maxretry = 10
7.3 Extending the Mail Server
7.3.1 Enhanced e-mail SPAM protection
The command below enables a stricter SPAM handling for postfix on ISPConfig 3 servers.
postconf -e 'smtpd_recipient_restrictions = permit_mynetworks, permit_sasl_authenticated, reject_invalid_hostname, reject_non_fqdn_hostname, reject_unknown_recipient_domain, reject_non_fqdn_recipient, reject_unauth_destination, reject_non_fqdn_sender, reject_unknown_sender_domain, reject_unknown_recipient_domain, reject_rbl_client cbl.abuseat.org,reject_rbl_client dul.dnsbl.sorbs.net,reject_rbl_client ix.dnsbl.manitu.net, check_recipient_access mysql:/etc/postfix/mysql-virtual_recipient.cf, reject_unauth_destination'
Then restart postfix:
/etc/init.d/postfix restart
7.3.2 Installing Postgrey
Postgrey will eliminate 99% of all spam emails you receive. To install it, run these commands:
apt-get install postgrey
/etc/init.d/postgrey start
The Postfix configuration files are located in /etc/postfix. Edit /etc/postfix/main.cf and add check_policy_service inet:127.0.0.1:60000 to the smtpd_recipient_restrictions.
Then reload postfix's configuration:
postfix reload
7.4 Securing The Servers Using SSL
Last but not least you should follow this tutorial:https://www.howtoforge.com/securing-your-ispconfig-3-installation-with-a-free-class1-ssl-certificate-from-startssl. Don't forget to execute the commands on the right server!
8 Maintaining Our Servers
You should regulary run this to keep your servers up-to-date:
apt-get update && apt-get -y upgrade && apt-get -y dist-upgrade
9 Links/Credits/Sources
Since most is not from me, here are all the links used for this tutorial:
- http://www.faqforge.com/linux/enhanced-e-mail-spam-protection-in-ispconfig-3/
- https://www.howtoforge.com/greylisting_postfix_postgrey
- https://www.howtoforge.com/extending-perfect-server-debian-squeeze-ispconfig-3-p4
- http://spielwiese.la-evento.com/xelasblog/archives/56-Apache-DOS-Attacken-erschweren-mit-mod_evasive.html
- http://www.faqforge.com/linux/apache-mod-security-installation-on-debian-6-0-squeeze/
- http://forum.whmcs.com/showpost.php?s=f876c3e3a7d56bd2f325685a80d746cf&p=16768&postcount=4
- https://www.howtoforge.com/extending-perfect-server-debian-squeeze-ispconfig-3-p3
- http://debian.nimmervoll.eu/tag/debian-logwatch-einrichten/
- http://www.debian-administration.org/articles/530
- https://www.howtoforge.com/securing-your-ispconfig-3-installation-with-a-free-class1-ssl-certificate-from-startssl
- https://www.howtoforge.com/multiserver-setup-with-dedicated-web-email-dns-and-mysql-database-servers-on-debian-squeeze-with-ispconfig-3
- http://debian.nimmervoll.eu/archey-debian-installation/
- http://ajenti.org/
- http://code.google.com/p/ovz-web-panel/wiki/Installation
- https://www.howtoforge.com/installing-and-using-openvz-on-debian-squeeze-amd64