MariaDB は、その発信元である MySQLに次ぐ最も人気のあるオープンソースデータベースの1つです。 。 MySQLの元の作成者 MariaDBを開発しました MySQLへの懸念に応えて オラクルが2010年に買収したため、突然有料サービスになります。同様の戦術を行ってきた歴史を持つMariaDBの開発者は、MariaDBをオープンソースに保ち、 MySQL> 。
MariaDB MySQLと同じくらい人気があります 開発者と、 Galera Cluster 4を使用した高度なクラスタリング 、より高速なキャッシュ/インデックス、ストレージエンジン、および MySQLにはない機能/拡張機能 。
MariaDB10.8.xリリースのハイライトには次のものがあります。
- mysqlbinlogGTIDのサポート
- ストアドプロシージャのINOUTパラメータ
- レプリケーションでのラグのないALTERTABLE
- 降順インデックス
- InnoDBREDOログの改善
- パーティションの自動作成
- JSONヒストグラム
- スパイダーストレージエンジンの改善
次のチュートリアルでは、コマンドラインターミナルを使用してDebian 11BullseyeにMariaDB10.8をインストールまたはアップグレードする方法と、既存のデータベースが存在する場合はアップグレードするためのヒントを学びます。
まず、を更新します 既存のすべてのパッケージが最新であることを確認するシステム。
sudo apt update && sudo apt upgrade -y最初のステップは、インストールに必要な依存関係をインストールすることです。
これを行うには、端末で次のコマンドを使用します。
sudo apt-get install curl software-properties-common dirmngr ca-certificates apt-transport-https -yMariaDB10.8GPGキーとリポジトリをインポート
デフォルトでは、MariaDBはDebian 11 Bullseyeでは使用できませんが、長期リリースであるため、サポートされているDebianなどのLinuxディストリビューション用に設計されたMariaDBbashスクリプトを使用してインポートできます。
ターミナルで、次のコマンドを使用します。
curl -LsS https://downloads.mariadb.com/MariaDB/mariadb_repo_setup | sudo bash -s -- --mariadb-server-version=10.8コマンドが失敗した場合は、curlパッケージのインストールを忘れている可能性があります。
sudo apt install curl -y出力例:
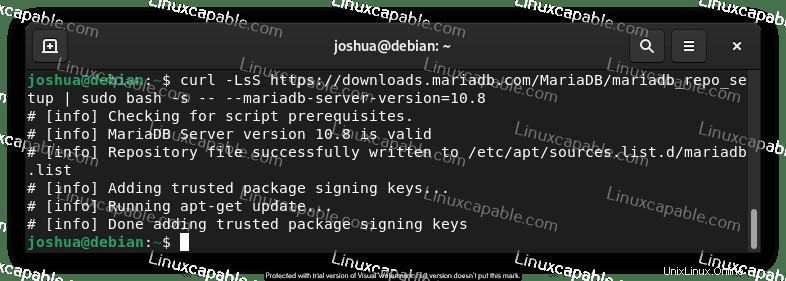
上記は、リポジトリが正常にインポートされたことを示しています。次に、APTリポジトリリストを更新します。
sudo apt updateMariaDB10.8のインストール/アップグレード
MariaDBをインストールするには、クライアントとサーバーのパッケージをインストールする必要があります。これは次のように実行できます:
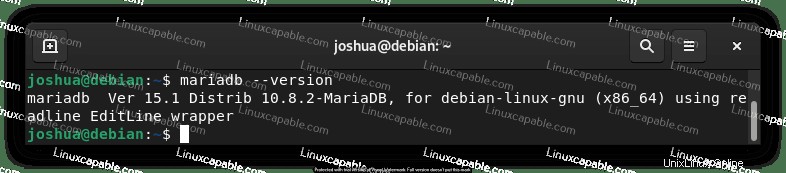
sudo apt install mariadb-server mariadb-client -yバージョンとビルドを確認して、MariaDBのインストールを確認します。
mariadb --version出力例:
MariaDB10.8サービスを有効にする
これでMariaDBがインストールされ、次のsystemctlコマンドを使用してデータベースソフトウェアのステータスを確認できます。
systemctl status mariadb例:
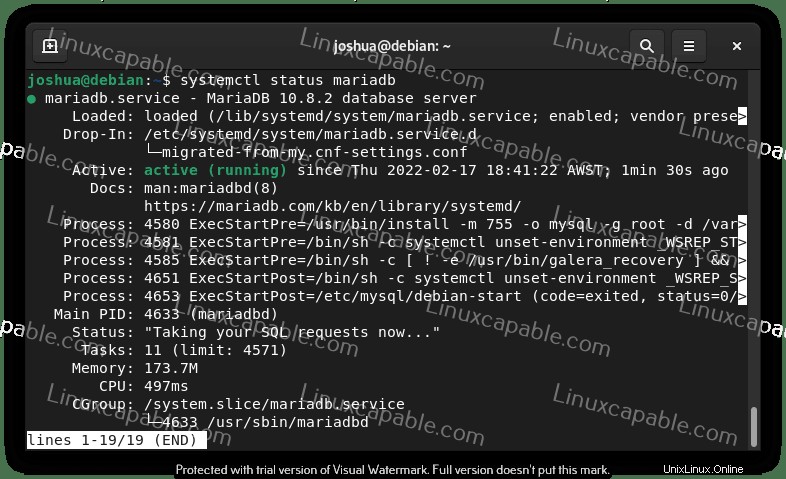
デフォルトでは、MariaDBステータスがアクティブ化されています。そうでない場合は、MariaDBを起動し、次のコマンドを使用します。
sudo systemctl start mariadbMariaDBを停止するには:
sudo systemctl stop mariadbシステムの起動時にMariaDBを有効にするには:
sudo systemctl enable mariadbシステムの起動時にMariaDBを無効にするには:
sudo systemctl disable mariadbMariaDBサービスを再起動するには:
sudo systemctl restart mariadbMariaDB10.8セキュリティスクリプトを実行する
MariaDBを新規にインストールする場合、ほとんどの標準ではデフォルト設定が弱いと見なされ、侵入を許可したり、ハッカーを悪用したりする可能性があるという懸念が生じます。解決策は、MariaDBインストールでインストールセキュリティスクリプトを実行することです。
まず、次のコマンドを使用して、 (mysql_secure_installation)> 。
sudo mysql_secure_installation次に、以下に従ってください:
- ルートのパスワードを設定する アカウント。
- ローカルホストの外部からアクセスできるルートアカウントを削除します。
- 匿名ユーザーアカウントの削除。
- 匿名ユーザーがデフォルトでアクセスできるテストデータベースを削除します。
(Y)を使用していることに注意してください すべてを削除します。
例:
[joshua@debian-11 ~]$ sudo mariadb-secure-installation

NOTE: RUNNING ALL PARTS OF THIS SCRIPT IS RECOMMENDED FOR ALL MariaDB
      SERVERS IN PRODUCTION USE!  PLEASE READ EACH STEP CAREFULLY!

In order to log into MariaDB to secure it, we'll need the current
password for the root user. If you've just installed MariaDB, and
haven't set the root password yet, you should just press enter here.

Enter current password for root (enter for none):
OK, successfully used password, moving on...

Setting the root password or using the unix_socket ensures that nobody
can log into the MariaDB root user without the proper authorisation.

You already have your root account protected, so you can safely answer 'n'.

Switch to unix_socket authentication [Y/n] Y <---- Type Y then press the ENTER KEY.
Enabled successfully!
Reloading privilege tables..
 ... Success!


You already have your root account protected, so you can safely answer 'n'.

Change the root password? [Y/n] Y <---- Type Y then press the ENTER KEY.
New password:
Re-enter new password:
Password updated successfully!
Reloading privilege tables..
 ... Success!


By default, a MariaDB installation has an anonymous user, allowing anyone
to log into MariaDB without having to have a user account created for
them.  This is intended only for testing, and to make the installation
go a bit smoother.  You should remove them before moving into a
production environment.

Remove anonymous users? [Y/n] Y <---- Type Y then press the ENTER KEY.
 ... Success!

Normally, root should only be allowed to connect from 'localhost'.  This
ensures that someone cannot guess at the root password from the network.

Disallow root login remotely? [Y/n] Y <---- Type Y then press the ENTER KEY.
 ... Success!

By default, MariaDB comes with a database named 'test' that anyone can
access.  This is also intended only for testing, and should be removed
before moving into a production environment.

Remove test database and access to it? [Y/n] Y <---- Type Y then press the ENTER KEY.
 - Dropping test database...
 ... Success!
 - Removing privileges on test database...
 ... Success!

Reloading the privilege tables will ensure that all changes made so far
will take effect immediately.

Reload privilege tables now? [Y/n] Y <---- Type Y then press the ENTER KEY.
 ... Success!

Cleaning up...

All done!  If you've completed all of the above steps, your MariaDB
installation should now be secure.

Thanks for using MariaDB!
MariaDBデータベーステーブルアップグレードツールを実行する
以前のバージョンのMariaDBからアップグレードしたユーザーの場合は、次の手順を使用して、テーブルをチェックし、バージョンのアップグレードに関する問題を修正するように設計されたツールを実行する必要があります。
次のコマンドを実行してアップグレードを開始するか、データベーステーブルに問題がないことを確認します。
sudo mariadb-upgradeMariaDB 10.8を削除(アンインストール)する方法
MariaDBを使用せずに完全に削除する場合は、次のコマンドを実行します。
sudo apt autoremove mariadb-server mariadb-client --purge -yこれにより、すべてのデータベースデータを含むMariaDBが削除されることに注意してください。
bashスクリプトリポジトリを削除するには、次のコマンドを使用します。
sudo rm /etc/apt/sources.list.d/mariadb.listこのコマンドは、MariaDBインストールで使用されていない依存関係のほとんどを削除して、システムのクリーンアップに役立てることに注意してください。