NextCloudは、ownCloudプロジェクトから分岐した無料のオープンソースファイルホスティングおよびファイル共有サーバーです。これは、Googleドライブ、Dropbox、iCloudなどの他のファイル共有サービスと非常によく似ています。 NextCloudを使用すると、中央の場所からファイル、ドキュメント、写真、ムービー、およびビデオを保存できます。 NextCloudを使用すると、ファイル、連絡先、その他のメディアを友達やクライアントと共有できます。 NextCloudは、メール、カレンダー、連絡先、その他の機能と統合されており、チームがより速く、より簡単に作業を行うのに役立ちます。デスクトップマシンにNextCloudクライアントをインストールして、ファイルをNextcloudサーバーと同期させることができます。デスクトップクライアントは、Windows、macOS、FreeBSD、Linuxなどのほとんどのオペレーティングシステムで利用できます。
このチュートリアルでは、NextCloudをインストールし、Debian10でLet'sEncryptSSLを使用して保護する方法を説明します。
- Debian10を実行しているサーバー。
- サーバーIPで指定された有効なドメイン名。このチュートリアルでは、nextcloud.example.comドメインを使用します。
- ルートパスワードはサーバーで構成されています。
Apache、MariaDB、PHPをインストール
NextCloudは、PHPで記述されたWebサーバー上で実行され、MariaDBを使用してデータを保存します。そのため、Apache、MariaDB、PHP、およびその他の必要なパッケージをシステムにインストールする必要があります。次のコマンドを実行して、それらすべてをインストールできます。
apt-get install apache2 libapache2-mod-php mariadb-server php-xml php-cli php-cgi php-mysql php-mbstring php-gd php-curl php-zip wget unzip -y
すべてのパッケージがインストールされたら、php.iniファイルを開き、いくつかの推奨設定を微調整します。
nano /etc/php/7.3/apache2/php.ini
次の設定を変更します:
memory_limit = 512M
upload_max_filesize = 500M
post_max_size = 500M
max_execution_time = 300
date.timezone = Asia/Kolkata
終了したら、ファイルを保存して閉じます。次に、ApacheおよびMariaDBサービスを開始し、次のコマンドを使用してシステムの再起動後に開始できるようにします。
systemctl start apache2
 systemctl start mariadb
 systemctl enable apache2
 systemctl enable mariadb
完了したら、次のステップに進むことができます。
次に、NextCloud用のデータベースとデータベースユーザーを作成する必要があります。これを行うには、次のコマンドを使用してMariaDBシェルにログインします。
mysql -u root -p
求められたらrootパスワードを入力し、次のコマンドでデータベースとユーザーを作成します。
MariaDB [(none)]> CREATE DATABASE nextclouddb;
 MariaDB [(none)]> CREATE USER 'nextclouduser'@'localhost' IDENTIFIED BY 'password';
次に、次のコマンドを使用して、nextclouddbにすべての権限を付与します。
MariaDB [(none)]> GRANT ALL ON nextclouddb.* TO 'nextclouduser'@'localhost';
次に、特権をフラッシュし、次のコマンドを使用してMariaDBシェルを終了します。
MariaDB [(none)]> FLUSH PRIVILEGES;
 MariaDB [(none)]> EXIT;
完了したら、次のステップに進むことができます。
まず、NextCloudダウンロードページにアクセスして、システムにNextCloudの最新バージョンをダウンロードします。この記事を書いている時点で、NextCloudの最新バージョンは17.0.1です。次のコマンドでダウンロードできます:
wget https://download.nextcloud.com/server/releases/nextcloud-17.0.1.zip
ダウンロードが完了したら、次のコマンドを使用してダウンロードしたファイルを解凍します。
unzip nextcloud-17.0.1.zip
次に、抽出したディレクトリをApacheWebルートディレクトリに移動します。
mv nextcloud /var/www/html/
次に、次のコマンドを使用して、nextcloudディレクトリに適切な権限を付与します。
chown -R www-data:www-data /var/www/html/nextcloud/
 chmod -R 755 /var/www/html/nextcloud/
終了したら、次のステップに進むことができます。
次に、NextCloudにサービスを提供するためにApache仮想ホスト構成ファイルを作成する必要があります。次のコマンドで作成できます:
nano /etc/apache2/sites-available/nextcloud.conf
次の行を追加します:
<VirtualHost *:80>
     ServerAdmin [email protected]
     DocumentRoot /var/www/html/nextcloud/
     ServerName nextcloud.example.com

     Alias /nextcloud "/var/www/html/nextcloud/"

     <Directory /var/www/html/nextcloud/>
        Options +FollowSymlinks
        AllowOverride All
        Require all granted
          <IfModule mod_dav.c>
            Dav off
          </IfModule>
        SetEnv HOME /var/www/html/nextcloud
        SetEnv HTTP_HOME /var/www/html/nextcloud
     </Directory>

     ErrorLog ${APACHE_LOG_DIR}/error.log
     CustomLog ${APACHE_LOG_DIR}/access.log combined

</VirtualHost>
終了したら、ファイルを保存して閉じます。次に、次のコマンドを使用して、Apache仮想ホストファイルとその他の必要なモジュールを有効にします。
a2ensite nextcloud.conf
 a2enmod rewrite
 a2enmod headers
 a2enmod env
 a2enmod dir
 a2enmod mime
最後に、Apacheサービスを再起動して、新しい構成を適用します。
systemctl restart apache2
NextCloudがインストールされ、構成されました。次に、Let'sEncryptの無料SSLで保護することをお勧めします。これを行うには、最初に次のコマンドを使用してCertbotクライアントをインストールします。
apt-get install python-certbot-apache -y
インストールしたら、次のコマンドを実行して、ドメインnextcloud.example.comのLet'sEncryptCertificateをインストールできます。
certbot --apache -d nextcloud.example.com
インストール中に、以下に示すように、メールアドレスを入力し、利用規約に同意するよう求められます。
Saving debug log to /var/log/letsencrypt/letsencrypt.log
Plugins selected: Authenticator apache, Installer apache
Enter email address (used for urgent renewal and security notices) (Enter 'c' to
cancel): [email protected]

- - - - - - - - - - - - - - - - - - - - - - - - - - - - - - - - - - - - - - - -
Please read the Terms of Service at
https://letsencrypt.org/documents/LE-SA-v1.2-November-15-2017.pdf. You must
agree in order to register with the ACME server at
https://acme-v02.api.letsencrypt.org/directory
- - - - - - - - - - - - - - - - - - - - - - - - - - - - - - - - - - - - - - - -
(A)gree/(C)ancel: A

- - - - - - - - - - - - - - - - - - - - - - - - - - - - - - - - - - - - - - - -
Would you be willing to share your email address with the Electronic Frontier
Foundation, a founding partner of the Let's Encrypt project and the non-profit
organization that develops Certbot? We'd like to send you email about our work
encrypting the web, EFF news, campaigns, and ways to support digital freedom.

- - - - - - - - - - - - - - - - - - - - - - - - - - - - - - - - - - - - - - - -
(Y)es/(N)o: Y
Obtaining a new certificate
Performing the following challenges:
http-01 challenge for nextcloud.example.com
Enabled Apache rewrite module
Waiting for verification...
Cleaning up challenges
Created an SSL vhost at /etc/apache2/sites-available/nextcloud-le-ssl.conf
Deploying Certificate to VirtualHost /etc/apache2/sites-available/nextcloud-le-ssl.conf
Enabling available site: /etc/apache2/sites-available/nextcloud-le-ssl.conf

Please choose whether or not to redirect HTTP traffic to HTTPS, removing HTTP access.
- - - - - - - - - - - - - - - - - - - - - - - - - - - - - - - - - - - - - - - -
1: No redirect - Make no further changes to the webserver configuration.
2: Redirect - Make all requests redirect to secure HTTPS access. Choose this for
new sites, or if you're confident your site works on HTTPS. You can undo this
change by editing your web server's configuration.
- - - - - - - - - - - - - - - - - - - - - - - - - - - - - - - - - - - - - - - -
Select the appropriate number [1-2] then [enter] (press 'c' to cancel): 2
次に、2と入力し、Enterキーを押して、ドメインの無料のSSL証明書をダウンロードしてインストールします。インストールが正常に完了したら。次の出力が得られるはずです:
Enabled Apache rewrite module
Redirecting vhost in /etc/apache2/sites-enabled/nextcloud.conf to ssl vhost in /etc/apache2/sites-available/
nextcloud-le-ssl.conf

- - - - - - - - - - - - - - - - - - - - - - - - - - - - - - - - - - - - - - - -
Congratulations! You have successfully enabled https://nextcloud.example.com

You should test your configuration at:
https://www.ssllabs.com/ssltest/analyze.html?d=nextcloud.example.com
- - - - - - - - - - - - - - - - - - - - - - - - - - - - - - - - - - - - - - - -
IMPORTANT NOTES:
 - Congratulations! Your certificate and chain have been saved at:
 /etc/letsencrypt/live/example.com/fullchain.pem
 Your key file has been saved at:
 /etc/letsencrypt/live/example.com/privkey.pem
 Your cert will expire on 2019-10-22. To obtain a new or tweaked
 version of this certificate in the future, simply run certbot again
 with the "certonly" option. To non-interactively renew *all* of
 your certificates, run "certbot renew"
 - Your account credentials have been saved in your Certbot
 configuration directory at /etc/letsencrypt. You should make a
 secure backup of this folder now. This configuration directory will
 also contain certificates and private keys obtained by Certbot so
 making regular backups of this folder is ideal.
 - If you like Certbot, please consider supporting our work by:
 Donating to ISRG / Let's Encrypt: https://letsencrypt.org/donate
 Donating to EFF: https://eff.org/donate-le
終了したら、次のステップに進むことができます。
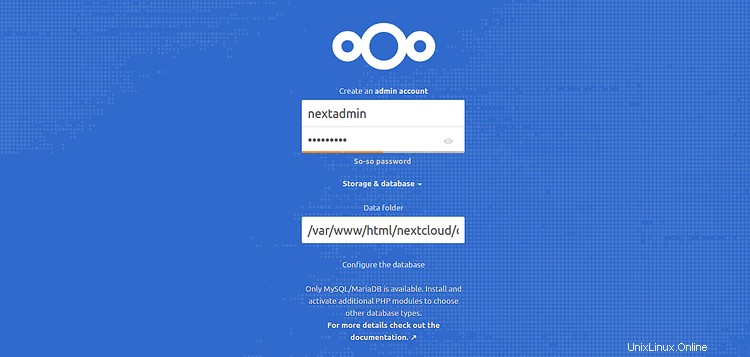
これで、NextCloudが構成され、Let'sEncryptSSLで保護されました。次に、Webブラウザーを開き、URL https://nextcloud.example.comを入力します 。次のページにリダイレクトされます:


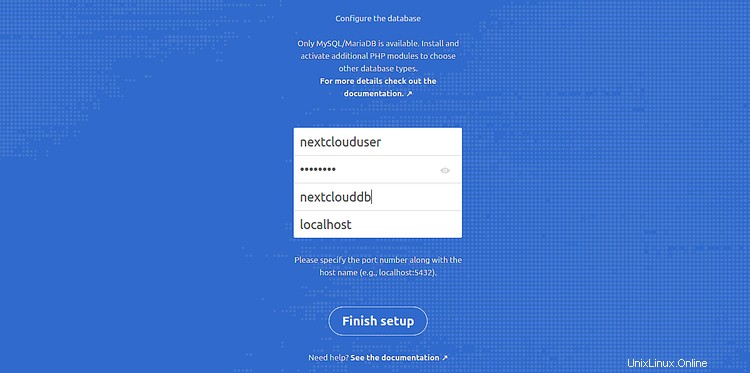
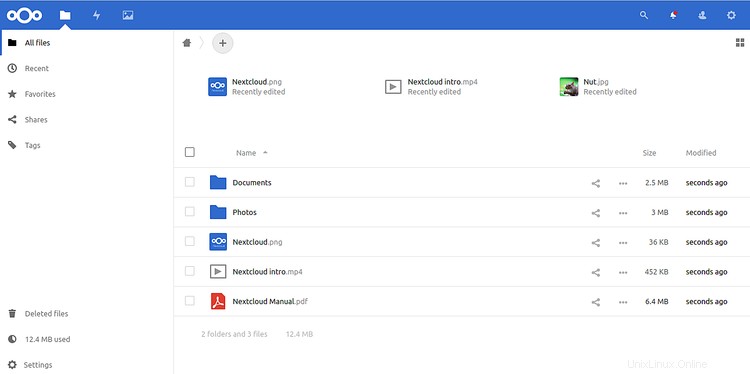
次に、管理者のユーザー名とパスワード、データフォルダー、正しいデータベースクレデンシャルを入力し、完了をクリックします。 セットアップ ボタン。次のページのNextCloudダッシュボードにリダイレクトされます:

今のところ以上です。
おめでとう!これで、Debian10にLet'sEncrypt Free SSLを使用してNextCloudが正常にインストールされ、保護されました。NextCloudWebインターフェイスを使用して、ファイル、ドキュメント、メディアを他のユーザーと簡単に共有できるようになりました。