この記事では、Debian 8サーバーでTLS対応のvsftpdサーバーを設定する方法と、FileZillaを使用してFTPサーバーにアクセスする方法について説明します。 FTPは、すべてのパスワードとすべてのデータがクリアテキストで転送されるため、デフォルトでは非常に安全でないプロトコルです。 TLSを使用することにより、通信全体を暗号化できるため、FTPの安全性が大幅に向上します。
1予備メモ
このチュートリアルでは、ホスト名server1.example.comとIPアドレス192.168.1.100を使用します。これらの設定は異なる場合があるため、必要に応じて置き換える必要があります。このチュートリアルの基礎として、Debian8の最小限のサーバー設定を使用しています。
2vsftpdとOpenSSLのインストール
TLSにはOpenSSLが必要です。 vsftpdとOpenSSLをインストールするには、次のコマンドを実行するだけです。
apt-get -y install vsftpd openssl
3TLS用のSSL証明書の作成
TLSを使用するには、SSL証明書を作成する必要があります。 / etc / ssl / privateに作成します-ディレクトリが存在しない場合は、今すぐ作成します::
mkdir -p /etc/ssl/private
chmod 700 /etc/ssl/private
その後、次のようにSSL証明書を生成できます。
openssl req -x509 -nodes -days 365 -newkey rsa:1024 -keyout /etc/ssl/private/vsftpd.pem -out /etc/ssl/private/vsftpd.pem
国名(2文字のコード)[AU]:<-国名を入力します(例:「DE」)。
州名または州名(フルネーム)[一部の州]:<-州を入力しますまたは州名。
地域名(例:市)[]:<-市区町村を入力してください。
組織名(例:会社)[Internet Widgits Pty Ltd]:<-組織名を入力してください(例:会社名)
組織単位名(例:セクション)[]:<-組織単位名(例:「IT部門」)を入力します。
一般名(例:あなたの名前)[]:<-システムの完全修飾ドメイン名を入力します(例: "server1.example.com")。
メールアドレス[]:<-メールアドレスを入力します。
4vsftpdでTLSを有効にする
vsftpdでTLSを有効にするには、/ etc / vsftpd.conf ...
を開きます。nano /etc/vsftpd.conf
...そして次のオプションを追加または変更します:
[...]

# Turn on SSL
ssl_enable=YES

# Allow anonymous users to use secured SSL connections
allow_anon_ssl=YES

# All non-anonymous logins are forced to use a secure SSL connection in order to
# send and receive data on data connections.
force_local_data_ssl=YES

# All non-anonymous logins are forced to use a secure SSL connection in order to send the password.
force_local_logins_ssl=YES

# Permit TLS v1 protocol connections. TLS v1 connections are preferred
ssl_tlsv1=YES

# Permit SSL v2 protocol connections. TLS v1 connections are preferred
ssl_sslv2=NO

# permit SSL v3 protocol connections. TLS v1 connections are preferred
ssl_sslv3=NO

# Disable SSL session reuse (required by WinSCP)
require_ssl_reuse=NO

# Select which SSL ciphers vsftpd will allow for encrypted SSL connections (required by FileZilla)
ssl_ciphers=HIGH

# This option specifies the location of the RSA certificate to use for SSL
# encrypted connections.
rsa_cert_file=/etc/ssl/private/vsftpd.pem
[...]
force_local_logins_ssl=YESおよびforce_local_data_ssl=YESを使用する場合、TLS接続のみが許可されます(これにより、TLSをサポートしていない古いFTPクライアントを持つすべてのユーザーがロックアウトされます)。 force_local_logins_ssl=NOおよびforce_local_data_ssl=NOを使用することにより、FTPクライアントがサポートするものに応じて、TLS接続と非TLS接続の両方が許可されます。
TLSオプションとは別に、匿名でないログインを有効にするために、vsftpd.confに次の設定もあることを確認してください。
[...]
# Uncomment this to allow local users to log in.
local_enable=YES
#
# Uncomment this to enable any form of FTP write command.
write_enable=YES
#
# Default umask for local users is 077. You may wish to change this to 022,
# if your users expect that (022 is used by most other ftpd's)
local_umask=022

[...]
を期待している場合は、これを022に変更します。
その後、vsftpdを再起動します:
service vsftpd restart
それでおしまい。これで、FTPクライアントを使用して接続を試みることができます。ただし、TLSを使用するようにFTPクライアントを構成する必要があります(force_local_logins_ssl=YESおよびforce_local_data_ssl=YESを使用する場合は必須です)。次の章で、FileZillaを使用してこれを行う方法を参照してください。
5 vsftpd add user
このステップでは、接続に使用できるローカルLinuxユーザーを追加します。パスワード「howtoforge」を使用して「till」ユーザーを作成します。すべてのFTPユーザーは、ホームディレクトリをmkdir / var / ftprootに置く必要があるため、最初にこのディレクトリを作成します。
mkdir /var/ftproot
次に、次のコマンドでユーザーを追加します:
adduser --home /var/ftproot/till till
adduserコマンドは、ユーザーパスワードとその他の詳細を要求します
[email protected]:/# adduser --home /var/ftproot/till till
Adding user `till' ...
Adding new group `till' (1001) ...
Adding new user `till' (1001) with group `till' ...
Creating home directory `/var/ftproot/till' ...
Copying files from `/etc/skel' ...
Enter new UNIX password: <-- Enter the new password here
Retype new UNIX password: <-- Enter the new password here
passwd: password updated successfully
Changing the user information for till
Enter the new value, or press ENTER for the default
Full Name []: <-- Enter your name here or press enter to skip
Room Number []: <-- Enter room number here or press enter to skip
Work Phone []: <-- Enter work phone here or press enter to skip
Home Phone []: <-- Enter home phone here or press enter to skip
Other []: <-- Enter Other user details here or press enter to skip
Is the information correct? [Y/n] <-- Y
FTPユーザーを正常に追加しました。
6TLS用のFileZillaの構成
FTPをTLSで使用するには、FileZillaなどのTLSをサポートするFTPクライアントが必要です。
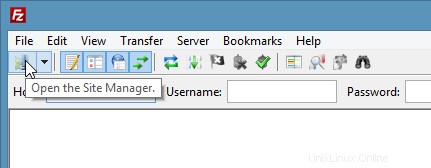
FileZillaで、サーバーマネージャーを開きます。
サーバーフィールドにFTPサーバーのIPアドレスまたはホスト名を入力し、プロトコル「FTP」と「TLSを介した明示的なFTPを要求する」を選択して、ユーザーフィールドにユーザー名を入力します。
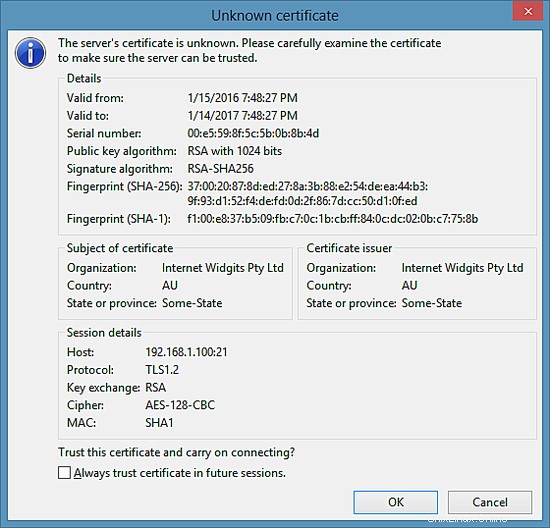
これで、サーバーに接続できます。これを初めて行う場合は、サーバーの新しいSSL証明書を受け入れる必要があります。
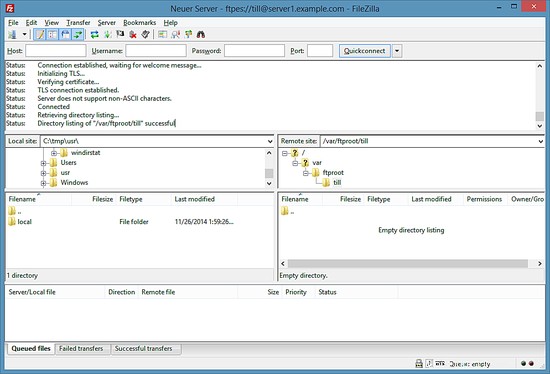
すべてがうまくいけば、サーバーにログインする必要があります:
7つのリンク
- vsftpd:https://security.appspot.com/vsftpd.html
- FileZilla:http://filezilla-project.org/
- Debian:http://www.debian.org/