このガイドでは、ISPConfigおよびApache2を実行しているDebianWheezyサーバーにRoundCubeWebメールアプリケーションをインストールする方法と、ユーザーがRoundCube内から電子メールパスワードを変更するなどのアクションを実行できるようにRoundCubeのISPConfig3プラグインを有効にする方法について説明します。 Roundcube Webメールは、アプリケーションのようなユーザーインターフェイスを備えたブラウザベースの多言語IMAPクライアントです。 MIMEサポート、アドレスブック、フォルダ操作、メッセージ検索、スペルチェックなどの機能が付属しています。
これがあなたのために働くという保証はありません!
1予備メモ
このチュートリアルでは、ISPConfig3サーバーのWebサーバーとしてApache2を使用していることを前提としています。このチュートリアルはnginxでは機能しません。 Debian WheezyリポジトリからRoundCubeをインストールします。これはかなり新しいバージョンです(0.7.2.9対0.9.1(現在の安定バージョン))。
RoundCubeは、エイリアス/ webmail(http://www.example.com/webmailなど)を介して各仮想ホストからアクセスできるように構成されます。
SquirrelMailのような別のウェブメールアプリケーションをすでに使用している場合は、それを完全に無効にするか、少なくともエイリアス/webmailを無効にしてください。 SquirrelMailをDebianパッケージとしてインストールした場合、エイリアスは/etc/apache2/conf.d/squirrelmail.confにあります。エイリアスをコメントアウトして/webmailエイリアスを無効にするか、ファイル全体をコメントアウトしてSquirrelMailを完全に無効にします。後でApacheを再起動することを忘れないでください。
2ISPConfigでのリモートユーザーの作成
RoundCube用のISPConfig3プラグインは、ISPConfigのリモートAPIを介して機能します。このAPIを使用するには、リモートユーザーが必要です。このようなユーザーを作成するには、[システム]>[ユーザー管理]>[リモートユーザー]に移動し、[新しいユーザーの追加]ボタンをクリックします。
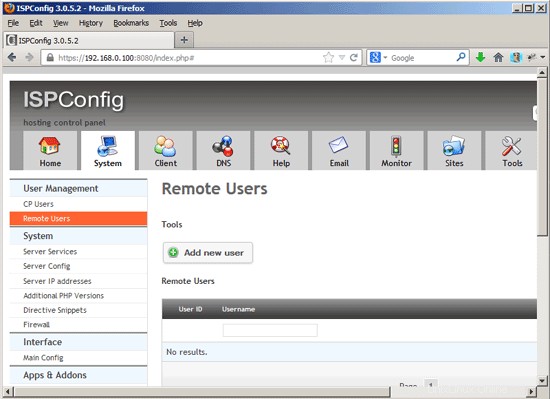
ユーザーのユーザー名とパスワードを入力してください...
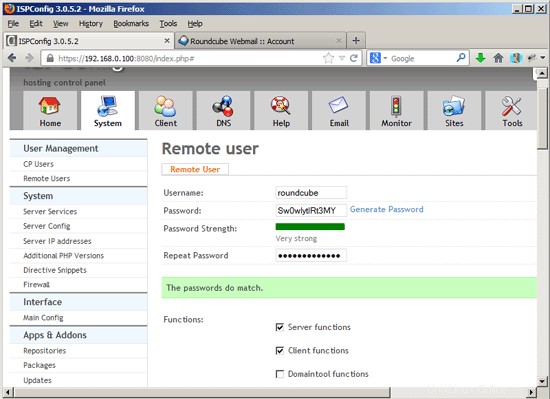
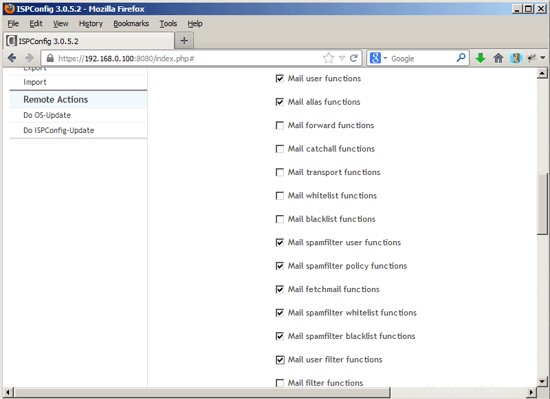
...そして次の機能を有効にします:
次に、[保存]をクリックします。
3RoundCubeのインストール
RoundCubeは次のようにインストールできます:
apt-get install roundcube roundcube-plugins roundcube-plugins-extra
次の質問が表示されます:
dbconfig-commonを使用してroundcube用にデータベースを構成しますか? <-はい
roundcubeで使用されるデータベースタイプ:<-mysql
データベースの管理ユーザーのパスワード:<-yourrootsqlpassword(MySQLルートユーザーのパスワード)
MySQLアプリケーションroundcubeのパスワード:<-roundcubesqlpassword
パスワードの確認:<-roundcubesqlpassword
これにより、MySQLユーザーroundcubeとパスワードroundcubesqlpasswordを使用してroundcubeというMySQLデータベースが作成されます。
次に/etc/apache2/conf.d/roundcubeを開きます...
vi /etc/apache2/conf.d/roundcube
...そして、Alias / webmail / var / lib/roundcubeという行を追加します。それに加えて、PHP構成を
# Those aliases do not work properly with several hosts on your apache server
# Uncomment them to use it or adapt them to your configuration
Alias /roundcube/program/js/tiny_mce/ /usr/share/tinymce/www/
Alias /roundcube /var/lib/roundcube
Alias /webmail /var/lib/roundcube

# Access to tinymce files
<Directory "/usr/share/tinymce/www/">
      Options Indexes MultiViews FollowSymLinks
      AllowOverride None
      Order allow,deny
      allow from all
</Directory>

<Directory /var/lib/roundcube/>
  Options +FollowSymLinks
  DirectoryIndex index.php

  <IfModule mod_php5.c>
    AddType application/x-httpd-php .php

    php_flag magic_quotes_gpc Off
    php_flag track_vars On
    php_flag register_globals Off
    php_value include_path .:/usr/share/php
  </IfModule>

  # This is needed to parse /var/lib/roundcube/.htaccess. See its
  # content before setting AllowOverride to None.
  AllowOverride All
  order allow,deny
  allow from all
</Directory>

# Protecting basic directories:
<Directory /var/lib/roundcube/config>
        Options -FollowSymLinks
        AllowOverride None
</Directory>

<Directory /var/lib/roundcube/temp>
        Options -FollowSymLinks
        AllowOverride None
        Order allow,deny
        Deny from all
</Directory>

<Directory /var/lib/roundcube/logs>
        Options -FollowSymLinks
        AllowOverride None
        Order allow,deny
        Deny from all
</Directory> |
その後、Apacheを再起動します:
/etc/init.d/apache2 restart
4RoundCubeの構成
/etc/roundcube/main.inc.phpを開きます...
vi /etc/roundcube/main.inc.php
...そして$rcmail_config['default_host']='localhost';を設定します。 (または、リモートマシン上にある場合はメールサーバーのホスト名またはIPアドレス):
[...] $rcmail_config['default_host'] = 'localhost'; [...] |
そうしないと、RoundCubeはログインの前にホスト名を要求するため、ユーザーに過度の負担がかかる可能性があります。可能な限り簡単に使用できるようにしたいと考えています。
次に、RoundCube用のISPConfig3プラグインをインストールします。
cd /tmp
git clone https://github.com/w2c/ispconfig3_roundcube.git
cd /tmp/ispconfig3_roundcube/
mv ispconfig3_* /var/lib/roundcube/plugins
cd /var/lib/roundcube/plugins
mv ispconfig3_account/config/config.inc.php.dist ispconfig3_account/config/config.inc.php
ispconfig3_account / config/config.inc.phpを開きます...
vi ispconfig3_account/config/config.inc.php
...そしてISPConfigリモートユーザーのログイン詳細とリモートAPIのURLを入力します-私のISPConfigインストールはhttps://192.168.0.100:8080で実行されるため、リモートAPIのURLはhttps://192.168です。 .0.100:8080 / remote /:
<?php $rcmail_config['identity_limit'] = false; $rcmail_config['remote_soap_user'] = 'roundcube'; $rcmail_config['remote_soap_pass'] = 'Sw0wlytlRt3MY'; $rcmail_config['soap_url'] = 'https://192.168.0.100:8080/remote/'; ?> |
最後に/etc/roundcube/main.inc.phpをもう一度開きます...
vi /etc/roundcube/main.inc.php
...そしてjqueruiプラグインとISPConfig3プラグインを有効にします...
[...]
// ----------------------------------
// PLUGINS
// ----------------------------------

// List of active plugins (in plugins/ directory)
//$rcmail_config['plugins'] = array();
$rcmail_config['plugins'] = array("jqueryui", "ispconfig3_account", "ispconfig3_autoreply", "ispconfig3_pass", "ispconfig3_spam", "ispconfig3_fetchmail", "ispconfig3_filter");
[...] |
...そしてスキンをデフォルトからクラシックに変更します(そうしないと、ISPConfig 3プラグインは機能しません):
[...] // skin name: folder from skins/ $rcmail_config['skin'] = 'classic'; [...] |
それでおしまい;これで、エイリアス/ webmail(www.example.com/webmailなど)でRoundCubeにアクセスできます。 ISPConfigで作成したメールアカウントのメールアドレスとパスワードでログインします:
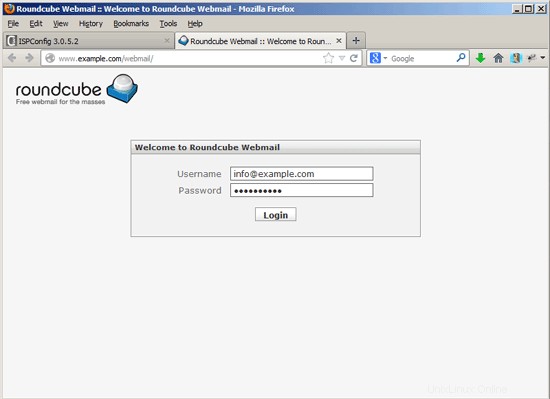
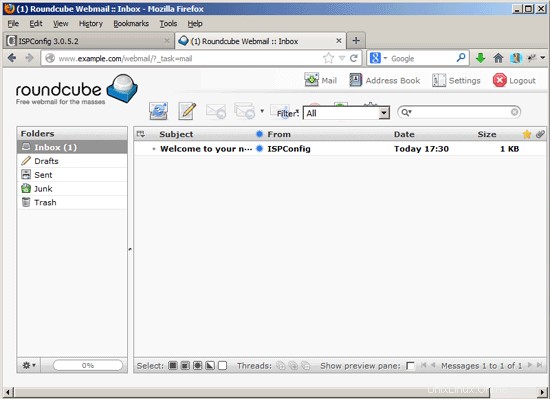
RoundCubeの外観は次のとおりです。
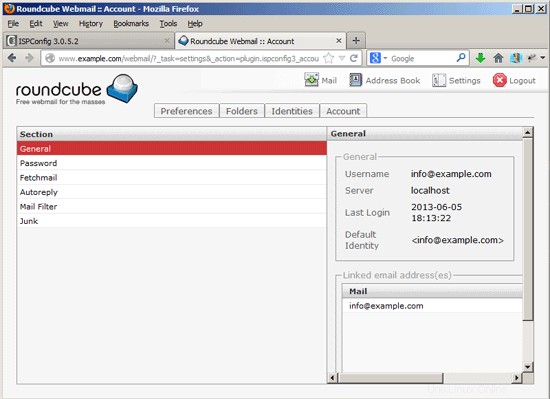
[設定]>[アカウント]で、RoundCube用のISPconfig 3プラグインを使用して、設定を変更できます。たとえば、...
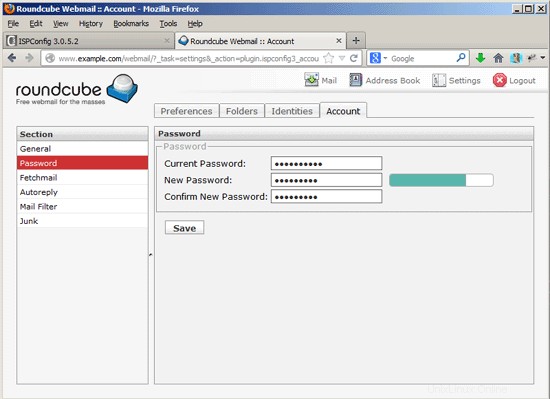
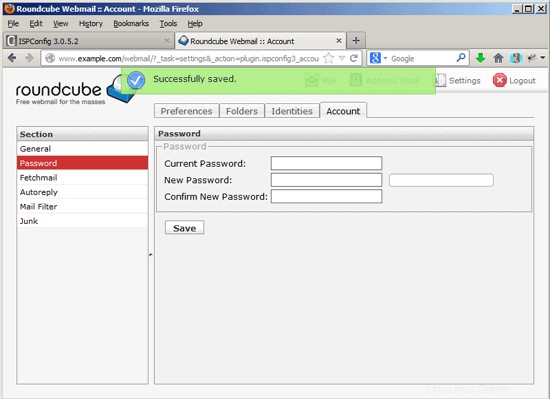
... ISPConfigを使用せずに、メールアカウントに新しいパスワードを設定できます:
5つのリンク
- RoundCube:http://roundcube.net/
- RoundCube用のISPConfig3プラグイン:https://github.com/w2c/ispconfig3_roundcube
- ISPConfig:http://www.ispconfig.org/
- Debian:http://www.debian.org/