Grafanaは、他のホストからのメトリックを監視するために使用される無料のオープンソースデータ視覚化ツールです。 Typescript and Goで記述されており、ロググラフとデータグラフの両方を作成および編集し、メトリックを作成できます。 Graphite、InfluxDB、OpenTSDBなどの時系列データベースからグラフとダッシュボードを生成し、他のユーザーと共有することができます。
機能
- ダッシュボードテンプレート
- アノテーションのプロビジョニング
- キオスクモードとプレイリスト
- カスタムプラグイン
- アラートフックとアラートフック
この投稿では、Debian11にGrafana8をインストールする方法を紹介します。
- Debian11を実行しているサーバー。
- サーバーIPで指定された有効なドメイン名。
- ルートパスワードはサーバーで構成されています。
開始する前に、システムを更新されたバージョンに更新することをお勧めします。次のコマンドを使用して、すべてのパッケージを更新できます。
apt-get update -y
すべてのパッケージを更新した後、次のコマンドを使用して他の必要な依存関係をインストールします。
apt-get install gnupg2 curl wget git software-properties-common -y
すべてのパッケージがインストールされたら、次のステップに進むことができます。
Grafana8をインストール
デフォルトでは、GrafanaはDebian11のデフォルトリポジトリに含まれていません。そのため、GrafanaリポジトリをAPTに追加する必要があります。次のコマンドを使用して追加できます:
curl https://packages.grafana.com/gpg.key | apt-key add -
add-apt-repository "deb https://packages.grafana.com/oss/deb stable main"
リポジトリが追加されたら、リポジトリキャッシュを更新し、次のコマンドを使用してGrafanaをインストールします。
apt-get update -y
apt-get install grafana -y
Grafanaをインストールしたら、次のコマンドを使用してGrafanaサービスを開始して有効にします。
systemctl start grafana-server
systemctl enable grafana-server
次のコマンドを使用して、Grafanaサービスのステータスを確認することもできます。
systemctl status grafana-server
次の出力が得られます:
? grafana-server.service - Grafana instance
     Loaded: loaded (/lib/systemd/system/grafana-server.service; disabled; vendor preset: enabled)
     Active: active (running) since Fri 2022-02-04 04:08:25 UTC; 5s ago
       Docs: http://docs.grafana.org
   Main PID: 8602 (grafana-server)
      Tasks: 9 (limit: 2341)
     Memory: 29.6M
        CPU: 1.299s
     CGroup: /system.slice/grafana-server.service
             ??8602 /usr/sbin/grafana-server --config=/etc/grafana/grafana.ini --pidfile=/run/grafana/grafana-server.pid --packaging=deb cfg:>

Feb 04 04:08:27 debian11 grafana-server[8602]: t=2022-02-04T04:08:27+0000 lvl=info msg="migrations completed" logger=migrator performed=381 s>
Feb 04 04:08:27 debian11 grafana-server[8602]: t=2022-02-04T04:08:27+0000 lvl=info msg="Created default admin" logger=sqlstore user=admin
Feb 04 04:08:27 debian11 grafana-server[8602]: t=2022-02-04T04:08:27+0000 lvl=info msg="Created default organization" logger=sqlstore
Feb 04 04:08:27 debian11 grafana-server[8602]: t=2022-02-04T04:08:27+0000 lvl=info msg="Initialising plugins" logger=plugin.manager
Feb 04 04:08:27 debian11 grafana-server[8602]: t=2022-02-04T04:08:27+0000 lvl=info msg="Plugin registered" logger=plugin.manager pluginId=inp>
Feb 04 04:08:27 debian11 grafana-server[8602]: t=2022-02-04T04:08:27+0000 lvl=info msg="Live Push Gateway initialization" logger=live.push_ht>
Feb 04 04:08:27 debian11 grafana-server[8602]: t=2022-02-04T04:08:27+0000 lvl=info msg="Writing PID file" logger=server path=/run/grafana/gra>
Feb 04 04:08:27 debian11 grafana-server[8602]: t=2022-02-04T04:08:27+0000 lvl=info msg="HTTP Server Listen" logger=http.server address=[::]:3>
Feb 04 04:08:27 debian11 grafana-server[8602]: t=2022-02-04T04:08:27+0000 lvl=info msg="warming cache for startup" logger=ngalert
Feb 04 04:08:27 debian11 grafana-server[8602]: t=2022-02-04T04:08:27+0000 lvl=info msg="starting MultiOrg Alertmanager" logger=ngalert.multio>
デフォルトでは、Grafanaはポート3000でリッスンします。次のコマンドで確認できます:
ss -antpl | grep 3000
次の出力が得られます:
LISTEN 0 4096 *:3000 *:* users:(("grafana-server",pid=8602,fd=8))
GrafanaのリバースプロキシとしてNginxをインストールする
次に、NginxをGrafanaのリバースプロキシとしてインストールして構成する必要があります。まず、次のコマンドを使用してNginxをインストールします。
apt-get install nginx -y
Nginxがインストールされたら、次のコマンドを使用してNginx仮想ホスト構成ファイルを作成します。
nano /etc/nginx/conf.d/grafana.conf
次の行を追加します:
server {
        server_name grafana.example.com;
        listen 80;
        access_log /var/log/nginx/grafana.log;


        location / {
                proxy_pass http://localhost:3000;
                proxy_set_header X-Forwarded-Host $host:$server_port;
                proxy_set_header X-Forwarded-Server $host;
                proxy_set_header X-Forwarded-For $proxy_add_x_forwarded_for;
        }
}
終了したら、ファイルを保存して閉じます。次に、次のコマンドを使用して、構文エラーがないかNginxを確認します。
nginx -t
すべてが正常であれば、次の出力が得られます:
nginx: the configuration file /etc/nginx/nginx.conf syntax is ok
nginx: configuration file /etc/nginx/nginx.conf test is successful
次に、Nginxを再起動して、構成の変更を適用します。
systemctl restart nginx
次のコマンドを使用して、Nginxのステータスを確認することもできます。
systemctl status nginx
次の出力が得られます:
? nginx.service - A high performance web server and a reverse proxy server
     Loaded: loaded (/lib/systemd/system/nginx.service; enabled; vendor preset: enabled)
     Active: active (running) since Fri 2022-02-04 04:09:20 UTC; 4s ago
       Docs: man:nginx(8)
    Process: 8631 ExecStartPre=/usr/sbin/nginx -t -q -g daemon on; master_process on; (code=exited, status=0/SUCCESS)
    Process: 8632 ExecStart=/usr/sbin/nginx -g daemon on; master_process on; (code=exited, status=0/SUCCESS)
   Main PID: 8633 (nginx)
      Tasks: 2 (limit: 2341)
     Memory: 2.5M
        CPU: 35ms
     CGroup: /system.slice/nginx.service
             ??8633 nginx: master process /usr/sbin/nginx -g daemon on; master_process on;
             ??8634 nginx: worker process

Feb 04 04:09:20 debian11 systemd[1]: Starting A high performance web server and a reverse proxy server...
Feb 04 04:09:20 debian11 systemd[1]: nginx.service: Failed to parse PID from file /run/nginx.pid: Invalid argument
Feb 04 04:09:20 debian11 systemd[1]: Started A high performance web server and a reverse proxy server.
この時点で、Nginxがインストールされ、Grafanaのリバースプロキシとして構成されます。これで、次のステップに進むことができます。
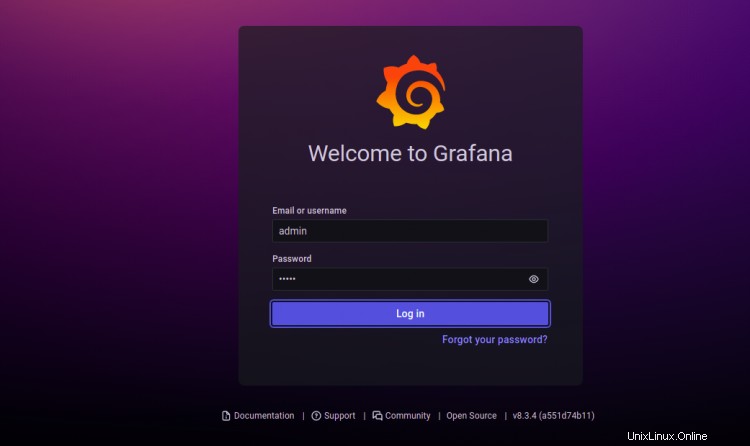
次に、Webブラウザーを開き、URL http://grafana.example.comを使用してGrafanaWebインターフェースにアクセスします。 。 Grafanaログインページにリダイレクトされます:

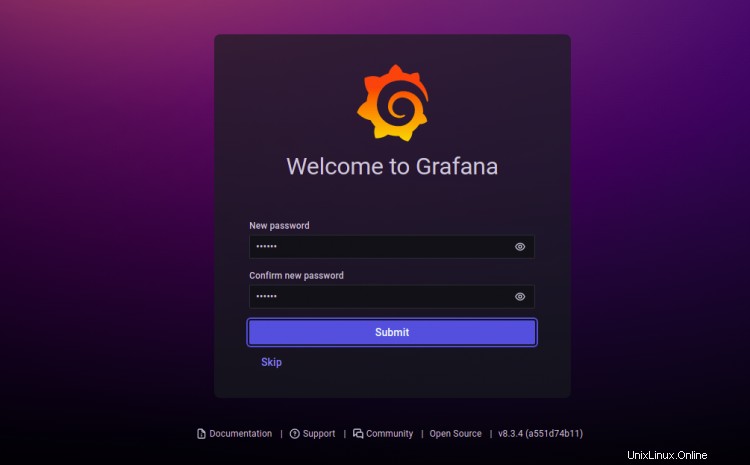
管理者のユーザー名とパスワードを入力し、ログインをクリックします ボタン。 Grafanaパスワードリセット画面が表示されます:

新しいパスワードを設定し、送信をクリックします ボタン。次の画面にGrafanaダッシュボードが表示されます。

Let'sEncryptで安全なGrafana
次に、Certbotクライアントパッケージをインストールして、Let'sEncryptSSLをインストールおよび管理する必要があります。
まず、次のコマンドを使用してCertbotをインストールします。
apt-get install certbot python3-certbot-nginx -y
インストールが完了したら、次のコマンドを実行してLet'sEncryptSSLをWebサイトにインストールします。
certbot --nginx -d grafana.example.com
以下に示すように、有効なメールアドレスを入力し、利用規約に同意するよう求められます。
Saving debug log to /var/log/letsencrypt/letsencrypt.log
Plugins selected: Authenticator nginx, Installer nginx
Enter email address (used for urgent renewal and security notices) (Enter 'c' to
cancel): [email protected]

- - - - - - - - - - - - - - - - - - - - - - - - - - - - - - - - - - - - - - - -
Please read the Terms of Service at
https://letsencrypt.org/documents/LE-SA-v1.2-November-15-2017.pdf. You must
agree in order to register with the ACME server at
https://acme-v02.api.letsencrypt.org/directory
- - - - - - - - - - - - - - - - - - - - - - - - - - - - - - - - - - - - - - - -
(A)gree/(C)ancel: A

- - - - - - - - - - - - - - - - - - - - - - - - - - - - - - - - - - - - - - - -
Would you be willing to share your email address with the Electronic Frontier
Foundation, a founding partner of the Let's Encrypt project and the non-profit
organization that develops Certbot? We'd like to send you email about our work
encrypting the web, EFF news, campaigns, and ways to support digital freedom.
- - - - - - - - - - - - - - - - - - - - - - - - - - - - - - - - - - - - - - - -
(Y)es/(N)o: Y
Obtaining a new certificate
Performing the following challenges:
http-01 challenge for grafana.example.com
Waiting for verification...
Cleaning up challenges
Deploying Certificate to VirtualHost /etc/nginx/conf.d/grafana.conf
次に、以下に示すように、HTTPトラフィックをHTTPSにリダイレクトするかどうかを選択します。
- - - - - - - - - - - - - - - - - - - - - - - - - - - - - - - - - - - - - - - -
1: No redirect - Make no further changes to the webserver configuration.
2: Redirect - Make all requests redirect to secure HTTPS access. Choose this for
new sites, or if you're confident your site works on HTTPS. You can undo this
change by editing your web server's configuration.
- - - - - - - - - - - - - - - - - - - - - - - - - - - - - - - - - - - - - - - -
Select the appropriate number [1-2] then [enter] (press 'c' to cancel): 2
2と入力し、Enterキーを押してインストールを終了します。次の出力が表示されます。
Redirecting all traffic on port 80 to ssl in /etc/nginx/conf.d/grafana.conf

- - - - - - - - - - - - - - - - - - - - - - - - - - - - - - - - - - - - - - - -
Congratulations! You have successfully enabled https://grafana.example.com

You should test your configuration at:
https://www.ssllabs.com/ssltest/analyze.html?d=grafana.example.com
- - - - - - - - - - - - - - - - - - - - - - - - - - - - - - - - - - - - - - - -

IMPORTANT NOTES:
 - Congratulations! Your certificate and chain have been saved at:
   /etc/letsencrypt/live/grafana.example.com/fullchain.pem
   Your key file has been saved at:
   /etc/letsencrypt/live/grafana.example.com/privkey.pem
   Your cert will expire on 2022-05-07. To obtain a new or tweaked
   version of this certificate in the future, simply run certbot again
   with the "certonly" option. To non-interactively renew *all* of
   your certificates, run "certbot renew"
 - Your account credentials have been saved in your Certbot
   configuration directory at /etc/letsencrypt. You should make a
   secure backup of this folder now. This configuration directory will
   also contain certificates and private keys obtained by Certbot so
   making regular backups of this folder is ideal.
 - If you like Certbot, please consider supporting our work by:

   Donating to ISRG / Let's Encrypt:   https://letsencrypt.org/donate
   Donating to EFF:                    https://eff.org/donate-le

 - We were unable to subscribe you the EFF mailing list because your
   e-mail address appears to be invalid. You can try again later by
   visiting https://act.eff.org.
おめでとう!これで、Debian11にNginxとLet'sEncryptSSLを使用してGrafana8が正常にインストールされました。これで、リモートホストを追加し、Grafanaダッシュボードから監視を開始できます。ご不明な点がございましたら、お気軽にお問い合わせください。