10月のCMSは、LaravelPHPFrameworkに基づく無料のオープンソースのセルフホストCMSプラットフォームです。 10月のCMSソースコードはGithubでホストされています。このチュートリアルでは、NGINXをウェブサーバーとして、MariaDBをデータベースサーバーとして使用し、オプションでacme.shクライアントを使用してトランスポート層を保護することにより、Debian 9(ストレッチ)オペレーティングシステムでの10月のCMSインストールプロセスについて説明します。認証局を暗号化してSSLサポートを追加しましょう。
続行する前に、サーバーが最小システム要件を満たしていることを確認する必要があります。 10月のCMSには、ウェブホスティングに関する次のサーバー要件があります。
- PHPバージョン7.0以降
- PHPPDO拡張機能
- cURLPHP拡張機能
- OpenSSLPHP拡張機能
- MbstringPHPライブラリ
- ZipPHPライブラリ
- GDPHPライブラリ
- XMLPHP拡張機能
- JSONPHP拡張機能
-
mod_rewriteを使用したApache またはNGINX - データベースサーバー(MariaDB、MySQL、PostgreSQL)
前提条件
- Debian 9(ストレッチ)を実行しているシステム。
- sudo権限を持つroot以外のユーザー。
Debianシステムのバージョンを確認してください:
lsb_release -ds
# Debian GNU/Linux 9.7 (stretch)
タイムゾーンを設定します:
dpkg-reconfigure tzdataオペレーティングシステムパッケージ(ソフトウェア)を更新します。これは、オペレーティングシステムのデフォルトのソフトウェアパッケージの最新の更新とセキュリティ修正を確実に行うための重要な最初のステップです。
apt update && apt upgrade -yDebianオペレーティングシステムの基本的な管理に必要ないくつかの重要なパッケージをインストールします:
apt install -y curl wget vim git sudo unzip socat bash-completion dirmngr apt-transport-https10月のCMSプラットフォームには、PHPバージョン7.0以降が必要です。デフォルトでは、Debian 9のデフォルトのソフトウェアリポジトリにPHPバージョン7.0があり、10月のCMSに適しています。
PHPと必要なPHP拡張機能をインストールします:
sudo apt install -y php7.0 php7.0-cli php7.0-fpm php7.0-common php7.0-mysql php7.0-curl php7.0-json php7.0-zip php7.0-gd php7.0-xml php7.0-mbstring モジュールにコンパイルされたPHPを表示するには、次のコマンドを実行できます。
php -m

ctype
curl
exif
fileinfo
. . .
. . .
PHPのバージョンを確認してください:
php --version

# PHP 7.0.33-0+deb9u1 (cli) (built: Dec  7 2018 11:36:49) ( NTS )
# Copyright (c) 1997-2017 The PHP Group
# Zend Engine v3.0.0, Copyright (c) 1998-2017 Zend Technologies
#     with Zend OPcache v7.0.33-0+deb9u1, Copyright (c) 1999-2017, by Zend Technologies
PHP-FPMサービスは、Debian 9システムで再起動すると自動的に開始されて有効になるため、手動で開始して有効にする必要はありません。次のステップであるデータベースのインストールとセットアップに進むことができます。
ステップ2-MariaDBをインストールし、10月のデータベースを作成します
10月は、MySQL / MariaDB、PostgreSQL、SQLite、およびSQLデータベースをサポートします。 DebianチームはMySQLをDebian9(ストレッチ)のデフォルトデータベースとしてMariaDBに置き換えたため、このチュートリアルでは、データベースサーバーとしてMariaDBを使用します。オリジナルのMySQLをインストールする場合は、Oracleが管理する公式のMySQLリポジトリを追加して使用できます。
公式のMariaDBリポジトリからMariaDBデータベースサーバーをインストールします:
sudo apt install -y software-properties-common dirmngr apt-transport-https
sudo apt-key adv --recv-keys --keyserver keyserver.ubuntu.com 0xF1656F24C74CD1D8
sudo add-apt-repository 'deb [arch=amd64,i386,ppc64el] https://mirrors.nxthost.com/mariadb/repo/10.2/debian stretch main'
sudo apt update
sudo apt install -y mariadb-server
MariaDBのバージョンを確認してください:
mysql --version
# mysql  Ver 15.1 Distrib 10.2.21-MariaDB, for debian-linux-gnu (x86_64) using readline 5.2
mysql_secure installationを実行します MariaDBのセキュリティを向上させ、MariaDBのrootのパスワードを設定するスクリプト ユーザー:
sudo mysql_secure_installationそれぞれの質問に答えてください:
Enter current password for root (enter for none): Press Enter
Set root password? [Y/n] Y
New password: your_secure_password
Re-enter new password: your_secure_password
Remove anonymous users? [Y/n] Y
Disallow root login remotely? [Y/n] Y
Remove test database and access to it? [Y/n] Y
Reload privilege tables now? [Y/n] Y
rootユーザーとしてMariaDBにログインします:
sudo mysql -u root -p
# Enter password
10月のインストールに使用するMariaDBデータベースとユーザーを作成し、資格情報を覚えておいてください。
CREATE DATABASE dbname;
GRANT ALL ON dbname.* TO 'username' IDENTIFIED BY 'password';
FLUSH PRIVILEGES;
MariaDBシェルを終了します:
exitステップ3-Acme.shクライアントをインストールし、Let's Encrypt証明書を取得します(オプション)
HTTPSを使用してWebサイトを保護する必要はありませんが、サイトのトラフィックを保護することをお勧めします。 Let's EncryptからSSL証明書を取得するには、Acme.shクライアントを使用します。 Acme.shは、依存関係がゼロのLet'sEncryptからSSL証明書を取得するための純粋なUNIXシェルソフトウェアです。
Acme.shをダウンロードしてインストールします:
sudo su - root
git clone https://github.com/Neilpang/acme.sh.git
cd acme.sh
./acme.sh --install --accountemail [email protected]
source ~/.bashrc
cd ~
acme.shのバージョンを確認してください:
acme.sh --version
# v2.8.0RSAを取得する およびECC/ ECCSA ドメイン/ホスト名の証明書:
# RSA 2048
acme.sh --issue --standalone -d example.com --keylength 2048
# ECDSA
acme.sh --issue --standalone -d example.com --keylength ec-256
テスト用の偽の証明書が必要な場合は、--stagingを追加できます 上記のコマンドにフラグを立てます。
上記のコマンドを実行した後、証明書 およびキー になります:
- RSAの場合 :
~/example.comディレクトリ。 - ECC / ECCSAの場合 :
~/example.com_eccディレクトリ。
発行された証明書を一覧表示するには、次のコマンドを実行できます:
acme.sh --list
証明書を保存するディレクトリを作成します。 /etc/letsencryptを使用します ディレクトリ。
mkdir -p /etc/letsencrypt/example.com
sudo mkdir -p /etc/letsencrypt/example.com_ecc
証明書を/etc/letsencryptディレクトリにインストール/コピーします。
# RSA
acme.sh --install-cert -d example.com \
        --cert-file /etc/letsencrypt/example.com/cert.pem \
        --key-file /etc/letsencrypt/example.com/private.key \
        --fullchain-file /etc/letsencrypt/example.com/fullchain.pem \
        --reloadcmd "sudo systemctl reload nginx.service"

# ECC/ECDSA
acme.sh --install-cert -d example.com --ecc \
        --cert-file /etc/letsencrypt/example.com_ecc/cert.pem \
        --key-file /etc/letsencrypt/example.com_ecc/private.key \
        --fullchain-file /etc/letsencrypt/example.com_ecc/fullchain.pem \
        --reloadcmd "sudo systemctl reload nginx.service"
すべての証明書は60日ごとに自動的に更新されます。
証明書を取得したら、rootユーザーを終了し、通常のsudoユーザーに戻ります。
exitステップ4-NGINXをインストールし、10月にNGINXを構成します
NGINXウェブサーバーをインストールします:
sudo apt install -y nginxNGINXのバージョンを確認してください:
sudo nginx -v
# nginx version: nginx/1.10.3
次のコマンドを実行して、10月のNGINXを構成します:
sudo vim /etc/nginx/sites-available/october.conf
そして、ファイルに次の構成を入力します。
server {
    listen [::]:443 ssl http2;
    listen 443 ssl http2;
    listen [::]:80;
    listen 80;

    server_name example.com;

    index index.php index.html;
    root /var/www/october;

    ssl_certificate /etc/letsencrypt/example.com/fullchain.pem;
    ssl_certificate_key /etc/letsencrypt/example.com/private.key;
    ssl_certificate /etc/letsencrypt/example.com_ecc/fullchain.pem;
    ssl_certificate_key /etc/letsencrypt/example.com_ecc/private.key;

    location / {
        try_files $uri $uri/ /index.php?$query_string;
    }

    location ~ \.php$ {
        include snippets/fastcgi-php.conf;
        fastcgi_pass unix:/var/run/php/php7.0-fpm.sock;
        fastcgi_read_timeout 120s;
    }

    location ~ ^/favicon\.ico { try_files $uri /index.php; }
    location ~ ^/sitemap\.xml { try_files $uri /index.php; }
    location ~ ^/robots\.txt { try_files $uri /index.php; }
    location ~ ^/humans\.txt { try_files $uri /index.php; }
    location ~ ^/storage/app/uploads/public { try_files $uri 404; }
    location ~ ^/storage/app/media { try_files $uri 404; }
    location ~ ^/storage/temp/public { try_files $uri 404; }
    location ~ ^/modules/.*/assets { try_files $uri 404; }
    location ~ ^/modules/.*/resources { try_files $uri 404; }
    location ~ ^/modules/.*/behaviors/.*/assets { try_files $uri 404; }
    location ~ ^/modules/.*/behaviors/.*/resources { try_files $uri 404; }
    location ~ ^/modules/.*/widgets/.*/assets { try_files $uri 404; }
    location ~ ^/modules/.*/widgets/.*/resources { try_files $uri 404; }
    location ~ ^/modules/.*/formwidgets/.*/assets { try_files $uri 404; }
    location ~ ^/modules/.*/formwidgets/.*/resources { try_files $uri 404; }
    location ~ ^/modules/.*/reportwidgets/.*/assets { try_files $uri 404; }
    location ~ ^/modules/.*/reportwidgets/.*/resources { try_files $uri 404; }
    location ~ ^/plugins/.*/.*/assets { try_files $uri 404; }
    location ~ ^/plugins/.*/.*/resources { try_files $uri 404; }
    location ~ ^/plugins/.*/.*/behaviors/.*/assets { try_files $uri 404; }
    location ~ ^/plugins/.*/.*/behaviors/.*/resources { try_files $uri 404; }
    location ~ ^/plugins/.*/.*/reportwidgets/.*/assets { try_files $uri 404; }
    location ~ ^/plugins/.*/.*/reportwidgets/.*/resources { try_files $uri 404; }
    location ~ ^/plugins/.*/.*/formwidgets/.*/assets { try_files $uri 404; }
    location ~ ^/plugins/.*/.*/formwidgets/.*/resources { try_files $uri 404; }
    location ~ ^/plugins/.*/.*/widgets/.*/assets { try_files $uri 404; }
    location ~ ^/plugins/.*/.*/widgets/.*/resources { try_files $uri 404; }
    location ~ ^/themes/.*/assets { try_files $uri 404; }
    location ~ ^/themes/.*/resources { try_files $uri 404; }

}
新しいoctober.confを有効にします ファイルをsites-enabledにリンクして構成します ディレクトリ。
sudo ln -s /etc/nginx/sites-available/october.conf /etc/nginx/sites-enabled構文エラーがないかNGINX構成を確認してください:
sudo nginx -tNGINXサービスをリロードします:
sudo systemctl reload nginx.serviceドキュメントのルートディレクトリを作成します:
sudo mkdir -p /var/www/october
/var/www/octoberの所有権を変更します [your_user]:
sudo chown -R [your_user]:[your_user] /var/www/octoberドキュメントルートに移動します:
cd /var/www/october10月のCMSインストーラーをダウンロードします:
wget https://octobercms.com/download -O october.zip10月のCMSインストーラーを解凍します:
unzip october.zip
rm october.zip
mv install-master/* .
/var/www/octoberの所有権を変更します www-data:へのディレクトリ
sudo chown -R www-data:www-data /var/www/october
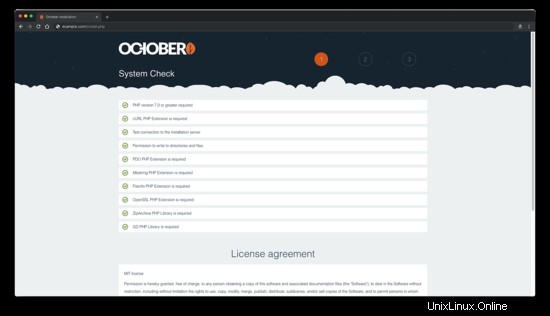
install.phpに移動します example.com/install.phpなどのウェブブラウザのスクリプト インストール手順に従ってください。
システムチェックに問題がないことを確認し、[同意して続行]を押して続行します 「ボタン。
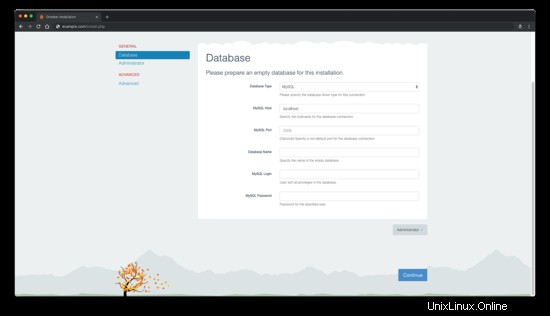
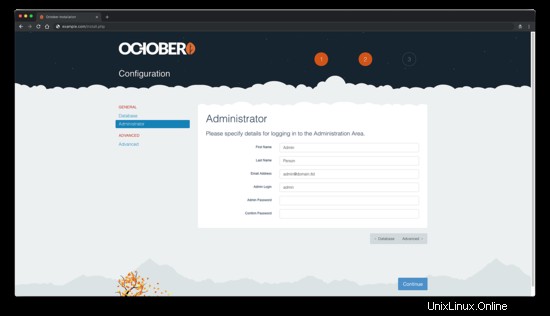
データベースと管理者ユーザーの設定を構成します。
いくつかの詳細設定を構成することも、デフォルト値のままにすることもできます。
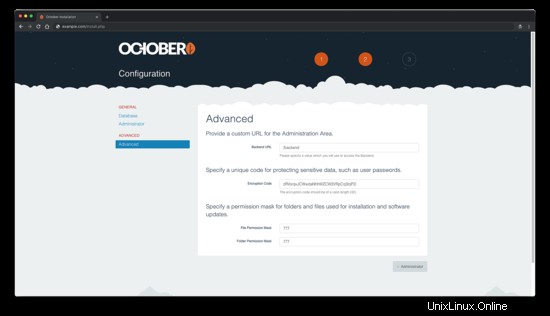
そして最後に、すべてが構成されたら、青色の「続行」を押します。 「ボタン。
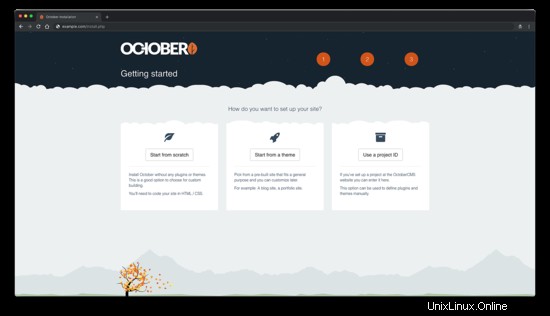
次に、「サイトをどのように設定しますか?」というメッセージが表示されます。 "。3つのオプションがあります:最初から始める 、テーマから始める 、プロジェクトIDを使用する 。ご希望のオプションを選択してください。
10月のCMSプラットフォームの管理エリアにアクセスするには、/backendを追加するだけです。 あなたのURL/IPに。
インストール後、セキュリティ上の理由から、インストールファイルinstall.phpを削除する必要があります スクリプトとinstall_files ディレクトリ:
sudo rm /var/www/october/install.php && sudo rm -rf /var/www/october/install_files- https://octobercms.com/
- https://github.com/octobercms/october