ERPNextは、Frappeフレームワーク上にPythonで記述された無料のオープンソースERPソフトウェアであり、経理、在庫、製造、CRM、販売、購入、プロジェクト管理、HRMSなどが含まれます。 ERPNextは、シンプルでパワフルで使いやすいERPシステムです。中央の場所から日常のタスクを管理するために使用できる美しいWebインターフェイスが付属しています。
このチュートリアルでは、Debian9サーバーにERPNextソフトウェアをインストールする方法を学習します。
- Debian9を実行しているサーバー。
- sudo権限を持つroot以外のユーザー。
開始する前に、パッケージリポジトリを最新バージョンに更新することをお勧めします。これを行うには、次のコマンドを実行します。
sudo apt-get update -y
sudo apt-get upgrade -y
次に、システムを再起動してすべての変更を適用します。
ERPNextが正しく機能するには、Pythonバージョン2.7が必要です。次のコマンドを実行して、Pythonおよびその他の必要なパッケージをインストールできます。
sudo apt-get install python-minimal git build-essential python-setuptools python-dev libffi-dev libssl-dev curl -y
Pythonの依存関係をインストールするには、Pythonのpipツールもインストールする必要があります。これを行うには、次のコマンドを実行します。
wget https://bootstrap.pypa.io/get-pip.py
sudo python get-pip.py
次に、pipコマンドを使用してansibleをインストールします:
sudo pip install ansible
Node.js、Redis、Nginxをインストールします
デフォルトでは、Node.jsの最新バージョンはDebian 9で利用できません。そのため、Node.js8.xのNodesourceリポジトリを追加する必要があります。これを行うには、次のコマンドを実行します。
sudo curl --silent --location https://deb.nodesource.com/setup_8.x | sudo bash -
次に、次のコマンドを実行して、Node.js、Nginx、Redisをインストールします。
sudo apt-get install nodejs redis-server nginx -y
すべてのパッケージがインストールされたら、NginxおよびRedisサービスを開始し、次のコマンドを使用して起動時に開始できるようにします。
sudo systemctl start nginx
sudo systemctl enable nginx
sudo systemctl start redis-server
sudo systemctl enable redis-server
MariaDBのインストールと構成
デフォルトでは、MariaDBの最新バージョンはDebian9リポジトリで利用できません。そのため、そのためにMariaDBリポジトリを追加する必要があります。
まず、次のコマンドを使用して、署名キーをダウンロードしてシステムに追加します。
sudo apt-get install software-properties-common dirmngr
sudo apt-key adv --recv-keys --keyserver keyserver.ubuntu.com 0xF1656F24C74CD1D8
次に、次のコマンドを使用してMariaDBリポジトリを追加します。
sudo add-apt-repository 'deb [arch=amd64,i386,ppc64el] http://ftp.utexas.edu/mariadb/repo/10.2/debian stretch main'
最後に、次のコマンドを使用してMariaDBサーバーをインストールします。
sudo apt-get update -y
sudo apt-get install mariadb-server libmysqlclient-dev -y
次に、ERPNextデータベースを作成するために、BarracudaストレージエンジンをMariaDB構成ファイルに追加する必要があります。 my.cnfファイルを編集することでこれを行うことができます:
sudo nano /etc/mysql/my.cnf
次の行を追加します:
[mysqld]

innodb-file-format=barracuda
innodb-file-per-table=1
innodb-large-prefix=1
character-set-client-handshake = FALSE
character-set-server = utf8mb4
collation-server = utf8mb4_unicode_ci

[mysql]

default-character-set = utf8mb4
終了したらファイルを保存して閉じ、MariaDBサービスを開始し、次のコマンドを使用して起動時にファイルを開始できるようにします。
sudo systemctl restart mysql
sudo systemctl enable mysql
次に、mysql_secure_installationスクリプトを実行してMariaDBを保護します。
sudo mysql_secure_installation
このスクリプトは、以下に示すように、rootパスワードを設定し、匿名ユーザーを削除し、リモートrootログインを禁止し、テストデータベースと安全なMariaDBへのアクセスを削除します。
Set root password? [Y/n] y
Remove anonymous users? [Y/n] y
Disallow root login remotely? [Y/n] y
Remove test database and access to it? [Y/n] y
Reload privilege tables now? [Y/n] y
PDFコンバーターのインストール
また、QT Webkitレンダリングエンジンを使用してHTMLをPDFに変換するには、wkhtmltopdfをインストールする必要があります。まず、次のコマンドを使用して必要な依存関係をインストールします。
sudo apt-get install libxext6 xfonts-75dpi xfonts-base libxrender1 -y
次に、次のコマンドを使用して、最新バージョンのwkhtmltopdfをダウンロードします。
wget https://github.com/wkhtmltopdf/wkhtmltopdf/releases/download/0.12.4/wkhtmltox-0.12.4_linux-generic-amd64.tar.xz
次に、ダウンロードしたファイルを/optディレクトリに抽出します。
sudo tar -xvf wkhtmltox-0.12.4_linux-generic-amd64.tar.xz -C /opt
次に、次のコマンドを使用してwkhtmltopdfのソフトリンクを作成します。
sudo ln -s /opt/wkhtmltox/bin/wkhtmltopdf /usr/bin/wkhtmltopdf
sudo ln -s /opt/wkhtmltox/bin/wkhtmltopdf /usr/bin/wkhtmltopdf
次に、システムにERPNextアプリケーションをインストールして管理するために、Benchをインストールする必要があります。ベンチは、Nginxとスーパーバイザーの構成を作成および管理するためにも使用されます。
Benchをインストールする前に、Benchのユーザーを追加する必要があります。
まず、次のコマンドを使用してベンチユーザーを作成します。
sudo adduser bench
次に、ベンチユーザーにsudo権限を付与します。
sudo usermod -aG sudo bench
次に、Benchユーザーでログインし、次のコマンドを使用してBenchリポジトリのクローンを作成します。
su - bench
git clone https://github.com/frappe/bench bench-repo
最後に、pipコマンドを使用してBenchをインストールします。
sudo pip install -e bench-repo
次に、フラッペフレームワークがインストールされたベンチディレクトリを初期化します。
bench init erpnext
次に、ディレクトリをerpnextに変更し、次のコマンドを使用して新しいFrappeサイトを作成します。
cd erpnext
bench new-site test.example.com
上記のコマンドは、MySQLルートパスワードを提供するように要求し、管理者アカウントの新しいパスワードを設定するように要求します。管理者パスワードは、後で管理者ダッシュボードにログインする必要があります。
次に、次のコマンドを使用して、GitリポジトリからERPNextインストールファイルをダウンロードします。
bench get-app erpnext https://github.com/frappe/erpnext
次に、新しく作成したサイトにERPNextをインストールします。
bench --site test.example.com install-app erpnext
最後に、次のコマンドを使用してベンチアプリケーションを起動します。
bench start
アプリケーションが正常に起動すると、次の出力が表示されます。
13:40:10 system           | redis_socketio.1 started (pid=2618)
13:40:10 system           | worker_long.1 started (pid=2625)
13:40:10 system           | watch.1 started (pid=2619)
13:40:10 system           | redis_queue.1 started (pid=2626)
13:40:10 redis_socketio.1 | 2630:M 24 Feb 13:40:10.939 * Increased maximum number of open files to 10032 (it was originally set to 1024).
13:40:10 system           | web.1 started (pid=2629)
13:40:11 system           | schedule.1 started (pid=2634)
13:40:10 redis_socketio.1 |                 _._
13:40:10 redis_socketio.1 |            _.-``__ ''-._
13:40:10 redis_socketio.1 |       _.-``    `.  `_.  ''-._           Redis 3.0.6 (00000000/0) 64 bit
13:40:10 redis_socketio.1 |   .-`` .-```.  ```\/    _.,_ ''-._
13:40:10 redis_socketio.1 |  (    '      ,       .-`  | `,    )     Running in standalone mode
13:40:10 redis_socketio.1 |  |`-._`-...-` __...-.``-._|'` _.-'|     Port: 12000
13:40:10 redis_socketio.1 |  |    `-._   `._    /     _.-'    |     PID: 2630
13:40:10 redis_socketio.1 |   `-._    `-._  `-./  _.-'    _.-'
13:40:10 redis_socketio.1 |  |`-._`-._    `-.__.-'    _.-'_.-'|
13:40:10 redis_socketio.1 |  |    `-._`-._        _.-'_.-'    |           http://redis.io
13:40:10 redis_socketio.1 |   `-._    `-._`-.__.-'_.-'    _.-'
13:40:10 redis_socketio.1 |  |`-._`-._    `-.__.-'    _.-'_.-'|
13:40:10 redis_socketio.1 |  |    `-._`-._        _.-'_.-'    |
13:40:10 redis_socketio.1 |   `-._    `-._`-.__.-'_.-'    _.-'
13:40:10 redis_socketio.1 |       `-._    `-.__.-'    _.-'
13:40:10 redis_socketio.1 |           `-._        _.-'
13:40:10 redis_socketio.1 |               `-.__.-'
13:40:10 redis_socketio.1 |
13:40:11 system           | worker_default.1 started (pid=2639)
13:40:10 redis_socketio.1 | 2630:M 24 Feb 13:40:10.973 # WARNING: The TCP backlog setting of 511 cannot be enforced because /proc/sys/net/core/somaxconn is set to the lower value of 128.
13:40:10 redis_socketio.1 | 2630:M 24 Feb 13:40:10.974 # Server started, Redis version 3.0.6
13:40:10 redis_socketio.1 | 2630:M 24 Feb 13:40:10.974 # WARNING overcommit_memory is set to 0! Background save may fail under low memory condition. To fix this issue add 'vm.overcommit_memory = 1' to /etc/sysctl.conf and then reboot or run the command 'sysctl vm.overcommit_memory=1' for this to take effect.
13:40:10 redis_socketio.1 | 2630:M 24 Feb 13:40:10.974 # WARNING you have Transparent Huge Pages (THP) support enabled in your kernel. This will create latency and memory usage issues with Redis. To fix this issue run the command 'echo never > /sys/kernel/mm/transparent_hugepage/enabled' as root, and add it to your /etc/rc.local in order to retain the setting after a reboot. Redis must be restarted after THP is disabled.
13:40:10 redis_queue.1    | 2635:M 24 Feb 13:40:10.976 * Increased maximum number of open files to 10032 (it was originally set to 1024).
13:40:10 redis_queue.1    |                 _._
13:40:10 redis_queue.1    |            _.-``__ ''-._
13:40:10 redis_queue.1    |       _.-``    `.  `_.  ''-._           Redis 3.0.6 (00000000/0) 64 bit
13:40:10 redis_queue.1    |   .-`` .-```.  ```\/    _.,_ ''-._
13:40:10 redis_queue.1    |  (    '      ,       .-`  | `,    )     Running in standalone mode
13:40:10 redis_queue.1    |  |`-._`-...-` __...-.``-._|'` _.-'|     Port: 11000
13:40:10 redis_queue.1    |  |    `-._   `._    /     _.-'    |     PID: 2635
13:40:10 redis_queue.1    |   `-._    `-._  `-./  _.-'    _.-'
13:40:10 redis_queue.1    |  |`-._`-._    `-.__.-'    _.-'_.-'|
13:40:10 redis_queue.1    |  |    `-._`-._        _.-'_.-'    |           http://redis.io
13:40:10 redis_queue.1    |   `-._    `-._`-.__.-'_.-'    _.-'
13:40:10 redis_queue.1    |  |`-._`-._    `-.__.-'    _.-'_.-'|
13:40:10 redis_queue.1    |  |    `-._`-._        _.-'_.-'    |
13:40:10 redis_queue.1    |   `-._    `-._`-.__.-'_.-'    _.-'
13:40:10 redis_queue.1    |       `-._    `-.__.-'    _.-'
13:40:10 redis_queue.1    |           `-._        _.-'
13:40:10 redis_queue.1    |               `-.__.-'
13:40:10 redis_queue.1    |
13:40:10 redis_queue.1    | 2635:M 24 Feb 13:40:10.998 # WARNING: The TCP backlog setting of 511 cannot be enforced because /proc/sys/net/core/somaxconn is set to the lower value of 128.
13:40:10 redis_queue.1    | 2635:M 24 Feb 13:40:10.999 # Server started, Redis version 3.0.6
13:40:11 redis_queue.1    | 2635:M 24 Feb 13:40:11.000 # WARNING overcommit_memory is set to 0! Background save may fail under low memory condition. To fix this issue add 'vm.overcommit_memory = 1' to /etc/sysctl.conf and then reboot or run the command 'sysctl vm.overcommit_memory=1' for this to take effect.
13:40:11 redis_socketio.1 | 2630:M 24 Feb 13:40:11.000 * The server is now ready to accept connections on port 12000
13:40:11 system           | socketio.1 started (pid=2637)
13:40:11 redis_queue.1    | 2635:M 24 Feb 13:40:11.029 # WARNING you have Transparent Huge Pages (THP) support enabled in your kernel. This will create latency and memory usage issues with Redis. To fix this issue run the command 'echo never > /sys/kernel/mm/transparent_hugepage/enabled' as root, and add it to your /etc/rc.local in order to retain the setting after a reboot. Redis must be restarted after THP is disabled.
13:40:11 redis_queue.1    | 2635:M 24 Feb 13:40:11.029 * The server is now ready to accept connections on port 11000
13:40:11 system           | redis_cache.1 started (pid=2652)
13:40:11 system           | worker_short.1 started (pid=2651)
13:40:11 redis_cache.1    | 2660:M 24 Feb 13:40:11.100 * Increased maximum number of open files to 10032 (it was originally set to 1024).
13:40:11 redis_cache.1    |                 _._
13:40:11 redis_cache.1    |            _.-``__ ''-._
13:40:11 redis_cache.1    |       _.-``    `.  `_.  ''-._           Redis 3.0.6 (00000000/0) 64 bit
13:40:11 redis_cache.1    |   .-`` .-```.  ```\/    _.,_ ''-._
13:40:11 redis_cache.1    |  (    '      ,       .-`  | `,    )     Running in standalone mode
13:40:11 redis_cache.1    |  |`-._`-...-` __...-.``-._|'` _.-'|     Port: 13000
13:40:11 redis_cache.1    |  |    `-._   `._    /     _.-'    |     PID: 2660
13:40:11 redis_cache.1    |   `-._    `-._  `-./  _.-'    _.-'
13:40:11 redis_cache.1    |  |`-._`-._    `-.__.-'    _.-'_.-'|
13:40:11 redis_cache.1    |  |    `-._`-._        _.-'_.-'    |           http://redis.io
13:40:11 redis_cache.1    |   `-._    `-._`-.__.-'_.-'    _.-'
13:40:11 redis_cache.1    |  |`-._`-._    `-.__.-'    _.-'_.-'|
13:40:11 redis_cache.1    |  |    `-._`-._        _.-'_.-'    |
13:40:11 redis_cache.1    |   `-._    `-._`-.__.-'_.-'    _.-'
13:40:11 redis_cache.1    |       `-._    `-.__.-'    _.-'
13:40:11 redis_cache.1    |           `-._        _.-'
13:40:11 redis_cache.1    |               `-.__.-'
13:40:11 redis_cache.1    |
13:40:11 redis_cache.1    | 2660:M 24 Feb 13:40:11.115 # WARNING: The TCP backlog setting of 511 cannot be enforced because /proc/sys/net/core/somaxconn is set to the lower value of 128.
13:40:11 redis_cache.1    | 2660:M 24 Feb 13:40:11.115 # Server started, Redis version 3.0.6
13:40:11 redis_cache.1    | 2660:M 24 Feb 13:40:11.115 # WARNING overcommit_memory is set to 0! Background save may fail under low memory condition. To fix this issue add 'vm.overcommit_memory = 1' to /etc/sysctl.conf and then reboot or run the command 'sysctl vm.overcommit_memory=1' for this to take effect.
13:40:11 redis_cache.1    | 2660:M 24 Feb 13:40:11.116 # WARNING you have Transparent Huge Pages (THP) support enabled in your kernel. This will create latency and memory usage issues with Redis. To fix this issue run the command 'echo never > /sys/kernel/mm/transparent_hugepage/enabled' as root, and add it to your /etc/rc.local in order to retain the setting after a reboot. Redis must be restarted after THP is disabled.
13:40:11 redis_cache.1    | 2660:M 24 Feb 13:40:11.116 * The server is now ready to accept connections on port 13000
13:40:16 socketio.1       | listening on *: 9000
13:40:34 worker_long.1    | 13:40:34 RQ worker u'rq:worker:Node1.2632.long' started, version 0.10.0
13:40:34 worker_long.1    | 13:40:34 *** Listening on long...
13:40:34 worker_long.1    | 13:40:34 Cleaning registries for queue: long
13:40:34 worker_default.1 | 13:40:34 RQ worker u'rq:worker:Node1.2646.default' started, version 0.10.0
13:40:34 worker_default.1 | 13:40:34 *** Listening on default...
13:40:34 worker_default.1 | 13:40:34 Cleaning registries for queue: default
13:40:34 worker_short.1   | 13:40:34 RQ worker u'rq:worker:Node1.2661.short' started, version 0.10.0
13:40:34 worker_short.1   | 13:40:34 *** Listening on short...
13:40:34 worker_short.1   | 13:40:34 Cleaning registries for queue: short
13:40:34 web.1            |  * Running on http://0.0.0.0:8000/ (Press CTRL+C to quit)
ERPNextWebインターフェイスにアクセス
これで、ERPNextがインストールされ、ポート 8000で実行されます。 。 ERPNextWebインターフェイスにアクセスするときが来ました。
Webブラウザーを開き、URL http://test.exaple.com:8000を入力します 、次のページにリダイレクトされます:

ここで、管理者アカウントの資格情報を入力し、サインインをクリックします。 ボタンをクリックすると、次のページが表示されます:
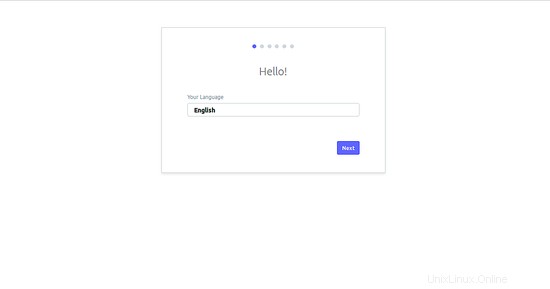
ここで、英語を選択し、次へをクリックします ボタンをクリックすると、次のページが表示されます:

ここで、国、タイムゾーン、通貨を選択し、次へをクリックします ボタンをクリックすると、次のページが表示されます:

ここで、名前、メールアドレス、パスワードを入力し、次へをクリックします。 ボタンをクリックすると、次のページが表示されます:

ここで、必要に応じてドメインを選択し、次へをクリックします。 ボタンをクリックすると、次のページが表示されます:

ここで、会社名と略語を入力し、次へをクリックします。 ボタンをクリックすると、次のページが表示されます:

ここで、組織の詳細を入力し、完全なセットアップをクリックします ボタンをクリックすると、次のページが表示されます:

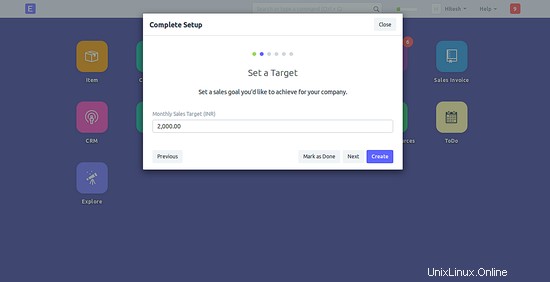
ここで、会社で達成したい目標を設定し、作成をクリックします。 ボタンをクリックすると、次のページが表示されます:
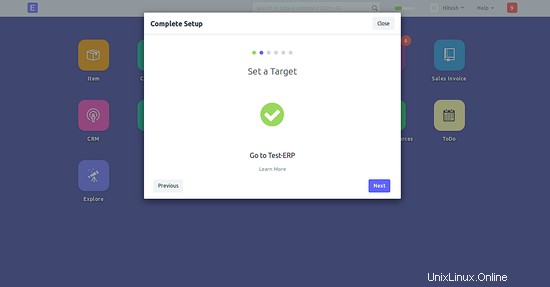
ここで、次へをクリックします ボタンをクリックして続行すると、次のページが表示されます:
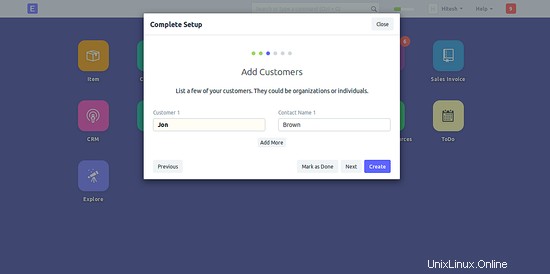
ここで、追加したい顧客を追加し、作成をクリックします ボタンをクリックすると、次のページが表示されます:
ここで、次へをクリックします ボタンをクリックして続行すると、次のページが表示されます:

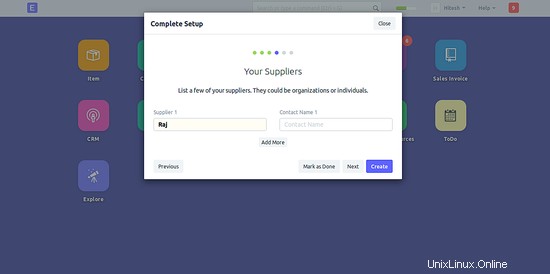
ここで、追加するサプライヤーを追加し、作成をクリックします。 ボタンをクリックすると、次のページが表示されます:
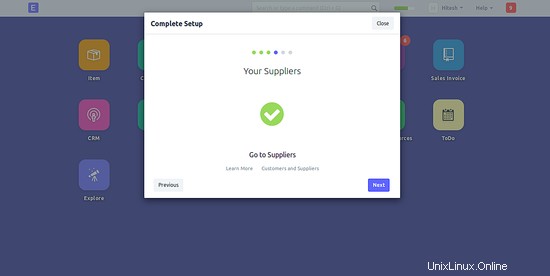
ここで、次へをクリックします ボタンをクリックして続行すると、次のページが表示されます:
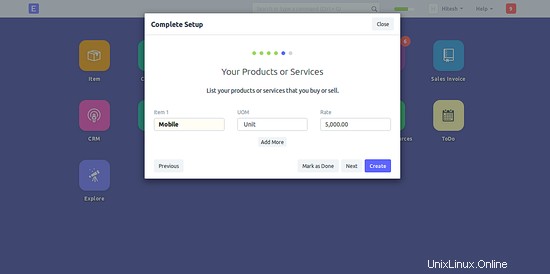
ここで、購入または販売したい商品やサービスを追加し、作成をクリックします。 ボタンをクリックすると、次のページが表示されます:
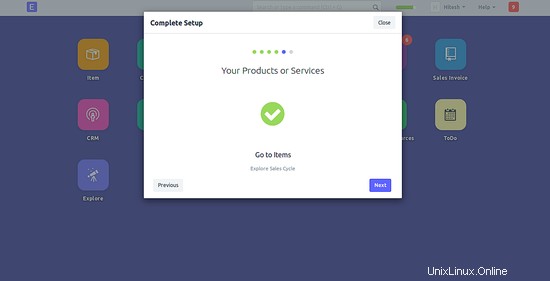
ここで、次へをクリックします ボタンをクリックして続行すると、次のページが表示されます:
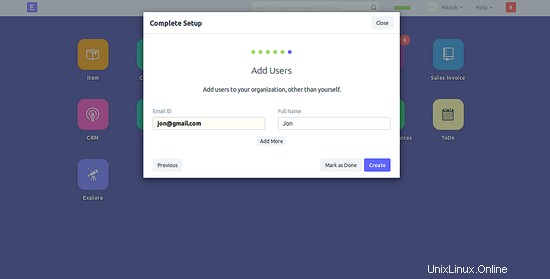
ここで、組織にユーザーを追加し、作成をクリックします ボタンをクリックすると、次のページにERPNextダッシュボードが表示されます。
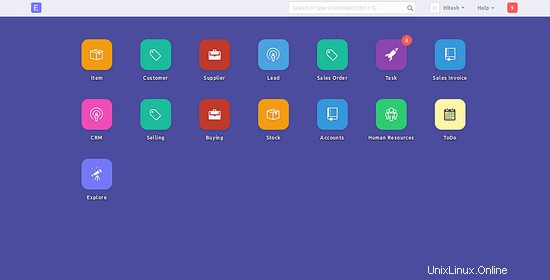
おめでとうございます!これで、Debian9サーバーにERPNextが正常にインストールおよび設定されました。これで、アプリケーションを簡単に使用して会社を管理できます。詳細については、Docの公式ERPNextドキュメントページを参照してください。