サーバーが1つだけで、WordPressサイトが2つ以上ある場合、各WordPressサイトを実行するにはサーバーを増やす必要があると考えてください。それは問題ありませんが、多くのサーバーを維持するために多くのコストがかからない場合はどうでしょうか。
この記事では、Ubuntu18.04LTSでNginx+Mariadb + php-fpmを使用して、1つのホストサーバーで複数のWordPressWebサイトを実行する方法を説明します。
前提条件
1)Webサーバー用のNginx
2)mysqlデータベース用のMariadb
3)php FastCGIProcessManagerのphp-fpm
以下のコマンドは、システムを更新し、phpパッケージの新しいリポジトリを追加します
# apt-get update
# apt-get install software-properties-common
# add-apt-repository ppa:ondrej/php
Nginx、Mariadb、php-fpmをインストールします
WebサーバーNginx、mysqlサーバーMariadb、php7-fpm、およびWordPressサイトの実行に必要なphp7拡張機能をインストールします
# apt-get install nginx mariadb-server mariadb-client \
php7.0-fpm php7.0-common php7.0-mbstring php7.0-xmlrpc \
php7.0-soap php7.0-gd php7.0-xml php7.0-intl php7.0-mysql \
php7.0-cli php7.0-mcrypt php7.0-ldap php7.0-zip php7.0-curl -y
Mariadbサーバーの構成
データベースサーバーを更新するには、mysqlルートパスワードとその他のオプションの構成が必要です
このコマンドはウィザードモードで実行されます。質問に答えて、「Enter」で適用してください。
# mysql_secure_installation

...

Enter current password for root (enter for none): #< Enter
...

Change the root password? [Y/n] y #< type 'y' then Enter
New password: #< Type mysql root password
Re-enter new password: #< Retype mysql root password
Password updated successfully!
Reloading privilege tables..
... Success!

...

Remove anonymous users? [Y/n] y #< type 'y' then Enter
... Success!

...

Disallow root login remotely? [Y/n] y #< type 'y' then Enter
... Success!

...

Remove test database and access to it? [Y/n] y #< type 'y' then Enter
...

Reload privilege tables now? [Y/n] y #< type 'y' then Enter
...

Thanks for using MariaDB!
Mariadbサービスを確認し、起動時にサービスを有効にします
mariadb-serverが実行されていることを確認し、前の手順で行ったすべての設定を確認します。
エラーがない場合、Mariadb-serverはデータベースサービスを提供する準備ができています
# systemctl status mariadb
● mariadb.service - MariaDB database server
Loaded: loaded (/lib/systemd/system/mariadb.service; enabled; vendor preset: enabled)
Active: active (running) since Mon 2018-07-16 03:11:48 UTC; 4h 19min ago
Main PID: 10781 (mysqld)
Status: "Taking your SQL requests now..."
Tasks: 27 (limit: 2322)
CGroup: /system.slice/mariadb.service
└─10781 /usr/sbin/mysqld
'password'を前の手順で入力したパスワードに置き換えます
# mysql -uroot -p'password'

Welcome to the MariaDB monitor. Commands end with ; or \g.
Your MariaDB connection id is 49
Server version: 10.1.29-MariaDB-6 Ubuntu 18.04

Copyright (c) 2000, 2017, Oracle, MariaDB Corporation Ab and others.

Type 'help;' or '\h' for help. Type '\c' to clear the current input statement.

MariaDB [(none)]>
よさそうです。起動時にmysqlサービスを有効にしてください
# systemctl enable mariadbConfig php-fpm
Nginxは、Apacheでのmod_phpのようなphpの実行をサポートしていません。
したがって、phpソースコードの実行をサポートするphp-fpmデーモンをインストール(実行)して構成する必要があります
以下のようなパラメータを使用してファイル/etc/php/7.0/fpm/php.iniを編集します
# vim /etc/php/7.0/fpm/php.ini

upload_max_filesize = 100M
max_execution_time = 360
cgi.fix_pathinfo = 0
date.timezone = Asia/Ho_Chi_Minh
php-fpmプール設定ファイル/etc/php/7.0/fpm/pool.d/www.conf
を確認してくださいこの構成にあることを確認し、まったくうまくいかない場合はデフォルトの他のオプションを残します:
user = www-data
group = www-data
listen = /run/php/php7.0-fpm.sock
listen.owner = www-data
listen.group = www-data
ここで、php-fpmデーモンを再起動してステータスを確認し、起動時にサービスを有効にします
# systemctl restart php7.0-fpm
# systemctl status php7.0-fpm
# systemctl enable php7.0-fpm
複数のワードプレスサイトを作成する
たとえば、3つのワードプレスサイトがあります。名前:
--site1.example.com
--site2.example.com
--site3.example.com
データベースの作成
site1、site2、site3のdbを作成し、それらのデータベースにdbユーザーを付与します
site1.example.comはデータベース名「site1」を実行します。データベースユーザーは「site1」@「localhost」です
mysql -u root -p'password' -e "CREATE DATABASE site1;"
mysql -u root -p'password' -e "GRANT ALL PRIVILEGES ON site1.* TO 'site1'@'localhost' IDENTIFIED BY 'site1password';"
mysql -u root -p'password' -e "FLUSH PRIVILEGES;"
site1、site2データベースに対して同じアクションを実行し、「site1」をsite2、site3に置き換えます。必要に応じてdbユーザーパスワードを置き換えます
mysql -u root -p'password' -e "CREATE DATABASE site2;"
mysql -u root -p'password' -e "GRANT ALL PRIVILEGES ON site2.* TO 'site2'@'localhost' IDENTIFIED BY 'site2password';"
mysql -u root -p'password' -e "FLUSH PRIVILEGES;"
mysql -u root -p'password' -e "CREATE DATABASE site3;"
mysql -u root -p'password' -e "GRANT ALL PRIVILEGES ON site3.* TO 'site3'@'localhost' IDENTIFIED BY 'site3password';"
mysql -u root -p'password' -e "FLUSH PRIVILEGES;"サイトごとにnginx構成ファイルを作成する
新しいサイトを追加するたびに、そのサイトの新しいサーバーブロックを追加するだけです
# cat > /etc/nginx/sites-available/site1.conf <<EOF
server {
listen 80;
root /var/www/site1;
index index.php index.html index.htm;
server_name site1.example.com www.site1.example.com;

client_max_body_size 100M;

location / {
try_files \$uri \$uri/ /index.php?\$args;
}

location ~ \.php\$ {
include snippets/fastcgi-php.conf;
fastcgi_pass unix:/run/php/php7.0-fpm.sock;
fastcgi_param SCRIPT_FILENAME \$document_root\$fastcgi_script_name;
}
}
EOFsite2に対しても同じアクションを実行します およびsite3
次に、/ etc / nginx /sites-available/に3つの新しい構成ファイルがあります。構成ベイの猫を確認するために確認できます コマンド
#cat  /etc/nginx/sites-available/site2.conf
server {
listen 80;
root /var/www/site2;
index index.php index.html index.htm;
server_name site2.linoxide.com www.site2.linoxide.com;

client_max_body_size 100M;

location / {
try_files $uri $uri/ /index.php?$args;
}

location ~ \.php$ {
include snippets/fastcgi-php.conf;
fastcgi_pass unix:/run/php/php7.0-fpm.sock;
fastcgi_param SCRIPT_FILENAME $document_root$fastcgi_script_name;
}
}
各サイトのドキュメントルートを作成
注 :ドキュメントのルートパスはNginx構成で同じである必要があります (server{}ブロックのパラメータ'root')および所有者はwww-data
ドキュメントのルートディレクトリを変更する場合は、nginxconfigの「root」オプションを変更して同じパスを作成します。
# mkdir -p /var/www/site{1,2,3}
# chown -R www-data:www-data /var/www/site*
各サイトでnginx構成を有効にし、構成を確認します
デフォルトでは、Nginxは / etc / nginx / sites-enabled /の構成のみを読み取るためです
したがって、Nginxで / etc / nginx / sites-available /の構成を読み取りたい場合
次のように、シンボリックリンクを作成するだけです。
# ln -s /etc/nginx/sites-enabled/site1.conf /etc/nginx/sites-available/site1.conf
# ln -s /etc/nginx/sites-enabled/site2.conf /etc/nginx/sites-available/site2.conf
# ln -s /etc/nginx/sites-enabled/site3.conf /etc/nginx/sites-available/site3.conf
次に、次のコマンドを実行してNginx構成を確認します:
# nginx -t -c /etc/nginx/nginx.conf
nginx: the configuration file /etc/nginx/nginx.conf syntax is ok
nginx: configuration file /etc/nginx/nginx.conf test is successful
構成が適切かどうかを確認し、Nginxデーモンをリロードします
# nginx -s reload -c /etc/nginx/nginx.confまたは
# systemctl reload nginxワードプレスのソースをダウンロードして/var/ www /site*に配置します
注:WordPressソースが存在する場合は、nginx構成に従ってドキュメントルートパスに配置するだけです。
# cd /tmp
# wget http://wordpress.org/latest.tar.gz
# tar -xzvf latest.tar.gz
# cp -r wordpress/* /var/www/site1/
# cp -r wordpress/* /var/www/site2/
# cp -r wordpress/* /var/www/site3/
# chown -R www-data:www-data /var/www/site*
ワードプレスの新規インストールの初期
ブラウザを使用して、WordPressを初期化する各サイトにアクセスします。言語を選択したら、[続行]をクリックします 'ボタン
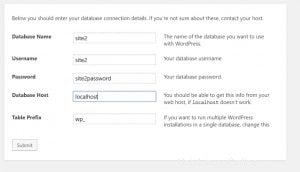
次に、データベース名、データベースユーザー、データベースパスワードを入力して、以下のように各サイトの構成を実行します

次に、構成を送信し、[インストールの実行]をクリックして[インストールの実行]を実行します 'ボタン。
お読みください:
- WP-CLIを使用してWordPressコマンドラインをインストールする方法
- Ubuntu18.04にLEMPをインストールする方法
現在、Nginx、Mysql、およびphp-fpmを使用すると、1つのサーバーで多くのサイトのWordPressを実行できます。 WordPressだけでなく、他のcmsソースに対しても同じ手順を実行できます。
次の記事では、Nginxとphp-fpmを実行しているWebサーバーのnginx、php-fpm構成を最適化する方法を説明およびガイドします