このチュートリアルでは、Ubuntu 16.04のnginxでGeoIPモジュールを使用して、訪問者がどこから来たのかを確認する方法について説明します。 GeoIPモジュールは、$ geoip_country_name、$ geoip_country_code、$ geoip_cityなどの複数の変数を設定します。これらの変数は、PHPスクリプトで使用したり、nginx構成で直接使用したりできます。たとえば、ユーザーの国に基づいてさまざまな言語でコンテンツを提供できます。
>
1予備メモ
ここでは、ドキュメントルート/var/www/www.example.com/web/とNginx仮想ホスト構成ファイル/etc/nginx/sites-enabled/www.example.comを使用してWebサイトwww.example.comを使用しています。 vhost。このチュートリアルは、Ubuntu-Nginxの基本的なセットアップに使用します。 https://www.howtoforge.com/tutorial/installing-nginx-with-php7-fpm-and-mysql-on-ubuntu-16.04-lts-lemp/
このチュートリアルは、ISPConfignginxセットアップとも互換性があります。
Ubuntuユーザーへの注意:
このチュートリアルのすべてのステップをroot権限で実行する必要があるため、このチュートリアルのすべてのコマンドの前に文字列sudoを付けるか、「
」と入力して今すぐrootになります。sudo -s
2NginxがGeoIPをサポートしているかどうかを確認します
始める前に、GeoIPモジュールがnginxサーバーに組み込まれているかどうかを確認する必要があります:
nginx -V
 [メール保護]:〜#nginx -V
 nginxバージョン:nginx / 1.10.0(Ubuntu)
OpenSSL1.0.2gで構築-fips2016年3月1日
TLSSNIサポート有効
引数の構成:-with-cc-opt ='-g -O2 -fPIE -fstack-protector-strong -Wformat -Werror =format-security -Wdate-time -D_FORTIFY_SOURCE =2'--with- ld-opt ='-Wl、-Bsymbolic-functions -fPIE -pie -Wl、-z、relro -Wl、-z、now' --prefix =/ usr / share / nginx --conf-path =/ etc / nginx / nginx.conf --http-log-path =/ var / log / nginx / access.log --error-log-path =/ var / log / nginx / error.log --lock-path =/ var / lock / nginx.lock --pid-path =/ run / nginx.pid --http-client-body-temp-path =/ var / lib / nginx / body --http-fastcgi-temp-path =/ var / lib / nginx / fastcgi --http-proxy-temp-path =/ var / lib / nginx / proxy --http-scgi-temp-path =/ var / lib / nginx / scgi --http-uwsgi-temp-path =/ var / lib / nginx / uwsgi --with-debug --with-pcre-jit --with-ipv6 --with-http_ssl_module --with-http_stub_status_module --with-http_realip_module --with-http_auth_request_module --with- http_addition_module --with-http_dav _module --with-http_geoip_module --with-http_gunzip_module --with-http_gzip_static_module --with-http_image_filter_module --with-http_v2_module --with-http_sub_module --with-http_xslt_module --with-stream --with-stream_ssl_module --with- mail --with-mail_ssl_module --with-threads
3GeoIPデータベースをダウンロード
DebianとUbuntuには、aptを介してインストールできるパッケージgeoip-databaseがありますが、少し古く、GeoLiteCity.dat(都市データベース)ではなく、GeoIP.dat(国データベース)のみが含まれています。したがって、そのパッケージはインストールしませんが、GeoIPWebサイトから/etc / nginx/geoipディレクトリに新しいコピーをダウンロードします。
mkdir / etc / nginx / geoip
 cd / etc / nginx / geoip
 wget http://geolite.maxmind.com/download/geoip/database/GeoLiteCountry/GeoIP.dat.gz
 gunzip GeoIP.dat.gz
 wget http://geolite.maxmind.com/download/geoip/database/GeoLiteCity.dat.gz
 gunzip GeoLiteCity.dat.gz
4Nginxを構成する
次に、nginxを構成します。 /etc/nginx/nginx.confを開きます...
nano /etc/nginx/nginx.conf
...そしてgeoip_countryおよびgeoip_cityディレクティブをhttp{}コンテナに追加します:
 [...] http {

 ##
#基本設定
 ##

 geoip_country / etc / nginx / geoip / GeoIP .dat; #国のIPデータベース
 geoip_city /etc/nginx/geoip/GeoLiteCity.dat; #都市IPデータベース[...]
geoip_countryディレクティブは、次の変数を使用可能にします。
- $ geoip_country_code-2文字の国コード(たとえば、RU、US)。
- $ geoip_country_code3- 3文字の国コード(たとえば、RUS、USA)。
- $ geoip_country_name-国の(詳細な)名前。たとえば、ロシア連邦、米国など。
geoip_cityディレクティブは、次の変数を提供します。
- $ geoip_city_country_code-2文字の国コード(たとえば、RU、US)。
- $ geoip_city_country_code3- 3文字の国コード(たとえば、RUS、USA)。
- $ geoip_city_country_name-国の名前(たとえば、ロシア連邦、米国)-利用可能な場合。
- $ geoip_region-地域の名前(州、地域、州、州、連邦の土地など)、たとえば、モスクワ市、DC-可能な場合。
- $ geoip_city-都市の名前(たとえば、モスクワ、ワシントン、リスボンなど)-利用可能な場合。
- $geoip_postal_code-郵便番号または郵便番号-利用可能な場合。
- $geoip_city_continent_code-利用可能な場合。
- $geoip_latitude-緯度-利用可能な場合。
- $geoip_longitude-経度-可能な場合。
これらの変数をPHPスクリプトでも使用できるようにするには、いくつかのfastcgi_paramディレクティブを設定する必要があります。これは、ファイル/ etc / nginx / fastcgi_paramsで行うのが最適です。ここで、他のfastcgi_paramディレクティブは次のとおりです。
nano / etc / nginx / fastcgi_params<前> [...] ### SETのGeoIP変数### fastcgi_param GEOIP_COUNTRY_CODE $ geoip_country_code; fastcgi_param GEOIP_COUNTRY_CODE3 $ geoip_country_code3; fastcgi_param GEOIP_COUNTRY_NAME $ geoip_country_name; fastcgi_param GEOIP_CITY_COUNTRY_CODE $ geoip_city_country_code; fastcgi_param GEOIP_CITY_COUNTRY_CODE3 $ geoip_city_country_code3; fastcgi_param GEOIP_CITY_COUNTRY_NAME $ geoip_city_country_name; fastcgi_param GEOIP_REGION $ geoip_region; fastcgi_param GEOIP_CITY $ geoip_city; fastcgi_param GEOIP_POSTAL_CODE $ geoip_postal_code; fastcgi_param GEOIP_CITY_CONTINENT_CODE $ geoip_city_continent_code; fastcgi_param GEOIP_LATITUDE $ geoIP_LATITUDE $ geoip_latitude;
(行に/ etc / nginx / fastcgi_params;がvhost構成の場所〜\ .php $ {}コンテナーに含まれていることを確認してください。そうでない場合、上記の構成はvhostには役に立たないためです。)
nginxをリバースプロキシとして使用し、GeoIP変数をバックエンドに渡したい場合は、ファイル/etc/nginx/proxy.confを作成/編集する必要があります...
nano /etc/nginx/proxy.conf
...そしてそれに次の行を追加します:
<前> [...] ### SETのGeoIP変数### proxy_set_header GEOIP_COUNTRY_CODE $ geoip_country_code; proxy_set_header GEOIP_COUNTRY_CODE3 $ geoip_country_code3; proxy_set_header GEOIP_COUNTRY_NAME $ geoip_country_name; proxy_set_header GEOIP_CITY_COUNTRY_CODE $ geoip_city_country_code; proxy_set_header GEOIP_CITY_COUNTRY_CODE3 $ geoip_city_country_code3; proxy_set_header GEOIP_CITY_COUNTRY_NAME $ geoip_city_country_name; proxy_set_header GEOIP_REGION $ geoip_region; proxy_set_header GEOIP_CITY $ geoip_city; proxy_set_header GEOIP_POSTAL_CODE $ geoip_postal_code; proxy_set_header GEOIP_CITY_CONTINENT_CODE $ geoip_city_continent_code; proxy_set_header GEOIP_LATITUDE $ geoip_(nginxプロキシ構成に/etc/nginx/proxy.conf;を含めるようにしてください。そうしないと、バックエンドでGeoIP変数を使用できません。)
nginxをリロードします...
systemctl reload nginx.service
...変更を有効にするため。
次のようにPHP-FPMを再起動します。
systemctl restart php7.0-fpm.service
5簡単なテスト
GeoIPモジュールが正しく機能しているかどうかを確認するために、www.example.com Webスペース(例:/var/www/www.example.com/web)に小さなPHPファイルを作成できます。
nano /var/www/www.example.com/web/geoiptest.php
次のようにGeoIP変数にアクセスできます。
$ geoip_country_code =getenv(GEOIP_COUNTRY_CODE);
またはこのように:
$ geoip_country_code =$ _SERVER ['GEOIP_COUNTRY_CODE'];
   <?php $ geoip_country_code =getenv(GEOIP_COUNTRY_CODE); / * $ geoip_country_code =$ _SERVER ['GEOIP_COUNTRY_CODE']; //同様に機能します*/$ geoip_country_code3 =getenv(GEOIP_COUNTRY_CODE3); $ geoip_country_name =getenv(GEOIP_COUNTRY_NAME); $ geoip_city_country_code =getenv(GEOIP_CITY_COUNTRY_CODE); $ geoip_city_country_code3 =getenv(GE getenv(GEOIP_REGION); $ geoip_city =getenv(GEOIP_CITY); $ geoip_postal_code =getenv(GEOIP_POSTAL_CODE); $ geoip_city_continent_code =getenv(GEOIP_CITY_CONTINENT_CODE); $ geoip_latitude =getenv(GEOIP_LATITUDE); 。$geoip_country_code。'
';echo'country_code3:'。$geoip_country_code3。'
'; echo'country_name:'。$geoip_country_name。'
'; echo'city_country_code:'。$geoip_city_country_code。
'; echo' city_country_code3:'。$geoip_city_country_code3。'
'; echo' city_country_name:'。$geoip_city_country_name。'
'; echo' region:'。$geoip_region。'
'; echo'city:'。$geoip_city。'
'; echo'postal_code:'。$geoip_postal_code。 '
'; echo' city_continent_code:'。$geoip_city_continent_code。'
'; echo'緯度:'。$geoip_latitude。'
'; echo'経度:'。$geoip_longitude。'
'; ?>
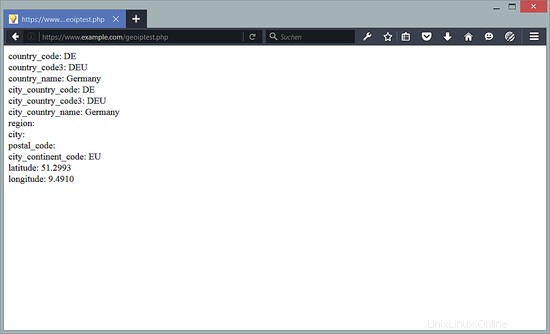
ブラウザ(http://www.example.com/geoiptest.php)でそのファイルを呼び出すと、GeoIPが機能していることがわかります(ローカルではなく、パブリックIPアドレスからファイルを呼び出していることを確認してください)。 :
また、nginx構成でGeoIP変数を直接使用することもできます。次のように:
nano /etc/nginx/sites-enabled/www.example.com.vhost
[...]場所/{indexindex.html index.php; try_files /index_$geoip_country_code.html /index.html; } [...] systemctl reload nginx.service
この例では、訪問者がドイツ(国コード:DE)から来ており、ファイルindex_DE.htmlが存在する場合、このファイルが提供されます。それ以外の場合は、デフォルトのindex.htmlファイルが提供されます。
これは、ユーザーの出身地に基づいて、さまざまな言語でコンテンツを提供するために使用できます。
6つのリンク
- nginx:http://nginx.org/
- nginx Wiki:http://wiki.nginx.org/
- Ubuntu:http://www.ubuntu.com/