ModSecurity は、ApacheNginxおよびIISWebサーバー用のオープンソースWebアプリケーションファイアウォール(WAF)です。このアプリケーション層ファイアウォールは、TrustwaveのSpiderLabsによって開発され、ApacheLicense2.0の下でリリースされています。 ModSecurityは、一連の正規表現ルールを使用して一般的に知られているエクスプロイトを除外することでWebサイトをハッカーから保護し、HTTPトラフィックの監視、ロギング、リアルタイム分析、および攻撃の検出を可能にします。 SQLインジェクション、クロスサイトスクリプティング(XSS)、ローカルファイルインクルード、リモートファイルインクルード、Wordpress、Joomla、Drupalなどの多くのWebアプリケーションのアプリケーション固有のルールなどの攻撃を検出するために利用できる16.000を超えるルールがあります。
このチュートリアルでは、高速なNginxウェブサーバーにmod_securityをインストールする方法を紹介します。 ModSecurityをスタンドアロンモジュールとして構成してから、ソースからNginxをビルドしてModSecurityを含めます。
- Ubuntu 15.04サーバー、ここでは192.168.1.106のIPを使用します。
- ルート権限
このチュートリアルで行うこと:
- Ubuntu15.04システムとリポジトリを更新します。
- NginxとModSecurityを構築するために必要な依存関係をインストールします。
- ModSecurityとNginxをダウンロードします。
- ModSecurityとNginxをインストールします。
- Nginxを構成します。
- ModSecurityを構成します。
- OWASPコアルールセット(CRS)を構成します。
- テスト。
以下のすべてのコマンドは、rootとして実行する必要があります。実行:
sudo -i
サーバーのrootユーザーになります。
1。システムとリポジトリを更新する
すべての依存関係のインストールを開始する前に、システムを更新してください:
apt-get update
apt-get upgrade
2。ビルドの依存関係をインストールします
以下のaptコマンドを使用してNginxとModSecurityをコンパイルするために必要なすべてのパッケージをインストールします。
apt-get install git build-essential libpcre3 libpcre3-dev libssl-dev libtool autoconf apache2-prefork-dev libxml2-dev libcurl4-openssl-dev
3。 ModSecurityとNginxをダウンロード
ディレクトリ"/usr / src /"に移動します 次に、GithubからModSecurityリポジトリのクローンを作成します:
cd /usr/src/
git clone https://github.com/SpiderLabs/ModSecurity.git modsecurity
wgetコマンドでNginxをダウンロードします。ここでは、Nginx安定バージョン1.8を使用します。別のバージョンを使用する場合は、Nginxダウンロードページにアクセスして、利用可能なすべてのリリースのリストを取得してください。
wget http://nginx.org/download/nginx-1.8.0.tar.gz
4。 ModSecurityとNginxをインストールする
次に、ModSecurityをインストールします。/usr/src/modsecurityディレクトリに移動してください:
cd /usr/src/modsecurity/
そして、ModSecurityをサーバー上でスタンドアロンモジュールとしてコンパイルし、Nginxに含めることができるようにします:
./autogen.sh
./configure --enable-standalone-module --disable-mlogc
make
次に、nginxディレクトリに移動し、Nginxをコンパイルして、ModSecurityモジュールを含めます。
cd ../nginx-1.8.0
./configure \
  --user=www-data \
  --group=www-data \
  --with-debug \
  --with-ipv6 \
  --with-http_ssl_module \
  --add-module=/usr/src/modsecurity/nginx/modsecurity
configureコマンドの説明:
Nginxはユーザーとグループの下で実行されます"www-data" 、 debug、ipv6、sslを有効にします。 モジュール。そして最後に、ModSecurityモジュールをNginxに含めます。
Nginxをインストールします:
make
make install
make installコマンドが終了すると、Nginxが "/ usr / local / nginx"にインストールされていることがわかります。 ディレクトリ:
cd /usr/local/nginx/

ll
drwxr-xr-x  2 root root 4096 Oct  3 07:21 conf/
drwxr-xr-x  2 root root 4096 Oct  3 07:21 html/
drwxr-xr-x  2 root root 4096 Oct  3 07:21 logs/
drwxr-xr-x  2 root root 4096 Oct  3 07:21 sbin/
5。 Nginxを構成する
vi / vimでnginx構成ファイルを編集し、ユーザー "www-data"で実行するようにnginxを構成します。 。
cd /usr/local/nginx/
vi conf/nginx.conf
最初の行で、「user」行のコメントを解除し、ユーザーをwww-data:
に変更します。user www-data;
保存して終了します。
コマンド"nginx"を使用できるように、nginxバイナリのシンボリックリンクを作成します 直接。
ln -s /usr/local/nginx/sbin/nginx /bin/nginx
次に、Nginxデーモンの開始/停止に使用されるNginxのsystemdスクリプトを作成します。ディレクトリ"/lib / systemd / system /"に移動してください そして、vi:
を使用して新しいファイル「nginx.service」を作成します。cd /lib/systemd/system/
vi nginx.service
以下のスクリプトを貼り付けてください:
[Service]
Type=forking
ExecStartPre=/usr/local/nginx/sbin/nginx -t -c /usr/local/nginx/conf/nginx.conf
ExecStart=/usr/local/nginx/sbin/nginx -c /usr/local/nginx/conf/nginx.conf
ExecReload=/usr/local/nginx/sbin/nginx -s reload
KillStop=/usr/local/nginx/sbin/nginx -s stop

KillMode=process
Restart=on-failure
RestartSec=42s

PrivateTmp=true
LimitNOFILE=200000

[Install]
WantedBy=multi-user.target
保存して終了します。
次に、systemd-daemonをリロードして、systemdが新しいNginxサービスファイルをロードするようにします。
systemctl daemon-reload
nginx構成をテストし、systemctlコマンドでnginxを起動します:
nginx -t
systemctl start nginx
6。 ModSecurityを構成する
ModSecurity構成ファイルをnginxディレクトリにコピーし、 "modsecurity.conf"という名前を付けます。 :
cp /usr/src/modsecurity/modsecurity.conf-recommended /usr/local/nginx/conf/modsecurity.conf
cp /usr/src/modsecurity/unicode.mapping /usr/local/nginx/conf/
viエディターでmodsecurity.confファイルを開きます:
cd /usr/Local/nginx/conf/
vi modsecurity.conf
7行目で、 "DetectionOnly"を変更します。 "on" 。
SecRuleEngine On
38行目で、「 SecRequestBodyLimit」の値を増やします。 「から「100000000」まで。
SecRequestBodyLimit 100000000
192行目で、「 SecAuditLogType」の値を変更します。 "から"同時 "そして、SecAuditLog行をコメントアウトし、196行目のコメントを解除します。
SecAuditLogType Concurrent
#SecAuditLog /var/log/modsec_audit.log

# Specify the path for concurrent audit logging.
SecAuditLogStorageDir /opt/modsecurity/var/audit/
保存して終了します。
次に、ModSecurity監査ログ用の新しいディレクトリを作成し、所有者をwww-dataに変更します。
mkdir -p /opt/modsecurity/var/audit/
chown -R www-data:www-data /opt/modsecurity/var/audit/
7。 OWASPコアルールセット(CRS)の構成
githubからOWASPコアルールセットをダウンロードします。
cd /usr/src/
git clone https://github.com/SpiderLabs/owasp-modsecurity-crs.git
ディレクトリ「owasp-modsecurity-crs」に移動します "そしてディレクトリをコピーします"base_rules" nginxディレクトリに移動します。
cd owasp-modsecurity-crs
cp -R base_rules/ /usr/Local/nginx/conf/
modsecurity.confを編集し、OWASPCRSを追加します。
cd /usr/Local/nginx/conf/
vi modsecurity.conf
ファイルの最後に移動して、次の構成を追加してください。
#DefaultAction
SecDefaultAction "log,deny,phase:1"

#If you want to load single rule /usr/loca/nginx/conf
#Include base_rules/modsecurity_crs_41_sql_injection_attacks.conf

#Load all Rule
Include base_rules/*.conf

#Disable rule by ID from error message (for my wordpress)
SecRuleRemoveById 981172 981173 960032 960034 960017 960010 950117 981004 960015
保存して終了します。
最後のステップとして、「 nginx.conf 」を編集して、modsecurity.confファイルをNginx構成に追加します。 "ファイル。
vi conf/nginx.conf
modsecurity.confを追加します:
[.....]

#Enable ModSecurity
ModSecurityEnabled on;
ModSecurityConfig modsecurity.conf;

root html;
index index.php index.html index.htm;

[.....]
保存して終了します。
Nginxを再起動して、構成の変更を適用します:
systemctl restart nginx
8。テスト
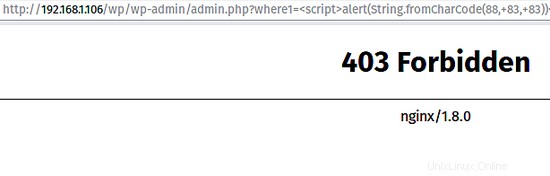
NginxとModSecurityで実行されているWordPressサイトがありますが、正常に機能しています。テストのために、XSSとSQLインジェクションに対して脆弱な新しいプラグインをインストールします。
結果は次のとおりです。
XSS禁止
https://www.exploit-db.com/exploits/37107/
ブラウザアクセス:
サーバーログ:

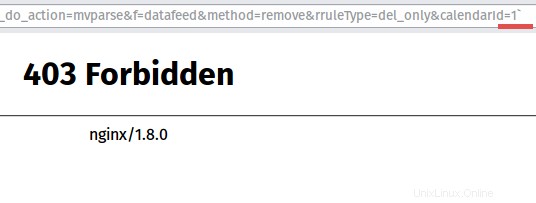
SQLインジェクションは禁止されています
https://www.exploit-db.com/exploits/37560/
ブラウザアクセス:
サーバーログ:
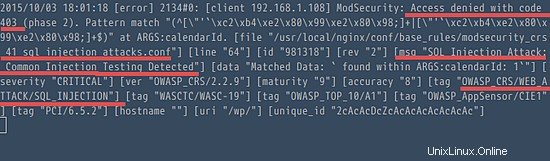
NginxとModSecurityは正常に実行されます。
ModSecurityは、Webアプリケーションを保護するためにTrustwaveのSpiderLabsによって開発されたオープンソースのWAF(Webアプリケーションファイアウォール)です。 SQLインジェクション、XSS、LFI、RFIなどの攻撃を検出するために利用できる16.000を超えるルールがあります。ModSecurityはインストールが簡単で、Apache、Nginx、IISforWindowsのモジュールとして利用できます。
- https://www.modsecurity.org/documentation.html
- https://www.owasp.org/index.php/Category:OWASP_ModSecurity_Core_Rule_Set_Project
- https://github.com/SpiderLabs/ModSecurity/wiki/Reference-Manual