Ghostは、Node.js上に構築された無料のオープンソースの軽量ブログプラットフォームです。シンプルでカスタマイズ可能で、インターネット上でコンテンツを作成して公開できます。ブログ用に特別に設計されているため、他のブログプラットフォームよりもはるかに高速です。豊富な機能セットを提供します。そのうちのいくつかを以下に示します。
- マークダウンエディタ
- スケジュールされた公開
- Linux、Mac、およびWindows用のアプリケーションを提供する
- 何百もの無料およびプレミアムテーマを提供します
- 組み込みの分析
- WordPressからGhostに移行するための移行プラグインを提供する
このチュートリアルでは、GhostwithNginxとLet'sEncryptSSLをUbuntu20.04にインストールする方法について説明します。
- Ubuntu20.04を実行しているサーバー。
- サーバーIPを指す有効なドメイン名。
- ルートパスワードはサーバーで構成されています。
まず、APTパッケージキャッシュを最新バージョンに更新することをお勧めします。次のコマンドで更新できます:
apt-get update -y
APTキャッシュが更新されたら、次のコマンドを使用して他の必要な依存関係をインストールします。
apt-get install gnupg2 curl unzip git acl -y
次に、Node.jsをシステムにインストールする必要もあります。
まず、次のコマンドを使用してNode.jsリポジトリを追加します。
curl -sL https://deb.nodesource.com/setup_12.x | bash -
リポジトリがインストールされたら、次のコマンドを実行してNode.jsをシステムにインストールします。
apt-get install nodejs -y
インストールが完了したら、次のコマンドを使用してNode.jsのバージョンを確認します。
node -v
次の出力が得られるはずです:
v12.22.1
次に、次のコマンドを使用してNPMのバージョンを確認します。
npm -v
次の出力が得られるはずです:
6.14.12
NginxとMariaDBをインストールする
次に、NginxWebサーバーとMariaDBデータベースサーバーをシステムにインストールする必要があります。次のコマンドで両方のパッケージをインストールできます:
apt-get install mariadb-server nginx -y
インストールが完了したら、MariaDBのインストールを保護し、次のコマンドを使用してMariaDBのrootパスワードを設定します。
mysql_secure_installation
MariaDBのインストールを保護するためのすべての質問に答えてください:
Enter current password for root (enter for none):
Set root password? [Y/n] Y
New password:
Re-enter new password:
Remove anonymous users? [Y/n] Y
Disallow root login remotely? [Y/n] Y
Remove test database and access to it? [Y/n] Y
Reload privilege tables now? [Y/n] Y
次に、次のコマンドを使用してMariaDBにログインします。
mysql -u root -p
ログインしたら、次のコマンドを使用してGhostのデータベースとユーザーを作成します。
MariaDB [(none)]> CREATE DATABASE ghostdb;
MariaDB [(none)]> CREATE USER 'ghostuser'@'localhost' IDENTIFIED BY 'password';
次に、次のコマンドを使用して、Ghostデータベースにすべての権限を付与します。
MariaDB [(none)]> GRANT ALL ON ghostdb.* TO 'ghostuser'@'localhost';
次に、特権をフラッシュし、次のコマンドでMariaDBを終了します。
MariaDB [(none)]> FLUSH PRIVILEGES;
MariaDB [(none)]> EXIT;
終了したら、次のステップに進むことができます。
GhostCliをインストールする
次に、Ghostをインストールして管理するには、GhostCliをインストールする必要があります。以下に示すように、NPMを使用してインストールできます。
npm install -g [email protected]
インストールしたら、次のコマンドを使用して、インストールされているGhostCliのバージョンを確認します。
ghost version
次の出力が表示されます。
Ghost-CLI version: 1.16.3
まず、次のコマンドを使用して、Ghost用に別のユーザーを作成します。
adduser user1
次に、次のコマンドを使用してuser1をsudoおよびwww-dataグループに追加します。
adduser user1 sudo
adduser user1 www-data
次に、user1でログインし、次のコマンドを使用してGhostのディレクトリを作成します。
su - user1
sudo mkdir /var/www/ghost
次に、次のコマンドを使用して適切な権限と所有権を設定します。
sudo chown -R www-data:www-data /var/www/ghost
sudo chown -R www-data:www-data /var/www/
sudo chmod 775 /var/www/ghost
sudo setfacl -R -m u:user1:rwx /var/www/ghost/
次に、ディレクトリをghostに変更し、次のコマンドを使用してGhostブログプラットフォームをインストールします。
cd /var/www/ghost
ghost install
以下に示すように、ブログのURL、データベース名、ユーザー名、パスワード、およびその他の情報を提供するように求められます。
? Enter your blog URL: https://ghost.linuxbuz.com
? Enter your MySQL hostname: localhost
? Enter your MySQL username: ghostuser
? Enter your MySQL password: [hidden]
? Enter your Ghost database name: ghostdb
? Configuring Ghost
? Setting up instance
+ sudo useradd --system --user-group ghost
+ sudo chown -R ghost:ghost /var/www/ghost/content
? Setting up "ghost" system user
? Setting up "ghost" mysql user [skipped]
? Do you wish to set up Nginx? Yes
+ sudo mv /tmp/ghost-linuxbuz-com/ghost.linuxbuz.com.conf /etc/nginx/sites-available/ghost.linuxbuz.com.conf
+ sudo ln -sf /etc/nginx/sites-available/ghost.linuxbuz.com.conf /etc/nginx/sites-enabled/ghost.linuxbuz.com.conf
+ sudo nginx -s reload
? Setting up SSL [skipped]
? Do you wish to set up Systemd? Yes
+ sudo mv /tmp/ghost-linuxbuz-com/ghost_ghost-linuxbuz-com.service /lib/systemd/system/ghost_ghost-linuxbuz-com.service
+ sudo systemctl daemon-reload
? Setting up Systemd
+ sudo systemctl is-active ghost_ghost-linuxbuz-com
? Do you want to start Ghost? (Y/n)
この時点で、Ghostがインストールされ、開始されます。
次に、Let'sEncryptSSLを使用してGhostを保護する必要があります。
まず、次のコマンドを使用してCertbotクライアントをインストールします。
sudo apt-get install certbot python3-certbot-nginx -y
インストールしたら、次のコマンドを実行してLet's Encrypt SSLをダウンロードし、それらの証明書を使用するようにNginxを構成します。
sudo certbot --nginx -d ghost.linuxbuz.com
以下に示すように、メールアドレスを入力し、利用規約に同意するよう求められます。
Saving debug log to /var/log/letsencrypt/letsencrypt.log
Plugins selected: Authenticator nginx, Installer nginx
Enter email address (used for urgent renewal and security notices) (Enter 'c' to
cancel): [email protected]

- - - - - - - - - - - - - - - - - - - - - - - - - - - - - - - - - - - - - - - -
Please read the Terms of Service at
https://letsencrypt.org/documents/LE-SA-v1.2-November-15-2017.pdf. You must
agree in order to register with the ACME server at
https://acme-v02.api.letsencrypt.org/directory
- - - - - - - - - - - - - - - - - - - - - - - - - - - - - - - - - - - - - - - -
(A)gree/(C)ancel: A

- - - - - - - - - - - - - - - - - - - - - - - - - - - - - - - - - - - - - - - -
Would you be willing to share your email address with the Electronic Frontier
Foundation, a founding partner of the Let's Encrypt project and the non-profit
organization that develops Certbot? We'd like to send you email about our work
encrypting the web, EFF news, campaigns, and ways to support digital freedom.
- - - - - - - - - - - - - - - - - - - - - - - - - - - - - - - - - - - - - - - -
(Y)es/(N)o: Y
Obtaining a new certificate
Performing the following challenges:
http-01 challenge for ghost.linuxbuz.com
Waiting for verification...
Cleaning up challenges
Deploying Certificate to VirtualHost /etc/nginx/sites-enabled/ghost.linuxbuz.com.conf
次に、HTTPトラフィックをHTTPSにリダイレクトするかどうかを選択します。
Please choose whether or not to redirect HTTP traffic to HTTPS, removing HTTP access.
- - - - - - - - - - - - - - - - - - - - - - - - - - - - - - - - - - - - - - - -
1: No redirect - Make no further changes to the webserver configuration.
2: Redirect - Make all requests redirect to secure HTTPS access. Choose this for
new sites, or if you're confident your site works on HTTPS. You can undo this
change by editing your web server's configuration.
- - - - - - - - - - - - - - - - - - - - - - - - - - - - - - - - - - - - - - - -
Select the appropriate number [1-2] then [enter] (press 'c' to cancel): 2
2と入力し、Enterキーを押してインストールを完了します。
Redirecting all traffic on port 80 to ssl in /etc/nginx/sites-enabled/ghost.linuxbuz.com.conf

- - - - - - - - - - - - - - - - - - - - - - - - - - - - - - - - - - - - - - - -
Congratulations! You have successfully enabled https://ghost.linuxbuz.com

You should test your configuration at:
https://www.ssllabs.com/ssltest/analyze.html?d=ghost.linuxbuz.com
- - - - - - - - - - - - - - - - - - - - - - - - - - - - - - - - - - - - - - - -

IMPORTANT NOTES:
 - Congratulations! Your certificate and chain have been saved at:
   /etc/letsencrypt/live/ghost.linuxbuz.com/fullchain.pem
   Your key file has been saved at:
   /etc/letsencrypt/live/ghost.linuxbuz.com/privkey.pem
   Your cert will expire on 2021-07-13. To obtain a new or tweaked
   version of this certificate in the future, simply run certbot again
   with the "certonly" option. To non-interactively renew *all* of
   your certificates, run "certbot renew"
 - Your account credentials have been saved in your Certbot
   configuration directory at /etc/letsencrypt. You should make a
   secure backup of this folder now. This configuration directory will
   also contain certificates and private keys obtained by Certbot so
   making regular backups of this folder is ideal.
 - If you like Certbot, please consider supporting our work by:

   Donating to ISRG / Let's Encrypt:   https://letsencrypt.org/donate
   Donating to EFF:                    https://eff.org/donate-le
これで、次のコマンドを使用してGhostWebサイトを確認できます。
ghost ls
次の出力が表示されます。
+ sudo systemctl is-active ghost_ghost-linuxbuz-com
??????????????????????????????????????????????????????????????????????????????????????????????????????????????????????????????
? Name               ? Location       ? Version ? Status               ? URL                        ? Port ? Process Manager ?
??????????????????????????????????????????????????????????????????????????????????????????????????????????????????????????????
? ghost-linuxbuz-com ? /var/www/ghost ? 4.2.1   ? running (production) ? https://ghost.linuxbuz.com ? 2368 ? systemd         ?
??????????????????????????????????????????????????????????????????????????????????????????????????????????????????????????????
次のコマンドを使用してGhostサービスを確認することもできます。
sudo systemctl status ghost_ghost-linuxbuz-com
次の出力が表示されます。
? ghost_ghost-linuxbuz-com.service - Ghost systemd service for blog: ghost-linuxbuz-com
     Loaded: loaded (/lib/systemd/system/ghost_ghost-linuxbuz-com.service; enabled; vendor preset: enabled)
     Active: active (running) since Wed 2021-04-14 07:05:33 UTC; 9min ago
       Docs: https://ghost.org/docs/
   Main PID: 7546 (node)
      Tasks: 22 (limit: 2353)
     Memory: 134.3M
     CGroup: /system.slice/ghost_ghost-linuxbuz-com.service
             ??7546 ghost run
             ??7590 /usr/bin/node current/index.js

Apr 14 07:13:44 ubuntu node[7590]: [2021-04-14 07:13:44] INFO "GET /ghost/assets/img/dashboard/start-membership-baafa2c6558d118ae59cb1fddab045>
Apr 14 07:13:44 ubuntu node[7590]: [2021-04-14 07:13:44] INFO "GET /ghost/assets/img/dashboard/the-browser-f5e7e199fe82d8435913e84d022fa7e1.pn>
Apr 14 07:13:44 ubuntu node[7590]: [2021-04-14 07:13:44] INFO "GET /ghost/assets/img/dashboard/join-community-bb5478f7dca6c04a2d0baf2b02f880fb>
Apr 14 07:13:44 ubuntu node[7590]: [2021-04-14 07:13:44] INFO "GET /ghost/api/canary/admin/members/?filter=status%3Apaid&order=created_at%20as>
Apr 14 07:14:11 ubuntu node[7590]: [2021-04-14 07:14:11] INFO "GET /" 200 475ms
Apr 14 07:14:11 ubuntu node[7590]: [2021-04-14 07:14:11] INFO "GET /" 200 480ms
Apr 14 07:14:15 ubuntu node[7590]: [2021-04-14 07:14:15] INFO "GET /members/api/site/" 200 12ms
Apr 14 07:14:18 ubuntu node[7590]: [2021-04-14 07:14:18] INFO "GET /" 304 142ms
Apr 14 07:14:25 ubuntu node[7590]: [2021-04-14 07:14:25] INFO "GET /members/api/site/" 304 4ms
Apr 14 07:14:26 ubuntu node[7590]: [2021-04-14 07:14:26] INFO "GET /members/api/member/" 401 4ms
次に、Webブラウザーを開き、URL https://ghost.linuxbuz.com/ghost/を使用してGhost管理インターフェースにアクセスします。 。次のページが表示されます:
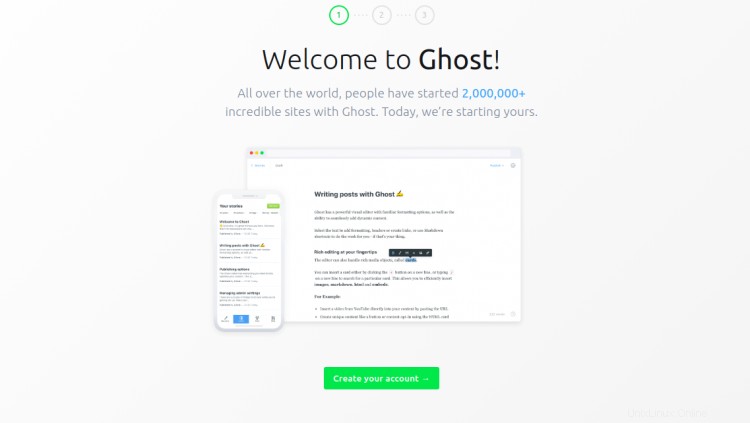
アカウントの作成をクリックします 最初のアカウントを作成するためのボタン:
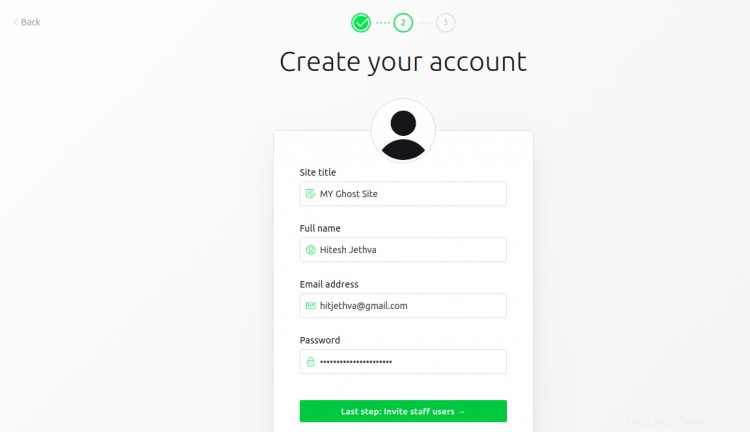
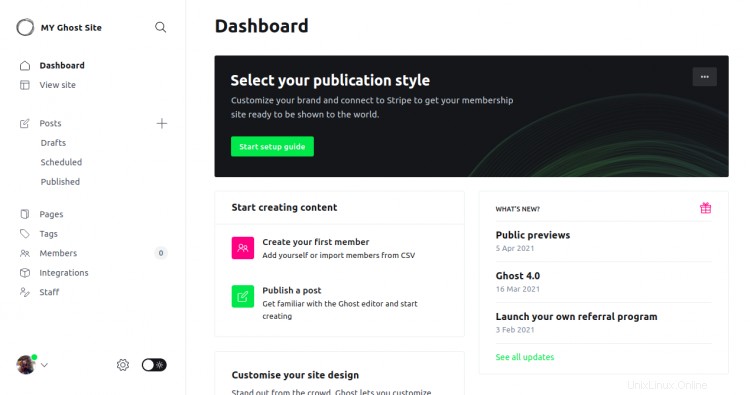
アカウントの詳細を入力し、後で行いますをクリックします 画面の下部にあります。次のページにGhost管理インターフェースが表示されます。
URLhttps://ghost.linuxbuz.com/を使用してGhostWebサイトにアクセスすることもできます。次のページが表示されます:

おめでとう!これで、GhostブログプラットフォームがUbuntu20.04に正常にインストールされました。 Ghostインターフェースから独自のコンテンツを作成して公開できるようになりました。