Arkimeは、Molochとも呼ばれ、オープンソースで大規模なインデックス付きパケットキャプチャおよび検索ツールです。キャプチャされたすべてのパケットをPCAP形式で保存およびエクスポートします。 Wiresharkまたは他のPCAP取り込みツールを使用して、PCAPエクスポートファイルを分析できます。 Arkimeには、PCAPの参照、検索、およびエクスポートに使用できる、シンプルでユーザーフレンドリーなWebインターフェイスが付属しています。複数のシステムに導入できるように設計されており、1秒あたりのギガビットのトラフィックも処理できます。
この投稿では、Ubuntu20.04にArkimeパケットキャプチャツールをインストールする方法を紹介します。
- Ubuntu20.04を実行しているサーバー。
- ルートパスワードがサーバーに設定されます。
開始する前に、システムパッケージを最新バージョンに更新する必要があります。次のコマンドで更新できます:
apt-get update -y
すべてのパッケージが更新されたら、次のコマンドを使用して必要な依存関係をインストールします。
apt-get install gnupg2 curl wget -y
すべてのパッケージがインストールされたら、次のステップに進むことができます。
ArkimeはElasticsearchを使用してインデックス作成と検索を行います。そのため、Elasticsearchをシステムにインストールする必要があります。デフォルトでは、Elasticsearchの最新バージョンはUbuntuのデフォルトリポジトリに含まれていません。そのため、Elasticsearchリポジトリをシステムに追加する必要があります。
まず、次のコマンドでGPGキーを追加します。
wget -qO - https://artifacts.elastic.co/GPG-KEY-elasticsearch --no-check-certificate | apt-key add -
次に、次のコマンドを使用してElasticsearchリポジトリをAPTに追加します。
echo "deb https://artifacts.elastic.co/packages/7.x/apt stable main" | tee -a /etc/apt/sources.list.d/elastic-7.x.list
次に、リポジトリを更新し、次のコマンドを使用してElasticsearchパッケージをインストールします。
apt-get update -y
apt-get install elasticsearch -y
Elasticsearchがインストールされたら、Elasticsearch構成ファイルを編集し、Javaメモリを設定します。
nano /etc/elasticsearch/jvm.options
次の行を変更します:
-Xms1g
-Xmx1g
ファイルを保存して閉じ、次のコマンドを使用して、システムの再起動時にElasticsearchサービスを開始できるようにします。
systemctl enable --now elasticsearch
デフォルトでは、Elasticsearchはポート9200でリッスンします。次のコマンドで確認できます:
ss -antpl | grep 9200
次の出力が得られるはずです:
LISTEN   0        4096        [::ffff:127.0.0.1]:9200                  *:*       users:(("java",pid=9518,fd=272))
LISTEN   0        4096                     [::1]:9200               [::]:*       users:(("java",pid=9518,fd=271))
次のコマンドを使用してElasticsearchを確認することもできます:
curl http://localhost:9200
次の出力が得られるはずです:
{
  "name" : "ubuntu2004",
  "cluster_name" : "elasticsearch",
  "cluster_uuid" : "9g2B-tNaQl-rjuV32eCgpg",
  "version" : {
    "number" : "7.11.1",
    "build_flavor" : "default",
    "build_type" : "deb",
    "build_hash" : "ff17057114c2199c9c1bbecc727003a907c0db7a",
    "build_date" : "2021-02-15T13:44:09.394032Z",
    "build_snapshot" : false,
    "lucene_version" : "8.7.0",
    "minimum_wire_compatibility_version" : "6.8.0",
    "minimum_index_compatibility_version" : "6.0.0-beta1"
  },
  "tagline" : "You Know, for Search"
}
この時点で、Elasticsearchがインストールされ、実行されています。これで、次のステップに進むことができます。
Arkimeのインストールと構成
まず、次のコマンドを使用して最新バージョンのArkimeをダウンロードします。
wget https://s3.amazonaws.com/files.molo.ch/builds/ubuntu-20.04/moloch_2.7.1-1_amd64.deb
パッケージがダウンロードされたら、次のコマンドを使用してダウンロードしたパッケージをインストールします。
apt install ./moloch_2.7.1-1_amd64.deb
Arkimeをインストールしたら、次のコマンドで構成します。
/data/moloch/bin/Configure
以下に示すように、ネットワークインターフェイスを指定するように求められます。
Found interfaces: lo;eth0;eth1
Semicolon ';' seperated list of interfaces to monitor [eth1] eth0
を監視するためのインターフェースの個別リスト
ネットワークインターフェイス名を入力し、Enterキーを押して続行します。構成が完了すると、次の出力が表示されます。
Install Elasticsearch server locally for demo, must have at least 3G of memory, NOT recommended for production use (yes or no) [no] no
Elasticsearch server URL [http://localhost:9200]
Password to encrypt S2S and other things [no-default]
Password to encrypt S2S and other things [no-default] mypassword
Moloch - Creating configuration files
Installing systemd start files, use systemctl
Moloch - Installing /etc/logrotate.d/moloch to rotate files after 7 days
Moloch - Installing /etc/security/limits.d/99-moloch.conf to make core and memlock unlimited
Download GEO files? (yes or no) [yes] yes

9) Visit http://MOLOCHHOST:8005 with your favorite browser.
      user: admin
      password: THEPASSWORD from step #6

If you want IP -> Geo/ASN to work, you need to setup a maxmind account and the geoipupdate program.
See https://molo.ch/faq#maxmind

Any configuration changes can be made to /data/moloch/etc/config.ini
See https://molo.ch/faq#moloch-is-not-working for issues

Additional information can be found at:
  * https://molo.ch/faq
  * https://molo.ch/settings
終了したら、次のステップに進むことができます。
ElasticsearchArkime構成を初期化します
次に、ElasticsearchArkime構成を初期化する必要があります。次のコマンドで実行できます:
/data/moloch/db/db.pl http://localhost:9200 init
次に、次のコマンドを使用してArkimeの管理者ユーザーアカウントを作成します。
/data/moloch/bin/moloch_add_user.sh admin "Moloch SuperAdmin" mypassword --admin
終了したら、次のステップに進むことができます。
Arkimeサービスの開始と管理
Arkimeは、capture、viewer、elasticsearchの3つのコンポーネントで構成されています。したがって、コンポーネントごとにサービスを開始する必要があります。
次のコマンドを使用して、molochcaptureおよびmolochviewerサービスを開始し、システムの再起動時に開始できるようにすることができます。
systemctl enable --now molochcapture
systemctl enable --now molochviewer
次のコマンドを使用して、両方のサービスのステータスを確認できるようになりました。
systemctl status molochcapture molochviewer
次の出力が得られるはずです:
? molochcapture.service - Moloch Capture
     Loaded: loaded (/etc/systemd/system/molochcapture.service; enabled; vendor preset: enabled)
     Active: active (running) since Mon 2021-03-01 11:40:08 UTC; 10s ago
   Main PID: 11313 (sh)
      Tasks: 7 (limit: 4691)
     Memory: 206.6M
     CGroup: /system.slice/molochcapture.service
             ??11313 /bin/sh -c /data/moloch/bin/moloch-capture -c /data/moloch/etc/config.ini  >> /data/moloch/logs/capture.log 2>&1
             ??11315 /data/moloch/bin/moloch-capture -c /data/moloch/etc/config.ini

Mar 01 11:40:08 ubuntu2004 systemd[1]: Starting Moloch Capture...
Mar 01 11:40:08 ubuntu2004 systemd[1]: Started Moloch Capture.

? molochviewer.service - Moloch Viewer
     Loaded: loaded (/etc/systemd/system/molochviewer.service; enabled; vendor preset: enabled)
     Active: active (running) since Mon 2021-03-01 11:40:13 UTC; 5s ago
   Main PID: 11361 (sh)
      Tasks: 12 (limit: 4691)
     Memory: 51.9M
     CGroup: /system.slice/molochviewer.service
             ??11361 /bin/sh -c /data/moloch/bin/node viewer.js -c /data/moloch/etc/config.ini  >> /data/moloch/logs/viewer.log 2>&1
             ??11362 /data/moloch/bin/node viewer.js -c /data/moloch/etc/config.ini

Mar 01 11:40:13 ubuntu2004 systemd[1]: Started Moloch Viewer.
これで、次のコマンドを使用してビューアログを確認できます。
tail -f /data/moloch/logs/viewer.log
次の出力が表示されます。
Express server listening on port 8005 in development mode
キャプチャログを確認するには、次のコマンドを実行します。
tail -f /data/moloch/logs/capture.log
次の出力が表示されます。
Mar  1 11:40:49 http.c:382 moloch_http_curlm_check_multi_info(): 1/30 ASYNC 201 http://localhost:9200/dstats/_doc/ubuntu2004-1209-5 806/154 0ms 51ms
Mar  1 11:40:49 http.c:382 moloch_http_curlm_check_multi_info(): 1/30 ASYNC 200 http://localhost:9200/_bulk 3737/327 0ms 51ms
Mar  1 11:40:50 http.c:382 moloch_http_curlm_check_multi_info(): 1/30 ASYNC 200 http://localhost:9200/_bulk 7246/451 0ms 51ms
Mar  1 11:40:51 http.c:382 moloch_http_curlm_check_multi_info(): 1/30 ASYNC 200 http://localhost:9200/stats/_doc/ubuntu2004?version_type=external&version=22 805/149 0ms 51ms
Mar  1 11:40:53 http.c:382 moloch_http_curlm_check_multi_info(): 1/30 ASYNC 200 http://localhost:9200/stats/_doc/ubuntu2004?version_type=external&version=23 805/149 0ms 52ms
Mar  1 11:40:54 http.c:382 moloch_http_curlm_check_multi_info(): 1/30 ASYNC 201 http://localhost:9200/dstats/_doc/ubuntu2004-1210-5 806/154 0ms 51ms
Mar  1 11:40:54 http.c:382 moloch_http_curlm_check_multi_info(): 1/30 ASYNC 200 http://localhost:9200/_bulk 2830/302 0ms 51ms
ArkimeWebインターフェイスにアクセス
この時点で、Arkimeが起動し、ポート8005でリッスンしています。次のコマンドで確認できます。
ss -antpl | grep 8005
次の出力が得られるはずです:
LISTEN 0 511 *:8005 *:* users:(("node",pid=11362,fd=20))
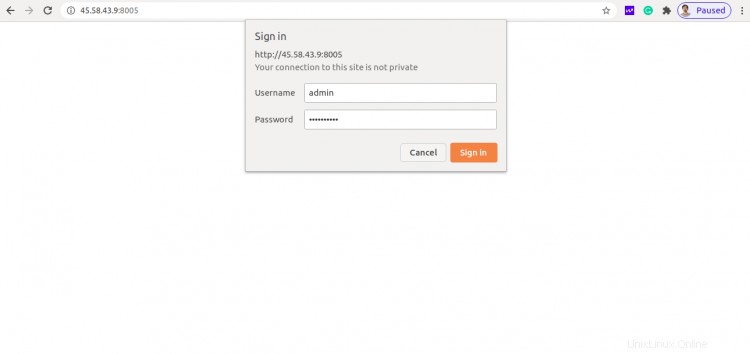
次に、Webブラウザーを開き、URL http:// your-server-ip:8005を使用してArkimeWebインターフェースにアクセスします。 。以下に示すように、管理者のユーザー名とパスワードを入力するように求められます。

管理者のユーザー名とパスワードを入力し、サインインをクリックします ボタン。次のページにArkimeダッシュボードが表示されます。

おめでとう!これで、Ubuntu20.04サーバーにArkimeパケットキャプチャツールが正常にインストールおよび設定されました。これで、Arkimeを探索してより多くの機能を探し、パケットのキャプチャを開始できます。ご不明な点がございましたら、お気軽にお問い合わせください。